In the previous tutorial, we saw how to download and install Keil uVision. In this tutorial, we will see how to create your first Keil uVision project for the TM4C123 Tiva C Series LaunchPad and walk through every project setup step needed to make Keil compatible with the TM4C123GH6PM microcontroller. By the end you will have a project that compiles cleanly and is configured to flash code onto the LaunchPad over its onboard ICDI debugger — ready for the LED blink tutorial that follows.
Recommended Components
The following components are used in this project or are helpful for getting started with TM4C123 Tiva C LaunchPad development.
| Component | How it’s used in this project | Buy on Amazon |
|---|---|---|
| TM4C123G Tiva C LaunchPad | The target board configured for this first Keil project | Check Price |
| Micro USB Cable | Connects the board to your PC for flashing via Stellaris ICDI | Check Price |
As an Amazon Associate we earn from qualifying purchases. Prices and availability are accurate as of the date/time indicated and are subject to change.
What You Will Learn
- How to launch Keil uVision and navigate the Getting Started window
- How to create a new uVision project and select the correct device for the TM4C123 LaunchPad
- The relationship between the board name (TM4C123GXL) and the microcontroller name (TM4C123GH6PM) inside Keil
- How to configure the Manage Run-Time Environment dialog to add the CMSIS Core and Device Startup files
- How to rename the target and source group for a clean project structure
- How to add a
main.csource file to the Src group - How to configure the debug settings to use the onboard Stellaris ICDI programmer
Introduction to Keil uVision
As we discussed in the previous tutorial, Keil uVision is the IDE used to build and load firmware onto Tiva C Series microcontrollers. Now that the latest version of Keil is installed, we are ready to write our first program in Keil and flash it to a Tiva C Series board. To do this, we first need to set up a project with the correct device family pack, runtime components, and debugger configuration. Once those settings are in place, we can write code, build it, and burn it onto the board. Let’s get started with Keil (which we installed in the previous tutorial).
Getting Started with Keil uVision
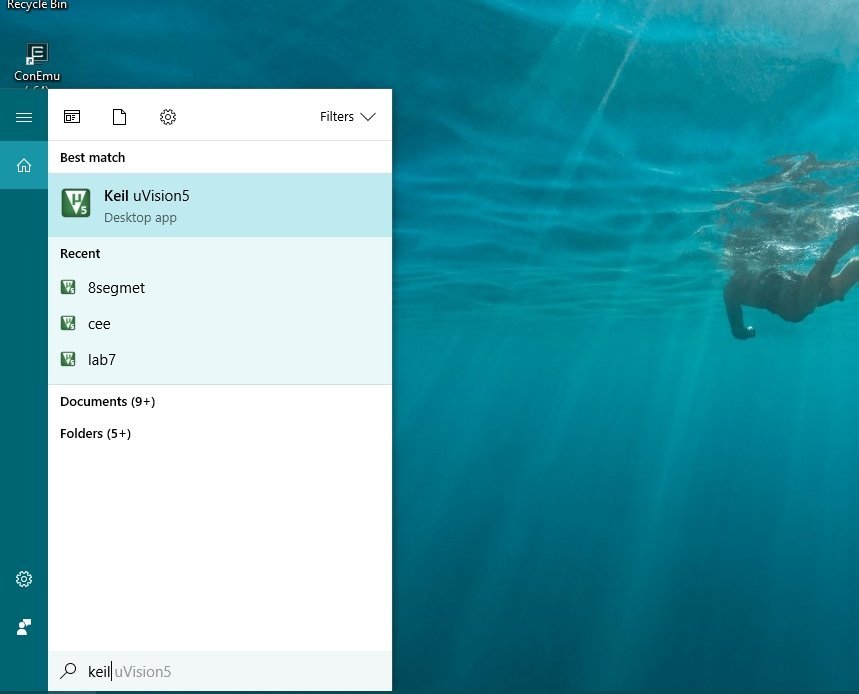
Once Keil is downloaded and installed, it will appear in your Windows search bar.
Open Keil IDE
Open the search bar on your computer, type Keil, and click on Keil uVision5 as shown in the figure below.
Once you click the icon, Keil will start loading. It can take a moment for the main window to fully open.
After the IDE finishes loading, the Getting Started window appears, as shown in the figure below:

Create a New Keil uVision Project
This is the workspace where any currently open projects appear, and where source code files will be displayed in the central editor area. To work on a program or step into a debugging session, we first need to create a project — this is the container that holds our main source file and the startup file. We will give a brief and concise overview of startup files in upcoming tutorials, so you don’t need to worry about them in detail at this point.
Let’s now create a new project. On the main page (shown in the previous figure), the menu bar at the top has options like File, Edit, View, etc. From this menu bar, click Project → New uVision Project as shown in the figure below.

When you click on New uVision Project, a save dialog appears as shown in the figure below.
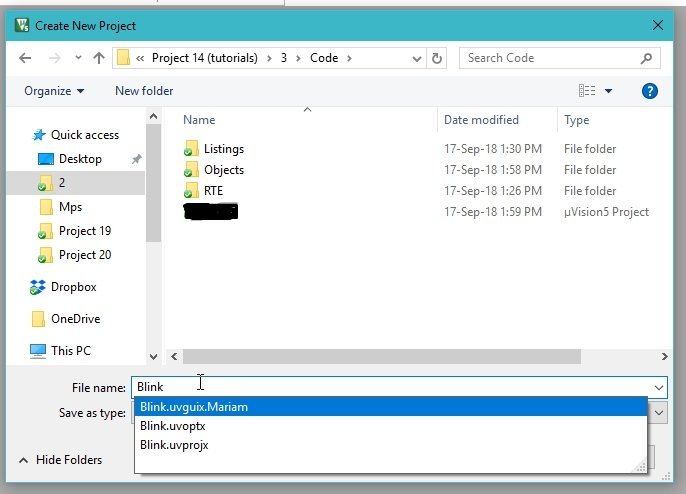
Select the Tiva C Series LaunchPad
This dialog asks where you want to save the project. Choose a folder for the project, then give it a name that reflects what it will do. In this tutorial we will reuse this project for the upcoming LED blinking tutorial that toggles the built-in RGB LED on Port F of the Tiva board.
So we will name the project blink (matching the task it will perform). After naming the project, click OK. The next dialog asks you to select the target device for which this project’s code will be compiled — this is where we pick the type of board we are using. Refer to the figure below:

In this dialog two vendor categories are visible: ARM and Texas Instruments. Tiva C boards are manufactured by Texas Instruments, so we select Texas Instruments. Expanding this category reveals all the installed TI device families, as shown in the figure below.

Tiva C Series is the option we need, so we expand it as well, as shown in the figure below.

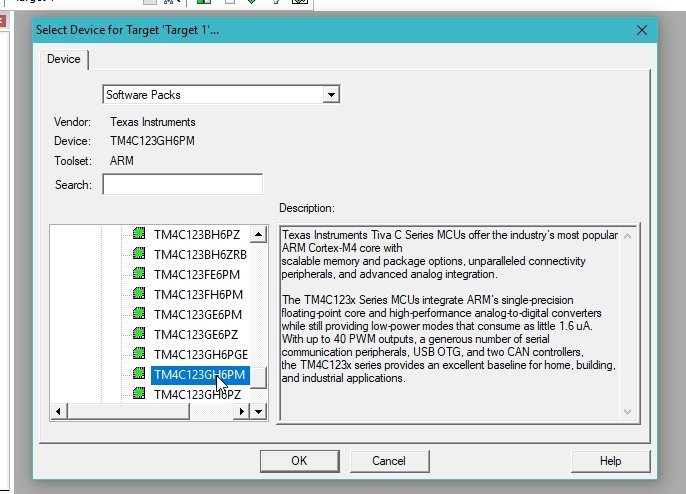
By default only two Tiva C series classes are installed; you can install more from the Pack Installer (covered in the previous tutorial). For this tutorial we need the TM4C123x Series, since the TM4C123G belongs to that family. Expand TM4C123x Series to choose the specific microcontroller, as shown below.
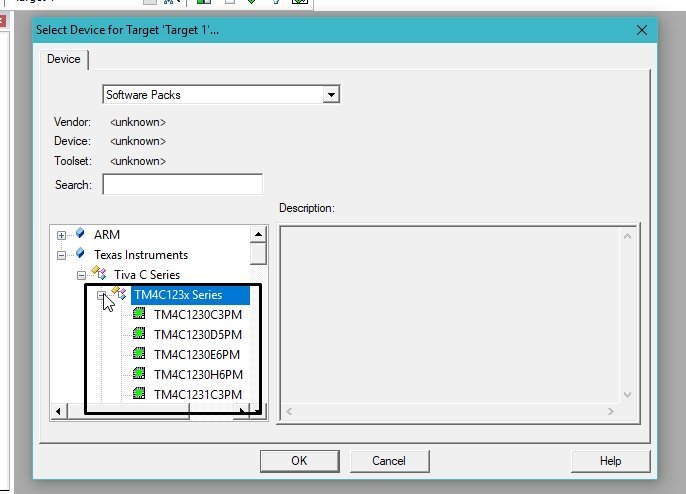
The microcontrollers under this series are shown in the figure above. One important note here: the microcontroller we are using is named TM4C123GXL on the LaunchPad silkscreen and product page, but you will not find a chip with that exact name in the device list. The actual microcontroller part number is TM4C123GH6PM, which is the same as TM4C123GXL — just listed under its silicon part number rather than the LaunchPad product number.
Remember this name or save it somewhere for future reference, as you will be creating projects with this device frequently. See the figure below for the alternative name.
After you select the microcontroller, click OK. The next dialog asks you to choose the runtime environment for the project. As mentioned earlier, every project needs to include startup files, and this is where you pick which ones go in. The Manage Run-Time Environment window is shown in the figure below:

This dialog selects the components that will be included in your project’s build environment. For example, if you wanted to include graphics or USB middleware in your project, you would tick those boxes here. For our first project we only need two components: the CMSIS Core file and the Device Startup file. Click the plus sign next to CMSIS, then tick the checkbox in front of CORE. Do the same for the Device category — expand it and tick the Startup checkbox, as shown in the figure below.

Project Settings — Rename Target and Source Group
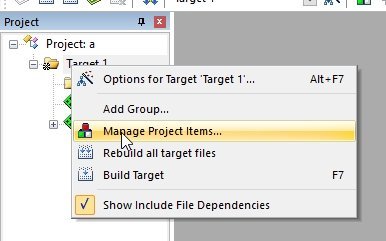
We will discuss the startup file in more depth in upcoming tutorials. After ticking the components, click OK and the project will be created. The new project appears in the Project Explorer pane on the left side of the main Keil window. Right-click on Target 1 and select Manage Project Items, as shown in the figure below.
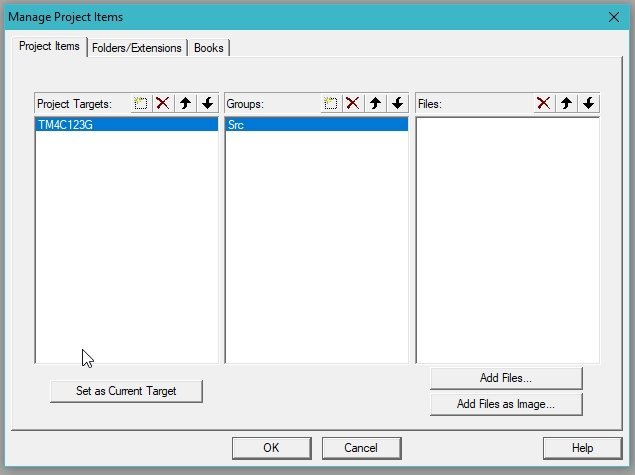
The Manage Project Items window appears as shown in the figure below.

- This is where you can rename the folders and groups of your project. Here we will rename Target 1 to TM4C123G and Source Group 1 to Src (since this is where the source files for our code will live), as shown in the figure below.
In the renamed Src folder we will add our main file (.c file), in which we will write the C code that runs on the board. Right-click on the Src folder and select Add New Item to Group “Src”, as shown in the figure below.

Create the main.c File in Keil
Clicking on Add New Item opens a dialog asking you to select the file extension and name. Select the C File (.c) option, and in the name field type the file name you want — in this tutorial we will use main.c. Don’t forget to include the .c extension along with the name, as shown in the figure below.

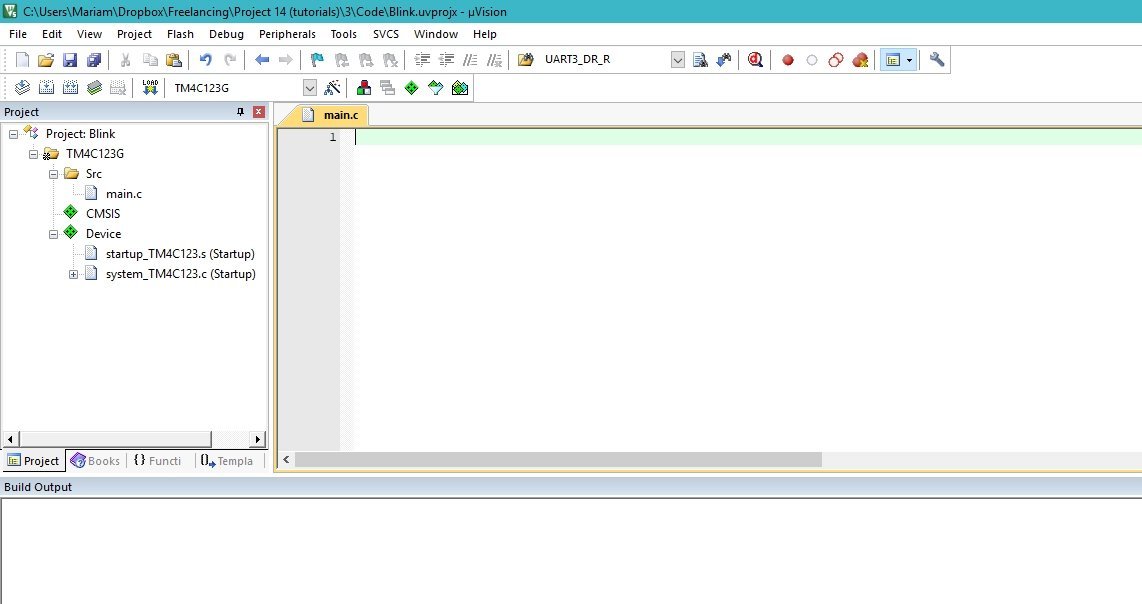
After clicking Add, a main.c file appears under the Src folder. Clicking on main.c opens it in the central editor area, as shown in the figure below.
Keil Flash and Debug Configuration
The only thing left in the project configuration is the flash setup, which tells Keil how to communicate with the TM4C123G board over the LaunchPad’s USB connection. Without configuring the debugger correctly, you will not be able to flash code to the Tiva board — Keil will return a flash error when you try to download the binary. To avoid that, let’s configure the flash and debug options now. From the top menu bar select Flash → Configure Flash Tools, as shown in the figure below.

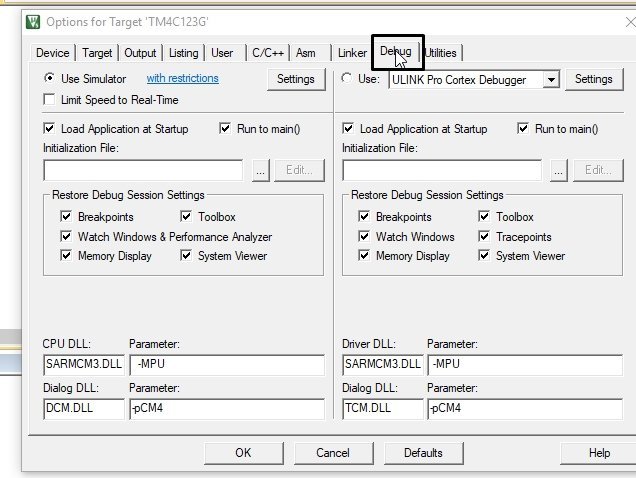
This opens the Options for Target window, which has tabs for the various flash, compiler, and debug options that can be configured for our microcontroller. Refer to the figure below for the Options for Target window:

You don’t need to change anything else here, because most of the default properties are already compatible with Tiva C Series boards. From the tabs along the top, select the Debug tab — that’s where we configure the programmer/debugger. The Debug tab is shown in the figure below.
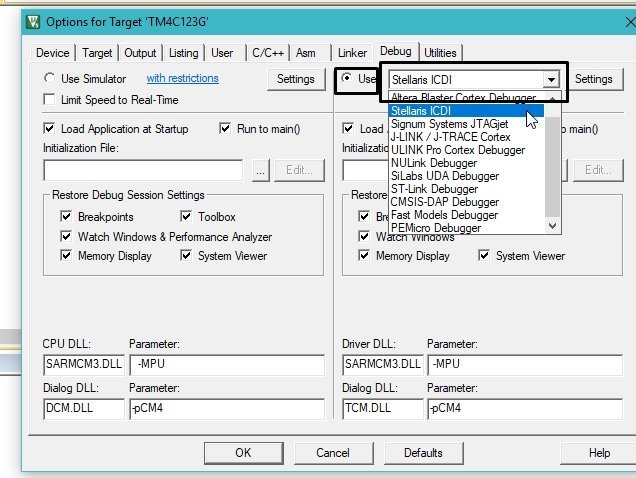
From this tab we only need to change the debugger setting, as shown in the figure below. Select the Use radio button on the top right of the dialog, and from the dropdown select Stellaris ICDI, then click OK. These are all the project configurations needed to build and flash a program onto the TM4C123G board.
Your IDE is now ready for you to write code that will run on the Tiva board. In the next tutorial we will write a program that blinks the built-in LEDs on the Tiva board.
Frequently Asked Questions
Why does Keil list TM4C123GH6PM but my LaunchPad says TM4C123GXL?
TM4C123GXL is the LaunchPad development board’s product number, while TM4C123GH6PM is the silicon part number of the actual ARM Cortex-M4F microcontroller mounted on the LaunchPad. They refer to the same chip — Keil’s device picker uses the silicon part number, which is what you should select when creating a project.
What is CMSIS and why do I need to add the CMSIS Core component?
CMSIS stands for Cortex Microcontroller Software Interface Standard. It is ARM’s vendor-independent abstraction layer for Cortex-M processors — providing standardized core register definitions, NVIC functions, intrinsics, and the system clock interface. Adding the CMSIS Core component pulls in core_cm4.h and related headers that any Cortex-M4 project depends on.
What is Stellaris ICDI?
Stellaris ICDI (In-Circuit Debug Interface) is the onboard debugger built into the Tiva LaunchPad. The LaunchPad has a separate small microcontroller (separate from the TM4C123 target) running ICDI firmware, which acts as a JTAG/SWD bridge between your PC and the target chip. When you select Stellaris ICDI in the Debug tab, Keil uses that onboard debugger to flash and debug the TM4C123 over the same USB cable that powers the board.
Do I need to install separate drivers for Stellaris ICDI?
Yes — Windows does not recognize the LaunchPad’s debug interface out of the box. You need the Stellaris ICDI USB drivers from Texas Instruments. Download them from the TI website and install before connecting the LaunchPad. Without these drivers, Keil’s Debug tab dropdown may not even show Stellaris ICDI as an option.
What is the Device Startup file in Keil?
The startup file (typically startup_TM4C123.s) is an assembly file that runs immediately after the microcontroller comes out of reset. It sets up the initial stack pointer, defines the interrupt vector table, calls the C runtime initialization routines, and finally jumps to main(). Without this file, the chip has no idea what to do when it boots — your main() function would never be called. The Manage Run-Time Environment dialog adds it to your project automatically when you tick Device → Startup.
Can I use Keil’s free version for TM4C123 projects?
Yes. The free MDK-ARM evaluation version has a 32 KB code-size limit, but this is plenty for the kind of register-level tutorial code we will write throughout this series — blinky, GPIO, ADC, UART, timers, PWM, and so on. Only larger application projects with significant middleware (USB stacks, file systems, RTOS plus graphics) are likely to exceed the 32 KB limit.
Conclusion
You now have a working Keil uVision project for the TM4C123 Tiva LaunchPad, with the correct device selected (TM4C123GH6PM), the CMSIS Core and Device Startup runtime components added, the target and source group renamed for a clean structure, a main.c source file created, and the Stellaris ICDI debugger configured. This setup is the foundation every TM4C123 tutorial in this series will build on. The next step is to actually write code in main.c — start with the LED blink tutorial, where we toggle the onboard RGB LED on Port F.
Related TM4C123 Tiva LaunchPad Tutorials
- Introduction to TM4C123 Tiva C Series LaunchPad
- How to Download and Install Keil uVision
- How to Use GPIO Pins of TM4C123G Tiva LaunchPad
- Use Push Button to Control LED with TM4C123G Tiva LaunchPad
- Accessing Memory Mapped Peripherals Registers of Microcontrollers
- SysTick Timer (System Timer) TM4C123G ARM Cortex M4 Microcontroller
- Systick Timer Interrupt Programming TM4C123 ARM Cortex M4
- What is Interrupt Vector Table?
- Nested Vectored Interrupt Controller (NVIC) ARM Cortex-M Microcontrollers
Images to any TIVA series article is not visible.
Please fix it.
Thanks for pointing out. We will update the TIVA pinout image with high resolution
If Stellaris is not available, you can download it here: http://www.keil.com//files/download/MDK_Stellaris_ICDI_AddOn.exe
The MDK_Stellaris_ICDI_AddOn.exe being an exe-file not a DFP-file, when executing it, will it find the right directory and install itself in a way that it automaticly appears in the target->simulator checkbox?
No. I executed MDK_Stellaris_ICDI_AddOn.exe and reopend the target->debug, but no choice for Stellaris appeared.
So could someone please give me a a thorough explination of how to get a debugger that works with the Tiva C.series bord
This Error comes when try to run the project
Error: Flash Download failed – Could not load file ‘C:UsersamithDocumentsArmObjectsblink.axf’