In this tutorial, you will learn how to access memory mapped peripheral registers of microcontroller through their memory addresses. We will see applications of pointers in embedded systems programming and what is the role of pointers in embedded software architecture development. Furthermore, we will see how to use pointers to access (read and write) memory mapped peripheral registers of microcontrollers with two methods.
Memory Mapping in Embedded Processors and Microcontrollers
Microcontrollers or microprocessors have two types of memory regions such as memory mapped region and non-memory mapped region.
Non-Memory Mapped Region
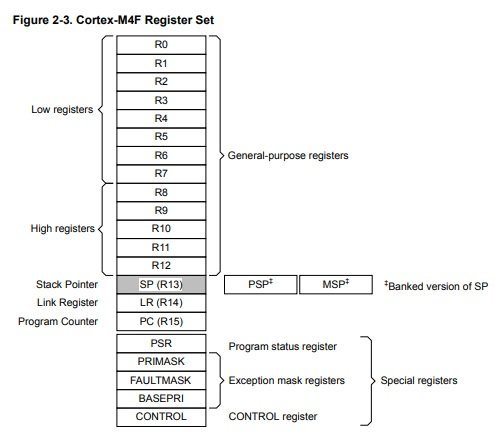
Non-memory mapped region includes internal general purpose and special function registers of CPU. These registers do not have addresses. We can access them using register names in assembly language. In C programming, we can access these registers using inline assembly language features of c programming. Therefore, in order to access internal CPU registers, we do not use their address instead use their names. For example, ARM Cortex M4 32-bit microcontroller has 13 general-purpose registers and nine special function registers.
Memory Mapped Region of Microcontrollers
The addressable memory space of a microcontroller or microprocessor depends on their address bus width. For instance, if we take the example of ARM Cortex M4 32-bit microcontroller, its addressable memory space is 2^32 which is equal to 4 gigabytes of memory. Each byte of this memory space has a unique memory address and the Cortex M4 microcontroller can access each memory location either to read and write data to each memory location.
Memory-mapped peripheral registers are special registers within a microcontroller that are mapped to specific memory addresses. These registers are used to control and interact with the various peripherals (such as GPIOs, timers, UARTs, ADCs, etc.) of the microcontroller. Accessing these registers is done through standard memory read and write operations, making it convenient for the CPU to interact with the peripherals.
Key Concepts
- Memory Mapping:
- In a microcontroller, certain regions of the memory address space are reserved for peripherals. Each peripheral has its registers mapped to specific addresses within this region. When the CPU accesses these addresses, it is actually interacting with the peripheral’s registers.
- Registers:
- Peripherals typically have multiple registers, each serving a specific function (e.g., control, status, data). These registers allow the CPU to configure the peripheral, check its status, and read/write data.
- Access Methods:
- These registers can be accessed using pointers in programming languages like C. For example, if a GPIO register is located at address
0x40021000, you might define a pointer to this address and use it to read or write the register.
- These registers can be accessed using pointers in programming languages like C. For example, if a GPIO register is located at address
Memory Mapped Peripherals Registers
In contrast microcontroller internal registers, microcontrollers also have memory mapped I/O region which belongs to different peripherals of a microcontroller such as GPIO, ADC, UART, SPI, I2C, Timers and other peripherals that are supported by a specific microcontroller.
The figure below shows the memory map of TM4C123GH6PM ARM Cortex M4 microcontroller. As you can see, this memory map includes Flash, Peripheral registers memory, SRAM, DRAM, and memory reserved external devices.
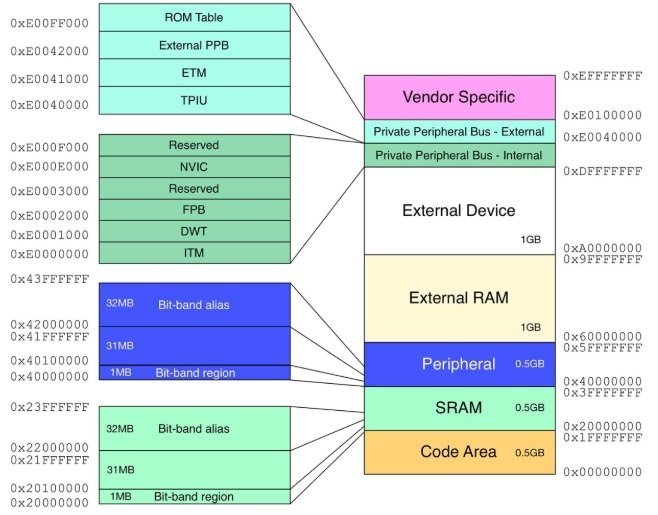
As you can see from above picture, there is total of 4GB addressable memory space available in ARM Cortex M4 microcontrollers.
ARM Cortex M4 Different Memory Regions
- First half GB of memory space from 0x0000_0000 to 0x1FFFF_FFFF is used to store program/code. Static initialized data can also be stored in this location.
- SRAM ( 0x2000_0000 – 0x3FFF_FFFF) : It is used to store temporary data such as heap, stack and temporary function variables. SRAM region also stores bit-banded alias and a bit-band region.
- Peripheral Registers ( 0x4000_0000 – 0x5FFF_FFFF) : This memory map region is used for peripheral registers such as GPIO ports, UART, I2C, Timers etc.
- External RAM (0x6000.0000 – 0x9FFF.FFFF) : This memory region is used to map external memory devices such as SD card, external Flash
Similary other memory regions are used for external memory devices and last 0.5GB memory is reserved for system memory such as NVIC (nested interrupt vector controller), sytem timer and sytem control block (SCB).
But, in this tutorial, our main topic of discussion is peripheral memory regions such as GPIO, ADC, Timers, UART, SPI, etc.
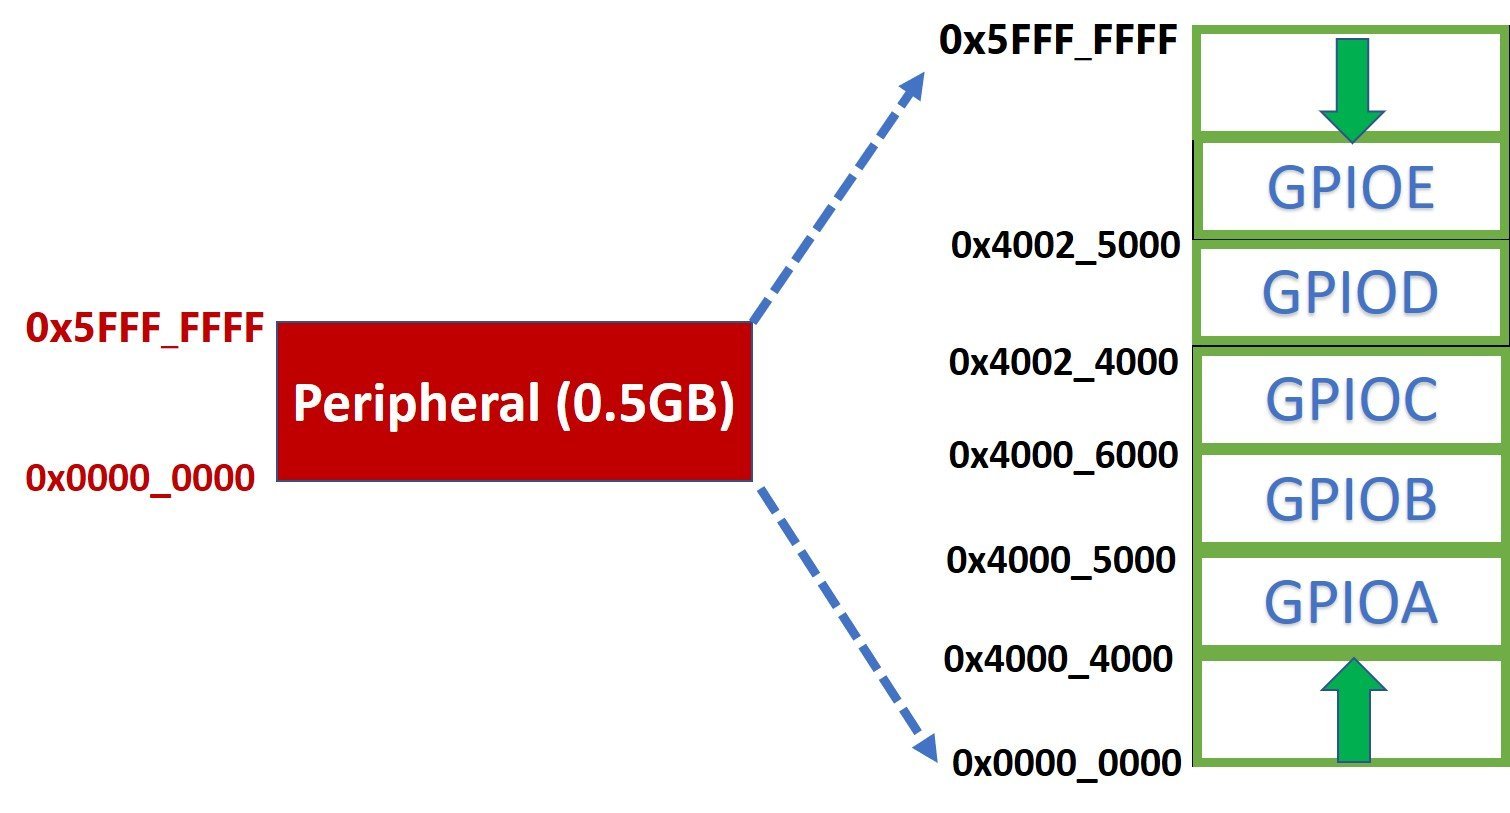
Peripheral Memory Region TM4C123G Microcontrollers
This diagram shows the memory map of different peripherals such as GPIOA, GPIOB, GPIOC, GPIOD, GPIOE. But it this memory map also contains registers for other peripherals also such as Timers, UART, SPI, CAN USB, etc. Each GPIO port has 4000 bytes or 4k bytes of memory.
But the question that may come to your mind is that why so much memory is assigned each GPIO PORT? Because each GPIO port consists of 36 registers. On top of that, each GPIO register of ARM cortex M4 microcontroller also supports bit-banding.
let’s take a closer look at internal registers of GPIO PORT. In this table, offset address defines how far away is the specific register from the base address of that PORT.
For example, if you want to find the address of GPIOFDATA register, you can simply add the base address of GPIOA with offset address of DATA register, you will get the physical address of PORTADATA register.
Physical address GPIOADATA register = Base address PORTA + offset address Data register
Physical address GPIOADATA register = 0x4000_4000 + 0x000
How to access Peripheral Registers?
We can access peripheral registers the same way we access variables. Because peripherals are also part of RAM memory. For example, if we want to read a value from a particular memory location and want to perform some processing on that data. After that, we want to write back this updated to the same location in memory? In C programming, pointers are used to dereference memory addresses.
If you are confused with pointers concept, you can read this good resource:
Introduction to Pointers in C Programming
The only difference between peripheral registers and other standard data types variables is that writing or updating peripheral registers always corresponds to some action such as turning LED on, reading ADC value, displaying data on LCD, etc.
One other major difference is that variables can store any available memory location in SRAM. On the other hand, peripheral registers have well define fixed memory addresses as we have seen earlier.
Use of pointers to access Peripheral Registers
To understand this concept, let’s take an example of a direction control register of PORTF of TM4C123GH6PM microcontroller. This register is used to configure the pins of PORTF either input or output. This is a 32-bit register but only the first 8 bits [0:7] are used. Bits 0 to 7 are used to set the direction pin.
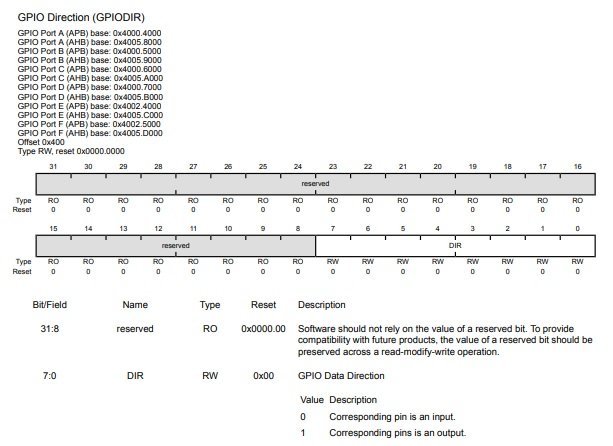
First, let’s find the physical address of the direction control register GPIODIR of PORTF.
Base address of PORTF = 0x40025000
Offset address of GPIODIR = 0x400 //page number 663 TM4C123GH6PM datasheet
GPIOFDIR Physical address =  0x40025000+0x400 = 0x4002_5400
Now, we know that the GPIOFDIR, which is the direction control register of PORTF, is mapped to the address 0x40025400 in the peripheral region.
Now let’s say we want to set the first four pins as digital input pins and last four pins as digital output pins. How we can do that without using a built-in compiler library?
Method 1: Using a pointer variable
This method requires the use of a pointer variable. Let’s initialize a pointer variable and assign it to the memory address that we calculated in the last step.
Unsigned int * GPIO_PORTF_DIR_R = (unsigned int*)0x40025400; By using dereference operation with the pointer variable “GPIO_PORTF_DIR_R”, it will update this value to the memory location 0x40025400.
*GPIO_PORTF_DIR_R = 0xF0; 0xF0 is equal to 1111_0000 in binary. Hence, it will configure the first four pins as input and the last four pins as output.
But the use of pointer variables to interact with memory is not memory efficient solution. Because each pointer variable, we will create takes up memory space and microcontrollers are memory limited devices. Furthermore, microcontrollers have many peripherals and each peripheral consists of many registers. We have to create a pointer variable for every peripheral register. We end up wasting a lot of SRAM of a microcontroller to save pointer variables. Additionally, it will make our code platform dependent.
Method 2: Directly dereferencing memory
Unlike the last method, directly dereferencing memory method does not create any memory storage to interact with peripheral register through their memory addresses. Firstly, we do not create a pointer variable to read and write data to a specific memory location. Secondly, it does not consume data memory.
In this method, we create a pointer to the specific memory location, directly dereference it and store or read value with it like this:
// write value 0xF0 to GPIOFDIR register
 (* ( ( volatile unsigned int * ) 0x40025400 ) ) = 0xF0;
//read value GPIOFDIR register memory address and store it in variable data.
 data =  (* ( ( volatile unsigned int * ) 0x40025400 ) ) ;
We do not need to create any pointer variable and we can still read/write a value to a specific memory location. But one disadvantage of this method is that it makes the code very difficult and hard to understand.
The easiest way to make code readable is the use of #define directives and give it a readable and easily understandable name like this:
#define GPIO_PORTF_DIR_R (*( ( volatile unsigned int * )0x40025400 ) ) Now we can use this name inside our code to read and write value to memory location 0x40025400.
GPIO_PORTF_DIR_R = 0xF0;
data =  GPIO_PORTF_DIR_R;
So till now, you have learned to access peripheral registers of the microcontroller using pointers and direct memory dereferencing method. The next step should be to learn to use all GPIO registers of any PORT and make an LED blinking project.
Example
Consider a microcontroller with a GPIO peripheral. The GPIO peripheral might have registers for setting the direction of the pins, writing data to the pins, and reading data from the pins. Here’s a simplified example in C:
#define GPIO_BASE_ADDR   0x40021000

#define GPIO_DIR_REG     (*(volatile uint32_t *)(GPIO_BASE_ADDR + 0x00))
#define GPIO_OUT_REG     (*(volatile uint32_t *)(GPIO_BASE_ADDR + 0x04))
#define GPIO_IN_REG      (*(volatile uint32_t *)(GPIO_BASE_ADDR + 0x08))

void configure_gpio_as_output() {
    GPIO_DIR_REG |= (1 << 0);  // Set pin 0 as output
}

void set_gpio_pin_high() {
    GPIO_OUT_REG |= (1 << 0);  // Set pin 0 high
}

void set_gpio_pin_low() {
    GPIO_OUT_REG &= ~(1 << 0); // Set pin 0 low
}

uint32_t read_gpio_pin() {
    return (GPIO_IN_REG & (1 << 0)); // Read pin 0
}
Conclusion
Memory-mapped peripheral registers are a fundamental concept in microcontroller programming, providing a direct and efficient means to control hardware peripherals through standard memory operations. Proper understanding and utilization of these registers are essential for effective embedded system development.
For a complete in-depth guide on how to use GPIO pins of tiva launchpad to control an LED with button, check these tutorials:
- Bare Metal Embedded Systems Build Process using GNU Toolchain
- How to use GPIO pins of TM4C123G Tiva launchPad
- Use Push Button to Control LED with TM4C123G Tiva LaunchPad
- What is Microcontrollers startup file – Understand its various Functions
- Bare Metal Embedded Systems Linker Script File
- SysTick Timer (System Timer) TM4C123G ARM Cortex M4 Microcontroller
- What is Interrupt Vector Table?
- Nested Vectored Interrupt Controller (NVIC) ARM Cortex-M Microcontrollers
Hello, First of all thank you for your great post,
it is helped me a lot for understanding control of embedded systems,
recently I’m interesting embedded system programming using Rust programming language instead of c and c++ for efficient and safe manner,
but I am wondering that how rust can access GPIO port directly without using manufactor provided library, I there am finally generally understand this point
thank you
Thanks Mahmood
Can you recommend to me a book about understanding principle of MCU like your post please?
Datasheets are the best resources to learn each and every aspect of any microcontroller.
Hi,
I have used method 2 like below
#define SPI_MUX (*((volatile unsigned int *) 0x00000028))
During compilation, I am getting errors like below
error: missing binary operator before token “(”
Pease reply why am i getting the error like this & how to solve it