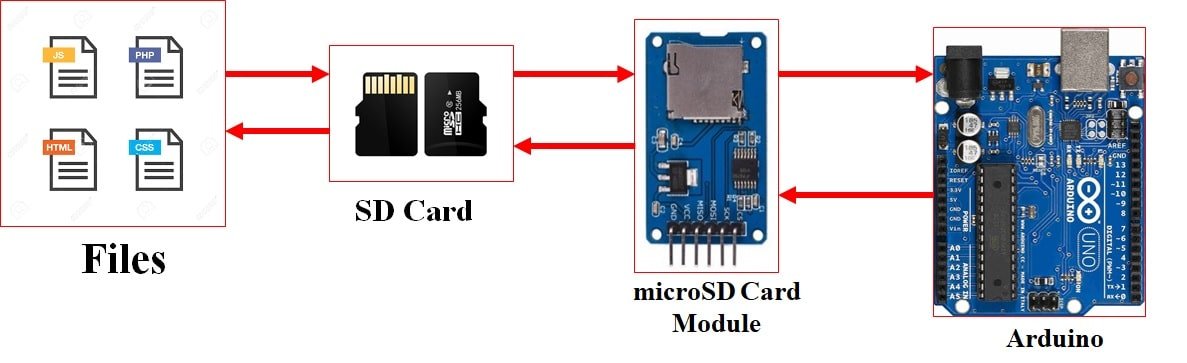
In this user guide, we will learn how to interface a micro SD card with Arduino using the microSD card module or connector and Arduino IDE. This module provides an SPI interface to connect an SD card module with any microcontroller which supports the SPI communication interface. Using a micro SD card becomes very handy for applications where we need to store files or any data.
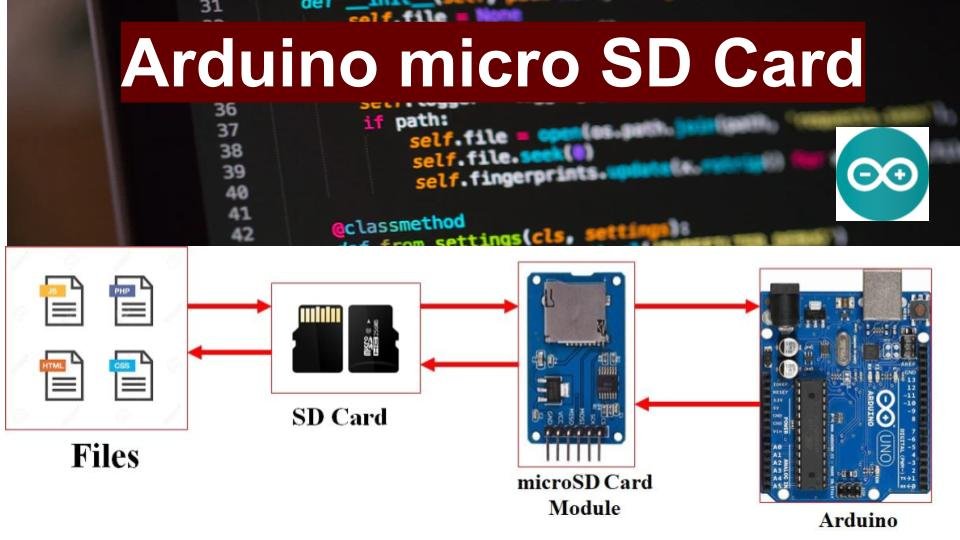
Additionally, we will learn how to handle files in the microSD card including accessing the microSD card information and reading/writing to a file. Storage data including text, video, audio, CSV, HTML, JavaScript, and CSS files can all be conveniently stored in the microSD card. It is one of the most reliable and practical ways to store data in devices such as mobile phones, laptops, and personal computers. The Arduino SD card library provides a convenient way of storing files in the microSD card which will be discussed in later sections of this tutorial.
We have a similar guide with the ESP32 development board as well:
MicroSD Card Module Introduction
The microSD card Modules are designed to communicate with the MicroSD cards. These connectors provide the required hardware and pinout to connect SD cards with microcontrollers such as ESP32, Arduino, ESP8266, Raspberry Pi, etc. Although, they are compatible with almost all SD cards which are commonly used in cell phones. But they can handle a maximum of 16GB capacity microSD cards and only 2GB capacity for standard SD cards.
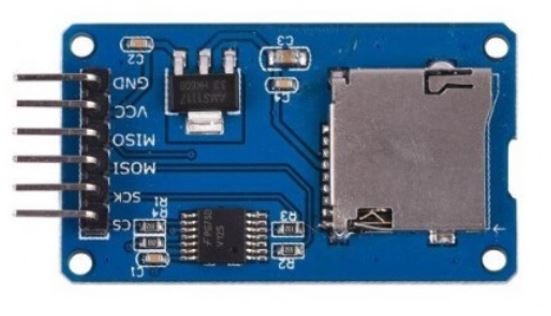
With the help of these modules, we will be able to read and write data to and from SD cards through the SPI communication protocol. There are several different types of microSD card modules easily available in the market. But, the one which we will be using in this article is shown below:
Pinout
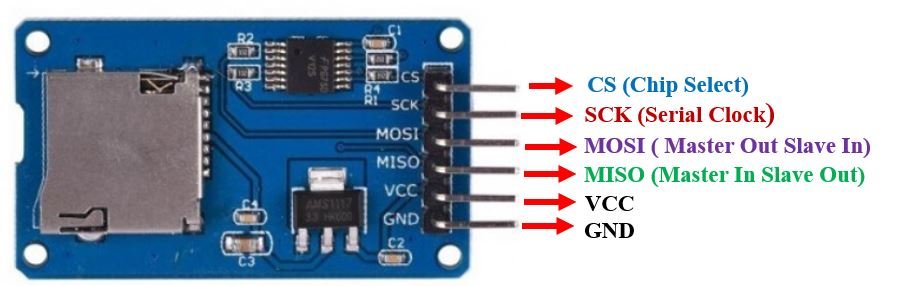
This microSD card module has 6 terminals consisting of SPI and power supply terminals. Below you can view the pinout of this module with some description of the individual pins.
| Pin Name | Description |
|---|---|
| GND | This is the ground pin which should be connected with the ground pin of Arduino. |
| VCC | This pin supplies power to the module. The power supply of ~4.5V-5.5V. The adapter consists of a 3.3V voltage regulator circuit as well. It is connected with 5V pin of Arduino. |
| CS | This is the Chip Select pin for SPI communication. |
| MOSI | This is called the ‘Master Out Slave In.’ It is used as the SPI input to the module. |
| SCK | This is called the ‘Serial Clock’ pin which is used in SPI serial clock output. |
| MISO | This is called the ‘Master in Slave Out.’ It is used as the SPI output from the module. |
MicroSD card module Interfacing with Arduino
Required Hardware:
Following components are required:
- 1 x Arduino board
- MicroSD card
- 1 x MicroSD card module
Now, we will show you how to connect the microSD card module and the Arduino board together. There are different versions of the Arduino boards including Arduino Uno, Arduino Mega, and Arduino Nano. The Uno/ Nano and Mega have different default SPI pins. The table below shows the default SPI pins for the three Arduino boards.
| Arduino UNO | Arduino Mega | Arduino Nano | |
|---|---|---|---|
| MOSI | 11 | 51 | 11 |
| MISO | 12 | 50 | 12 |
| SCK | 13 | 52 | 13 |
| CS | 10 | 53 | 10 |
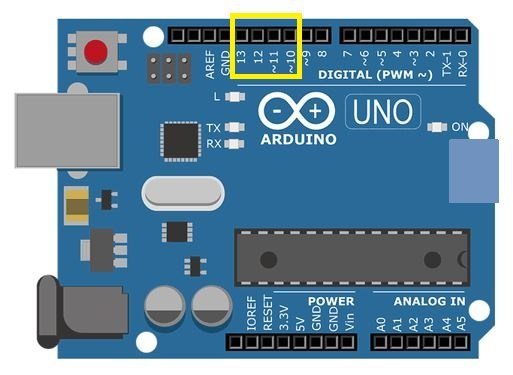
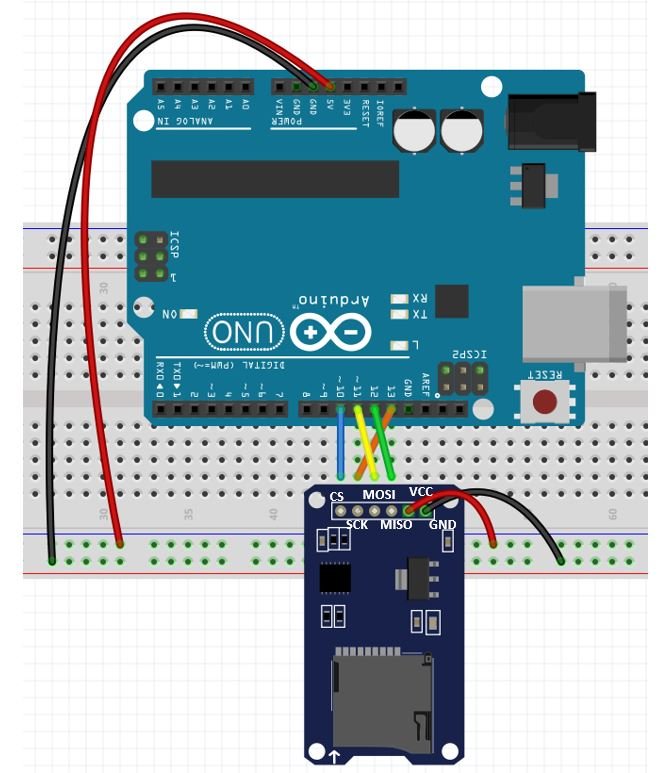
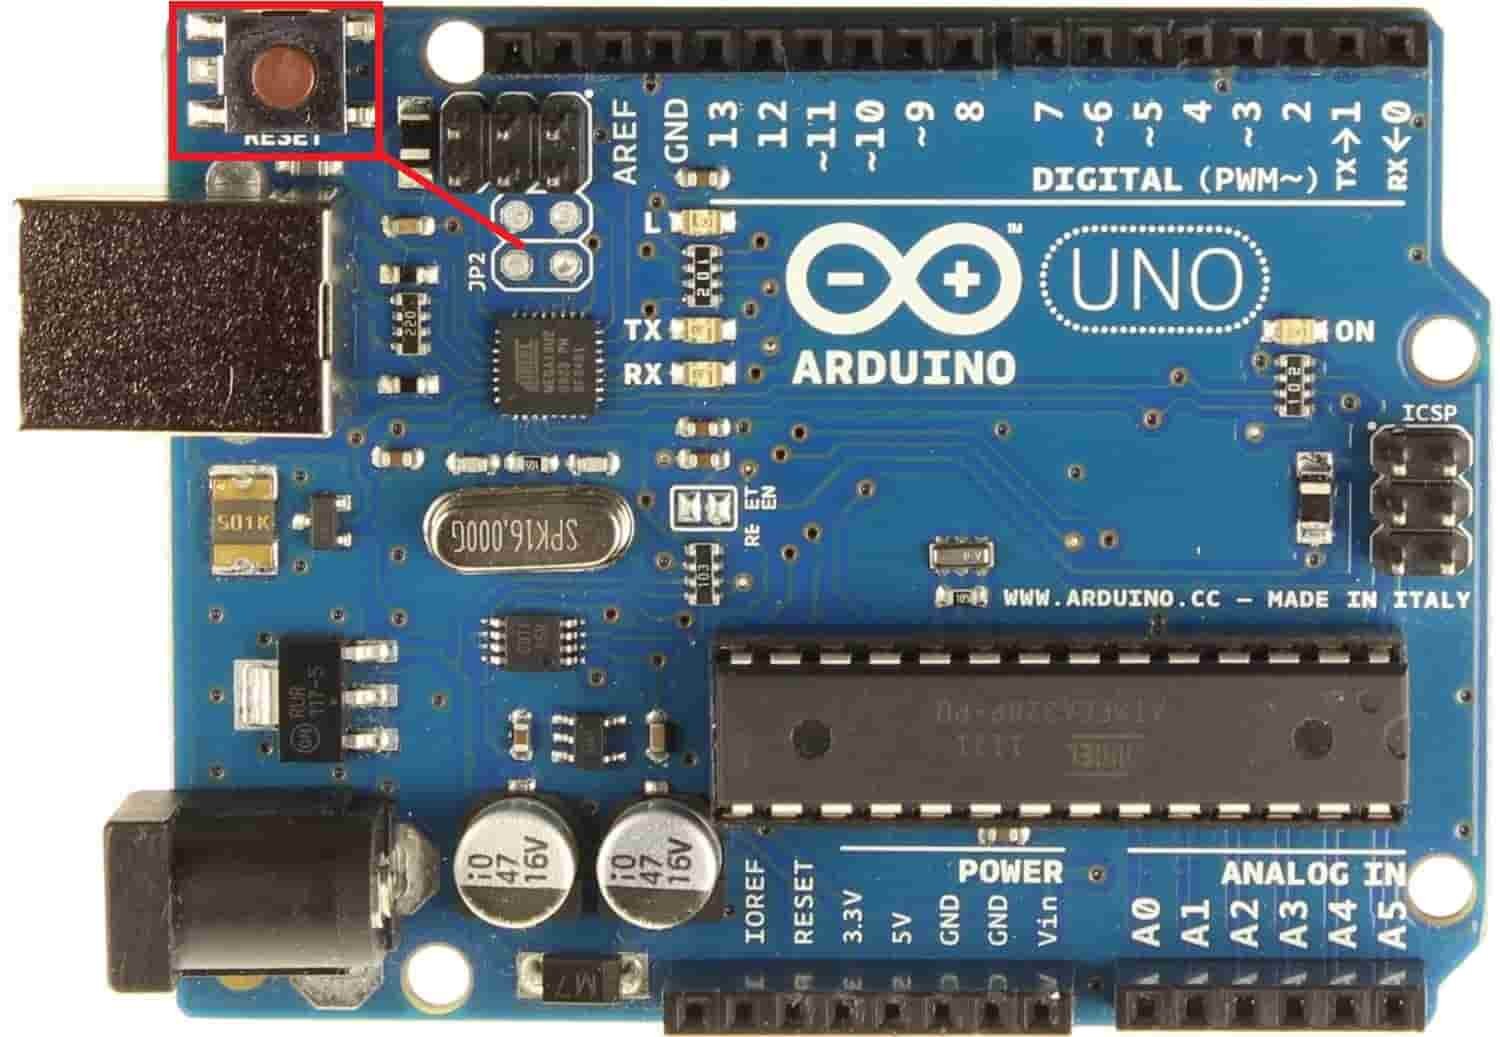
You can use any of the Arduino boards mentioned above but remember to use the correct SPI pins for connection of the microSD card module and Arduino. For this article, we will be using the Arduino Uno board. The figure below shows the default SPI pins of Arduino Uno.
Now let us see how to connect the microSD card module and the Arduino Uno board. The table below shows the connections between the two devices:
| MicroSD card module | Arduino UNO |
|---|---|
| GND | GND |
| VCC | 5V |
| CS | GPIO10 |
| MOSI | GPIO11 |
| SCK | GPIO13 |
| MISO | GPIO12 |
As shown from the table, we will connect the VCC terminal of the MicroSD card module with 5V of Arduino Uno board. Both grounds will be common. The default SPI GPIO pins of Arduino Uno are being used to connect with each of the remaining SPI terminals of the microSD card module.
Now, as we know how to interface the microSD card module and the Arduino Uno together let us learn how to prepare the microSD card to handle files in Arduino IDE.
Formatting the MicroSD card
As we have to use our microSD card in Arduino IDE so we would have to format it as FAT32. We will have to follow a series of steps to accomplish it successfully.
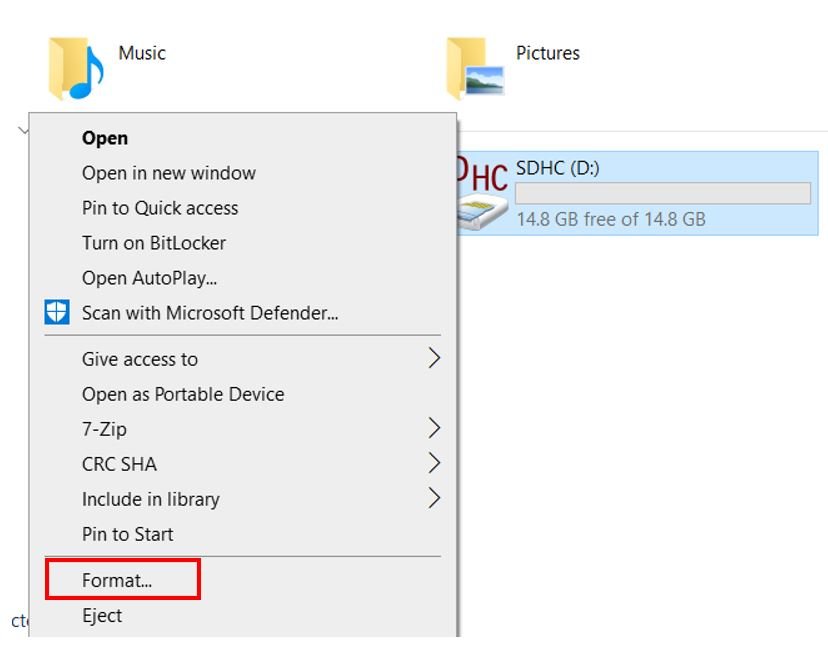
- First, insert your microSD card in your laptop/computer. Now go to ‘This PC’ and click on SD card icon. Then click on Format by right clicking the SD card icon.
- The following window will appear. Select FAT32 from the dialog box of ‘File System’ and click on ‘START.’

- You will receive a warning message that formatting will erase all previous data saved on the microSD card. Click ‘OK.’

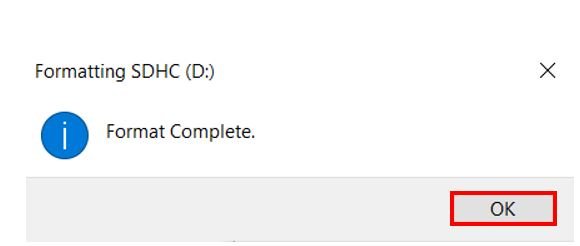
- After a few moments, your microSD card will be formatted successfully. Click ‘OK.’
Arduino Uno with microSD Card: Example Sketches
In this section, we will show you how to use example sketches available in the Arduino IDE. These will help us to handle files with a microSD card using Arduino Uno and Arduino IDE. We will use the SD library examples to demonstrate the card information and some file handling functions like reading and writing on a file which will be saved on the microSD card.
Arduino Sketch (CardInfo)
Open your Arduino IDE and go to File > Examples > SD > CardInfo. The following program code will open. This example sketch will recognize the microSD card and display information related to it on the serial monitor. It will help us in making sure that we are using a card which is supported.
/*
  SD card test

  This example shows how use the utility libraries on which the'
  SD library is based in order to get info about your SD card.
  Very useful for testing a card when you're not sure whether its working or not.

  The circuit:
    SD card attached to SPI bus as follows:
 ** MOSI - pin 11 on Arduino Uno/Duemilanove/Diecimila
 ** MISO - pin 12 on Arduino Uno/Duemilanove/Diecimila
 ** CLK - pin 13 on Arduino Uno/Duemilanove/Diecimila
 ** CS - depends on your SD card shield or module.
 		Pin 4 used here for consistency with other Arduino examples


  created  28 Mar 2011
  by Limor Fried
  modified 9 Apr 2012
  by Tom Igoe
*/
// include the SD library:
#include <SPI.h>
#include <SD.h>

// set up variables using the SD utility library functions:
Sd2Card card;
SdVolume volume;
SdFile root;

// change this to match your SD shield or module;
// Arduino Ethernet shield: pin 4
// Adafruit SD shields and modules: pin 10
// Sparkfun SD shield: pin 8
// MKRZero SD: SDCARD_SS_PIN
const int chipSelect = 10;

void setup() {
  // Open serial communications and wait for port to open:
  Serial.begin(9600);
  while (!Serial) {
    ; // wait for serial port to connect. Needed for native USB port only
  }


  Serial.print("\nInitializing SD card...");

  // we'll use the initialization code from the utility libraries
  // since we're just testing if the card is working!
  if (!card.init(SPI_HALF_SPEED, chipSelect)) {
    Serial.println("initialization failed. Things to check:");
    Serial.println("* is a card inserted?");
    Serial.println("* is your wiring correct?");
    Serial.println("* did you change the chipSelect pin to match your shield or module?");
    while (1);
  } else {
    Serial.println("Wiring is correct and a card is present.");
  }

  // print the type of card
  Serial.println();
  Serial.print("Card type:         ");
  switch (card.type()) {
    case SD_CARD_TYPE_SD1:
      Serial.println("SD1");
      break;
    case SD_CARD_TYPE_SD2:
      Serial.println("SD2");
      break;
    case SD_CARD_TYPE_SDHC:
      Serial.println("SDHC");
      break;
    default:
      Serial.println("Unknown");
  }

  // Now we will try to open the 'volume'/'partition' - it should be FAT16 or FAT32
  if (!volume.init(card)) {
    Serial.println("Could not find FAT16/FAT32 partition.\nMake sure you've formatted the card");
    while (1);
  }

  Serial.print("Clusters:          ");
  Serial.println(volume.clusterCount());
  Serial.print("Blocks x Cluster:  ");
  Serial.println(volume.blocksPerCluster());

  Serial.print("Total Blocks:      ");
  Serial.println(volume.blocksPerCluster() * volume.clusterCount());
  Serial.println();

  // print the type and size of the first FAT-type volume
  uint32_t volumesize;
  Serial.print("Volume type is:    FAT");
  Serial.println(volume.fatType(), DEC);

  volumesize = volume.blocksPerCluster();    // clusters are collections of blocks
  volumesize *= volume.clusterCount();       // we'll have a lot of clusters
  volumesize /= 2;                           // SD card blocks are always 512 bytes (2 blocks are 1KB)
  Serial.print("Volume size (Kb):  ");
  Serial.println(volumesize);
  Serial.print("Volume size (Mb):  ");
  volumesize /= 1024;
  Serial.println(volumesize);
  Serial.print("Volume size (Gb):  ");
  Serial.println((float)volumesize / 1024.0);

  Serial.println("\nFiles found on the card (name, date and size in bytes): ");
  root.openRoot(volume);

  // list all files in the card with date and size
  root.ls(LS_R | LS_DATE | LS_SIZE);
}

void loop(void) {
}
We have modified one line in this sketch according to the board we are using. As we are using Arduino Uno, hence its default SPI CS pin is GPIO10. Therefore, make sure that ‘chipSelect’ variable is set to 10 in this case. By default it was set to 4.
const int chipSelect = 10;Demonstration
To see the demonstration of the above code, upload the code to Arduino. But, before uploading code, make sure to select the Arduino board from Tools > Board and also select the correct COM port to which the Arduino board is connected from Tools > Port.
Once the code is uploaded to Arduino, open the serial monitor of Arduino IDE and set the baud rate to 9600. Now press the Reset button on the Arduino Uno.
The Serial monitor will display some messages. Our microSD card is supported hence our card gets initialized and there is no error messages. We can view the card type as ‘SDHC’ and other parameters as well including its size and type. The volume type is FAT32.

Now, if your serial monitor did not display the product ID or manufacturer ID this means that your card is not supported and is faulty. The card was unable to get initialized. Additionally, if you did not format the card to FAT32 in the beginning, it will point that error as well.
Now as our microSD card is getting initialized and all is working well let us proceed with the next example sketch where we will learn to read/write on a .txt file.
Arduino Sketch: Read/Write on a File
Open your Arduino IDE and go to File > Examples > SD > ReadWrite . The following program code will open. This example sketch will read and write data on a .txt file that will get saved on our microSD card.
/*
  SD card read/write

  This example shows how to read and write data to and from an SD card file
  The circuit:
   SD card attached to SPI bus as follows:
 ** MOSI - pin 11
 ** MISO - pin 12
 ** CLK - pin 13
 ** CS - pin 4 (for MKRZero SD: SDCARD_SS_PIN)

  created   Nov 2010
  by David A. Mellis
  modified 9 Apr 2012
  by Tom Igoe

  This example code is in the public domain.

*/

#include <SPI.h>
#include <SD.h>

File myFile;

void setup() {
  // Open serial communications and wait for port to open:
  Serial.begin(9600);
  while (!Serial) {
    ; // wait for serial port to connect. Needed for native USB port only
  }


  Serial.print("Initializing SD card...");

  if (!SD.begin(10)) {
    Serial.println("initialization failed!");
    while (1);
  }
  Serial.println("initialization done.");

  // open the file. note that only one file can be open at a time,
  // so you have to close this one before opening another.
  myFile = SD.open("test.txt", FILE_WRITE);

  // if the file opened okay, write to it:
  if (myFile) {
    Serial.print("Writing to test.txt...");
    myFile.println("testing 1, 2, 3.");
    // close the file:
    myFile.close();
    Serial.println("done.");
  } else {
    // if the file didn't open, print an error:
    Serial.println("error opening test.txt");
  }

  // re-open the file for reading:
  myFile = SD.open("test.txt");
  if (myFile) {
    Serial.println("test.txt:");

    // read from the file until there's nothing else in it:
    while (myFile.available()) {
      Serial.write(myFile.read());
    }
    // close the file:
    myFile.close();
  } else {
    // if the file didn't open, print an error:
    Serial.println("error opening test.txt");
  }
}

void loop() {
  // nothing happens after setup
}
We have modified one line in this sketch according to the board we are using. As we are using Arduino Uno, hence its default SPI CS pin is GPIO10. Using the begin() function on the SD filesystem, we will initialize the microSD card. Therefore, make sure when initializing the microSD card replace the argument in the begin() function to 10. By default it was set to 4.
 if (!SD.begin(10)) {
    Serial.println("initialization failed!");
    while (1);
  }
How the Code Works?
Now let us understand how each part of the code works.
Including Libraries
The first step is to include all the libraries that are necessary for this project. The SD library will be used for the microSD card functionality and the SPI library will be used as we are using SPI communication protocol between the Arduino Uno board and the microSD card module.
#include <SPI.h>
#include <SD.h>
Creating File Object
Secondly, we will create an object of File and name it ‘myFile.’ This is the object which we will use later to read and write data to our file in the microSD card.
File myFile;Inside the setup() function, we will open a serial connection at a baud rate of 9600.
Serial.begin(9600);Initializing the microSD card
The following lines of code will initialize the microSD card using the begin() function on the SD filesystem using SD.begin(). The begin() function takes in the CS Pin as an argument which we have stated as ’10.’ Thus, it will start the SPI communication using the default SPI CS pin that is GPIO10. To change the SPI CS pin you can pass the pin number as an argument inside the begin() function.
if (!SD.begin(10)) {
    Serial.println("initialization failed!");
    while (1);
  }
  Serial.println("initialization done.");
Writing data to file
Next, we will open the test.txt file on the microSD card using SD.open() and will act as read/write. If the file does not exist, it will get created.
myFile = SD.open("test.txt", FILE_WRITE);
Using the println() function on the myFile object we will write ‘testing 1, 2, 3.’ in the test.txt file. After that, we will close the file using file.close(). This will ensure that the data written on the file gets saved as well. The serial monitor will display ‘Writing to test.txt…’ and ‘done’ after the data is written. If the file is unable to open the serial monitor will display an error message.
Note: print() and println() work in similar way to write strings/variable to a file
print(): prints the message on the same line
println(): prints the message on the next line
if (myFile) {
    Serial.print("Writing to test.txt...");
    myFile.println("testing 1, 2, 3.");
    // close the file:
    myFile.close();
    Serial.println("done.");
  } else {
    // if the file didn't open, print an error:
    Serial.println("error opening test.txt");
  }
Reading data from file
Now, we will read the data which we just wrote on our test.txt file. To do that we will first open the test.txt file by using SD.open(). Then by using Serial.write() and passing myFile.read() as an argument inside it, it will read the test.txt file and print the data in the serial monitor. Notice that we are using a while loop with myFile.available() as an argument inside it. This will make sure that all the contents of the file are displayed on the serial monitor properly. After that, we will close the file using file.close(). If the file is unable to open the serial monitor will display an error message.
Note: read() function only reads a single character at a time.
  // re-open the file for reading:
  myFile = SD.open("test.txt");
  if (myFile) {
    Serial.println("test.txt:");

    // read from the file until there's nothing else in it:
    while (myFile.available()) {
      Serial.write(myFile.read());
    }
    // close the file:
    myFile.close();
  } else {
    // if the file didn't open, print an error:
    Serial.println("error opening test.txt");
  }
Demonstration
To see the demonstration of the above code, upload the code to Arduino. But, before uploading code, make sure to select the Arduino board from Tools > Board and also select the correct COM port to which the Arduino board is connected from Tools > Port.

Once the code is uploaded to Arduino, open the serial monitor of Arduino IDE and set the baud rate to 9600. You will be able to view the following messages if the data is successfully written to the file (highlighted in blue). The red highlighted box shows the contents of the test.txt file which are ‘testing 1, 2, 3.’ If we press the Reset button again, another set of data will get appended in the file.

Arduino Sketch: Creating and Deleting Files on SD Card
Open your Arduino IDE and go to File > Examples > SD > Files . The following program code will open. This example sketch will create and delete a .txt file in our microSD card.
/*
  SD card basic file example

  This example shows how to create and destroy an SD card file
  The circuit:
   SD card attached to SPI bus as follows:
 ** MOSI - pin 11
 ** MISO - pin 12
 ** CLK - pin 13
 ** CS - pin 4 (for MKRZero SD: SDCARD_SS_PIN)

  created   Nov 2010
  by David A. Mellis
  modified 9 Apr 2012
  by Tom Igoe

  This example code is in the public domain.

*/
#include <SPI.h>
#include <SD.h>

File myFile;

void setup() {
  // Open serial communications and wait for port to open:
  Serial.begin(9600);
  while (!Serial) {
    ; // wait for serial port to connect. Needed for native USB port only
  }


  Serial.print("Initializing SD card...");

  if (!SD.begin(10)) {
    Serial.println("initialization failed!");
    while (1);
  }
  Serial.println("initialization done.");

  if (SD.exists("example.txt")) {
    Serial.println("example.txt exists.");
  } else {
    Serial.println("example.txt doesn't exist.");
  }

  // open a new file and immediately close it:
  Serial.println("Creating example.txt...");
  myFile = SD.open("example.txt", FILE_WRITE);
  myFile.close();

  // Check to see if the file exists:
  if (SD.exists("example.txt")) {
    Serial.println("example.txt exists.");
  } else {
    Serial.println("example.txt doesn't exist.");
  }

  // delete the file:
  Serial.println("Removing example.txt...");
  SD.remove("example.txt");

  if (SD.exists("example.txt")) {
    Serial.println("example.txt exists.");
  } else {
    Serial.println("example.txt doesn't exist.");
  }
}

void loop() {
  // nothing happens after setup finishes.
}
We have modified one line in this sketch according to the board we are using. As we are using Arduino Uno, hence its default SPI CS pin is GPIO10. Using the begin() function on the SD filesystem, we will initialize the microSD card. Therefore, make sure when initializing the microSD card replace the argument in the begin() function to 10. By default it was set to 4.
if (!SD.begin(10)) {
    Serial.println("initialization failed!");
    while (1);
  }
Demonstration
To see the demonstration of the above code, upload the code to Arduino. But, before uploading code, make sure to select the Arduino board from Tools > Board and also select the correct COM port to which the Arduino board is connected from Tools > Port.
Once the code is uploaded to Arduino, open the serial monitor of Arduino IDE and set the baud rate to 9600.
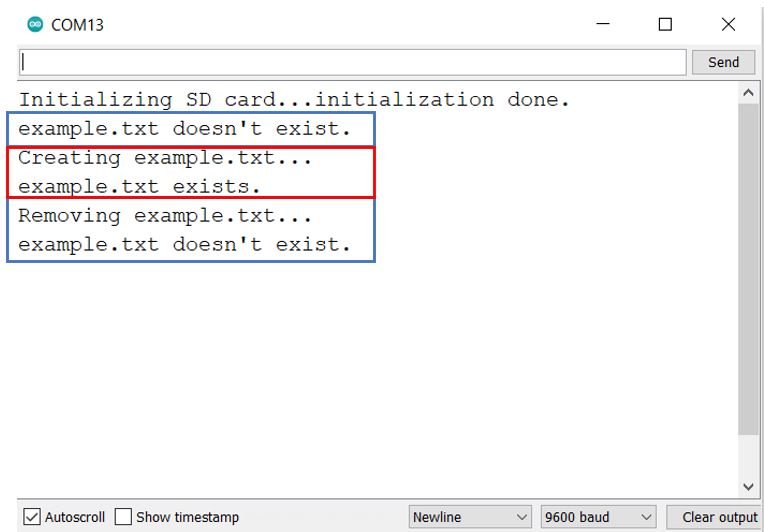
At first, you can view that example.txt file did not exist in the microSD card. Hence it was first created as highlighted in red. Then it was removed from the microSD card.
Arduino Sketch: List all Files from MicroSD Card
Open your Arduino IDE and go to File > Examples > SD > listfiles. The following program code will open. This example sketch will display all the files present in your microSD card on the serial monitor.
/*
  Listfiles

  This example shows how print out the files in a
  directory on a SD card

  The circuit:
   SD card attached to SPI bus as follows:
 ** MOSI - pin 11
 ** MISO - pin 12
 ** CLK - pin 13
 ** CS - pin 4 (for MKRZero SD: SDCARD_SS_PIN)

  created   Nov 2010
  by David A. Mellis
  modified 9 Apr 2012
  by Tom Igoe
  modified 2 Feb 2014
  by Scott Fitzgerald

  This example code is in the public domain.

*/
#include <SPI.h>
#include <SD.h>

File root;

void setup() {
  // Open serial communications and wait for port to open:
  Serial.begin(9600);
  while (!Serial) {
    ; // wait for serial port to connect. Needed for native USB port only
  }

  Serial.print("Initializing SD card...");

  if (!SD.begin(10)) {
    Serial.println("initialization failed!");
    while (1);
  }
  Serial.println("initialization done.");

  root = SD.open("/");

  printDirectory(root, 0);

  Serial.println("done!");
}

void loop() {
  // nothing happens after setup finishes.
}

void printDirectory(File dir, int numTabs) {
  while (true) {

    File entry =  dir.openNextFile();
    if (! entry) {
      // no more files
      break;
    }
    for (uint8_t i = 0; i < numTabs; i++) {
      Serial.print('\t');
    }
    Serial.print(entry.name());
    if (entry.isDirectory()) {
      Serial.println("/");
      printDirectory(entry, numTabs + 1);
    } else {
      // files have sizes, directories do not
      Serial.print("\t\t");
      Serial.println(entry.size(), DEC);
    }
    entry.close();
  }
}
We have modified one line in this sketch according to the board we are using. As we are using Arduino Uno, hence its default SPI CS pin is GPIO10. Using the begin() function on the SD filesystem, we will initialize the microSD card. Therefore, make sure when initializing the microSD card replace the argument in the begin() function to 10. By default it was set to 4.
 if (!SD.begin(10)) {
    Serial.println("initialization failed!");
    while (1);
  }
Demonstration
To see the demonstration of the above code, upload the code to Arduino. But, before uploading code, make sure to select the Arduino board from Tools > Board and also select the correct COM port to which the Arduino board is connected from Tools > Port.
Once the code is uploaded to Arduino, open the serial monitor of Arduino IDE and set the baud rate to 9600.
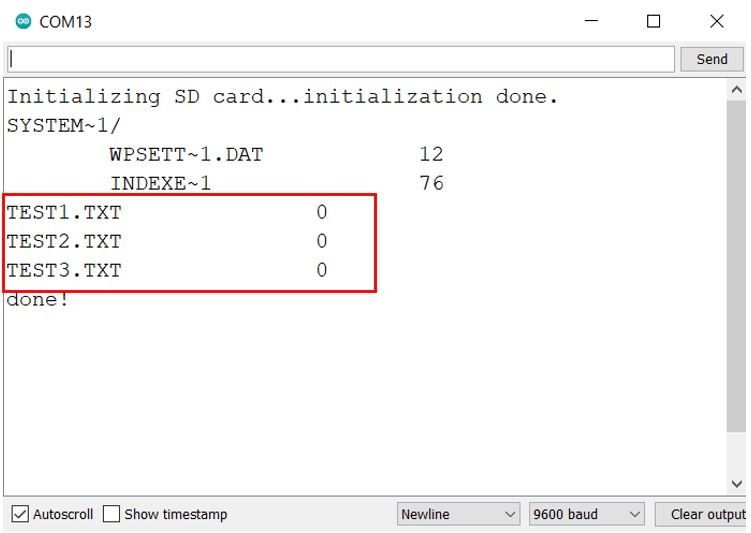
As you can notice in the serial monitor, first the system files are displayed with their sizes. Next, we have three .txt files (TEST1.txt, TEST2.txt and TEST3.txt) in our microSD card which are empty as denoted by their size.
SD Card Library Useful Functions
The table below shows some commonly used functions with SD object that we did not cover till now.
| exists(“test.txt”) | This function will return true/false depending on whether the file passed as an argument inside it exists or not. In this case, it will check whether the file ‘test.txt’ exists in the microSD card or not. |
| remove(“test.txt”) | This function will permanently remove the file passed as an argument inside it. In this case, it will remove the ‘test.txt’ file. |
| mkdir(“/mynewdir”) | This function will create a new directory |
The table below shows some commonly used functions with the File object (e.g. myFile) that we did not cover till now.
| seek() | This function will help us to change the location of the cursor while reading/writing on a file. It takes in a single parameter which denotes the relative position of the cursor where 0 is the starting of a file. |
| position() | This function will help us in knowing the exact position we are in a file while reading/writing. |
| size() | This function denotes the size of the file by denoting the number of bytes it consumes. |
| isDirectory() | This function specifies whether the particular file is a directory or not. |
| openNextFile() | This function will enable us to go through all the files in a directory. |
Conclusion
In conclusion, we learned how to use a micro SD card with Arduino using Arduino IDE. We looked at example sketches from the SD library and successfully initialized our microSD card. Additionally, we were able to read and write to a .txt file as well.
You may like to read these SD card guides for Arduino and sensors:
- BME280 Data Logger with Arduino and Micro SD Card
- DHT22 Data Logger with Arduino and Micro SD Card
- GPS Data Logger with Arduino and Micro SD Card – GPS Tracker
SD card interfacing with other development boards: