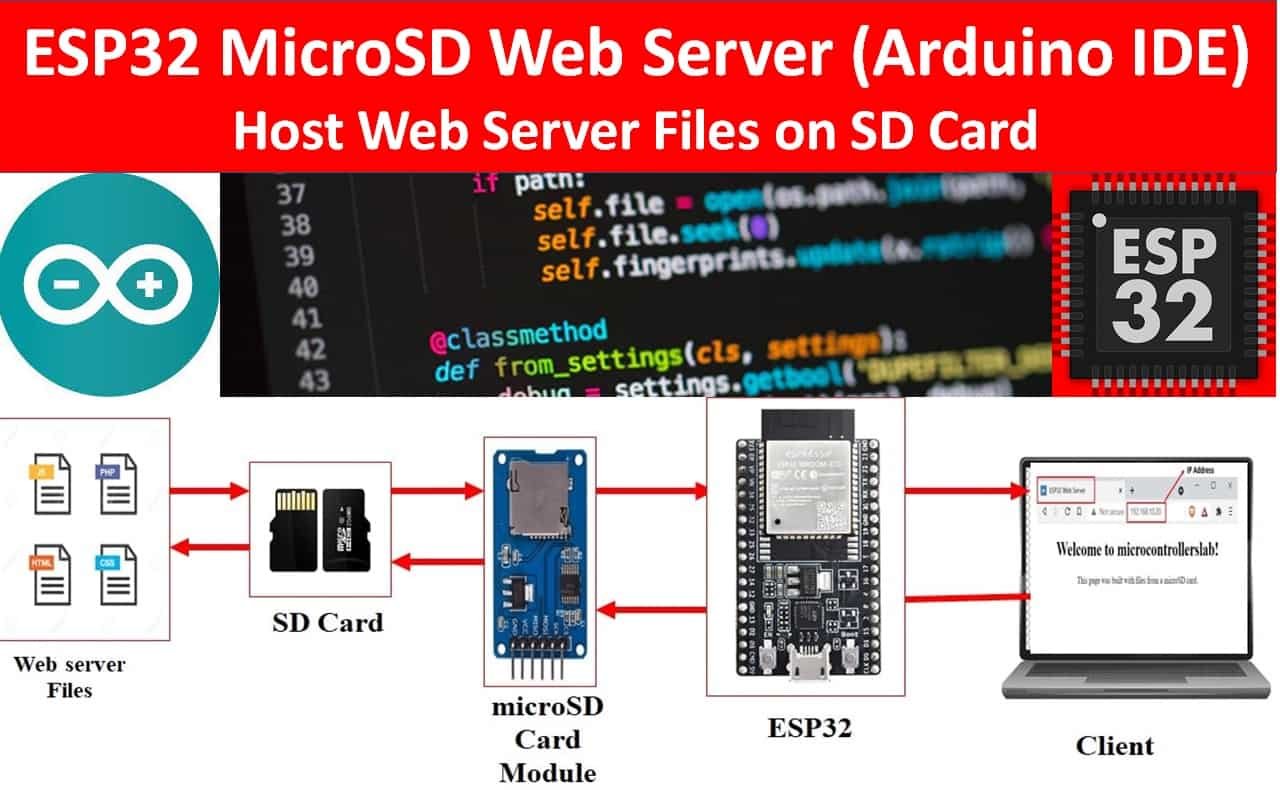
In this user guide, we will learn how to host ESP32 web server files on a microSD card. In other words, we will build a web server that serves the files to a client saved on the microSD card. Storage data including text, video, audio, CSV, HTML, JavaScript, and CSS files can all be conveniently stored in the microSD card. For applications where the size of files is higher than the available SPI flash file system of ESP32, using a microSD card is a good choice to host larger files.
Recommended Components
The following components are used in this project or are helpful for building it with the ESP32.
| Component | How it’s used in this project | Buy on Amazon |
|---|---|---|
| ESP32 Development Board (DevKit V1) | Hosts the web server and reads the HTML, CSS and favicon files from the microSD card over SPI. | Check Price |
| Micro USB Cable | Connects the ESP32 to your computer for flashing the code and powering the board. | Check Price |
| Breadboard | Lets you wire the microSD card module to the ESP32 without soldering. | Check Price |
| Jumper Wires | Make the SPI connections between the ESP32 and the microSD card module. | Check Price |
| MicroSD card module (SPI) | Reads the website files stored on the microSD card and serves them through the ESP32 over SPI. | Check Price |
| MicroSD card | Stores the index.html, style.css and favicon files that the ESP32 web server hosts. | Check Price |
As an Amazon Associate we earn from qualifying purchases. Prices and availability are accurate as of the date/time indicated and are subject to change.
ESP32 SD Card Web Server Project Overview
In this section, we will cover the overview of the microSD card based ESP32 web server. We will build a web server with ESP32 that will serve the files to the web clients hosted on a microSD card. The web page will display: “Welcome to microcontrollerslab!” with the help of a simple HTML document which we will store in a microSD card. The figure below shows the series of steps that would be followed:
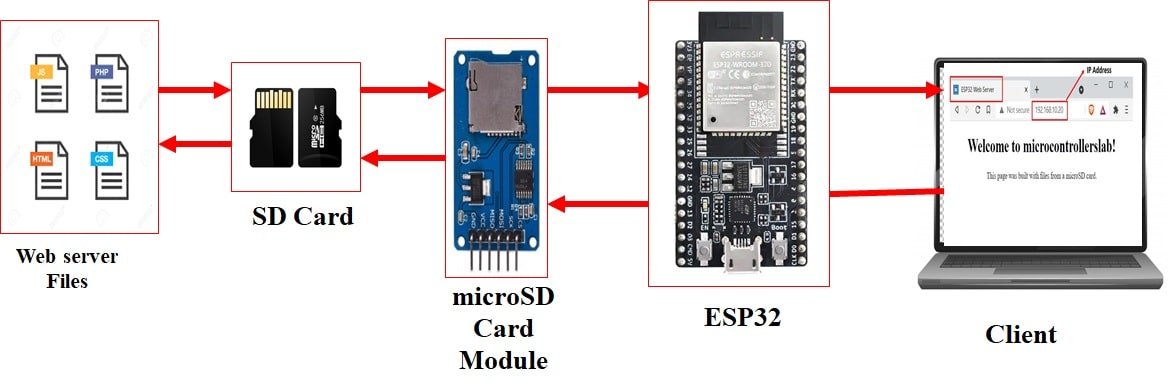
The following series of steps show how the process will work.
- Our microsdSD card would have different files stored inside it including favicon image, CSS and HTML. We will be using the microSD card module to server files to a web client through ESP32.
- Then, we will use the ESPAsyncWebServer library to create a web server.
- Next, we will communicate through SPI protocol with a microSD module using ESP32 board to read files.
- The files would be displayed on the webpage, whenever the client would request one.
The web server that we will build in this tutorial is an asynchronous web server. You can read our in-depth project on an asynchronous web server:
ESP32 Asynchronous Web Server using Arduino IDE and ESPAsyncWebServer library
MicroSD Card Module Introduction
The microSD card Modules are designed to communicate with the MicroSD cards. These connectors provide the required hardware and pinout to connect SD cards with microcontrollers such as ESP32, Arduino, ESP8266, Raspberry Pi, etc. Although, they are compatible with almost all SD cards which are commonly used in cell phones. But they can handle a maximum of 16GB capacity microSD cards and only 2GB capacity for standard SD cards.
With the help of these modules, we will be able to read and write data to and from SD cards through the SPI communication protocol. There are several different types of microSD card modules easily available in the market. But, the one which we will be using in this article is shown below:
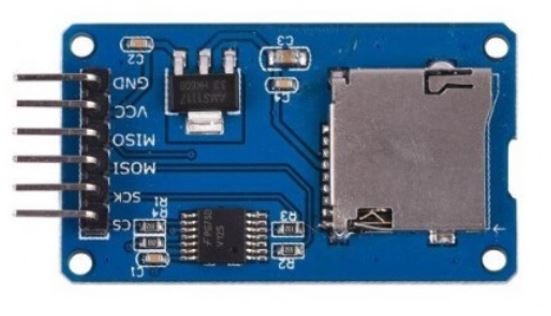
Pinout
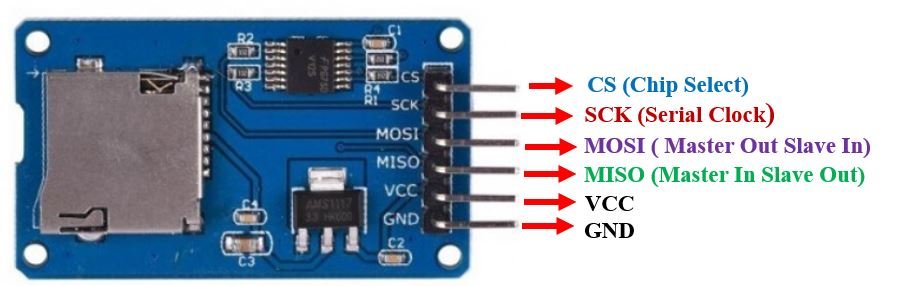
This microSD card module has 6 terminals consisting of SPI and power supply terminals. Below you can view the pinout of this module with some description of the individual pins.
| Pin Name | Description |
|---|---|
| GND | This is the ground pin which should be connected with the ground pin of ESP32 |
| VCC | This pin supplies power to the module. The power supply of ~4.5V-5.5V. The adapter consists of a 3.3V voltage regulator circuit as well to cater to ESP32’s power supply range. |
| CS | This is the Chip Select pin for SPI communication. |
| MOSI | This is called the ‘Master Out Slave In.’ It is used as the SPI input to the module. |
| SCK | This is called the ‘Serial Clock’ pin which is used in SPI serial clock output. |
| MISO | This is called the ‘Master in Slave Out.’ It is used as the SPI output from the module. |
MicroSD card module Interfacing with ESP32
Required Hardware
Following components are required
- 1 x ESP32 development board
- MicroSD card
- 1 x MicroSD card module
- Connecting wires
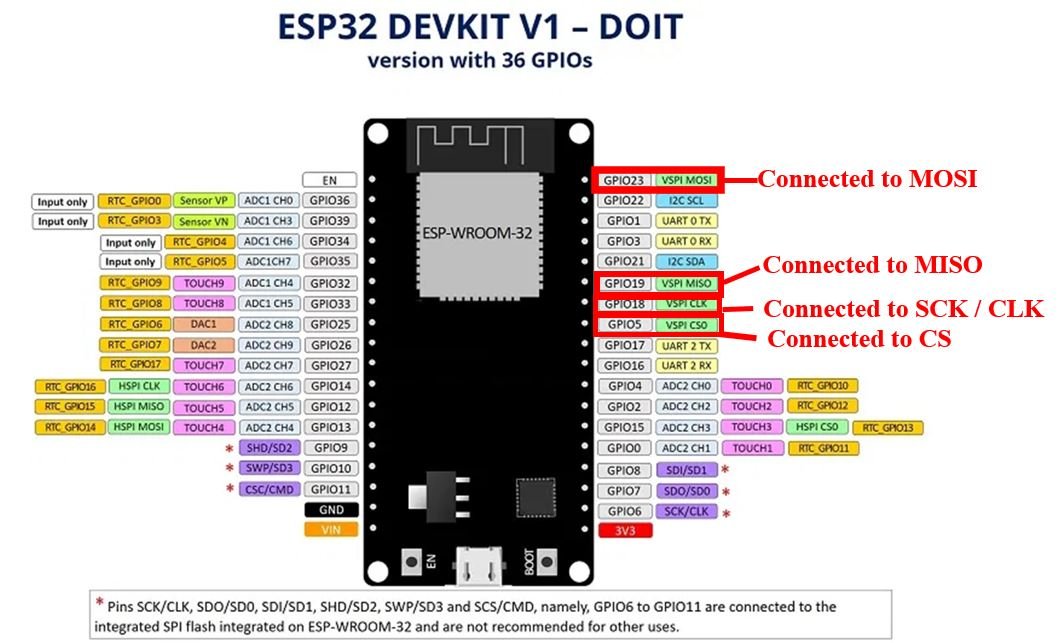
Now, we will show you how to connect the microSD card module and the ESP32 development board together. Below you can see the pinout of ESP32 DEVKIT V1 to get a better idea of the SPI default pins.
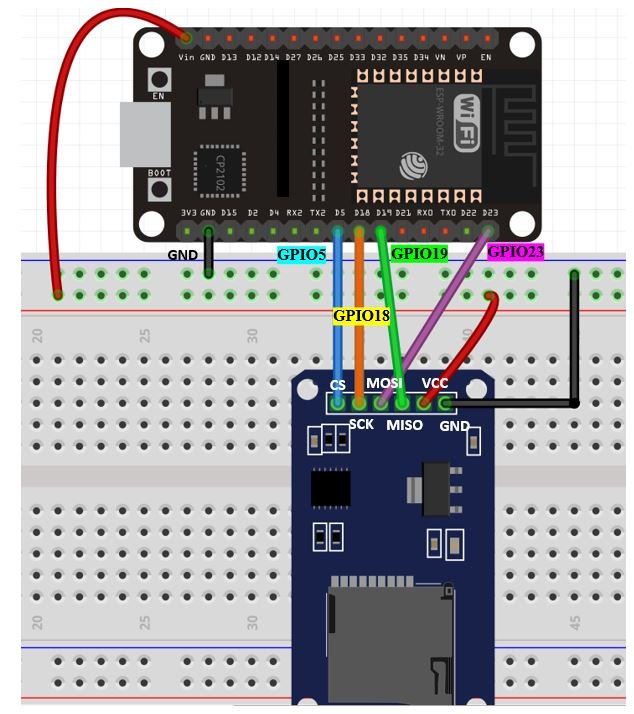
The table below shows the connections between the two modules:
| MicroSD card module | ESP32 module |
|---|---|
| GND | GND |
| VCC | Vin |
| CS | GPIO5 |
| MOSI | GPIO23 |
| SCK | GPIO18 |
| MISO | GPIO19 |
As shown from the table, we will connect the VCC terminal of MicroSD card module with Vin of ESP32. Both grounds will be common. The default SPI GPIO pins of ESP32 are being used to connect with each of the remaining SPI terminals of the microSD card module.
Now, as we know how to interface the microSD card module and the ESP32 module together let us proceed with our project of creating a web server in ESP32.
Formatting MicroSD card
As we have to use our microSD card in Arduino IDE so we would have to format it as FAT32. We will have to follow a series of steps to accomplish it successfully.
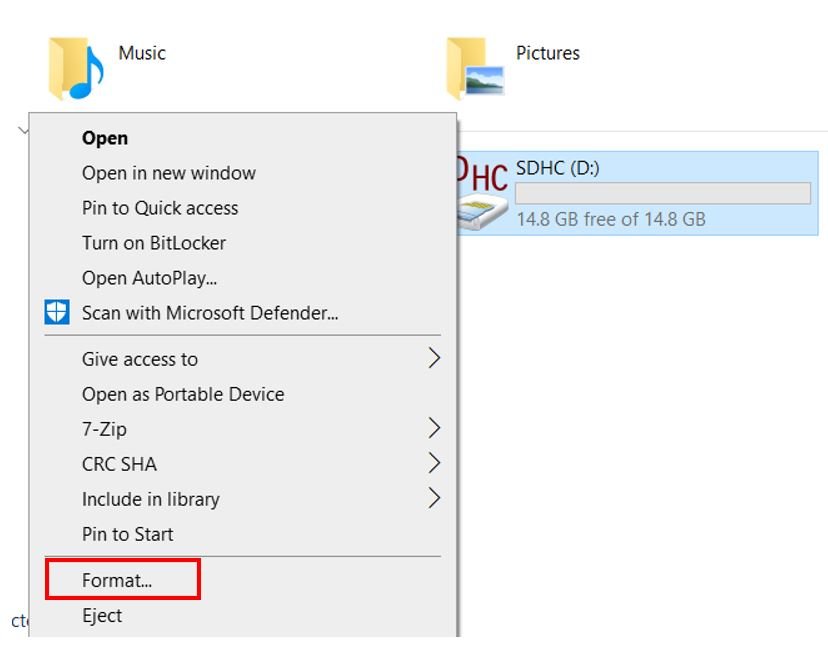
- First, insert your microSD card in your laptop/computer. Now go to ‘This PC’ and click on SD card icon. Then click on Format by right clicking the SD card icon.
- The following window will appear. Select FAT32 from the dialog box of ‘File System’ and click on ‘START.’

- You will receive a warning message that formatting will erase all previous data saved on the microSD card. Click ‘OK.’

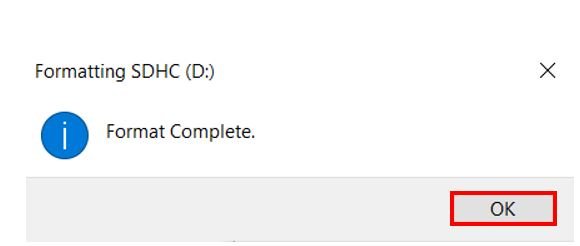
- After a few moments, your microSD card will be formatted successfully. Click ‘OK.’
Setting up Arduino IDE
Before we proceed further, you should make sure that you have the latest version of Arduino IDE installed on your system. Moreover, you should also install an ESP32 add-on in Arduino IDE. If your IDE does not have the plugin installed you can visit the link below:
Installing ESPAsyncWebServer Libraries
The ESPAsyncWebServer library will help us in creating our web server easily. With this library, we will set an asynchronous HTTP server. AsyncTCP is another library that we will be incorporating as it as a dependency for the ESPAsyncWebServer library. This library will not be used directly inside our program code and only acts as the base for the first library.
Both of these libraries are not available in the Arduino library manager so we will have to download and load them in the IDE ourselves. We will use GitHub to download the respective libraries and then place them in the library folder of our Arduino IDE.
Click ESPAsyncWebServer library and AsyncTCP library to open the respective GitHub pages for the libraries.
The webpage when you open the ESPAsyncWeb Server link will look something like this.
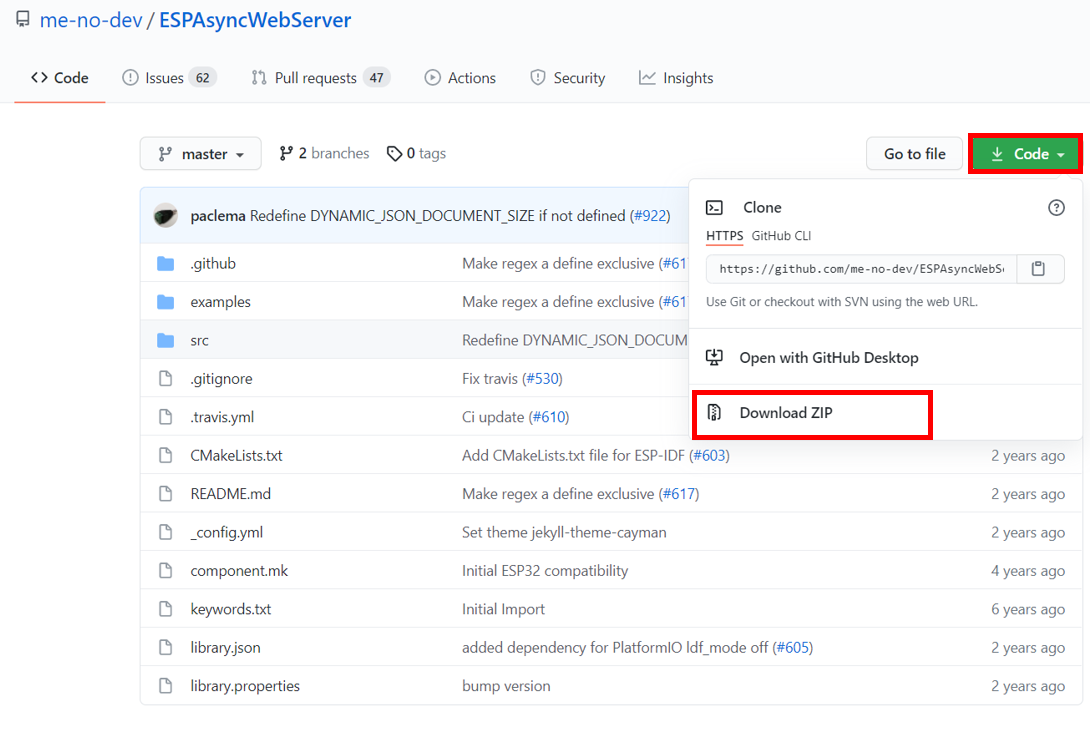
Click the Code button and go to the Download Zip option as highlighted in the figure. Your zip file will get downloaded to your computer right away. After the download is complete, extract the .zip file to the Arduino library folder. A similar process will apply to the installation of the AsyncTCP library as well. Make sure you rename the extracted files as ESPAsyncWebServer and AsyncTCP accordingly.
You can also go to Sketch > Include Library > Add .zip Library inside the IDE to add the libraries as well. Through this procedure now we will be able to use the functionalities of the libraries inside our Arduino IDE.
Creating HTML, CSS & Favicon Files and saving them in microSD card
In this section, we will create the HTML and CSS files along with the .png file that will act as a favicon. All of these three files will help in building the web server. Additionally, we will also save them in a microSD card.
index.html
Copy the code given below in your ‘index.html.’ This contains the text message that will be displayed on the web server.
<!DOCTYPE HTML><html>
<head>
  <meta name="viewport" content="width=device-width, initial-scale=1">
  <link rel="stylesheet" type="text/css" href="style.css">
  <link rel="icon"  type="image/png" href="favicon.png">
  <title>ESP32 Web Server</title>
</head>
<body>
  <h1>Welcome to microcontrollerslab!</h1>
  <p>This page was built with files from a microSD card.</p>
</body>
</html>
style.css
Now we will create another file and name it ‘style.css’
This will set the font type, size and other numerical proportions of the web server. Copy the code below in that file.
html {
    font-family: Times New Roman;
    text-align: center;
}
body {
    max-width: 900px;
    margin:0px auto;
}
Favicon
This is a graphic image which we could display on our web server. It has a pixel resolution of 16×16. It is optional but you can implement it for a better visual and representation of your web server. We will be using the following favicon as our icon. Save it in .png format.

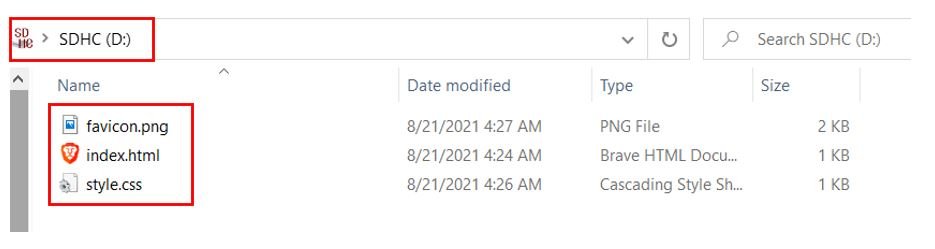
Transferring files to microSD card
After you have created all three files, transfer them to your microSD card by copying them in its directory.
MicroSD Card Web Server Arduino Code
Open your Arduino IDE and create a new file. Copy the code given below in that file.
#include <Arduino.h>
#include <WiFi.h>
#include <AsyncTCP.h>
#include <ESPAsyncWebServer.h>
#include "FS.h"
#include "SD.h"
#include "SPI.h"

const char* ssid = "*******";        //Write your own Wi-Fi name here
const char* password "********";    //Write your own password here


AsyncWebServer server(80);         //object created on default port 80

void initmicroSDCard(){
  if(!SD.begin()){
    Serial.println("Initialization Failed");
    return;
  }
  uint8_t cardType = SD.cardType();

  if(cardType == CARD_NONE){
    Serial.println("SD card is not present!");
    return;
  }

  Serial.print("SD Card Type: ");
  if(cardType == CARD_MMC){
    Serial.println("MMC");
  } else if(cardType == CARD_SD){
    Serial.println("SDSC");
  } else if(cardType == CARD_SDHC){
    Serial.println("SDHC");
  } else {
    Serial.println("UNKNOWN");
  }
  uint64_t cardSize = SD.cardSize() / (1024 * 1024);
  Serial.printf("SD Card Size: %lluMB\n", cardSize);
}

void initWiFi() {
  WiFi.mode(WIFI_STA);
  WiFi.begin(ssid, password);
  Serial.print("Connecting to WiFi network");
  while (WiFi.status() != WL_CONNECTED) {
    Serial.print('.');
    delay(2000);
  }
  Serial.println(WiFi.localIP());
}

void setup() {
  Serial.begin(115200);
  initWiFi();
  initmicroSDCard();

  server.on("/", HTTP_GET, [](AsyncWebServerRequest *request){
    request->send(SD, "/index.html", "text/html");
  });

  server.serveStatic("/", SD, "/");

  server.begin();
}

void loop() {

}
How the Code works?
As always with any code, we will define the libraries at the start. Apart from the general libraries which we always include, we will include three additional libraries. FS.h, SPI.h and SD.h. These will help us to communicate via the SPI protocol with the microSD card and in reading the files from the card. The WiFi.h library will connect the ESP32 with the wi-fi network available and the ESPAsyncWebServer.h will help us in construct the HTML web page which would be accessible to the clients.
#include "FS.h"
#include "SD.h"
#include "SPI.h"
#include <WiFi.h>
#include <ESPAsyncWebServer.h>
Now, we will specify our network credentials for the Wi-Fi network through which the ESP32 board will connect. We have specified our network name and entered the eight-digit password as well. These are being stores in global variables so they can be accessed throughout the program code. We have named them as: ‘ssid’ and ‘password.’ Make sure you replace these with your own credentials.
const char* ssid = "*******";        //Write your own Wi-Fi name here
const char* password "********";    //Write your own password here
Then, we will create an object of the class AsyncWebServer. This will help us in the setup of the server routes. We have assigned it a port 80 which is the HTTP default port. This is where the server will receive the requests from the clients.
AsyncWebServer server(80); In our web server program code, we will create three different functions to perform different tasks which are named: void initmicroSDcard(), void initWiFi() and void setup().
initmicroSDcard()
First we will define the void initmicroSDcard() function. This is the function which will initialize the microSD card by taking in information about its size and type. These, will then be displayed on the serial monitor. The SD.begin() function will be used in the initialization process by using an if statement to check whether it the initialization was successful or not. Then we will use cardType() to access the type of the microSD card from ‘SD’ and print the relevant type on the serial monitor. Likewise, we will use cardSize() to access the memory size and print it as well.
void initmicroSDCard(){
  if(!SD.begin()){
    Serial.println("Initialization Failed");
    return;
  }
  uint8_t cardType = SD.cardType();

  if(cardType == CARD_NONE){
    Serial.println("SD card is not present!");
    return;
  }

  Serial.print("SD Card Type: ");
  if(cardType == CARD_MMC){
    Serial.println("MMC");
  } else if(cardType == CARD_SD){
    Serial.println("SDSC");
  } else if(cardType == CARD_SDHC){
    Serial.println("SDHC");
  } else {
    Serial.println("UNKNOWN");
  }
  uint64_t cardSize = SD.cardSize() / (1024 * 1024);
  Serial.printf("SD Card Size: %lluMB\n", cardSize);
}
void initWiFi()
In this function we will connect to our Wi-Fi network. We will use WiFi.mode() to set the mode of the Wi-Fi for example if we want our ESP32 to act as an access point, as a station or as both. This mode, will be passed as a parameter inside the function. Thus, we will use WiFi.mode(WIFI_STA) which will denote that the ESP32 is in station mode and will connect to another access point which in our case will be the router.
By using WiFi.begin(), we will pass our network name and password as parameters. Make sure to replace them with your network credentials when we initialized them above. Then, we will connect to the local network and display the status on the screen. The IP address of your ESP32 module will also be printed on the serial monitor through Serial.println(WiFi.localIP()).
void initWiFi() {
  WiFi.mode(WIFI_STA);
  WiFi.begin(ssid, password);
  Serial.print("Connecting to WiFi network");
  while (WiFi.status() != WL_CONNECTED) {
    Serial.print('.');
    delay(2000);
  }
  Serial.println(WiFi.localIP());
}
void setup()
In the setup() function, we will initiate the serial communication at a baud rate of 115200 by using the Serial.begin() function and passing the baud rate as a parameter inside it. Next, we will call initWiFi() and initmicroSDcard() functions which we defined previously. These will connect with the local Wi-Fi and initialize the microSD card respectively.
Serial.begin(115200);
  initWiFi();
  initmicroSDCard();
Serving Files from the microSD card
All the steps which we have followed till now helped in the initialization of the card and successful connection of the setup. Now, we will move on to the major step where we will serve the files which we created from the microSD card itself. Firstly, we will create the HTTP web server. Inside the setup() function, we will write the following code:
server.on("/", HTTP_GET, [](AsyncWebServerRequest *request){
  request->send(SD, "/index.html", "text/html");
});
Here, we will create a route (/) which will return the files which we transferred to the ESP32 through the microSD card module. The send() function takes in three arguments: the first is the microSD card (SD) where the files are saved, the second is the path where the file is located which is /index.html and the third is the content type which we denoted as text/html so the web server is able to transcribe the returned content.
Now, as we have loaded the HTML file but we still have to include the CSS and the Favicon files as well which will be requested when the server would load. These files will be included whenever they would be requested by the root URL. As both of these files are present in the same directory as the HTML (SD) and are also static in nature thus the following line of code easily includes them as well.
server.serveStatic("/", SD, "/");Finally, to start receiving the HTTP requests, we will use the begin() method on the server object.
server.begin();void loop()
We will keep the loop() function empty as we have to demonstrate our project once and not run it multiple times. Hence, we will call all the major functions which we defined before in the setup() function which will run once.
void loop() {

}
ESP32 Hosting Web Server MicroSD Card Demonstration
Choose the correct board and COM port before uploading your code to the ESP32 board. Go to Tools > Board and select ESP32 Dev Module.

Next, go to Tools > Port and select the appropriate port through which your board is connected.

Now click on the upload button to upload code to ESP32. After that open the Arduino serial monitor and press the enable button on ESP32.

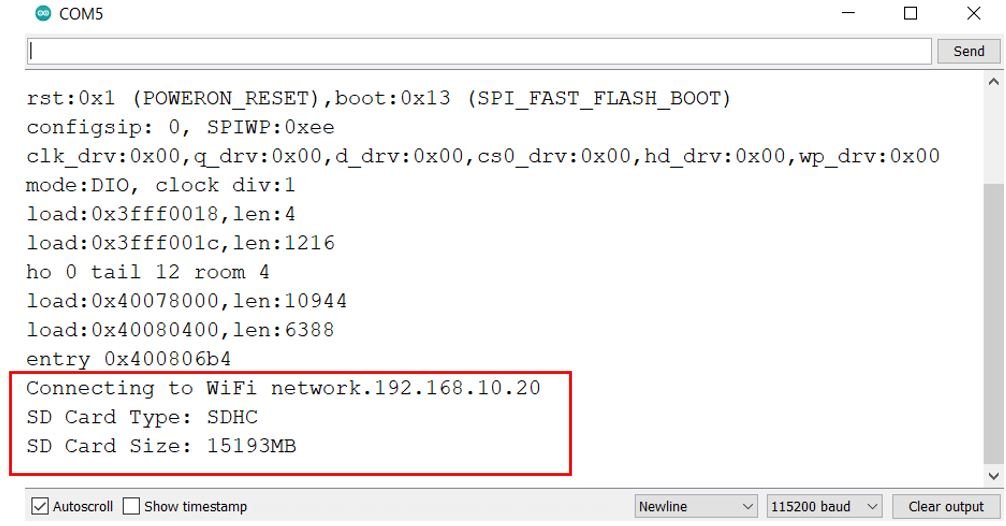
If it is a success, then on your serial monitor you will be able to see the details of the microSD card including its IP address, type, and size.
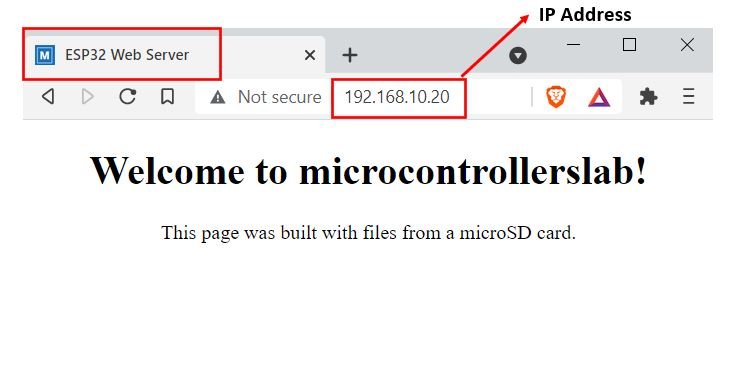
Then, open a browser and write down your ESP32 IP address in the Search tab. After you press enter, the window loads to a new page that was created from the files saved on the microSD card. You can view the favicon and the text being displayed with the styling that we implemented.
Conclusion
In this article, we showed you how to connect your ESP32 with a microSD card module and serve your HTML, CSS, and Favicon files from the card onto a web server using the development board in a fairly simple manner.
For more microSD card articles follow the links below:
referring to your above web server.
I have loaded and run your code and the serial monitor replicates yours.
On my router I can see the the esp is connected. however when i try to connect via my browser i get the address page can’t be found.
Any ideas why not, needless to say I have checked the coding.
can you share which error you are getting on the serial monitor?