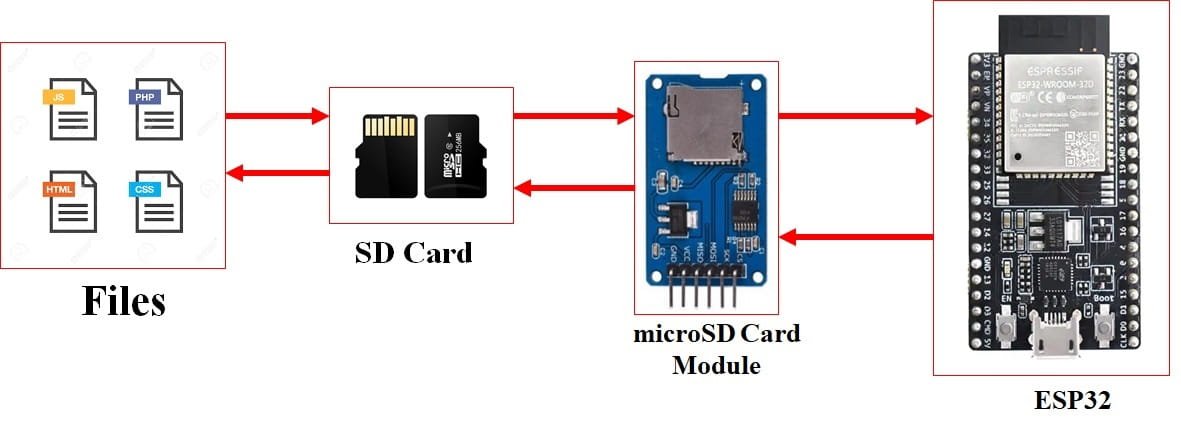
In this user guide, we will learn how to interface a microSD card with ESP32 using the microSD card module or connector and Arduino IDE. This module provides an SPI interface to connect an SD card module with any microcontroller which supports the SPI communication interface. Using a microSD card becomes very handy for applications where we need to store files that are larger than the size of SPIFF (flash file system) of ESP32.

Additionally, we will learn how to handle files in the microSD card including reading, writing, deleting files, and many others. Storage data including text, video, audio, CSV, HTML, JavaScript, and CSS files can all be conveniently stored in the microSD card. It is one of the most reliable and practical ways to store data in devices such as mobile phones, laptops, and personal computers. The ESP32 SD card library provides a convenient way of storing files in the microSD card which will be discussed in later sections of this tutorial.
We have similar guides with ESP8266 and Arduino:
- Micro SD Card Module with ESP8266 NodeMCU
- Micro SD Card Interfacing with Arduino using MicroSD Module
Recommended Components
The following components are used in this project or are helpful for building it with the ESP32.
| Component | How it’s used in this project | Buy on Amazon |
|---|---|---|
| ESP32 Development Board (DevKit V1) | Communicates with the microSD card module over SPI to read, write and manage files. | Check Price |
| Micro USB Cable | Connects the ESP32 to your computer for flashing the code and powering the board. | Check Price |
| Breadboard | Lets you wire the microSD card module to the ESP32 without soldering. | Check Price |
| Jumper Wires | Make the SPI connections between the ESP32 and the microSD card module. | Check Price |
| MicroSD card module (SPI) | Provides the SPI interface used to handle files on the microSD card with the ESP32. | Check Price |
| MicroSD card | The storage medium used to demonstrate reading, writing and deleting files. | Check Price |
As an Amazon Associate we earn from qualifying purchases. Prices and availability are accurate as of the date/time indicated and are subject to change.
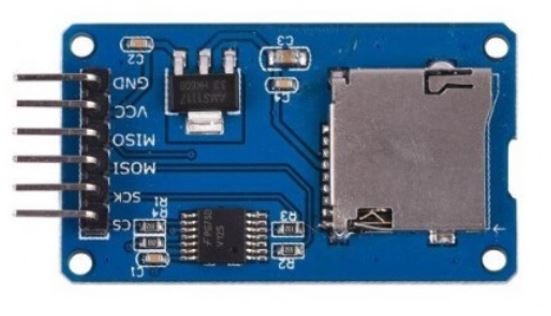
MicroSD Card Module Introduction
The microSD card Modules are designed to communicate with the MicroSD cards. These connectors provides a required hardware and pinout to connect SD cards with microcontrollers such as ESP32, Arduino, ESP8266, Raspberry Pi, etc. Although, they are compatible with the almost all SD cards which are commonly used in cell phones. But they can handle a maximum of 16GB capacity microSD cards and only 2GB capacity for standard SD cards.
With the help of these modules, we will be able to read and write data to and from SD cards through the SPI communication protocol. There are several different types of microSD card modules easily available in the market. But, the one which we will be using in this article is shown below:
Pinout
This microSD card module has 6 terminals consisting of SPI and power supply terminals. Below you can view the pinout of this module with some description of the individual pins.
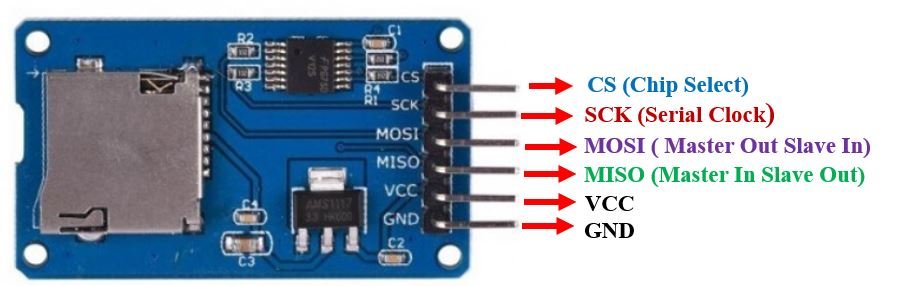
| Pin Name | Description |
|---|---|
| GND | This is the ground pin which should be connected with the ground pin of ESP32 |
| VCC | This pin supplies power to the module. The power supply of ~4.5V-5.5V. The adapter consists of a 3.3V voltage regulator circuit as well to cater to ESP32’s power supply range. |
| CS | This is the Chip Select pin for SPI communication. |
| MOSI | This is called the ‘Master Out Slave In.’ It is used as the SPI input to the module. |
| SCK | This is called the ‘Serial Clock’ pin which is used in SPI serial clock output. |
| MISO | This is called the ‘Master in Slave Out.’ It is used as the SPI output from the module. |
MicroSD card module Interfacing with ESP32
Required Hardware
Following components are required
- 1 x ESP32 development board
- MicroSD card
- 1 x MicroSD card module
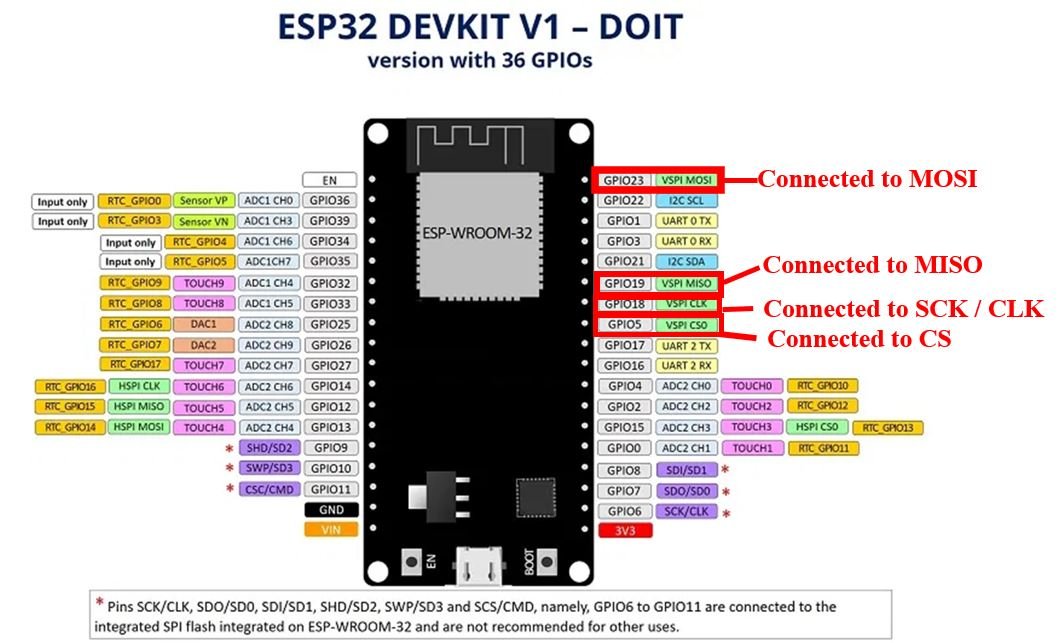
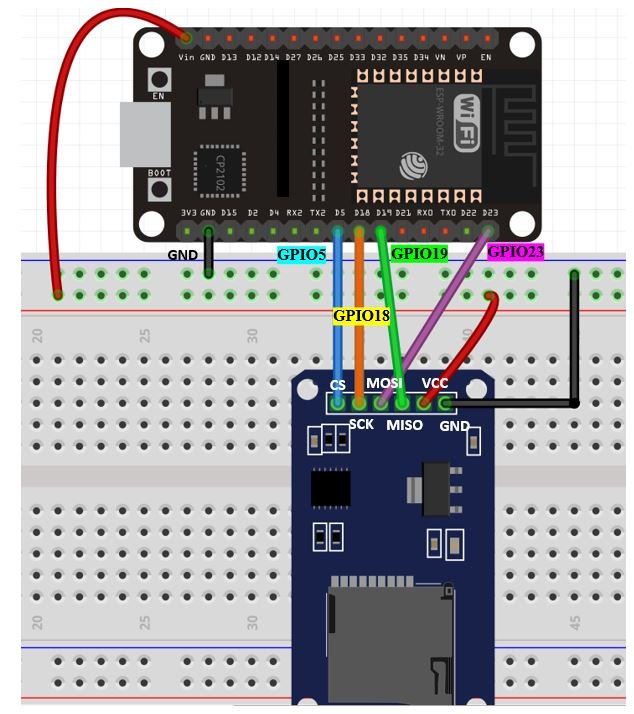
Now, we will show you how to connect the microSD card module and the ESP32 development board together. Below you can see the pinout of ESP32 DEVKIT V1 to get a better idea of the SPI default pins.
The table below shows the connections between the two modules:
| MicroSD card module | ESP32 module |
|---|---|
| GND | GND |
| VCC | Vin |
| CS | GPIO5 |
| MOSI | GPIO23 |
| SCK | GPIO18 |
| MISO | GPIO19 |
As shown from the table, we will connect the VCC terminal of MicroSD card module with Vin of ESP32. Both grounds will be common. The default SPI GPIO pins of ESP32 are being used to connect with each of the remaining SPI terminals of the microSD card module.
Now, as we know how to interface the microSD card module and the ESP32 module together let us learn how to prepare the microSD card to handle files in Arduino IDE.
Formatting the MicroSD card
As we have to use our microSD card in Arduino IDE so we would have to format it as FAT32. We will have to follow a series of steps to accomplish it successfully.
- First, insert your microSD card in your laptop/computer. Now go to ‘This PC’ and click on SD card icon. Then click on Format by right clicking the SD card icon.
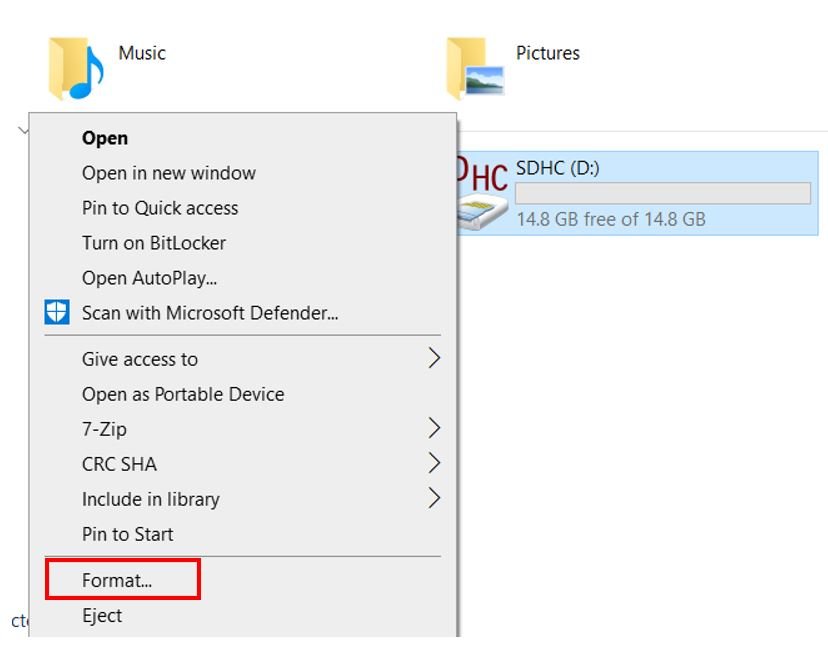
- The following window will appear. Select FAT32 from the dialog box of ‘File System’ and click on ‘START.’

- You will receive a warning message that formatting will erase all previous data saved on the microSD card. Click ‘OK.’

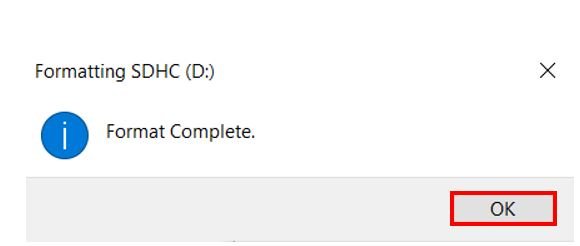
- After a few moments, your microSD card will be formatted successfully. Click ‘OK.’
Prerequisites
Before we proceed further, you should make sure that you have the latest version of Arduino IDE installed on your system. Moreover, you should also install an ESP32 add-on in Arduino IDE. If your IDE does not have the plugin installed you can visit the link below:
ESP32 Handling Files with microSD Card
In this section, we will show you how you how to handle files with a microSD card using ESP32 and Arduino IDE. We will use the SD library example to demonstrate all of the major file handling functions including reading, deleting, adding a file etc. The SD library for ESP32 uses the SPI controller.
Arduino Sketch
Open your Arduino IDE and go to File > Examples > SD(esp32) > SD_Test. The following program code will open.
/*
* Connect the SD card to the following pins:
*
* SD Card | ESP32
* D2 -
* D3 SS
* CMD MOSI
* VSS GND
* VDD 3.3V
* CLK SCK
* VSS GND
* D0 MISO
* D1 -
*/
#include "FS.h"
#include "SD.h"
#include "SPI.h"
void listDir(fs::FS &fs, const char * dirname, uint8_t levels){
Serial.printf("Listing directory: %s\n", dirname);
File root = fs.open(dirname);
if(!root){
Serial.println("Failed to open directory");
return;
}
if(!root.isDirectory()){
Serial.println("Not a directory");
return;
}
File file = root.openNextFile();
while(file){
if(file.isDirectory()){
Serial.print(" DIR : ");
Serial.println(file.name());
if(levels){
listDir(fs, file.name(), levels -1);
}
} else {
Serial.print(" FILE: ");
Serial.print(file.name());
Serial.print(" SIZE: ");
Serial.println(file.size());
}
file = root.openNextFile();
}
}
void createDir(fs::FS &fs, const char * path){
Serial.printf("Creating Dir: %s\n", path);
if(fs.mkdir(path)){
Serial.println("Dir created");
} else {
Serial.println("mkdir failed");
}
}
void removeDir(fs::FS &fs, const char * path){
Serial.printf("Removing Dir: %s\n", path);
if(fs.rmdir(path)){
Serial.println("Dir removed");
} else {
Serial.println("rmdir failed");
}
}
void readFile(fs::FS &fs, const char * path){
Serial.printf("Reading file: %s\n", path);
File file = fs.open(path);
if(!file){
Serial.println("Failed to open file for reading");
return;
}
Serial.print("Read from file: ");
while(file.available()){
Serial.write(file.read());
}
file.close();
}
void writeFile(fs::FS &fs, const char * path, const char * message){
Serial.printf("Writing file: %s\n", path);
File file = fs.open(path, FILE_WRITE);
if(!file){
Serial.println("Failed to open file for writing");
return;
}
if(file.print(message)){
Serial.println("File written");
} else {
Serial.println("Write failed");
}
file.close();
}
void appendFile(fs::FS &fs, const char * path, const char * message){
Serial.printf("Appending to file: %s\n", path);
File file = fs.open(path, FILE_APPEND);
if(!file){
Serial.println("Failed to open file for appending");
return;
}
if(file.print(message)){
Serial.println("Message appended");
} else {
Serial.println("Append failed");
}
file.close();
}
void renameFile(fs::FS &fs, const char * path1, const char * path2){
Serial.printf("Renaming file %s to %s\n", path1, path2);
if (fs.rename(path1, path2)) {
Serial.println("File renamed");
} else {
Serial.println("Rename failed");
}
}
void deleteFile(fs::FS &fs, const char * path){
Serial.printf("Deleting file: %s\n", path);
if(fs.remove(path)){
Serial.println("File deleted");
} else {
Serial.println("Delete failed");
}
}
void testFileIO(fs::FS &fs, const char * path){
File file = fs.open(path);
static uint8_t buf[512];
size_t len = 0;
uint32_t start = millis();
uint32_t end = start;
if(file){
len = file.size();
size_t flen = len;
start = millis();
while(len){
size_t toRead = len;
if(toRead > 512){
toRead = 512;
}
file.read(buf, toRead);
len -= toRead;
}
end = millis() - start;
Serial.printf("%u bytes read for %u ms\n", flen, end);
file.close();
} else {
Serial.println("Failed to open file for reading");
}
file = fs.open(path, FILE_WRITE);
if(!file){
Serial.println("Failed to open file for writing");
return;
}
size_t i;
start = millis();
for(i=0; i<2048; i++){
file.write(buf, 512);
}
end = millis() - start;
Serial.printf("%u bytes written for %u ms\n", 2048 * 512, end);
file.close();
}
void setup(){
Serial.begin(115200);
if(!SD.begin()){
Serial.println("Card Mount Failed");
return;
}
uint8_t cardType = SD.cardType();
if(cardType == CARD_NONE){
Serial.println("No SD card attached");
return;
}
Serial.print("SD Card Type: ");
if(cardType == CARD_MMC){
Serial.println("MMC");
} else if(cardType == CARD_SD){
Serial.println("SDSC");
} else if(cardType == CARD_SDHC){
Serial.println("SDHC");
} else {
Serial.println("UNKNOWN");
}
uint64_t cardSize = SD.cardSize() / (1024 * 1024);
Serial.printf("SD Card Size: %lluMB\n", cardSize);
listDir(SD, "/", 0);
createDir(SD, "/mydir");
listDir(SD, "/", 0);
removeDir(SD, "/mydir");
listDir(SD, "/", 2);
writeFile(SD, "/hello.txt", "Hello ");
appendFile(SD, "/hello.txt", "World!\n");
readFile(SD, "/hello.txt");
deleteFile(SD, "/foo.txt");
renameFile(SD, "/hello.txt", "/foo.txt");
readFile(SD, "/foo.txt");
testFileIO(SD, "/test.txt");
Serial.printf("Total space: %lluMB\n", SD.totalBytes() / (1024 * 1024));
Serial.printf("Used space: %lluMB\n", SD.usedBytes() / (1024 * 1024));
}
void loop(){
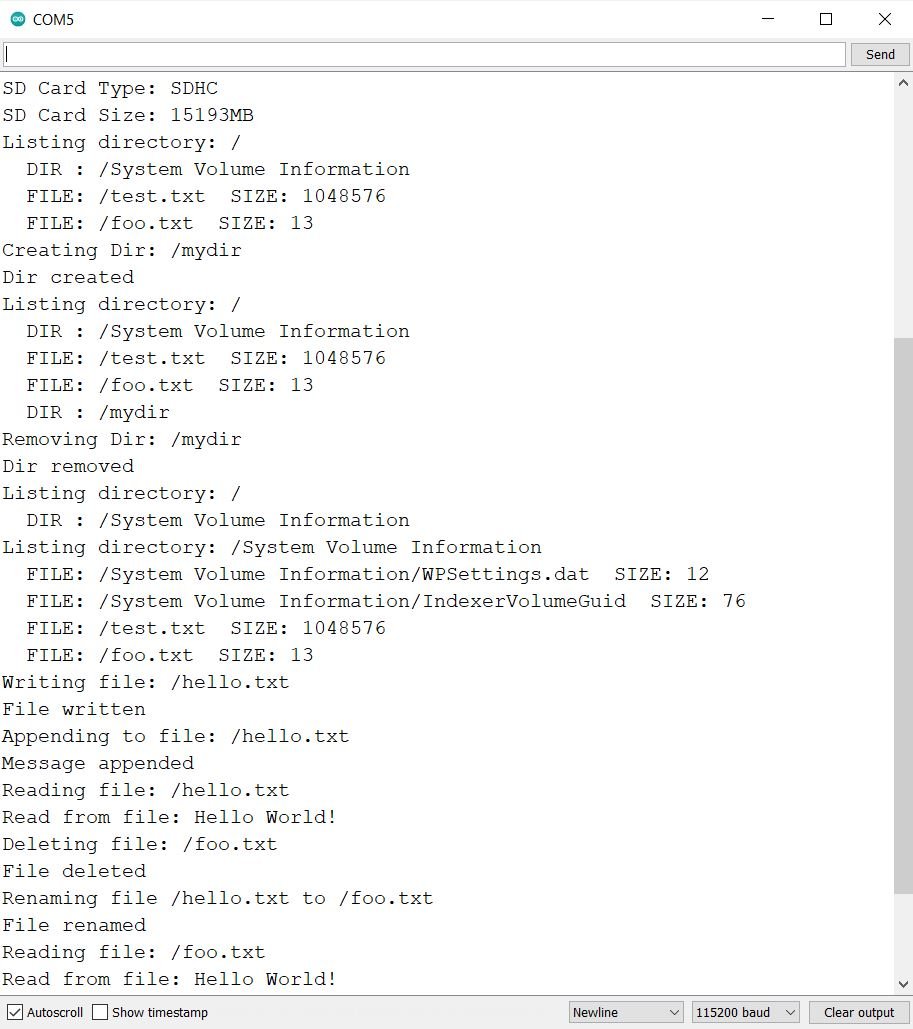
}Through this example sketch, we will be able to demonstrate different file handling with our microSD card. These include:
- Listing a directory
- Creating a directory
- Removing a directory
- Reading a file
- Writing in the file
- Adding content at the end of a file (Appending)
- Renaming a file
- Deleting a file
- Initializing the microSD card
- Obtaining the microSD card size and type
At the end, we will demonstrate all of these functionalities on the Arduino serial monitor.
How the Code Works?
We will include all the necessary libraries e.g., FS, SPI, and SD. The FS library will be used for handling files, the SD library will be used for the microSD card functionality and the SPI library will be used as we are using SPI communication protocol between the ESP32 board and the microSD card module.
#include "FS.h"
#include "SD.h"
#include "SPI.h"
Now we will specify the different functions to handles files which we mentioned previously.
Listing a directory ( void listDir())
The first function in this example sketch is void listDir(). It takes in three parameters. It includes the ‘SD’ that is the filesystem, the name of the main directory (“/” specifies the root directory) and the level of the directory. First, the file is opened using fs.open() and we specify the name of the directory as an argument inside it. This will open the directory. Then in order to list all the files in the directory we will use root.openNextFile().
void listDir(fs::FS &fs, const char * dirname, uint8_t levels){
    Serial.printf("Listing directory: %s\n", dirname);

    File root = fs.open(dirname);
    if(!root){
        Serial.println("Failed to open directory");
        return;
    }
    if(!root.isDirectory()){
        Serial.println("Not a directory");
        return;
    }

    File file = root.openNextFile();
    while(file){
        if(file.isDirectory()){
            Serial.print("  DIR : ");
            Serial.println(file.name());
            if(levels){
                listDir(fs, file.name(), levels -1);
            }
        } else {
            Serial.print("  FILE: ");
            Serial.print(file.name());
            Serial.print("  SIZE: ");
            Serial.println(file.size());
        }
        file = root.openNextFile();
    }
}
Therefore, to list a directory we will use this function in the following way where “/” specifies the root directory of the microSD card.
listDir(SD, "/", 0);Creating a directory ( void createDir())
The next function is used to create a directory. It is called createDir() and is a void function. This function takes in two parameters that are SD and the path of the new directory.
void createDir(fs::FS &fs, const char * path){
    Serial.printf("Creating Dir: %s\n", path);
    if(fs.mkdir(path)){
        Serial.println("Dir created");
    } else {
        Serial.println("mkdir failed");
    }
}
To create a new directory on ‘mydir’ we will use this function in the following way:
createDir(SD, "/mydir");Removing Directory (removeDir())
The removeDir() function removes the directory on the specified path. This function takes in the parameters of the SD filesystem and the directory path.
void removeDir(fs::FS &fs, const char * path){
    Serial.printf("Removing Dir: %s\n", path);
    if(fs.rmdir(path)){
        Serial.println("Dir removed");
    } else {
        Serial.println("rmdir failed");
    }
}
This function will be called in this way to remove the ‘mydir’ directory.
removeDir(SD, "/mydir");Reading a file (readFile())
The following function readFile(), reads the content of the file of the specified path. The contents of the file will be displayed in the serial monitor.
void readFile(fs::FS &fs, const char * path){
    Serial.printf("Reading file: %s\n", path);

    File file = fs.open(path);
    if(!file){
        Serial.println("Failed to open file for reading");
        return;
    }

    Serial.print("Read from file: ");
    while(file.available()){
        Serial.write(file.read());
    }
    file.close();
}
To display the content of ‘hello.txt’ file we will call the function in the following way:
readFile(SD, "/hello.txt")Writing in a file (writeFile())
The writeFile() function takes in three parameters. The first is the SD filesystem, the second is the file path and the third is the content which we want to write in the file.
void writeFile(fs::FS &fs, const char * path, const char * message){
    Serial.printf("Writing file: %s\n", path);

    File file = fs.open(path, FILE_WRITE);
    if(!file){
        Serial.println("Failed to open file for writing");
        return;
    }
    if(file.print(message)){
        Serial.println("File written");
    } else {
        Serial.println("Write failed");
    }
    file.close();
}
As an example, to write ‘Hello’ to the file ‘hello.txt’, we will use the writeFile() function in the following way.
writeFile(SD, "/hello.txt", "Hello ");Adding content at the end of a file /Appending (appendFile())
To add some content at the end of a file, we will use the appendFile() function. This takes in the SD filesystem, the file path and the content which has to be added.
void appendFile(fs::FS &fs, const char * path, const char * message){
    Serial.printf("Appending to file: %s\n", path);

    File file = fs.open(path, FILE_APPEND);
    if(!file){
        Serial.println("Failed to open file for appending");
        return;
    }
    if(file.print(message)){
        Serial.println("Message appended");
    } else {
        Serial.println("Append failed");
    }
    file.close();
}
As an example, to add ‘World!’ at the end the file ‘hello.txt’, we will use the appendFile() function in the following way.
appendFile(SD, "/hello.txt", "World!\n");Renaming a file (renameFile())
The renameFile() function is used to rename a file. It takes in three parameters. The first parameter is the SD filesystem, the second parameter is the name of the file and the third parameter is the new name of the file.
void renameFile(fs::FS &fs, const char * path1, const char * path2){
    Serial.printf("Renaming file %s to %s\n", path1, path2);
    if (fs.rename(path1, path2)) {
        Serial.println("File renamed");
    } else {
        Serial.println("Rename failed");
    }
}
For example, if you want to change the name of ‘hello.txt’ file to ‘foo.txt’ then we will use the renameFile() in the following way:
renameFile(SD, "/hello.txt", "/foo.txt");Deleting a file (deleteFile())
The deleteFile() function deletes the specified file which is passed as the second argument inside this function. We will use fs.remove() with the file path to be deleted as a parameter inside it.
void deleteFile(fs::FS &fs, const char * path){
    Serial.printf("Deleting file: %s\n", path);
    if(fs.remove(path)){
        Serial.println("File deleted");
    } else {
        Serial.println("Delete failed");
    }
}
For example, to delete ‘foo.txt’ from the microSD card, we will use the deleteFile() function in the following way:
deleteFile(SD, "/foo.txt");Testing a file (testFileIO())
The following testFileIO() function, prints in the serial monitor the number of milliseconds it took to read/write on a file. It takes in two parameters. The first parameter is the SD filesystem and the second parameter is the file path.
void testFileIO(fs::FS &fs, const char * path){
    File file = fs.open(path);
    static uint8_t buf[512];
    size_t len = 0;
    uint32_t start = millis();
    uint32_t end = start;
    if(file){
        len = file.size();
        size_t flen = len;
        start = millis();
        while(len){
            size_t toRead = len;
            if(toRead > 512){
                toRead = 512;
            }
            file.read(buf, toRead);
            len -= toRead;
        }
        end = millis() - start;
        Serial.printf("%u bytes read for %u ms\n", flen, end);
        file.close();
    } else {
        Serial.println("Failed to open file for reading");
    }


    file = fs.open(path, FILE_WRITE);
    if(!file){
        Serial.println("Failed to open file for writing");
        return;
    }

    size_t i;
    start = millis();
    for(i=0; i<2048; i++){
        file.write(buf, 512);
    }
    end = millis() - start;
    Serial.printf("%u bytes written for %u ms\n", 2048 * 512, end);
    file.close();
}
setup()
In the setup() function, we will first initiate the serial communication with the serial monitor with a baud rate of 115200 by using the begin() function.
Serial.begin(115200);Initializing microSD card
Using the begin() function on the SD filesystem, we will initialize the microSD card.
The begin() function takes in no argument. Thus, it will start the SPI communication using the default SPI CS pin that is GPIO5. To change the SPI CS pin you can pass the pin number as an argument inside the begin() function.
We will show you how to use custom SPI pins in the next modified example sketch.
 if(!SD.begin()){
        Serial.println("Card Mount Failed");
        return;
    }
Displaying microSD card type and size
The following lines of code display the microSD card type (MMC, SDSC or SDHC) in the serial monitor.
uint8_t cardType = SD.cardType();

    if(cardType == CARD_NONE){
        Serial.println("No SD card attached");
        return;
    }

    Serial.print("SD Card Type: ");
    if(cardType == CARD_MMC){
        Serial.println("MMC");
    } else if(cardType == CARD_SD){
        Serial.println("SDSC");
    } else if(cardType == CARD_SDHC){
        Serial.println("SDHC");
    } else {
        Serial.println("UNKNOWN");
    }
Additionally, the microSD card size is also displayed by using SD.cardSize().
uint64_t cardSize = SD.cardSize() / (1024 * 1024);
Serial.printf("SD Card Size: %lluMB\n", cardSize);
Now, comes the testing part where we will call all the functions which were defined previously. We have already shown you how each function will be called with its respective parameters.
listDir(SD, "/", 0);
    createDir(SD, "/mydir");
    listDir(SD, "/", 0);
    removeDir(SD, "/mydir");
    listDir(SD, "/", 2);
    writeFile(SD, "/hello.txt", "Hello ");
    appendFile(SD, "/hello.txt", "World!\n");
    readFile(SD, "/hello.txt");
    deleteFile(SD, "/foo.txt");
    renameFile(SD, "/hello.txt", "/foo.txt");
    readFile(SD, "/foo.txt");
    testFileIO(SD, "/test.txt");
    Serial.printf("Total space: %lluMB\n", SD.totalBytes() / (1024 * 1024));
    Serial.printf("Used space: %lluMB\n", SD.usedBytes() / (1024 * 1024));
Demonstration
Choose the correct board and COM port before uploading your code to the ESP32 board. Go to Tools > Board and select ESP32 Dev Module.

Next, go to Tools > Port and select the appropriate port through which your board is connected.

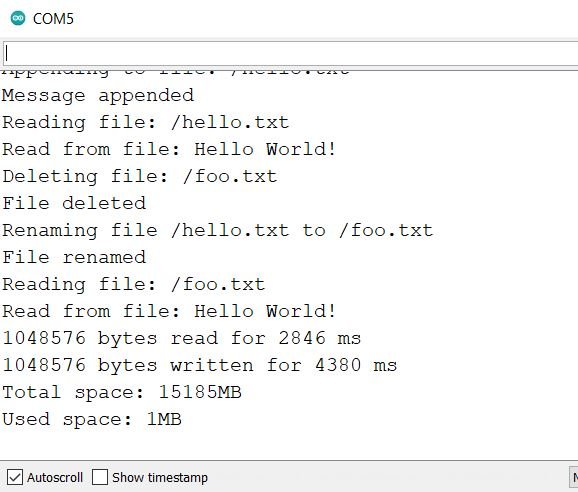
Now click on the upload button to upload code to ESP32. After that open the Arduino serial monitor and press the enable button on ESP32:

Open your serial monitor. You will be able to view the different messages.
Using Custom SPI Pins ESP32 with microSD card
By default ESP32 has two SPI communication channels VSPI and HSPI and following table provides the defaults SPI pins for both channels. But if we can also map these pins to other GPIO pins also in Arduino or esp-idf.
| SPI Channel | MOSI | MISO | SCK/CLK | CS/SS |
|---|---|---|---|---|
| VSPI | GPIO23 | GPIO19 | GPIO18 | GPIO5 |
| HSPI | GPIO13 | GPIO12 | GPIO14 | GPIO15 |
While using the SD library with microSD card, the default VSPI/HSPI SPI pins are used unless you specify them in the program sketch. In the following Arduino sketch, we have modified the previous program code and incorporated custom SPI pins with our microSD card.
Arduino Sketch
#include "FS.h"
#include "SD.h"
#include "SPI.h"

#define SCK  17
#define MISO  19
#define MOSI  23
#define CS  5

void listDir(fs::FS &fs, const char * dirname, uint8_t levels){
  Serial.printf("Listing directory: %s\n", dirname);

  File root = fs.open(dirname);
  if(!root){
    Serial.println("Failed to open directory");
    return;
  }
  if(!root.isDirectory()){
    Serial.println("Not a directory");
    return;
  }

  File file = root.openNextFile();
  while(file){
    if(file.isDirectory()){
      Serial.print("  DIR : ");
      Serial.println(file.name());
      if(levels){
        listDir(fs, file.name(), levels -1);
      }
    } else {
      Serial.print("  FILE: ");
      Serial.print(file.name());
      Serial.print("  SIZE: ");
      Serial.println(file.size());
    }
    file = root.openNextFile();
  }
}

void createDir(fs::FS &fs, const char * path){
  Serial.printf("Creating Dir: %s\n", path);
  if(fs.mkdir(path)){
    Serial.println("Dir created");
  } else {
    Serial.println("mkdir failed");
  }
}

void removeDir(fs::FS &fs, const char * path){
  Serial.printf("Removing Dir: %s\n", path);
  if(fs.rmdir(path)){
    Serial.println("Dir removed");
  } else {
    Serial.println("rmdir failed");
  }
}

void readFile(fs::FS &fs, const char * path){
  Serial.printf("Reading file: %s\n", path);

  File file = fs.open(path);
  if(!file){
    Serial.println("Failed to open file for reading");
    return;
  }

  Serial.print("Read from file: ");
  while(file.available()){
    Serial.write(file.read());
  }
  file.close();
}

void writeFile(fs::FS &fs, const char * path, const char * message){
  Serial.printf("Writing file: %s\n", path);

  File file = fs.open(path, FILE_WRITE);
  if(!file){
    Serial.println("Failed to open file for writing");
    return;
  }
  if(file.print(message)){
    Serial.println("File written");
  } else {
    Serial.println("Write failed");
  }
  file.close();
}

void appendFile(fs::FS &fs, const char * path, const char * message){
  Serial.printf("Appending to file: %s\n", path);

  File file = fs.open(path, FILE_APPEND);
  if(!file){
    Serial.println("Failed to open file for appending");
    return;
  }
  if(file.print(message)){
    Serial.println("Message appended");
  } else {
    Serial.println("Append failed");
  }
  file.close();
}

void renameFile(fs::FS &fs, const char * path1, const char * path2){
  Serial.printf("Renaming file %s to %s\n", path1, path2);
  if (fs.rename(path1, path2)) {
    Serial.println("File renamed");
  } else {
    Serial.println("Rename failed");
  }
}

void deleteFile(fs::FS &fs, const char * path){
  Serial.printf("Deleting file: %s\n", path);
  if(fs.remove(path)){
    Serial.println("File deleted");
  } else {
    Serial.println("Delete failed");
  }
}

void testFileIO(fs::FS &fs, const char * path){
  File file = fs.open(path);
  static uint8_t buf[512];
  size_t len = 0;
  uint32_t start = millis();
  uint32_t end = start;
  if(file){
    len = file.size();
    size_t flen = len;
    start = millis();
    while(len){
      size_t toRead = len;
      if(toRead > 512){
        toRead = 512;
      }
      file.read(buf, toRead);
      len -= toRead;
    }
    end = millis() - start;
    Serial.printf("%u bytes read for %u ms\n", flen, end);
    file.close();
  } else {
    Serial.println("Failed to open file for reading");
  }


  file = fs.open(path, FILE_WRITE);
  if(!file){
    Serial.println("Failed to open file for writing");
    return;
  }

  size_t i;
  start = millis();
  for(i=0; i<2048; i++){
    file.write(buf, 512);
  }
  end = millis() - start;
  Serial.printf("%u bytes written for %u ms\n", 2048 * 512, end);
  file.close();
}

void setup(){
  Serial.begin(115200);
  SPIClass spi = SPIClass(VSPI);
  spi.begin(SCK, MISO, MOSI, CS);

  if (!SD.begin(CS,spi,80000000)) {
    Serial.println("Card Mount Failed");
    return;
  }
  uint8_t cardType = SD.cardType();

  if(cardType == CARD_NONE){
    Serial.println("No SD card attached");
    return;
  }

  Serial.print("SD Card Type: ");
  if(cardType == CARD_MMC){
    Serial.println("MMC");
  } else if(cardType == CARD_SD){
    Serial.println("SDSC");
  } else if(cardType == CARD_SDHC){
    Serial.println("SDHC");
  } else {
    Serial.println("UNKNOWN");
  }

  uint64_t cardSize = SD.cardSize() / (1024 * 1024);
  Serial.printf("SD Card Size: %lluMB\n", cardSize);

  listDir(SD, "/", 0);
  createDir(SD, "/mydir");
  listDir(SD, "/", 0);
  removeDir(SD, "/mydir");
  listDir(SD, "/", 2);
  writeFile(SD, "/hello.txt", "Hello ");
  appendFile(SD, "/hello.txt", "World!\n");
  readFile(SD, "/hello.txt");
  deleteFile(SD, "/foo.txt");
  renameFile(SD, "/hello.txt", "/foo.txt");
  readFile(SD, "/foo.txt");
  testFileIO(SD, "/test.txt");
  Serial.printf("Total space: %lluMB\n", SD.totalBytes() / (1024 * 1024));
  Serial.printf("Used space: %lluMB\n", SD.usedBytes() / (1024 * 1024));
}

void loop(){

}
How the Code Works?
Most of the code is the same as the example sketch that we looked at previously but we have modified some parts which we will explain.
Firstly, we will define the custom SPI pins which we want to use to initiate the SPI communication between the microSD card module and the ESP32 board.
#define SCK  17
#define MISO  19
#define MOSI  23
#define CS  5
Secondly, in the void setup() function we will first define a SPI class as shown below. We are using the VSPI SPI pins so we will pass it as an argument. If using HSPI SPI pins instead, change accordingly.
SPIClass spi = SPIClass(VSPI);The next step will be to initialize SPI protocol by using begin() function on the SPI class ‘spi.’ We will pass as arguments the custom SPI pins which we initially defined.
spi.begin(SCK, MISO, MOSI, CS);Lastly, we will initialize the microSD card by using SD.begin() on the Chip select pin, the SPI class named ‘spi’ and the bus frequency.
if (!SD.begin(CS,spi,80000000)) {
  Serial.println("Card Mount Failed");
  return;
}
Conclusion
In conclusion, we learned how to use microSD card with ESP32 using Arduino IDE. Using the example sketch we also demonstrated various functions to handle the files in the microSD card. Additionally, we also took a glance at using ESP32 custom SPI pins and modified the example sketch accordingly. In the next tutorial, we will show you how to create an ESP32 web server with files that will be saved in the microSD card.
FS.h does not exist in Arduino IDE.
I also coudn’t find this lib (if it is a lib) to download.
Any tip?
Thanks!
same problem. how to download sd library. if you know tell me. please
Great article.
I was having problems using an SD module I purchased.
I couldn’t get this article to work until I used some code on an UNO.
Once I got the UNO to work, I was able to get this code to work on an ESP32.
Keep up the good work.
I’ll try many times to connect SD -ESP32 devkit V1 but not work. Around many forums but stand still with error ” Card mount failed”. I intend to come back with UNO but not comfortable to look many advantages of ESP32.
Thank You! I was struggling with a 3.5″ TFTLCD with ILI9488 driver, getting it to read the SD card. The program froze whenever I attached the SD card reader. Turned to blank screen. Apparently I was using the Flash SPI! Thanks for helping me find the problem and an option that actually worked! Have grand kids pics cycling through now 🙂
I have tried many times to connect SD -ESP32 devkit V1 but always failed. I tried to solve it by asking on several forums but I didn’t get an answer. This article is really extraordinary. this article has awakened my love for staying true with ESP32. Thank a lot for the information that helped me to add content at the end of the file.
One more question. If I want to assemble an ESP32 with 5 humidity sensors and I want the sensor data to be stored in the SD card. How to make a listing file?
May the V-IN Pin on the ESP32-device module be used to supply other 5V modules?
I thought that the +5V coming from the pc (or laptop) when the ESP32 module is fed via USB connector is not directly going to V-IN?
If supplying is possible how much current may maximally flow throug this pin?
Anyhow I needed +5V for my SD-card and it works on this way (+3.3 V gives an “Card Mout Failed”). That’s too little
The last sentence of my previous message “That’s too little” had a relations to the +3.3 Volt. Apologize for that.