In this series of MicroPython tutorials, we will learn how to setup ESP32/ESP8266 development board as a soft access point or SoftAP mode. Previously, we used it as a station mode to connect ESP32/ESP8266 to a Wi-Fi router. The soft access point mode allows devices to connect with ESP boards without a wireless router.

Prerequisites
Before we start this lesson make sure you are familiar with and have the latest version of MicroPython firmware installed in your ESP boards and have a running Integrated Development Environment (IDE) in which we will be doing the programming. We will be using the same uPyCraft IDE as we have done previously when we learned how to blink and chase LEDs in MicroPython.
- Getting Started with MicroPython on ESP32 and ESP8266
- ESP32 and ESP8266 GPIO Programming with MicroPython – LED Blinking Example
If you are using Thonny IDE, you can check this getting started guide:
Soft Access Point Introduction
The Soft AP is known as a “software-enabled access point” A soft access point which is also known as a ‘virtual router,’ combines software that sets up an ESP32 and ESP8266 into a wireless access point. There is no connection with a wired network involved hence called SoftAP.
Station Mode vs Soft AP Mode
To create a web server with ESP32 and ESP8266, we can use either soft access point or station mode as follows:
ESP32/ESP8266 in Station Mode
In this mode, ESP32 board connects to your Wi-Fi network through a router. Therefore, the medium of communication between the web client (web browser) and ESP32/ESP8266 (web server) is the router. ESP32 boards get the IP address from the Wi-Fi router. With this IP address, web clients can access the Web server through an existing local network.
In our previous web server projects with ESP boards, we used a router to connect ESP32/ESP8266 boards to get access to the local network. In that case, the ESP32/ESP8266 module acted as a station client and the router was set up as an access point as shown in the figure below:

ESP32/ESP8266 in Soft Access Point Mode
In this mode, ESP32/ESP8266 creates its own wireless Wi-Fi network similar to your existing Wi-Fi router. In this mode, we do not need to connect ESP32/ESP8266 to the Wi-Fi network. Any user who wants to access the web server should first connect to this wireless Wi-Fi network for ESP32 and ESP8266. Up to 5 devices can connect to this Wi-Fi network created by ESP boards.
This time we will learn to use ESP32/ESP8266 as an Access Point. There is a significant advantage of using ESP32/ESP8266 in SoftAP mode because a network router is not required. By setting the ESP board as an Access point, we are basically setting it up as a hot spot. Thus, we can connect all the devices which are supported by Wi-Fi and the router is not even involved. All the Wi-Fi supported devices which are nearby including cell phone, laptop or your personal computer (PC) will be able to connect with your ESP board.

As shown, the ESP board acts as a hot spot and all the nearby devices with wi-fi can connect to it by using its name and password. The ESP32 and ESP8266 will create their own wi-fi network and there will be no need for an external internet connection.
MicroPython API to Set ESP32 and ESP8266 as an Access Point
MicroPython provides network interface module. This network module provides two types of Wi-Fi interfaces. One for the station, when the ESP32/ESP8266 connects to a router. Similarly, one for the access point that is for other devices to connect to the ESP8266/ESP32. Because we want to connect ESP32 and ESP8266 in SoftAP mode. Therefore, we will use the access point mode interface. We create an instance of this object using the station interface network.WLAN(network.AP_IF).
ap = network.WLAN(network.AP_IF)The network.WLAN() is used to create a.WLAN network interface object.
Supported interfaces are:
- network.STA_IF (station mode)
- network.AP_IF (Soft access point mode)
After that, activate the access point by passing the “True” argument to the ap.active() method. Here ‘ap’ is an instance of the object which we created in the last step. We will use the same instance to access all methods of network class.
ap .active(True)We define two variables that hold the name and password of the ESP32/ESP8266 access point network. The following variables hold SoftAP credentials:
ssid= 'Enter_Acess_Point_Name_Here'
password = 'Enter_Acess_Point_Passoword_Here'
The config() function is used to configure with a given ssid and password.
ap.config(essid=ssid,password=password)
In short, the following MicroPython script set up softAP mode for ESP32 and ESP8266:
ap = network.WLAN(network.AP_IF)
ap.active(True)
ap.config(essid=ssid, password=password)
MicroPython Script: ESP32/ESP8266 Access point Web Server Example
In this section, we will create an example to use ESP32 or ESP8266 in Soft Access Point mode by creating an “Microcontrollerlab” web server.
We will configure ESP32/ESP8266 in the soft access point mode by going through a simple demonstration of a web server.
MicroPython Script
In your uPyCraft IDE, open a New File and write down the following code in your boot.py file. This SoftAP web server prints “Welcome to microcontrollerslab!” on a web page.
try:
 import usocket as socket        #importing socket
except:
 import socket
import network            #importing network
import esp                 #importing ESP
esp.osdebug(None)
import gc
gc.collect()
ssid = 'ESP_AP'                  #Set access point name
password = '12345678'      #Set your access point password


ap = network.WLAN(network.AP_IF)
ap.active(True)            #activating
ap.config(essid=ssid, password=password)

while ap.active() == False:
  pass
print('Connection is successful')
print(ap.ifconfig())
def web_page():
  html = """<html><head><meta name="viewport" content="width=device-width, initial-scale=1"></head>
  <body><h1>Welcome to microcontrollerslab!</h1></body></html>"""
  return html
s = socket.socket(socket.AF_INET, socket.SOCK_STREAM)   #creating socket object
s.bind(('', 80))
s.listen(5)
while True:
  conn, addr = s.accept()
  print('Got a connection from %s' % str(addr))
  request = conn.recv(1024)
  print('Content = %s' % str(request))
  response = web_page()
  conn.send(response)
  conn.close()
How Code Works
Setting up the Wi-fi & password
First, set up the name and password of an access point in MicroPython code to let other devices connect to ESP32 and ESP8266. You can change the ssid and password according to your choice. We have set it as ESP_AP and the password to an 8-digit number.
ssid = 'ESP_AP'                  #Set access point name
password = '12345678'      #Set your access point password
Creating an Access point
Now, we will be creating an access point using a MicroPython script. Because we are setting up an ESP board as an access point to which other devices will be able to connect. Therefore, we will select the access point (ap) network interface. We will create an instance of this object using the ap interface which we will call network.AP_IF. The network.WLAN() creates a network interface object in our case network.AP_IF.
ap = network.WLAN(network.AP_IF)
Now, activate softAP mode bypassing the True as a parameter in the ap.active() method.
ap.active(True) #activating
The config() function is used to configure with a given SSID and password.
ap.config(essid=ssid, password=password)The following lines check whether the AP is activated or not. If not then it will not move to the next step. Otherwise, it will display the IP address of the softAP.
while ap.active() == False:
  pass
print('Connection is successful')
print(ap.ifconfig())
Creating a Web page
We will be defining a web page which would display ‘Welcome to microcontrollerslab!’
def web_page():
  html = """<html><head><meta name="viewport" content="width=device-width, initial-scale=1"></head>
  <body><h1>Welcome to microcontrollerslab!</h1></body></html>"""
  return html
Socket Server
To provide a response to web client requests, create a socket server on ESP32 or ESP8266 using Micrpython socket API. We will use a socket.socket() function to initialize our socket server. This function takes in two arguments. The first is the socket_family and the second argument is the socket_type. We will then create a socket object called ‘s’ and pass the first parameter in the function AF_INET transport mechanism and the second parameter as SOCK_STREAM which is the type of the socket.
s = socket.socket(socket.AF_INET, socket.SOCK_STREAM)Next, we will bind the socket to an IP address and a port number. This is achieved by using the bind() method. In our case, we will pass an empty string followed by ‘80’ to the bind() function. The empty string portrays the default IP address of our ESP32/ESP8266 board and ‘80’ specifies the port number set for the Esp web servers.
s.bind(('', 80))Then, we will be creating a listening socket to receive requests from the web clients.
s.listen(5)The accept() method accepts the connection whenever a web client makes a request.
conn,addr=s.accept()We will be providing the reference of the web_page() function to a variable which we will call ‘response.’ After that, send the content of the web page to a socket client. This will be achieved through send() method whose parameter we will specify as ‘response.’ In the end, in order to stop the connection, we will use the close() method. Keep in mind all of this is occurring inside an infinite while loop.
response = web_page()
conn.send(response)
conn.close()
For in-depth guide on how to create socket server using MicroPython and ESP32/ESP8266, you can read our previously published post:
Soft Access Point Web Server Demo
To test SoftAP MicroPython web server code, copy the above code to boot.py file and upload boot.py file to ESP board.

After uploading MicroPython scripts, click on Enable/Reset button of ESP32:

Sometime later, your ESP board will print the IP address of access point in MicroPython shell as follows:
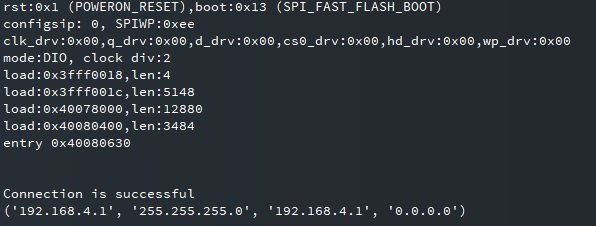
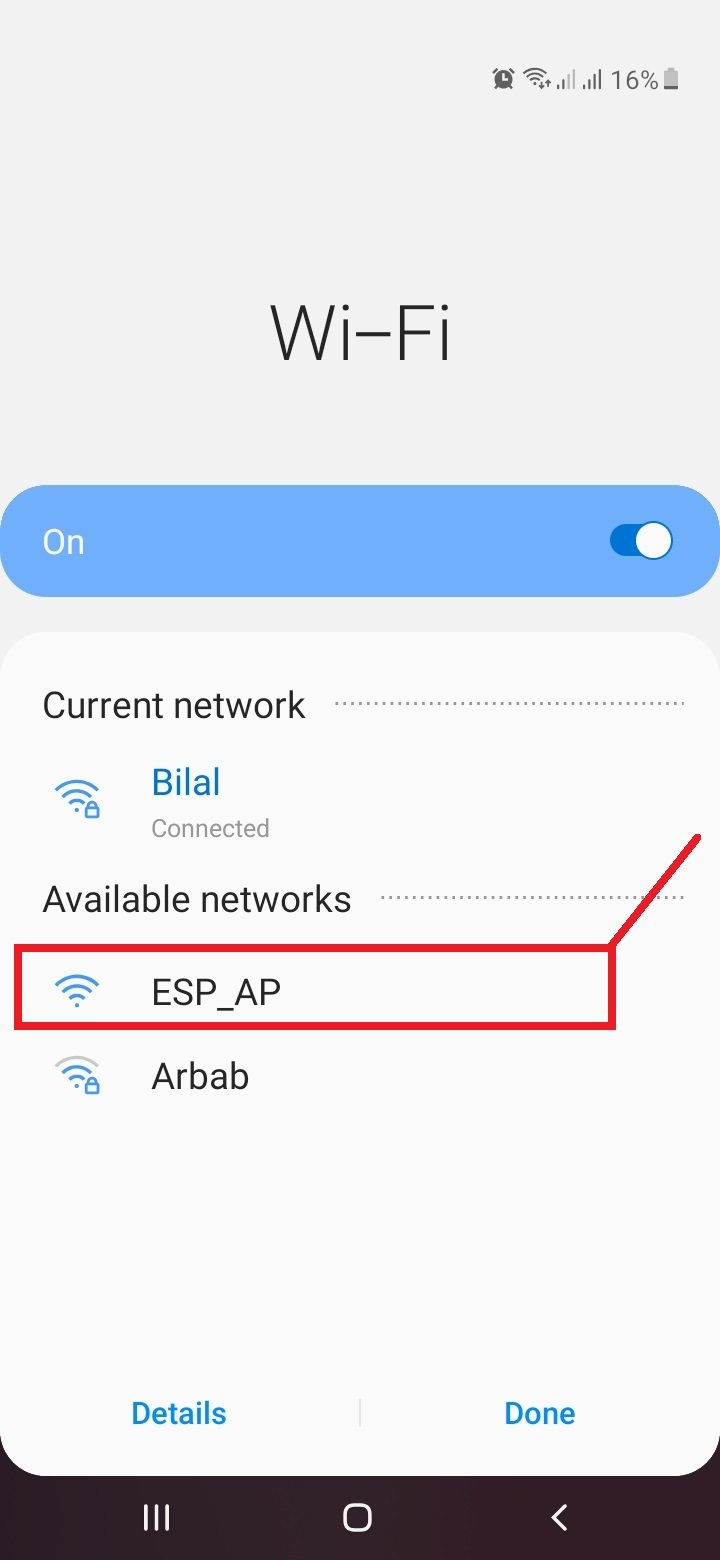
Note down this IP address. Because we will use it to access web page through a browser. After that open a WiFi settings page in your mobile phone or laptop and you will see ESP=AP network in the list. Connect to this using the ssid and password defined in the MicroPython script.
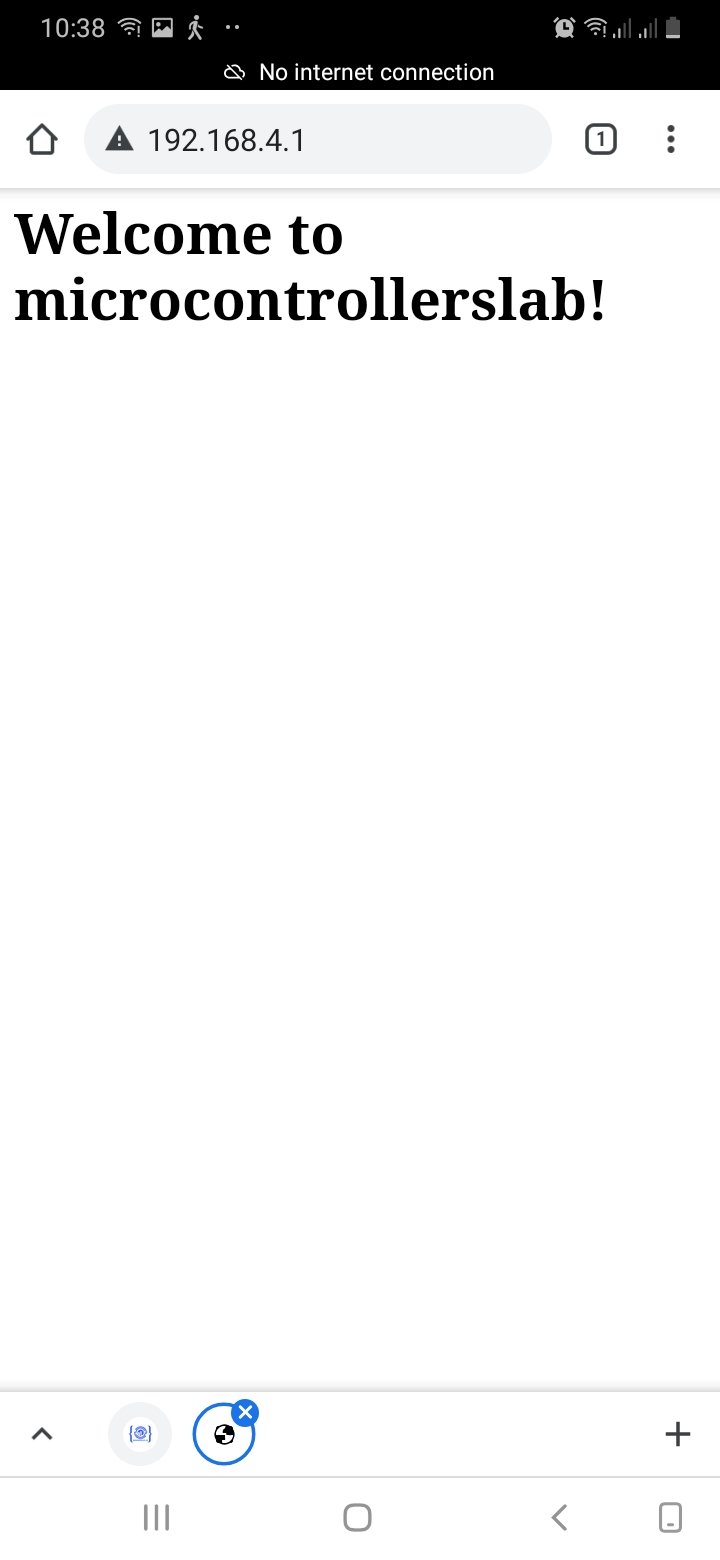
Now go to any web browser and enter the IP address http://192.168.4.1 which we noted in last section. You will get the response from ESP32/ESP8266 as follows:
In summary, we have learned to setup Access Point on ESP32 and ESP8266 using MicroPython. We have a similar tutorial with Arduino IDE:
You may also like to read:
Don’t do this
The password does not work, since no authentication is was set.
The response is missing the headers
which password?
wifi should be in open, no need to enter any password
Thanks for the tutorial.
We have a situation where obtaining the IP address is not possible.
The dhcp_host_name feature would seem to be helpful here, but we cannot get it to work.
Have you ever gotten the dhcp_host_name feature to work? How?
How would you troubleshoot this on a Windows PC?
Thanks!
Hi Bill, unfortunately we have not explored dhcp_host_name yet.
I use this command to set dhcp_hostname
station.config(dhcp_hostname= b’myhostname’)
it shows up in the routers list of devices with that name and you can see its ip address there
I tried pinging that hostname though and that does not work