In this tutorial, we will learn to get Getting Epoch/Unix time with ESP8266 NodeMCU through the NTP server using Arduino IDE. In the data logger application, Epoch timestamp is useful to log values along with timestamps. Epoch time is also known as Unix epoch, Unix time, POSIX time, or Unix timestamp.
To get Epoch time, we use getEpochTime() function available in Arduino. It will return the structure which contains the time elapsed since January 1, 1970.
We have similar guide with ESP32:
What is Epoch Time?
The Epoch time or the UNIX time is the number of seconds that have passed since the Unix epoch which is 00:00:00 UTC on 1 January 1970, minus leap seconds. It tracks the time in seconds and is calculated from the same point of time regardless of time zones. It is commonly used in different file formats and operating systems.
In this tutorial, we will look at an interesting feature of the ESP8266 NodeMCU development board through which we can acquire the epoch or Unix time from an NTP server. It provides a timestamp with a precision of approximately a few milliseconds of the Coordinated Universal time (UTC). This can be achieved without any supplementary hardware setup and costs. We will use the Network Time Protocol (NTP) server to request the current epoch time through our local WIFI network.
Network Time Protocol (NTP)
NTP is a standard internet protocol that is widely used to synchronize computer clocks to a reference network. With a precision of approximately 50ms over the wide-area network (WAN) and less than 5ms over the local area network (LAN), it synchronizes epoch time of all networked devices to the UTC.
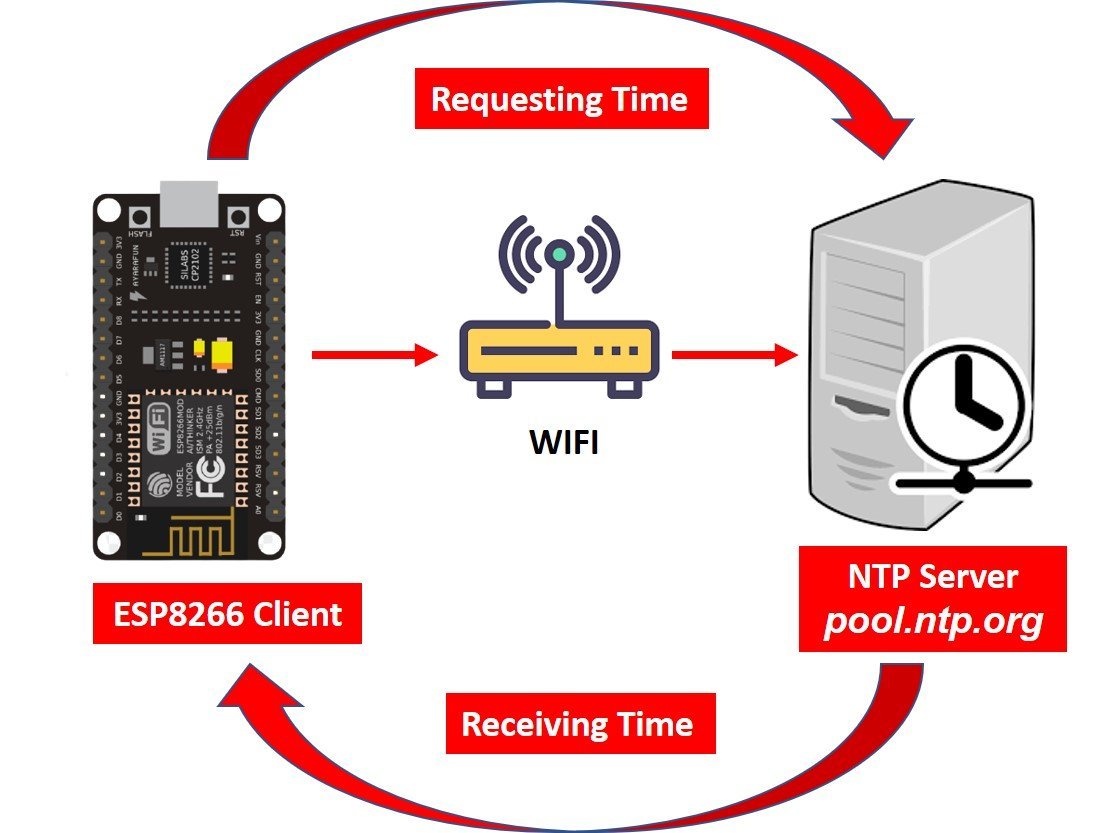
To get epoch time with ESP8266 NodeMCU through the NTP server, the server will operate in the client-server model. We will use the NTP server: pool.ntp.org which is easily accessible for everyone worldwide. Our ESP8266 NodeMCU development board will be the client and will connect to the NTP server through UDP on port 123. Through this port, the server (pool.ntp.org) will be able to connect with the client. After the connection is made, the ESP8266 NodeMCU board will send a request to the server. When the NTP receives the request, it will transmit the time stamp containing the information regarding the time.
Setting up Arduino IDE
We will be using Arduino IDE to program our ESP8266 NodeMCU development board. Before we move ahead, make sure you have the latest version of Arduino installed on your computer. Moreover, it would help if you had also an ESP8266 add-on in Arduino IDE. You can check this tutorial:
Getting Epoch/Unix Time ESP8266 Code
Now let’s proceed with our project. First, open your Arduino IDE and click on File > New to open a new file. Copy the code given below in that file. We will use the Get_Epoch_Time() function in our script which will return the current epoch time.
After you have copied the code, click the save icon to save the file.
#include <ESP8266WiFi.h>
#include <NTPClient.h>
#include <WiFiUdp.h>

// Replace ssid and password with your network credentials
const char* ssid = "REPLACE_WITH_YOUR_SSID";
const char* password = "REPLACE_WITH_YOUR_PASSWORD";

// Define NTP Client
WiFiUDP ntpUDP;
NTPClient timeClient(ntpUDP, "pool.ntp.org");

// Variable to hold current epoch timestamp
unsigned long Epoch_Time;


// Get_Epoch_Time() Function that gets current epoch time
unsigned long Get_Epoch_Time() {
  timeClient.update();
  unsigned long now = timeClient.getEpochTime();
  return now;
}

void setup() {
  Serial.begin(115200);
  WiFi.mode(WIFI_STA);
  WiFi.begin(ssid, password);
  Serial.print("Connecting to WiFi ..");
  while (WiFi.status() != WL_CONNECTED) {
    Serial.print('.');
    delay(1000);
  }
  Serial.println(WiFi.localIP());
  timeClient.begin();
}

void loop() {
  Epoch_Time = Get_Epoch_Time();
  Serial.print("Epoch Time: ");
  Serial.println(Epoch_Time);
  delay(1000);
}
How the Code Works?
In this section, let’s discuss how does the above code works.
Importing NTP Client and Wi-Fi Libraries
We will include the following three libraries to access the current epoch time using ESP8266. ESP8266WiFi.h library is necessary as we want our ESP8266 board to connect with the local network. Also, we will be able to access the NTP server through the internet so this library is a must. Secondly, the NTPClient.h library will handle is vital for the NTP server synchronization and to get the time from the NTP server.
#include <ESP8266WiFi.h>
#include <NTPClient.h>
#include <WiFiUdp.h>
Enter Your Network Credentials
Next, to connect with our local Wi-Fi network, we will specify our SSID and password in global variables which will be accessed throughout the code. Remember to replace them with your credentials to establish a successful connection with the NTP server.
// Replace with your network credentials
const char* ssid = "REPLACE_WITH_YOUR_SSID";
const char* password = "REPLACE_WITH_YOUR_PASSWORD";
Define NTP Client
We will define the NTP client ‘pool.ntp.org’ to access the epoch time inside the NTPClient object timeClient()
WiFiUDP ntpUDP;
NTPClient timeClient(ntpUDP, "pool.ntp.org");
The Epoch_Time variable will hold the current epoch time that we access from the NTP server.
unsigned long Epoch_Time;ESP8266 Get Epoch/Unix Time Function
To get epoch/Unix time, we create the Get_Epoch_Time() function which will return the current epoch time whenever a request will be made to the server. This section of code shows the function and how it returns the time.
unsigned long Get_Epoch_Time() {
  timeClient.update();
  unsigned long now = timeClient.getEpochTime();
  return now;
}
setup()
We will display the epoch time values on the Arduino serial monitor. Therefore, in the setup() function, initiate the serial communication with a baud rate of 115200.
Serial.begin(115200);We will also initialize the Wi-Fi network which will help the ESP8266 NodeMCU to connect to the local network through the WiFi.begin() function. This will take in two arguments which are the network credentials which we already specified above. Whenever a successful network connection will be established, the serial monitor will display the IP address of the ESP8266 NodeMCU board.
WiFi.mode(WIFI_STA);
  WiFi.begin(ssid, password);
  Serial.print("Connecting to WiFi ..");
  while (WiFi.status() != WL_CONNECTED) {
    Serial.print('.');
    delay(1000);
  }
  Serial.println(WiFi.localIP());
We will also initialize the NTP client by using the begin() method on the NTPClient object.
timeClient.begin();Displaying Timestamp on Serial Monitor
In the infinite loop, we will call the Get_Epoch_Time() function. This function returns epoch timestamp. We will save it in the variable ‘Epoch_Time.’ This value will get printed on the serial monitor continuously with a delay of 1 second. Hence, displaying the current epoch time.
void loop() {
  Epoch_Time = Get_Epoch_Time();
  Serial.print("Epoch Time: ");
  Serial.println(Epoch_Time);
  delay(1000);
}
Demonstration
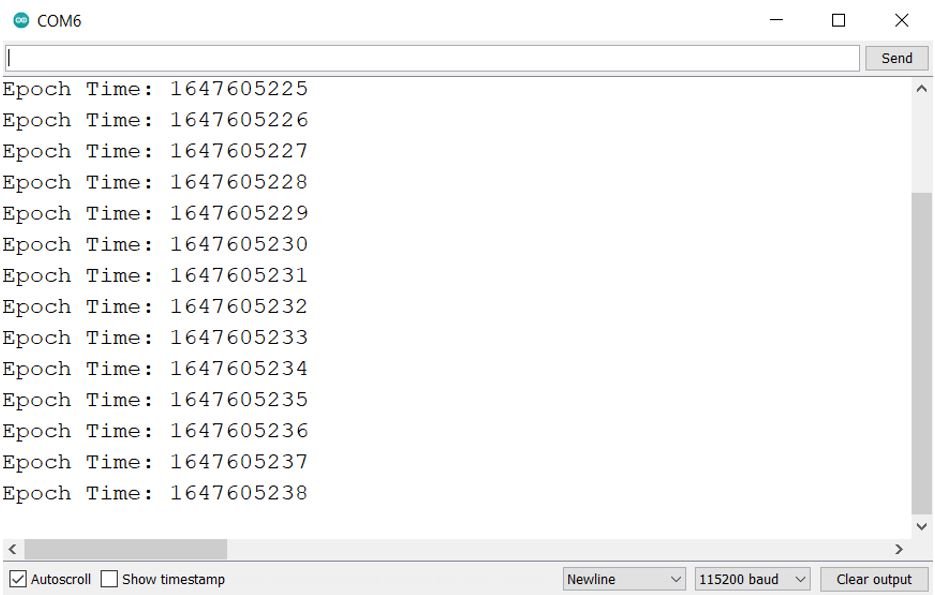
After uploading the code to your ESP8266 NodeMCU, press the RST button on it. After a successful connection has been established, you will notice the serial monitor display the current epoch time in seconds after every second.
In conclusion, the NTP server helps us in acquiring the current epoch time easily through our ESP8266 NodeMCU development board. The only requirement is a steady WiFi connection. It shows how to get epoch time with ESP8266 from an NTP server.
If you find this ESP8266 NodeMCU guide useful, you may like to check these ESP8266 NodeMCU guides:
- MPU-6050 with ESP8266 NodeMCU Accelerometer, Gyroscope, and Temperature Sensor (Arduino IDE)
- Create Simple ESP8266 NodeMCU Web server in Arduino IDE
- Control NodeMCU with HTTP shortcuts
- OLED Display with ESP32 and ESP8266 in MicroPython
- MicroPython: BME680 Web Server with ESP32 and ESP8266 (Gas, Pressure, Temperature, Humidity)
- Send Sensor Readings via Email (IFTTT) with ESP32 and ESP8266
- MicroPython: Wi-Fi Manager with ESP32 and ESP8266