In this user guide, we learn about the SSD1306 0.96-inch I2C OLED display and how to connect it with ESP32 and ESP8266 by using MicroPython firmware. An OLED (organic light-emitting diode) is used frequently in displaying texts, bitmap images, shapes, and different types of clocks. They offer good view angles and pixel density in a cost-effective manner. At first, we will take a look at the pinout of the OLED display and then connect it with the ESP boards using MicroPython and then display a simple message on the screen.
Recommended Components
The following components are used in this project or are helpful for getting started with MicroPython on ESP32 and ESP8266.
| Component | How it’s used in this project | Buy on Amazon |
|---|---|---|
| ESP32 Development Board (DevKit V1) | The ESP32 board flashed with MicroPython firmware. | Check Price |
| ESP8266 NodeMCU (ESP-12E) | The ESP8266 NodeMCU running the same MicroPython code. | Check Price |
| Micro USB Cable | Programs and powers the board from your PC. | Check Price |
| 0.96″ SSD1306 OLED Display | I2C OLED screen that shows the text and sensor readings. | Check Price |
| Breadboard | Holds the OLED and board for solderless wiring. | Check Price |
| Jumper Wires | Connect the I2C SDA, SCL, power and ground lines. | Check Price |
As an Amazon Associate we earn from qualifying purchases. Prices and availability are accurate as of the date/time indicated and are subject to change.
Prerequisites
Before we start this lesson make sure you are familiar with and have the latest version of MicroPython firmware installed in your ESP boards and have a running Integrated Development Environment (IDE) in which we will be doing the programming such as uPyCraft IDE or Thonny IDE.
- Getting Started with uPyCraft IDE on ESP32 and ESP8266
- Getting Started with Thonny MicroPython IDE for ESP32 and ESP8266
SSD1306 0.96inch OLED Display
Although there are several types of OLED displays available in the market the one which we will be using is the SSD1306 0.96-inch OLED display. The main component of all different types of OLED displays is an SSD1306 controller which uses I2C or SPI protocol to communicate with the microcontrollers. The OLED displays can vary in size, color, and shape but primarily programmed in a similar way.
Let us take a look at the OLED display which we will be using in this article. It is called SSD 1306 0.96-inch OLED display which has 128×64 pixels and communicates only via I2C protocol with the ESP development boards. It is cheap and readily available in the market.
Below you can see the pinout of this OLED Display.
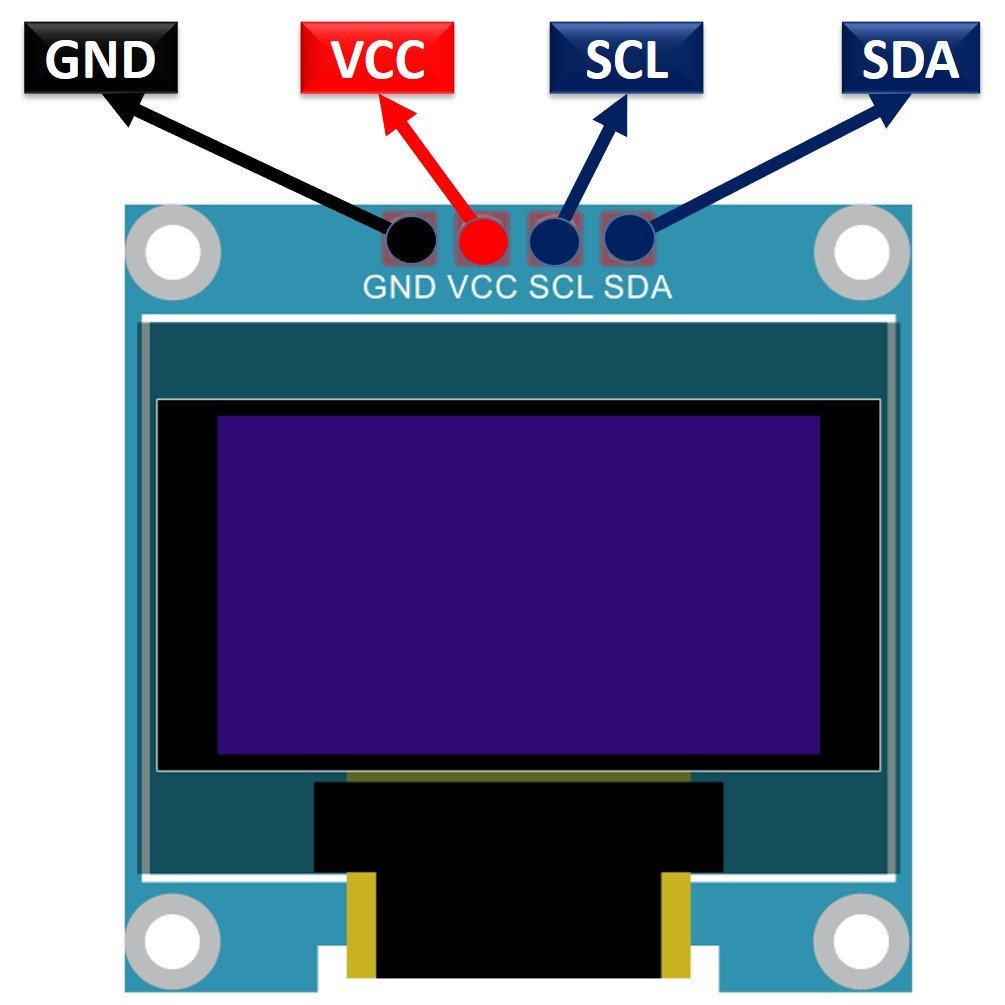
SSD1306 OLED Pinout
There are four pins in this display. Imprinted as VCC, GND, SCL, and SDA respectively. The VCC and GND pins will power the OLED display and will be connected with the ESP board’s power supply pins as they require a driving voltage of 3.3-5V. The SCL and SDA pins are necessary for generating the clock signal and in the transmission of data respectively. Both of these pins will be connected with the I2C pins of the ESP32 and ESP8266 boards.
Now let us have a look at the specifications for this model:
| Size | 0.96 inch |
| Terminals | 4 |
| Pixels | 128×64 |
| Communication type | I2C only |
| VCC | 3.3-5V |
| Operating Temperature | -40℃ to +80℃ |
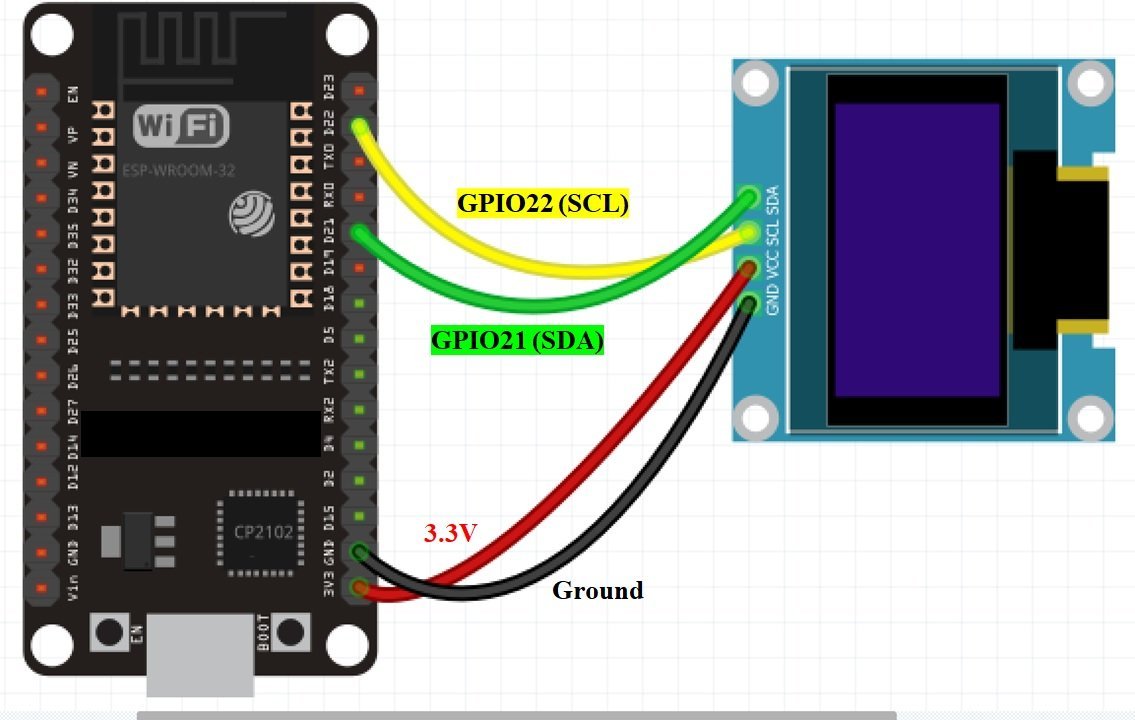
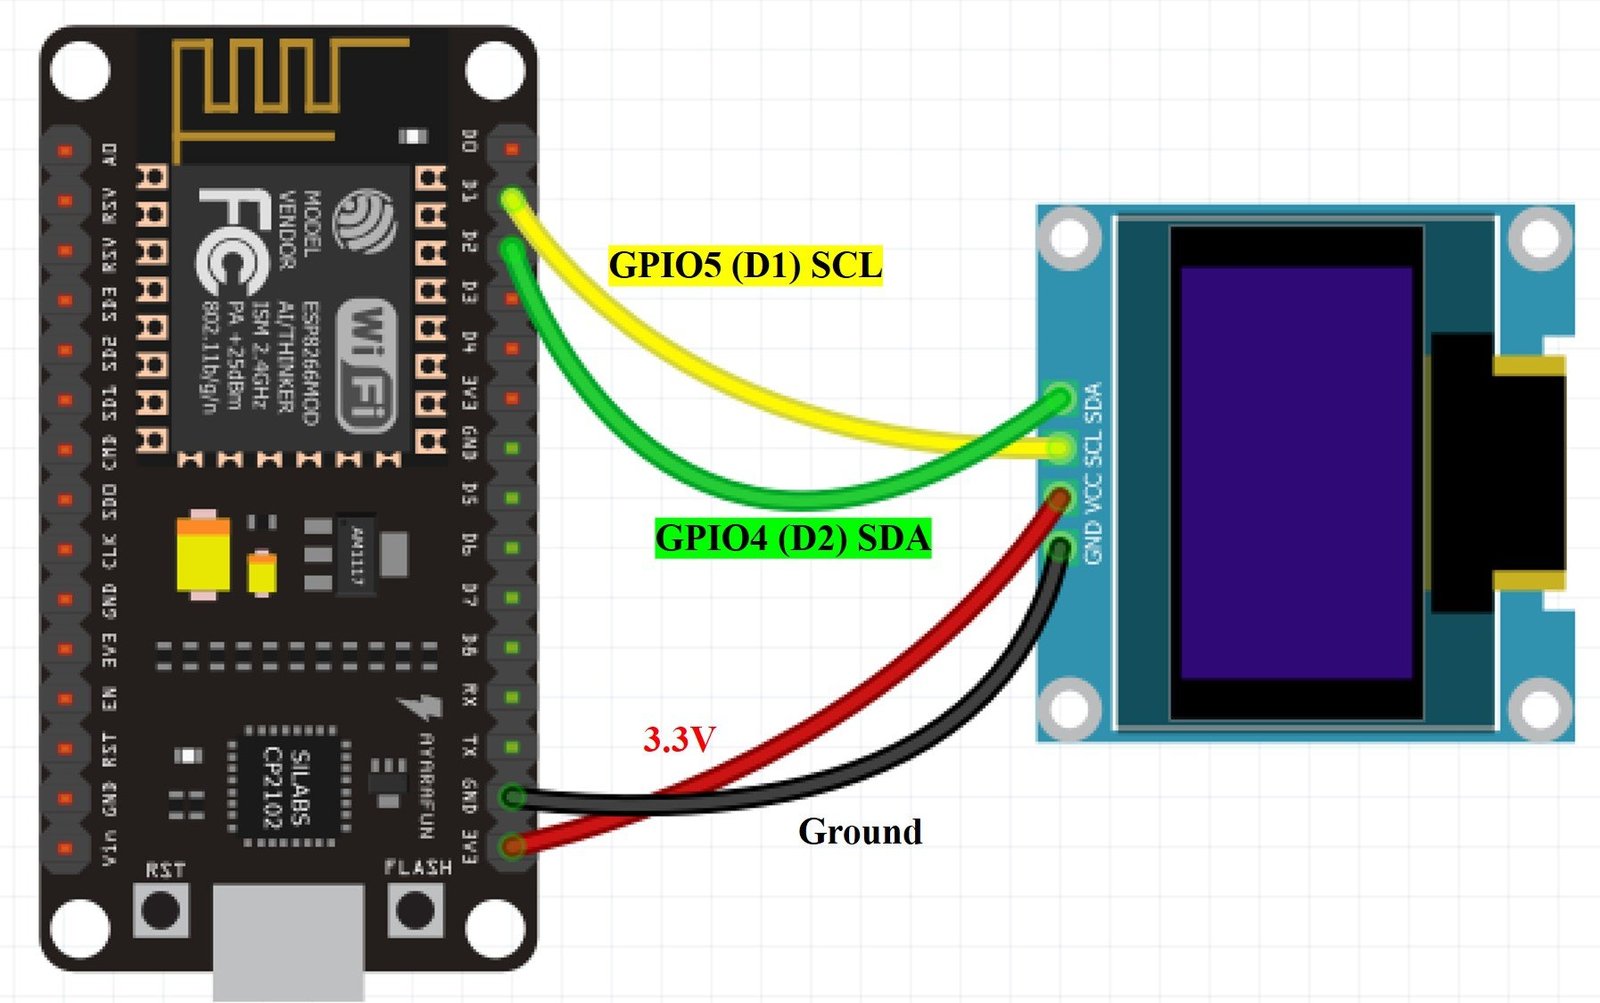
Connecting SSD1306 OLED Display with ESP32 and ESP8266
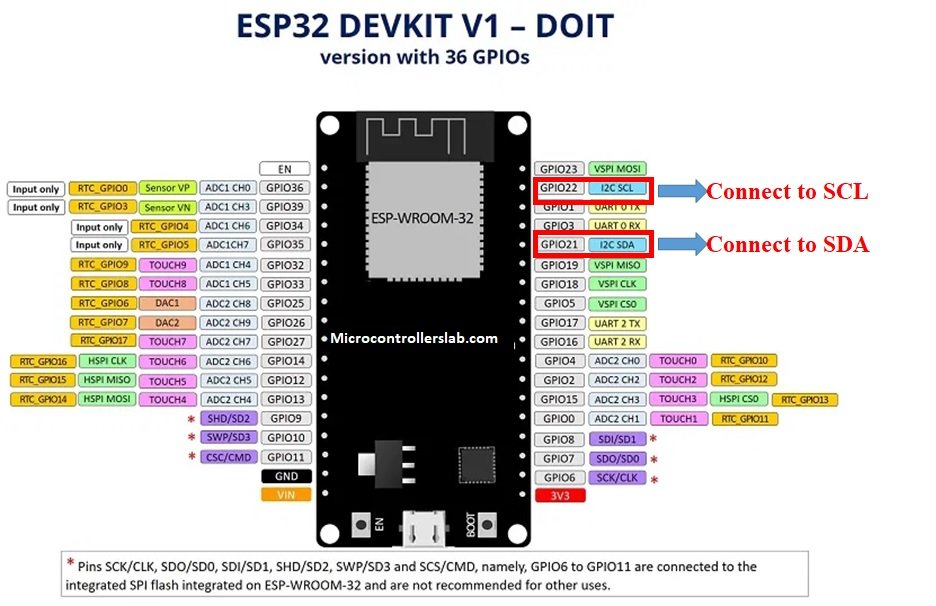
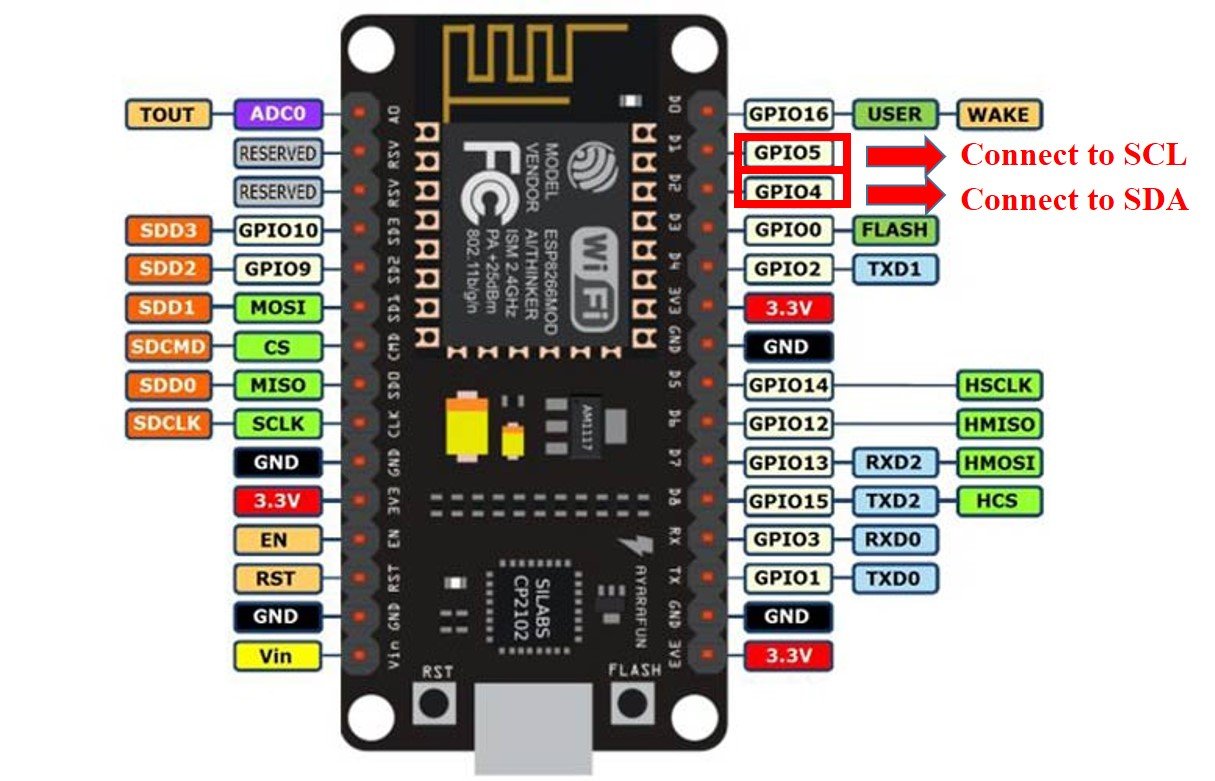
As we have seen above, the OLED display has 4 terminals which we will connect with the ESP boards. As the OLED display requires an operating voltage in the range of 3.3-5V hence we will connect the VCC terminal with 3.3V which will be in common with the ESP board. SCL of the display will be connected with the SCL pin of the module and the SDA of the display will be connected with the SDA of the module. By default, the I2C pin in ESP32 for SDA is GPIO21, and for SCL is GPIO22. Whereas in ESP8266 the default I2C pin for SDA is GPIO4 and for SCL is GPIO5. The ground of both the devices will be held common. The connections between the two devices can be seen below.
| ESP32 | ESP8266 | SSD1306 OLED Display |
|---|---|---|
| VCC=3.3V | 3.3V | VCC |
| GPIO21(I2C SDA) | GPIO4 (D2) | SDA |
| GPIO22 (I2C SCL) | GPIO5 (D1) | SCL |
| GROUND | GROUND | GND |
The I2C pins stated above are set in default. If you want to use any GPIO pins for I2C, you will have to set it in code using SoftI2C().
ESP32 I2C Pins
The I2C pins stated above are set in default. If we want to change the GPIO pins we have to set them in code. The diagrams below show the pinout for the ESP32 and Esp8266 respectively.
ESP8266 I2C Pins
The following figure shows the I2C pins of ESP8266 NodeMCU:https://3905944c7706de1a323751faf164f33e.safeframe.googlesyndication.com/safeframe/1-0-38/html/container.htmlAd by Valueimpression
More information on ESP32 and ESP8266 pins is available here:
Components Required
We will need the following components to connect our ESP board with the OLED Display.
- ESP32/ESP8266
- SSD1306 OLED Display
- Connecting Wires
- Breadboard
Schematic ESP32 with OLED
Follow the schematic diagrams below for both the ESP modules and connect them accordingly. If you are using ESP32 for this project, connect the ESP32 device with OLED as shown in the schematic diagram below:
Schematic ESP8266 with OLED
Similarly, if you are using ESP8266 NodeMCU for this project, connect the ESP8266 device with OLED as shown in the schematic diagram below:
SSD1306 OLED MicroPython Library
MicroPython does not contain the library for the OLED display so we would have to upload it ourselves. The library can be found on GitHub which was developed by Adafruit. We will copy the program code for the library from there and upload it on our ESP boards by saving it as ssd1306_oled.py.
# MicroPython SSD1306 OLED driver, I2C and SPI interfaces
from micropython import const
import time
import framebuf
import sys

currentBoard=""
if(sys.platform=="esp8266"):
  currentBoard="esp8266"
elif(sys.platform=="esp32"):
  currentBoard="esp32"
elif(sys.platform=="pyboard"):
  currentBoard="pyboard"
  import pyb
# register definitions
SET_CONTRAST        = const(0x81)
SET_ENTIRE_ON       = const(0xa4)
SET_NORM_INV        = const(0xa6)
SET_DISP            = const(0xae)
SET_MEM_ADDR        = const(0x20)
SET_COL_ADDR        = const(0x21)
SET_PAGE_ADDR       = const(0x22)
SET_DISP_START_LINE = const(0x40)
SET_SEG_REMAP       = const(0xa0)
SET_MUX_RATIO       = const(0xa8)
SET_COM_OUT_DIR     = const(0xc0)
SET_DISP_OFFSET     = const(0xd3)
SET_COM_PIN_CFG     = const(0xda)
SET_DISP_CLK_DIV    = const(0xd5)
SET_PRECHARGE       = const(0xd9)
SET_VCOM_DESEL      = const(0xdb)
SET_CHARGE_PUMP     = const(0x8d)
class SSD1306:
  def __init__(self, width, height, external_vcc):
    self.width = width
    self.height = height
    self.external_vcc = external_vcc
    self.pages = self.height // 8
    self.buffer = bytearray(self.pages * self.width)
    self.framebuf = framebuf.FrameBuffer(self.buffer, self.width, self.height, framebuf.MVLSB)
    self.poweron()
    self.init_display()
  def init_display(self):
    for cmd in (
      SET_DISP | 0x00, # off
      # address setting
      SET_MEM_ADDR, 0x00, # horizontal
      # resolution and layout
      SET_DISP_START_LINE | 0x00,
      SET_SEG_REMAP | 0x01, # column addr 127 mapped to SEG0
      SET_MUX_RATIO, self.height - 1,
      SET_COM_OUT_DIR | 0x08, # scan from COM[N] to COM0
      SET_DISP_OFFSET, 0x00,
      SET_COM_PIN_CFG, 0x02 if self.height == 32 else 0x12,
      # timing and driving scheme
      SET_DISP_CLK_DIV, 0x80,
      SET_PRECHARGE, 0x22 if self.external_vcc else 0xf1,
      SET_VCOM_DESEL, 0x30, # 0.83*Vcc
      # display
      SET_CONTRAST, 0xff, # maximum
      SET_ENTIRE_ON, # output follows RAM contents
      SET_NORM_INV, # not inverted
      # charge pump
      SET_CHARGE_PUMP, 0x10 if self.external_vcc else 0x14,
      SET_DISP | 0x01): # on
      self.write_cmd(cmd)
    self.fill(0)
    self.show()
  def poweroff(self):
    self.write_cmd(SET_DISP | 0x00)
  def contrast(self, contrast):
    self.write_cmd(SET_CONTRAST)
    self.write_cmd(contrast)
  def invert(self, invert):
    self.write_cmd(SET_NORM_INV | (invert & 1))
  def show(self):
    x0 = 0
    x1 = self.width - 1
    if self.width == 64:
      # displays with width of 64 pixels are shifted by 32
      x0 += 32
      x1 += 32
    self.write_cmd(SET_COL_ADDR)
    self.write_cmd(x0)
    self.write_cmd(x1)
    self.write_cmd(SET_PAGE_ADDR)
    self.write_cmd(0)
    self.write_cmd(self.pages - 1)
    self.write_data(self.buffer)
  def fill(self, col):
    self.framebuf.fill(col)
  def pixel(self, x, y, col):
    self.framebuf.pixel(x, y, col)
  def scroll(self, dx, dy):
    self.framebuf.scroll(dx, dy)
  def text(self, string, x, y, col=1):
    self.framebuf.text(string, x, y, col)
  def hline(self, x, y, w, col):
    self.framebuf.hline(x, y, w, col)
  def vline(self, x, y, h, col):
    self.framebuf.vline(x, y, h, col)
  def line(self, x1, y1, x2, y2, col):
    self.framebuf.line(x1, y1, x2, y2, col)
  def rect(self, x, y, w, h, col):
    self.framebuf.rect(x, y, w, h, col)
  def fill_rect(self, x, y, w, h, col):
    self.framebuf.fill_rect(x, y, w, h, col)
  def blit(self, fbuf, x, y):
    self.framebuf.blit(fbuf, x, y)

class SSD1306_I2C(SSD1306):
  def __init__(self, width, height, i2c, addr=0x3c, external_vcc=False):
    self.i2c = i2c
    self.addr = addr
    self.temp = bytearray(2)
    super().__init__(width, height, external_vcc)
  def write_cmd(self, cmd):
    self.temp[0] = 0x80 # Co=1, D/C#=0
    self.temp[1] = cmd
    #IF SYS  :
    global currentBoard
    if currentBoard=="esp8266" or currentBoard=="esp32":
      self.i2c.writeto(self.addr, self.temp)
    elif currentBoard=="pyboard":
      self.i2c.send(self.temp,self.addr)
    #ELSE:

  def write_data(self, buf):
    self.temp[0] = self.addr << 1
    self.temp[1] = 0x40 # Co=0, D/C#=1
    global currentBoard
    if currentBoard=="esp8266" or currentBoard=="esp32":
      self.i2c.start()
      self.i2c.write(self.temp)
      self.i2c.write(buf)
      self.i2c.stop()
    elif currentBoard=="pyboard":
      #self.i2c.send(self.temp,self.addr)
      #self.i2c.send(buf,self.addr)
      self.i2c.mem_write(buf,self.addr,0x40)
  def poweron(self):
    pass

class SSD1306_SPI(SSD1306):
  def __init__(self, width, height, spi, dc, res, cs, external_vcc=False):
    self.rate = 10 * 1024 * 1024
    dc.init(dc.OUT, value=0)
    res.init(res.OUT, value=0)
    cs.init(cs.OUT, value=1)
    self.spi = spi
    self.dc = dc
    self.res = res
    self.cs = cs
    super().__init__(width, height, external_vcc)
  def write_cmd(self, cmd):
    global currentBoard
    if currentBoard=="esp8266" or currentBoard=="esp32":
      self.spi.init(baudrate=self.rate, polarity=0, phase=0)
    elif currentBoard=="pyboard":
      self.spi.init(mode = pyb.SPI.MASTER,baudrate=self.rate, polarity=0, phase=0)
    self.cs.high()
    self.dc.low()
    self.cs.low()
    global currentBoard
    if currentBoard=="esp8266" or currentBoard=="esp32":
      self.spi.write(bytearray([cmd]))
    elif currentBoard=="pyboard":
      self.spi.send(bytearray([cmd]))
    self.cs.high()
  def write_data(self, buf):
    global currentBoard
    if currentBoard=="esp8266" or currentBoard=="esp32":
      self.spi.init(baudrate=self.rate, polarity=0, phase=0)
    elif currentBoard=="pyboard":
      self.spi.init(mode = pyb.SPI.MASTER,baudrate=self.rate, polarity=0, phase=0)
    self.cs.high()
    self.dc.high()
    self.cs.low()
    global currentBoard
    if currentBoard=="esp8266" or currentBoard=="esp32":
      self.spi.write(buf)
    elif currentBoard=="pyboard":
      self.spi.send(buf)
    self.cs.high()
  def poweron(self):
    self.res.high()
    time.sleep_ms(1)
    self.res.low()
    time.sleep_ms(10)
    self.res.high()
Uploading OLED Library with uPyCraft IDE
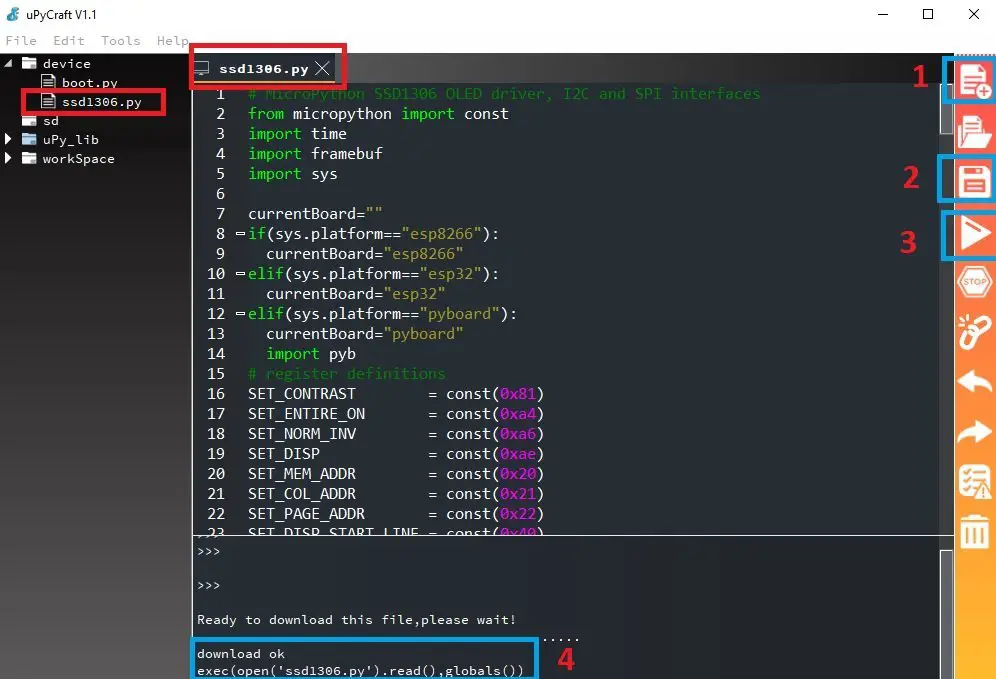
Now, we will look at how to upload the SSD1306 OLED library to ESP32 and ESP8266. This step is required because the MicroPython implementation itself does not contain the OLED library. Follow the steps in order to successfully upload the library to ESP32/ESP8266 in uPyCraft IDE:
- First, in the Tools section, click on the NEW FILE button and open a file.

- Then replicate the following OLED library in that file.
- Name the file ssd1306.py and save it by choosing your desired directory.

- Now press the button DOWNLOAD AND RUN in the tools section.

As soon as you click on the download and run button, you will get the message that states “download ok”. Moreover, you will also see ssd1306.py file lists under the device menu.
You have now successfully uploaded the ssd1306 OLED library to ESP32/ESP8266 using uPyCraft IDE. After that, we can use the above library functions to display text, draw shapes, lines, etc, on OLED. You can use a similar procedure to upload files using Thonny IDE.
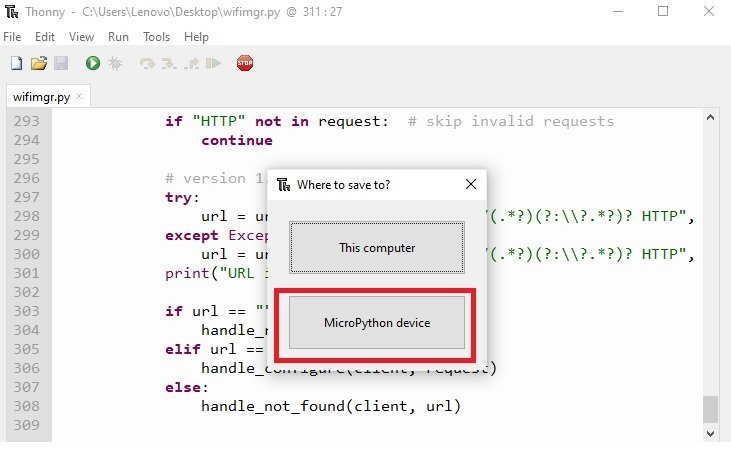
Uploading Wi-Fi Manager in Thonny IDE
Open a new file and write the OLED library code into that file. Click on the Save button and set the file name as ssd1306.py

When you click on the save button, you will see the following window will appear. Select, MicroPython device to upload the library to ESP32 or ESP8266.
Note: The Device options in the menu bar to upload scripts are available in the previous versions of Thonny IDE.
After following these steps, we have successfully uploaded the ssd1306.py library to ESP32 or ESP8266 NodeMCU using Thonny IDE.
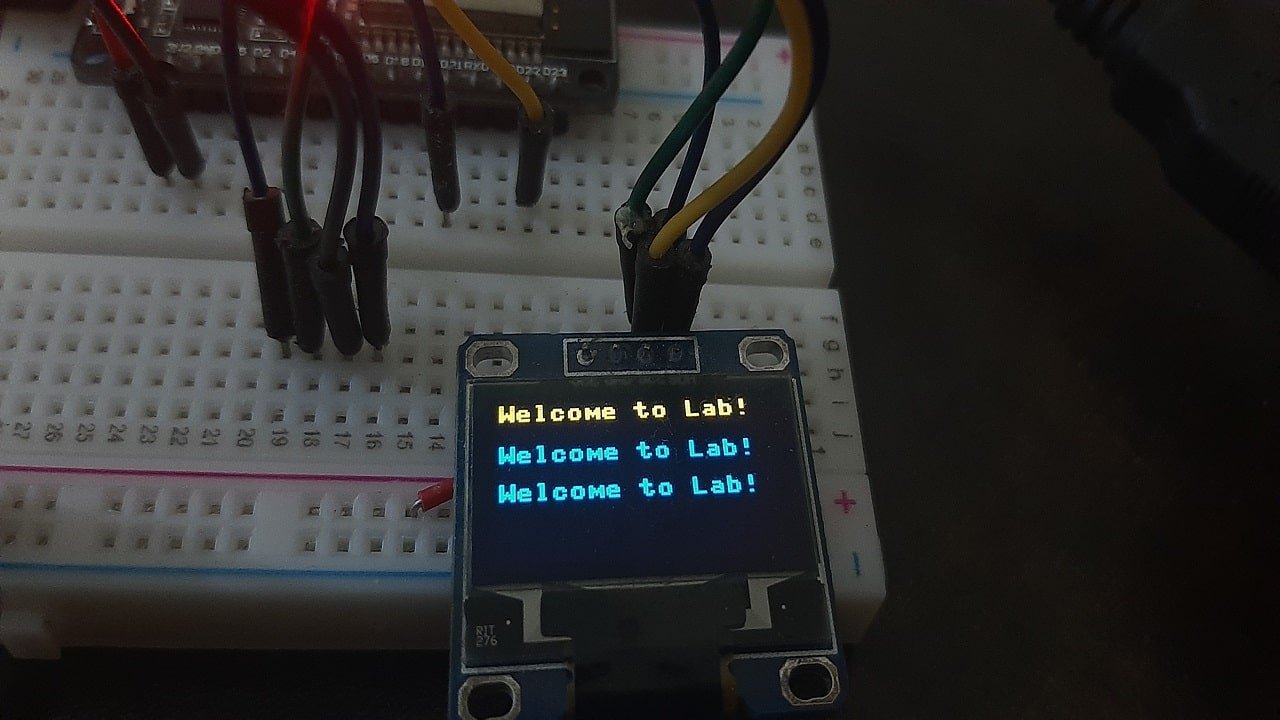
MicroPython Script: Displaying a simple message on OLED Display
As we have already uploaded the SSD1306 OLED Display Library in our respective ESP boards. Let’s now take a look at the MicroPython code. This code will display a message on the OLED display.
Open a new file and save the file as main.py. Copy the code given below in that file. Make sure both your ssd1306.py and main.py are uploaded to ESP32 or ESP8266.
from machine import Pin, I2C
import ssd1306
from time import sleep


i2c = I2C(-1, scl=Pin(22), sda=Pin(21)) #For ESP32: pin initializing
#i2c = I2C(-1, scl=Pin(5), sda=Pin(4))  #For ESP8266: pin initializing

oled_width = 128
oled_height = 64
oled = ssd1306.SSD1306_I2C(oled_width, oled_height, i2c)

oled.text('Welcome to Lab!', 0, 0)
oled.text('Welcome to Lab!', 0, 16)
oled.text('Welcome to Lab!', 0, 32)

oled.show()
How the Code works?
Importing I2C and OLED Library
We start off by importing the pin and the I2C classes from the machine module. Because we have to interact with the GPIO pins and transmit data through the I2C protocol hence both these classes are necessary. We will also import the ssd1306 which is the OLED display library that we uploaded earlier. This will help us in accessing all the functions defined inside it.
from machine import Pin, I2C
import ssd1306
Selecting I2C Pins for OLED
Next, we will initialize the I2C GPIO pins for SCL and SDA respectively. We have used the default SCL and SDA pins for both the ESP boards.
We have created an I2C() method which takes in three parameters. The first parameter is -1 indicating that it a software I2C, not a hardware one. The second parameter specifies the I2C GPIO pin of the ESP board which is connected to the SCL line. The third parameter specifies the I2C GPIO pin of the ESP board which is connected to the SDA line.
In case if we are using ESP32, we are setting the SCL on pin 22 and the SDA on pin 21.
i2c = I2C(-1, scl=Pin(22), sda=Pin(21))In case if we are using ESP8266, then uncomment the following line and comment the line above which was configuring the pins for ESP32. We are setting the SCL on pin 5 and the SDA on pin 4.
#i2c = I2C(-1, scl=Pin(5), sda=Pin(4)) #For ESP8266: pin initializingInitialize OLED
Keep in mind that we are using default I2C pins for both the ESP boards in our script. This data gets saved in the object ‘i2c’ which will connect to the I2C bus and help in the communication between the two devices
We will define the width and the height which are the horizontal and the vertical resolution of the display (128×64) as follows:
oled_width = 128
oled_height = 64
Now, we will create an object ‘oled’ of SSD1306_I2C which uses the width, height, and the i2c object as parameters.
oled = ssd1306.SSD1306_I2C(oled_width, oled_height, i2c) #Initializing the OLED displayDisplaying Text on OLED
Next, we used the text() function on the oled object which we initialized before. The text() function takes in three arguments.
- First argument to text() is the text which we want to display. This should be in the form of ‘string.’ We will be displaying ‘Welcome to Lab’.
- The second argument is the horizontal position where the text starts. This is known as the ‘X position.’ We will specify it as 0.
- The third argument is the ‘Y position’ which is the vertical position from where the text starts.
We will specify it first as 0, then 16, and lastly as 32 to view the three messages which we will display in three rows, one after another. The horizontal position remains the same in all. The fourth argument is the color of the text. We are not specifying any fourth argument so it will be set as default which is white. You can choose between black and white. For white, we specify 1 and for black, we specify 0.
To display text just use the text() fucntion on the oled object. The following code displays the message: ‘Welcome to Lab’ on x=0 and y=0.
oled.text('Welcome to Lab!', 0, 0)
Next line of code displays the message on the next line as x=0 and y=16.
oled.text('Welcome to Lab!', 0, 16)
oled.text('Welcome to Lab!', 0, 32)
Lastly, we will use the show() method on the oled object to successfully display the messages on the OLED Display.
oled.show()Demonstration
Now upload both ssd1306.py and main.py to ESP32 or ESP8266 NodeMCU, you will see this message on OLED:
MicroPython: Displaying Sensor Value on OLED
In this section, we will see how to display sensor values on OLED. For that, we will take the example of the BME680 sensor and display its values on OLED using ESP32 and ESP8266.
BME680 MicroPython Library
To use the BME680 sensor with ESP32 or ESP8266, we need to upload bme680.py file to ESP boards. You should follow the same procedure to upload the library as we did for ssd1306.py.
import time
import math
from micropython import const
from ubinascii import hexlify as hex
try:
  import struct
except ImportError:
  import ustruct as struct
_BME680_CHIPID = const(0x61)
_BME680_REG_CHIPID = const(0xD0)
_BME680_BME680_COEFF_ADDR1 = const(0x89)
_BME680_BME680_COEFF_ADDR2 = const(0xE1)
_BME680_BME680_RES_HEAT_0 = const(0x5A)
_BME680_BME680_GAS_WAIT_0 = const(0x64)
_BME680_REG_SOFTRESET = const(0xE0)
_BME680_REG_CTRL_GAS = const(0x71)
_BME680_REG_CTRL_HUM = const(0x72)
_BME280_REG_STATUS = const(0xF3)
_BME680_REG_CTRL_MEAS = const(0x74)
_BME680_REG_CONFIG = const(0x75)
_BME680_REG_PAGE_SELECT = const(0x73)
_BME680_REG_MEAS_STATUS = const(0x1D)
_BME680_REG_PDATA = const(0x1F)
_BME680_REG_TDATA = const(0x22)
_BME680_REG_HDATA = const(0x25)
_BME680_SAMPLERATES = (0, 1, 2, 4, 8, 16)
_BME680_FILTERSIZES = (0, 1, 3, 7, 15, 31, 63, 127)
_BME680_RUNGAS = const(0x10)
_LOOKUP_TABLE_1 = (2147483647.0, 2147483647.0, 2147483647.0, 2147483647.0, 2147483647.0,
  2126008810.0, 2147483647.0, 2130303777.0, 2147483647.0, 2147483647.0,
  2143188679.0, 2136746228.0, 2147483647.0, 2126008810.0, 2147483647.0,
  2147483647.0)
_LOOKUP_TABLE_2 = (4096000000.0, 2048000000.0, 1024000000.0, 512000000.0, 255744255.0, 127110228.0,
  64000000.0, 32258064.0, 16016016.0, 8000000.0, 4000000.0, 2000000.0, 1000000.0,
  500000.0, 250000.0, 125000.0)
def _read24(arr):
  ret = 0.0
  for b in arr:
    ret *= 256.0
    ret += float(b & 0xFF)
  return ret
class Adafruit_BME680:
  def __init__(self, *, refresh_rate=10):
    self._write(_BME680_REG_SOFTRESET, [0xB6])
    time.sleep(0.005)
    chip_id = self._read_byte(_BME680_REG_CHIPID)
    if chip_id != _BME680_CHIPID:
      raise RuntimeError('Failed 0x%x' % chip_id)
    self._read_calibration()
    self._write(_BME680_BME680_RES_HEAT_0, [0x73])
    self._write(_BME680_BME680_GAS_WAIT_0, [0x65])
    self.sea_level_pressure = 1013.25
    self._pressure_oversample = 0b011
    self._temp_oversample = 0b100
    self._humidity_oversample = 0b010
    self._filter = 0b010
    self._adc_pres = None
    self._adc_temp = None
    self._adc_hum = None
    self._adc_gas = None
    self._gas_range = None
    self._t_fine = None
    self._last_reading = 0
    self._min_refresh_time = 1000 / refresh_rate
  @property
  def pressure_oversample(self):
    return _BME680_SAMPLERATES[self._pressure_oversample]
  @pressure_oversample.setter
  def pressure_oversample(self, sample_rate):
    if sample_rate in _BME680_SAMPLERATES:
      self._pressure_oversample = _BME680_SAMPLERATES.index(sample_rate)
    else:
      raise RuntimeError("Invalid")
  @property
  def humidity_oversample(self):
    return _BME680_SAMPLERATES[self._humidity_oversample]
  @humidity_oversample.setter
  def humidity_oversample(self, sample_rate):
    if sample_rate in _BME680_SAMPLERATES:
      self._humidity_oversample = _BME680_SAMPLERATES.index(sample_rate)
    else:
      raise RuntimeError("Invalid")
  @property
  def temperature_oversample(self):
      return _BME680_SAMPLERATES[self._temp_oversample]
  @temperature_oversample.setter
  def temperature_oversample(self, sample_rate):
    if sample_rate in _BME680_SAMPLERATES:
      self._temp_oversample = _BME680_SAMPLERATES.index(sample_rate)
    else:
      raise RuntimeError("Invalid")
  @property
  def filter_size(self):
    return _BME680_FILTERSIZES[self._filter]
  @filter_size.setter
  def filter_size(self, size):
    if size in _BME680_FILTERSIZES:
      self._filter = _BME680_FILTERSIZES[size]
    else:
      raise RuntimeError("Invalid")
  @property
  def temperature(self):
    self._perform_reading()
    calc_temp = (((self._t_fine * 5) + 128) / 256)
    return calc_temp / 100
  @property
  def pressure(self):
    self._perform_reading()
    var1 = (self._t_fine / 2) - 64000
    var2 = ((var1 / 4) * (var1 / 4)) / 2048
    var2 = (var2 * self._pressure_calibration[5]) / 4
    var2 = var2 + (var1 * self._pressure_calibration[4] * 2)
    var2 = (var2 / 4) + (self._pressure_calibration[3] * 65536)
    var1 = (((((var1 / 4) * (var1 / 4)) / 8192) *
      (self._pressure_calibration[2] * 32) / 8) +
      ((self._pressure_calibration[1] * var1) / 2))
    var1 = var1 / 262144
    var1 = ((32768 + var1) * self._pressure_calibration[0]) / 32768
    calc_pres = 1048576 - self._adc_pres
    calc_pres = (calc_pres - (var2 / 4096)) * 3125
    calc_pres = (calc_pres / var1) * 2
    var1 = (self._pressure_calibration[8] * (((calc_pres / 8) * (calc_pres / 8)) / 8192)) / 4096
    var2 = ((calc_pres / 4) * self._pressure_calibration[7]) / 8192
    var3 = (((calc_pres / 256) ** 3) * self._pressure_calibration[9]) / 131072
    calc_pres += ((var1 + var2 + var3 + (self._pressure_calibration[6] * 128)) / 16)
    return calc_pres/100
  @property
  def humidity(self):
    self._perform_reading()
    temp_scaled = ((self._t_fine * 5) + 128) / 256
    var1 = ((self._adc_hum - (self._humidity_calibration[0] * 16)) -
      ((temp_scaled * self._humidity_calibration[2]) / 200))
    var2 = (self._humidity_calibration[1] *
      (((temp_scaled * self._humidity_calibration[3]) / 100) +
       (((temp_scaled * ((temp_scaled * self._humidity_calibration[4]) / 100)) /
         64) / 100) + 16384)) / 1024
    var3 = var1 * var2
    var4 = self._humidity_calibration[5] * 128
    var4 = (var4 + ((temp_scaled * self._humidity_calibration[6]) / 100)) / 16
    var5 = ((var3 / 16384) * (var3 / 16384)) / 1024
    var6 = (var4 * var5) / 2
    calc_hum = (((var3 + var6) / 1024) * 1000) / 4096
    calc_hum /= 1000
    if calc_hum > 100:
      calc_hum = 100
    if calc_hum < 0:
      calc_hum = 0
    return calc_hum
  @property
  def altitude(self):
    pressure = self.pressure
    return 44330 * (1.0 - math.pow(pressure / self.sea_level_pressure, 0.1903))
  @property
  def gas(self):
    self._perform_reading()
    var1 = ((1340 + (5 * self._sw_err)) * (_LOOKUP_TABLE_1[self._gas_range])) / 65536
    var2 = ((self._adc_gas * 32768) - 16777216) + var1
    var3 = (_LOOKUP_TABLE_2[self._gas_range] * var1) / 512
    calc_gas_res = (var3 + (var2 / 2)) / var2
    return int(calc_gas_res)
  def _perform_reading(self):
    if (time.ticks_diff(self._last_reading, time.ticks_ms()) * time.ticks_diff(0, 1)
        < self._min_refresh_time):
      return
    self._write(_BME680_REG_CONFIG, [self._filter << 2])
    self._write(_BME680_REG_CTRL_MEAS,
      [(self._temp_oversample << 5)|(self._pressure_oversample << 2)])
    self._write(_BME680_REG_CTRL_HUM, [self._humidity_oversample])
    self._write(_BME680_REG_CTRL_GAS, [_BME680_RUNGAS])
    ctrl = self._read_byte(_BME680_REG_CTRL_MEAS)
    ctrl = (ctrl & 0xFC) | 0x01
    self._write(_BME680_REG_CTRL_MEAS, [ctrl])
    new_data = False
    while not new_data:
      data = self._read(_BME680_REG_MEAS_STATUS, 15)
      new_data = data[0] & 0x80 != 0
      time.sleep(0.005)
    self._last_reading = time.ticks_ms()
    self._adc_pres = _read24(data[2:5]) / 16
    self._adc_temp = _read24(data[5:8]) / 16
    self._adc_hum = struct.unpack('>H', bytes(data[8:10]))[0]
    self._adc_gas = int(struct.unpack('>H', bytes(data[13:15]))[0] / 64)
    self._gas_range = data[14] & 0x0F
    var1 = (self._adc_temp / 8) - (self._temp_calibration[0] * 2)
    var2 = (var1 * self._temp_calibration[1]) / 2048
    var3 = ((var1 / 2) * (var1 / 2)) / 4096
    var3 = (var3 * self._temp_calibration[2] * 16) / 16384
    self._t_fine = int(var2 + var3)
  def _read_calibration(self):
    coeff = self._read(_BME680_BME680_COEFF_ADDR1, 25)
    coeff += self._read(_BME680_BME680_COEFF_ADDR2, 16)
    coeff = list(struct.unpack('<hbBHhbBhhbbHhhBBBHbbbBbHhbb', bytes(coeff[1:39])))
    coeff = [float(i) for i in coeff]
    self._temp_calibration = [coeff[x] for x in [23, 0, 1]]
    self._pressure_calibration = [coeff[x] for x in [3, 4, 5, 7, 8, 10, 9, 12, 13, 14]]
    self._humidity_calibration = [coeff[x] for x in [17, 16, 18, 19, 20, 21, 22]]
    self._gas_calibration = [coeff[x] for x in [25, 24, 26]]
    self._humidity_calibration[1] *= 16
    self._humidity_calibration[1] += self._humidity_calibration[0] % 16
    self._humidity_calibration[0] /= 16
    self._heat_range = (self._read_byte(0x02) & 0x30) / 16
    self._heat_val = self._read_byte(0x00)
    self._sw_err = (self._read_byte(0x04) & 0xF0) / 16
  def _read_byte(self, register):
    return self._read(register, 1)[0]
  def _read(self, register, length):
    raise NotImplementedError()
  def _write(self, register, values):
    raise NotImplementedError()
class BME680_I2C(Adafruit_BME680):
  def __init__(self, i2c, address=0x77, debug=False, *, refresh_rate=10):
    self._i2c = i2c
    self._address = address
    self._debug = debug
    super().__init__(refresh_rate=refresh_rate)
  def _read(self, register, length):
    result = bytearray(length)
    self._i2c.readfrom_mem_into(self._address, register & 0xff, result)
    if self._debug:
      print("\t${:x} read ".format(register), " ".join(["{:02x}".format(i) for i in result]))
    return result
  def _write(self, register, values):
    if self._debug:
      print("\t${:x} write".format(register), " ".join(["{:02x}".format(i) for i in values]))
    for value in values:
      self._i2c.writeto_mem(self._address, register, bytearray([value & 0xFF]))
register += 1Schematic – OLED with ESP32 and BME680
The table below shows the terminals of the three devices which would be connected together.
| OLED Display | ESP32 | BME680 |
|---|---|---|
| VCC | VCC=3.3V | VCC |
| GND | GND | GND |
| SCL | GPIO22 | SCL |
| SDA | GPIO21 | SDA |
Assemble the circuit as shown in the schematic diagram below:

As you can see above, we have connected all the VCC terminals with a 3.3V power supply. The SCL terminals are connected with GPIO22 and the SDA terminals are connected with GPIO21. The grounds are also common.
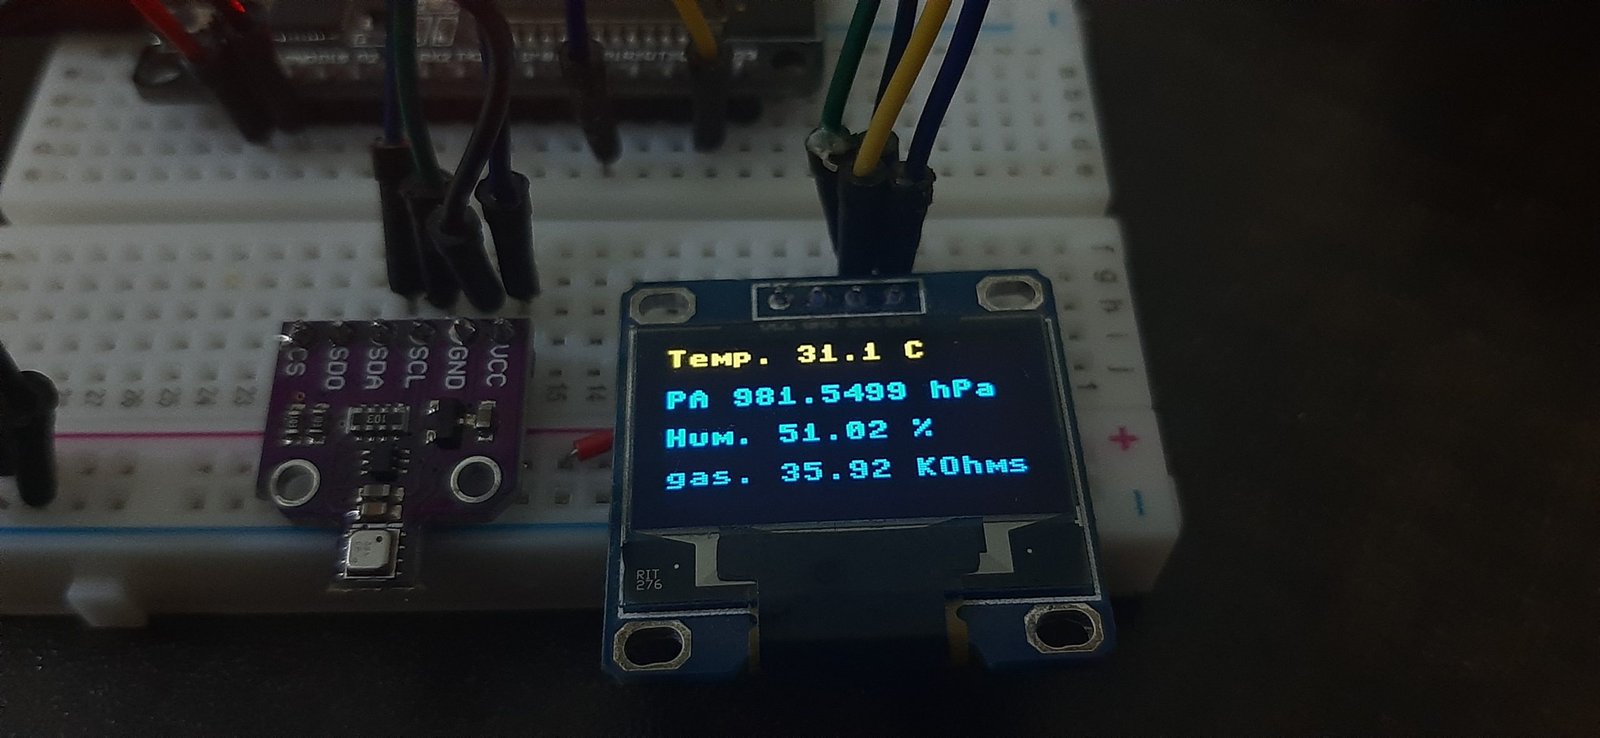
MicroPython Code: Displaying BME680 readings on OLED Display
from machine import Pin,I2C
from time import sleep
import ssd1306
from time import sleep
from bme680 import *
i2c = I2C(scl=Pin(22), sda=Pin(21))
lcd=ssd1306.SSD1306_I2C(128,64,i2c)
bme = BME680_I2C(i2c=i2c)

while True:
  lcd.fill(0)
  try:
    temp = str(round(bme.temperature, 2)) + ' C'
    #temp = (bme.temperature) * (9/5) + 32
    #temp = str(round(temp, 2)) + 'F'

    hum = str(round(bme.humidity, 2)) + ' %'

    pres = str(round(bme.pressure, 2)) + ' hPa'

    gas = str(round(bme.gas/1000, 2)) + ' KOhms'

    print('Temperature:', temp)
    print('Humidity:', hum)
    print('Pressure:', pres)
    print('Gas:', gas)
    print('-------')
    lcd.text("Temp. "+temp, 0, 0)
    lcd.text("PA "+pres, 0, 16)
    lcd.text("Hum. "+hum, 0,32)
    lcd.text("gas. "+gas, 0, 48)

  except OSError as e:
    print('Failed to read sensor.')
  lcd.show()                          #display pix
  sleep(5)
How Does the Code Work?
In the section, we only explained the Micropython code part which is used to display sensor values on OLED. Because reset of the code is the same as we have used in previous sections to display sensor readings on the shell console.
Import SSD1306 OLED library.
import ssd1306
Create an instance of the SSD1306_I2C() method by giving it the name of “lcd”. The first two arguments to SSD1306_I2C() are the size of OLED that is the number of columns and rows. A last argument is an object of I2C pins which we define with SoftI2C().
lcd=ssd1306.SSD1306_I2C(128,64,i2c)Clears the OLED display with led.fill() routine.
lcd.fill(0)Finally display the text along with sensor readings on OLED.
lcd.text("Temp. "+temp, 0, 0)
lcd.text("PA "+pres, 0, 16)
lcd.text("Hum. "+hum, 0,32)
lcd.text("gas. "+gas, 0, 48)
At the end, call the show() method on lcd method for changes to show on OLED.
lcd.show() #display pixDemonstration
Upload the above code as main.py file along with bme680.py and ssd1306.py to ESP32 or ESP8266. After that press the reset button on your ESP board. You will get sensor readings on OLED display as follows:
Video Demo: