In this tutorial, we will take our previous project one step further to increase its productiveness. If you remember we create a web server and design a circuit with NodeMCU and four LED to control them through the different buttons on the web server. The web server is also password protected to prevent unauthorized user.
If you are new or want to see circuit diagram, sketches and other information like username and password encoding you can find all it over here Controlling NodeMCU using Web server. We can do so many creative things using HTTP shortcuts like feeding your pet using food dispenser, controlling any appliances like Fan, Coffee maker, AC and Heater using NodeMCU ESp8266 and relay module. Or we can lock and unlock our automated doors. The list goes on and on you can do whatever you think or want to control remotely and efficiently using smartphone as smartphones are the most common used daily gadgets in our lives.
In this tutorial, we download an android application in our smartphone and create widgets to control GPIO’s of the NodeMCU.

Downloading HTTP Shortcuts application
Open the Google Play Store of your android smartphone writes “HTTP Request Shortcuts” in the search bar. Install the application after successfully installation opens the application.
After successful installation of the application and after opening you will see the following screen which displaying message of “no shortcuts yet” and you will able to see a plus signal in the bottom right corner.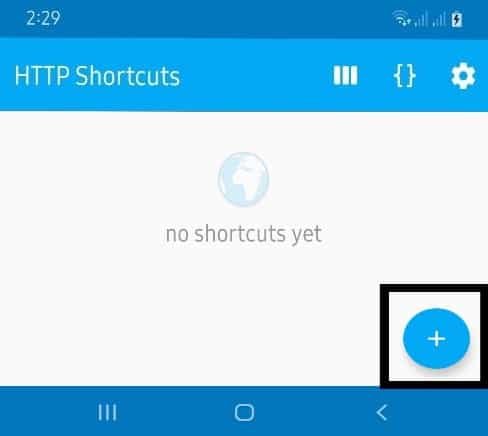
Press the plus sign button to create a shortcut. After pressing the button a window is appeared with two option to create the shortcut. First one is “From Scratch” and the second one is “From cURL Command”. Select the first option to create the shortcut from scratch. After pressing you will see so many bars, section and drop down menu. We have to change few as shown in the following tutorial. First of all, in the Appearance section, we have to write the name of the widget we want to create. In my case, for simplicity, I write LED1 On, LED1 Off and so on, but you can write whatever you want.
If you want to change the icon of the widget to change its appearance. Press the icon appearing at the end of the Shortcut Name bar as shown in the bellow image.![]()
After pressing the icon a window will appears with three option as follow:
- Choose Built-in icon
- Choose custom image
- Choose ipack icon
Either you can choose an icon from a large range of built-in icon or you can select a custom image from your smartphone gallery. The third and last option is not recommended to use. After completing the Appearance section now scroll down to Basic Request Settings. We have to write IP address only in URL bar such as “http://192.168.137.217:443/LED1on”. The IP address will vary in your case. If you face problem in your IP address you can also press the button on the web server and you will find the correct IP address from the serial monitor on Arduino IDE. Keep other option in this section unchanged as below.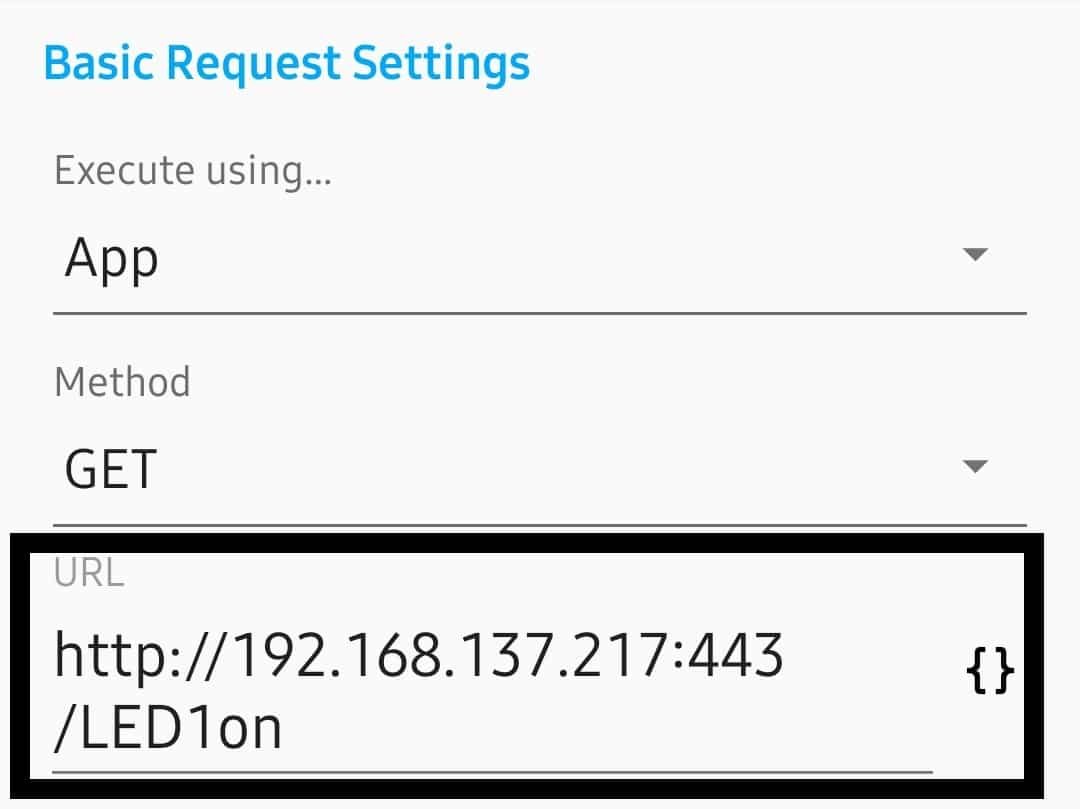
Scroll down to Authentication section and in this section, first of all, change the Authentication Method from No Authentication to Basic Authentication. If you remember we protect our web server with a password so that we have to make this change. If your web server is not password protected so keep the Authentication Method to No Authentication.
Write the Username and Password in their respected bars; in my case username is “User” and password is “1234”
If you forget the username and password then open your web server Arduino sketch and copy the encoded information and decode it using the online 64 bit converter. Scroll down to the last section which is Advance Settings change the Timeout and change it from medium (10 seconds) to short (3 seconds).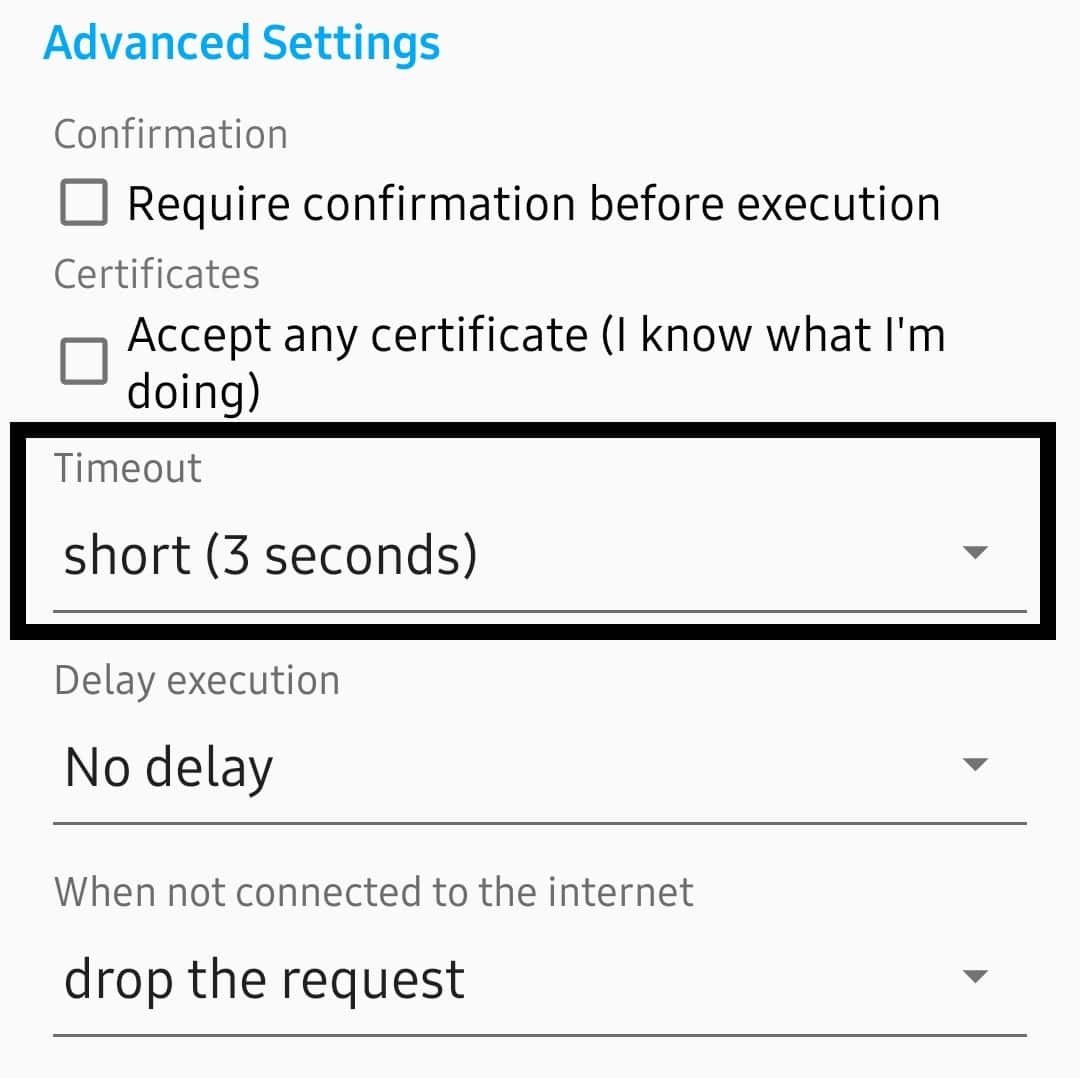
Press the play sign button to the left with the Tick sign in the top right corner. It will execute the shortcut if everything goes according to the plan LED1 On: execute message will appears on the screen. If something went wrong LED1 On: Timeout error message will appear. Then press the tick sign in the top right corner to create the shortcut widget.
Press the created shortcut until the below shown window will appear from which you can delete, edit, execute, cURL export, duplicate, and place on home screen. Press the first option to place the shortcut to the home screen.
Repeat this whole procedure to create multiple HTTP shortcut widget to control multiple GPIO’s. We also need to create a shortcut to off the LED. Keep in mind the following configuration for LED1 Off shortcut:
Shortcut Name: LED1 Off
Icon: Change the icon of your desire by pressing the icon
Method: GET
URL: http://ESP_IP_ADDRESS: server port number/LED operation label. In my case http://192.168.137.217:443/LED1off
Authentication Method: Basic Authentication
Username: User
Password: 1234
Response Type: Simple Toast
Timeout: short (3 seconds)
Delay execution: No delay
When not connected to the internet: drop the request
Save: Press the tick sign button on the top right corner
Then add this created shortcut to the home screen
Components Required
- ESP8266 Development Board (NodeMCU or Wemos D1 Mini)
- LEDs
- Resistors (100 ohms)
- Jumper Wires
- Breadboard
- Micro USB cable
- Smartphone
- Arduino IDE
Circuit diagram
We need four LEDs with suitable resistors, NodeMCU, breadboard and jumper wires. One terminal of resistors is connected to the cathode of each LED and other terminal connected to the ground pin. Anodes of the LEDs connected to D1 to D4 pins respectively.
That is all for this tutorial. So far we created a web server using NodeMCU ESP8266, design a circuit on breadboard, add username and password to webserver for protection, and create HTTP shortcut to control GPIO’s. Last and an important thing that is must for a good web server is port forwarding which we will be cover in the next tutorial. After port forwarding we can control the GPIO’s from anywhere round the globe.
You may also think to have a look on these ESP8266 tutorials:
Plz can I get code for battery percentage or level?