In this tutorial, we will learn to use ADC of Raspberry Pi Pico using MicroPython. In other words, we will learn to read Analog values using Analog to Digital Converter module of Raspberry Pi Pico using Thonny IDE and UpyCraft IDE. To provide an analog signal to ADC channel, we will interface a potentiometer with the Raspberry Pi Pico board and read its Analog value respectively.
ADC Raspberry Pi Pico Prerequisites
Before we start this lesson, make sure you are familiar with and have the latest version of Python3 installed in your system and set up MicroPython in your Raspberry Pi Pico. Additionally, you should have a running Integrated Development Environment(IDE) to do the programming. We will be using the same Thonny IDE as we have done previously when we learned how to blink and chase LEDs in MicroPython here:
If you are using uPyCraft IDE, you can check this getting started guide:
Raspberry Pi Pico ADC Channels
Raspberry Pi Pico has a 12-bit resolution which we can change according to our needs. It supports four 12-bit SAR based analog to digital converters. But only three analog channels are exposed to pinout. The fourth analog channel is internally connected to the internal temperature sensor. Therefore, if we want to measure temperature, we can directly use build-in temperature by reading the analog value of ADC4. The following table shows that the input signal for ADC0, ADC1, and ADC2 can be connected with GP26, GP27, and GP28 pins, respectively.
| ADC Module | GPIO Pins |
|---|---|
| ADC0 | GP26 |
| ADC1 | GP27 |
| ADC2 | GP28 |
A/D conversion can be performed in polling, interrupt, and FIFO with DMA mode.
ADC conversion speed per sample is 2μs that is 500kS/s. Because RP2040 microcontroller operates on 48MHZ clock frequency which comes from USB PLL. ADC takes 96 CPU clock cycles to perform one conversion. Therefore, the sampling frequency is
96 x 1 / 48MHz) = 2 μs per sample (500kS/s).Raspberry Pi ADC Resolution
The ADC resolution can be defined as the smallest input voltage at the analog pin that an ADC can identify and increments its digital value. The maximum and minimum digital output value of ADC depends on the number of bits of the ADC. For example, for an 8-bit ADC, the digital output value will be between 0-255, for a 10-bit ADC, the digital output value will be between 0-1023 and for a 12-bit ADC, the digital output value will be between 0-4095.
In Raspberry Pi Pico, there is a 12-bit SAR type ADC. Hence, the digital value will be between 0-4095. This means the maximum value 4095 corresponds to a 3.3V and a value of 0 corresponds to 0V. Any in-between corresponding values will also get assigned accordingly.
ADC resolution can be defined as:
Resolution = ( Operating voltage of ADC ) / 2^(number of bits ADC)
For example, the operating voltage of raspberry Pi Pico 3.3V and ADC is of 12-bit:
Resolution = 3.3V/2^12 = 3.3/4095 = 0.8mV
Therefore, for every 0.8mV on ADC input, the digital value will increment and if we apply 3.3V to the input pin of ADC, the digital output value of ADC will be 4095.
Similarly, if we measured a digital value of ADC with a Raspberry Pi Pico, we can convert it back into a voltage by multiplying it with the resolution value. For example, the measured digital output value is 3500, we can convert it into a voltage by multiplying it by 0.8mV.
Input Voltage = 3500 x 0.8mV = 2800mV or 2.8V
Note: We can measure higher voltages such as high DC voltage, AC voltage also. But we have to use signal conditioning circuits.
Reading Analog Inputs with Raspberry Pi Pico using MicroPython
We will now learn how to read the Analog inputs from Raspberry Pi Pico using a variable resistor i.e. a potentiometer.
The following diagram shows the connections of the potentiometer. The center terminal gives the output and the two terminals on the sides are provided VCC and ground respectively.
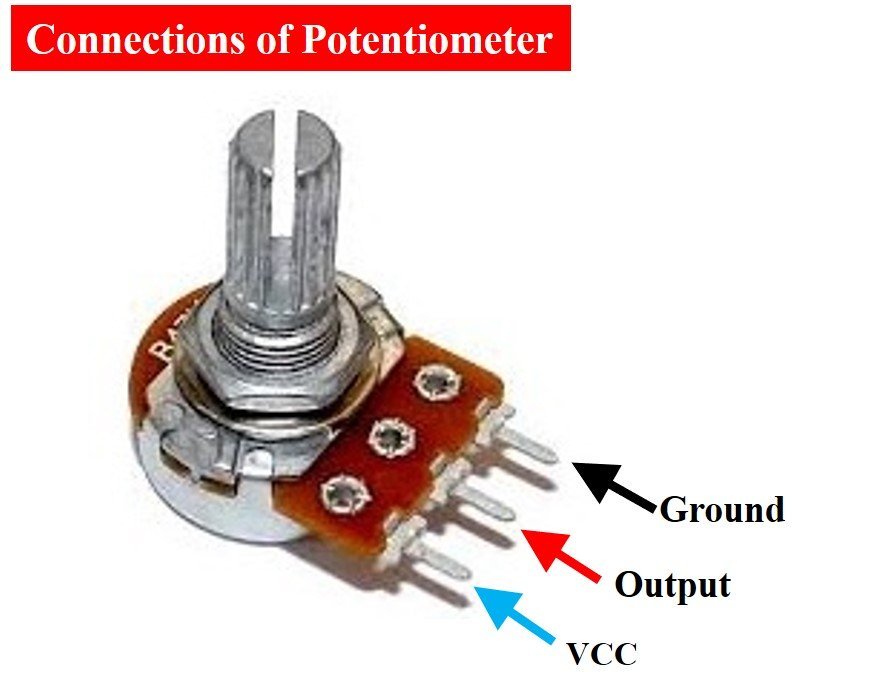
We will connect the potentiometer with any Analog channel on our board. By turning the upper knob of the potentiometer, variable input voltages would be supplied which would be converted to their corresponding digital values through the ADC module in our microcontroller. The following components are required to perform this procedure:
Required Components:
- Raspberry Pi Pico
- Breadboard
- Potentiometer
- Connecting Wire
Raspberry Pi Pico ADC Connection Diagram
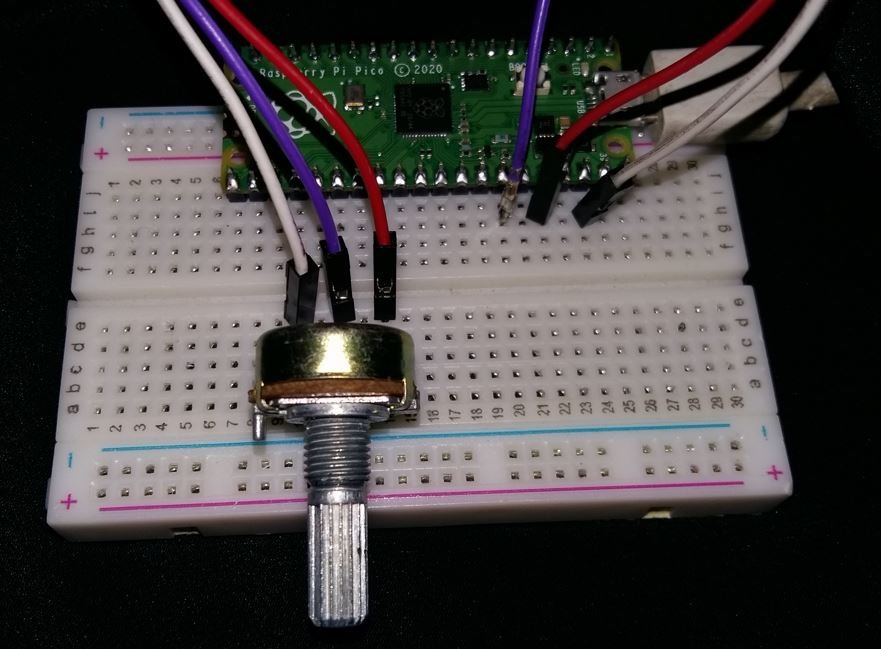
The below picture shows the schematic for Raspberry Pi Pico with a potentiometer. Assemble your circuit as follows:

As we can see one terminal of the potentiometer is powered by 3.3V, the centre terminal is connected to an ADC pin, GP28 in our case and the last one is grounded (black).
MicroPython ADC Library
In order to read Analog inputs in our Raspberry Pi Pico we have to follow three steps:
- Importing the ADC class.
from machine import ADCSecondly, creating an ADC object for the variable resistor in the form of ADC(Pin), in which Pin is the number of the GPIO you want to read the Analog values from.
For the case of Raspberry Pi Pico if we want to connect our input from GP28 we will use ADC(28) to read its value.
potentiometer = ADC(28)
Lastly, in order to read the Analog value using the read_u16() method on the ADC object to get the required value. We will get readings from 0-65535 as the 12-bit resolution has been scaled to 16 bit here.
potentiometer_value = potentiometer.read_u16() ADC MicroPython Script
Following is the MicroPython script to read Analog input for Raspberry Pi Pico:
from machine import Pin, ADC            #importing Pin and ADC class
from time import sleep                  #importing sleep class
potentiometer = ADC(28)           #creating potentiometer object

while True:
        potentiometer_value = potentiometer.read_u16()   #reading analog pin
        print(potentiometer_value)                   #printing the ADC value
        sleep(0.25)
How Code Works?
Now I will explain the steps in which the program code is working. Firstly in order to read the Analog input, we will import the ADC class. The Pin class is also imported in order to interact with the input/output GPIOs. We will import the machine module that contains classes to interact with the GPIOs. The sleep module is also imported for use in delays.
from machine import Pin, ADC
from time import sleep
Create ADC Object for Raspberry Pi Pico
Then we created an ADC object named potentiometer on GP28.
potentiometer = ADC(28) Reading Digital Value
Next we used an infinite while loop which reads the Analog value from the potentiometer endlessly. Using the read_u16() method, we read the value of the potentiometer and store them in the variable ‘potentiometer_value.’
potentiometer_value = potentiometer.read_u16()Lastly we print the potentiometer value and give a delay of 0.25 seconds before another value is printed.
print(potentiometer_value)
sleep(0.25)
MicroPython ADC Code Demo
Now let’s see the output of the above-given MicroPython script. Follow these steps to create new project in Thonny IDE:
- First, create a new file by clicking on File > New in Thonny IDE.
- Copy the code to the new opened untitled window.
- After that click on the “Save” icon. This gives two options to save this file either to your computer or directly to your devices such as Raspberry Pi Pico. That means we can also directly upload files to a device. But for now, save it on your computer. You can select any location in your computer where you want to save this file. Save it as ADC.py (You can use any other name as well just make sure it ends in .py)
- Now click on the “Run” button to upload code to Raspberry Pi Pico. Before uploading code make sure the correct board is selected.
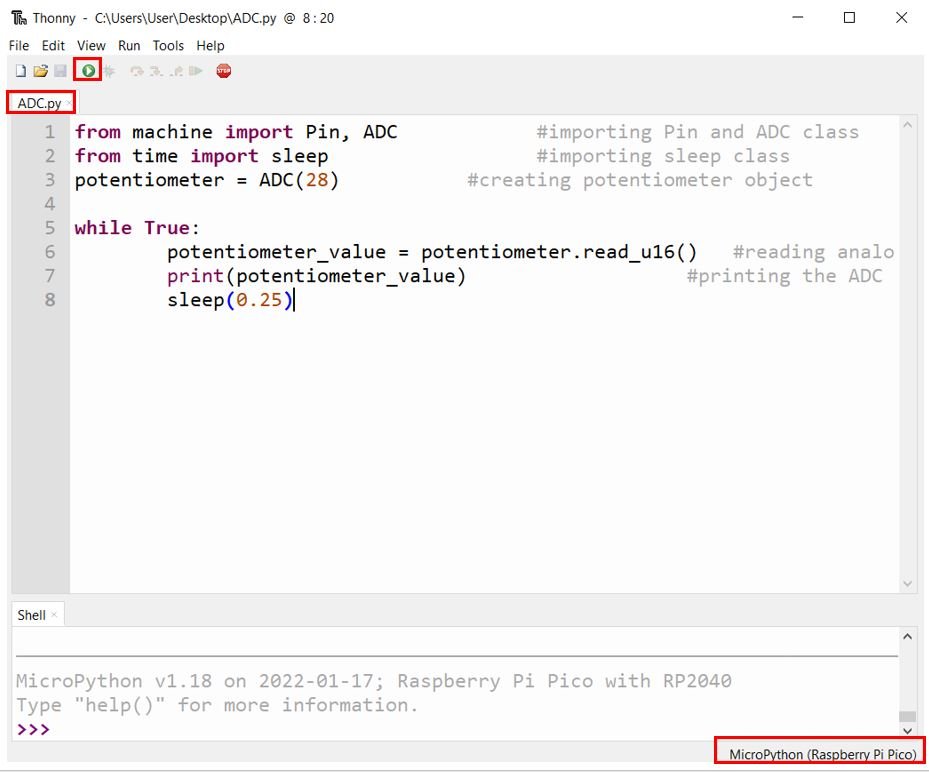
When you run this code on your Raspberry Pi Pico and rotate the potentiometer knob, you will get the value of ADC after every 0.25 seconds as you can see in the figure below:

Analog Voltage Measurement Raspberry Pi Pico MicroPython
In the last section, we have seen how to convert Analog signal into digital value using MicroPython with Raspberry Pi Pico. Similarly, we can also convert measured digital value back into voltage by multiplying digital value with the resolution of ADC which is 3.3/65536.
Now let’s see an example to measure Analog voltage signal using MicroPython with Pi Pico.
Analog Voltage Measurement MicroPython Script
from machine import Pin, ADC            #importing Pin and ADC class
from time import sleep                  #importing sleep class

potentiometer = ADC(28)            #creating potentiometer object

while True:
 potentiometer_value = potentiometer.read_u16() * 3.3 / 65536  #reading analog pin
 print(potentiometer_value)                   #printing the ADC value
 sleep(0.25)
Again, upload this code to your board, you will get measured voltage value on shell console instead of digital output value:
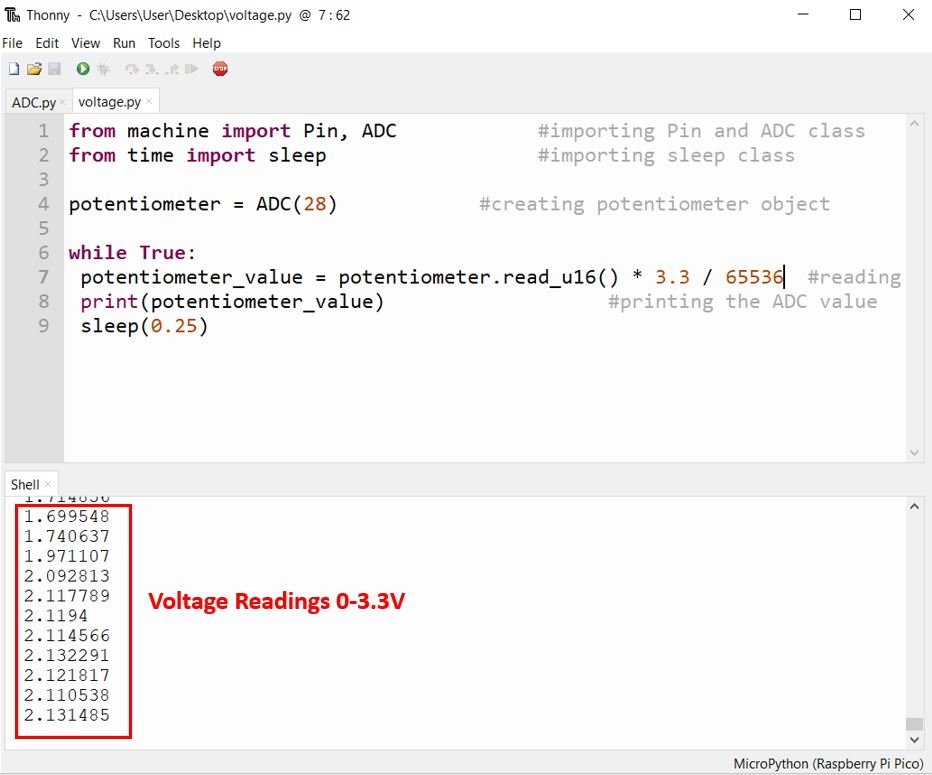
In this line, we multiply the ADC digital value with a resolution of Raspberry Pi Pico ADC which is 3.3/65536. It will provide output in the form of voltage.
potentiometer_value = potentiometer.read_u16() * 3.3 / 65536In this tutorial, we learned how to read analog values using MicroPython with Raspberry Pi Pico board and how to measure DC voltage with ADC of Pico board. You can further extend it to measure higher voltages such as AC voltage by using an appropriate voltage divider and voltage step-down circuits.
You may also like to read these getting started guides:
How is the code for programming the Pico with the help of the Arduino IDE?
I think to reduce the impact of potential interference you should use AGND (pin 33) instead of GND (pin 38)
Thanks for the suggestion – it does seem to make a small improvement. I’m using a small 10 kohm, 12 turn Bourns potentiometer with the wiper connected to GP26/ADC0, and a 100pf cap from the wiper to ground. I’m running a slightly-modified version of the `hello-adc` example from the C SDK.
Initially, I was amazed at how much variance I was getting from consecutive readings. Adding the 100pf cap smoothed the variance a bit, and your suggestion for AGND has smoothed the readings a bit more.
Just watching the numbers go by now, I see this range over 15-20 measurements:
1.025610 – .993384 ~ 32 mV
This is 40 units of ADC resolution (0.8 mV) – that still seems a bit much.
The potentiometer is a high impedance and so the sampling current from the SAR ADC has a huge impact. A much larger cap, with short leads should help.
It’s unfortunate the ADC can’t use an external voltage reference, since the 3.3V is pretty noisy and poorly regulated.
I take 1000 readings and average them, I then have to multiply the voltage reading by 0.95 to get it to correspond to the multimeter.
I know this is old but but Im having to do the same with the .95
except I have to divide.
battery.read_u16() * 3.3 / 65536 *2 /.95
The *2 is because I have the battery feeding the input (28) through a voltage divider. Do you know why you have to use the .95?
In reply to Paulk
If you have a accurate voltmeter measure the 3.3V reference and use this reading in place of the 3.3 in your code.
This should give more accurate readings for anyone.
The pico 3.3v will vary quite a few ADC bits with each different Pico.
while True:
rvdc=machine.ADC(26).read_u16()
print(rvdc,” “,end=””)