In this tutorial, we will learn to design a basic calculator using LabVIEW VI. In simple words, we will try to design a simple calculator that will allow us to add, subtract, multiply, and divide two numbers. It will first ask us to enter two operands, and then we will select the operator. After that, the VI will return the output of the operation applied to the entered operands. At the end of the tutorial, we have provided an exercise for you to do on your own. In the next tutorials, we will assume that you have done those exercises, and we will not explain the concept regarding them.
Design Calculator in LabVIEW
Let’s look at a basic calculator for this tutorial. It can perform basic mathematical operations such as addition, subtraction, multiplication, and division between two operands. Using this concept, we will now try to develop a similar VI in LabVIEW.
The simple two-operand calculator implemented in LabVIEW will offer a user-friendly interface for performing basic arithmetic operations. We will be able to input two operands and choose from fundamental operations such as addition, subtraction, multiplication, or division. This project not only aids in grasping the fundamentals of LabVIEW programming but also lays the foundation for more complex calculations and user interface designs in the future.
Design Calculator in LabVIEW Example
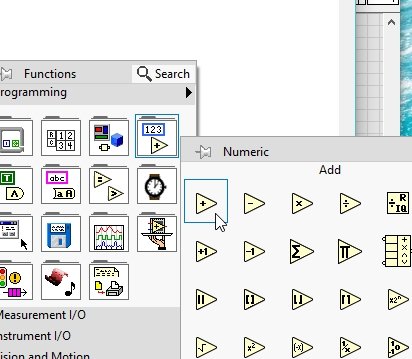
Let’s now move to the designing part as we create a VI as we have discussed in Tutorial 1 and save it for future use, as we have been doing in all previous tutorials. From the Function Palette on the block diagram, select Numeric and then select Add, as shown in the figure below.
On the input side of this block, two nodes are present. Right-click on that node, and a drop-down menu will appear. From that menu, select create and then control. This will create an input control for the input of the operands, as shown in the figure below.
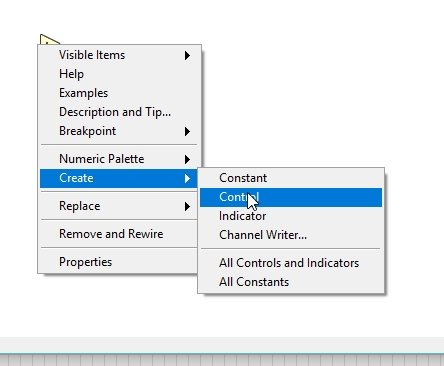
Repeat the same step for the second input of the Add block. Now, at the output of this block, one node is present. Right-click on that node, and from the drop-down menu, select create and then indicator. This will create an indicator to display the output, as shown in the figure below.

Addition Block Diagram
The complete block diagram for adding two numbers is shown in the figure below.

Here, we will need an enumerated control to select the case for operation. On the front panel, press right-click, and from the Control Palette, select Rings & Enum, and then select the Enum as shown in the figure below.

On this block, press right-click, and from the drop-down menu, select Edit Items, as shown in the figure below.

This will display a window, as we have already discussed in previous tutorials. Create four items in the enum control window named add, subtract, multiply, and divide, as shown in the figure below, and click OK.

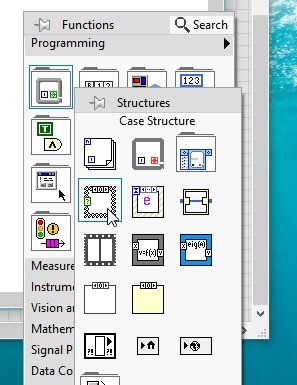
Now come to the cases part. We will need to select the case for each operation, i.e., add, subtract, etc., depending upon the enum controls’ input. Therefore, we will need a case structure, which we have already used in previous tutorials. From the Function Palette, select Structures, and then select Case Structure, as shown in the figure below.
Place the add block on the block diagram inside the case structure and all other indicators and controls outside it, as shown in the figure below.
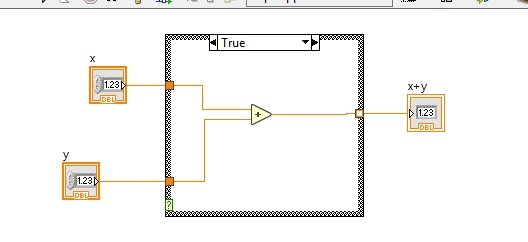
Now, connect the enum control we created previously to the case selector node of the case structure, as shown in the figure below.

The case for this operation will be automatically selected as subtracts. Right-click on the case structure boundary, and from the drop-down menu, select Make This Case “add”, as shown in the figure below.

Subtraction case
Now change the selector label to Subtract, and from the Function Palette, select Numeric, and then select Subtract as shown in the figure below.

Connect the input side of this block to the input nodes of the case structure and the output side to the output node of the case structure, as shown in the figure below.

By default, the case selector has only two cases, but in our case, we need four, so we have to add two more. Right-click on the boundary of the case structure, and from the dropdown menu, select Add case after, as shown in the figure below.

Multiplication case
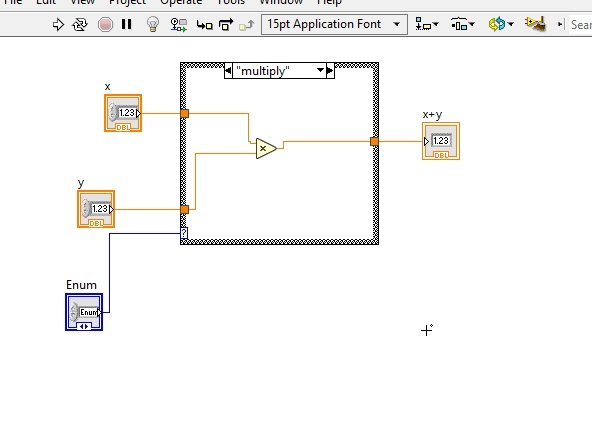
Now change the selector label to Multiply, and from the Function Palette, select Numeric, and then select Multiply, as shown in the figure below.

Firstly, connect the input side of this block to the input nodes of the case structure. Then connect the output side to the output node of the case structure, as shown in the figure below.
Division case
Now change the selector label to Divide, and from the Function Palette, select Numeric. After this, select Divide, as shown in the figure below.

Connect the input side of this block to the input nodes of the case structure and the output side to the output node of the case structure, as shown in the figure below.

Output of Calculator
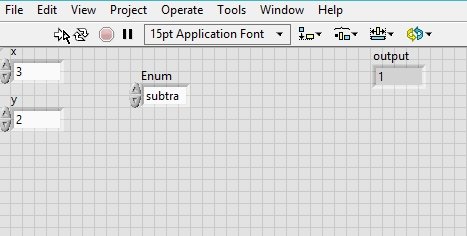
On the front panel, enter two values into the input control of the LabVIEW calculator. Then, from the enum control, select the operation to perform and run the VI. The figures below show the output of every operation for the same operands.


Exercise
- Try to evaluate square root and square function as well in this LabVIEW calculator in addition to simple mathematical operations
Conclusion
In conclusion, this tutorial provides an in-depth overview of designing a basic calculator in LabVIEW’s VI. It also covers a step-by-step explanation of designing a block diagram for this purpose. This helps us better understand the concept of designing a basic calculator in LabVIEW. You can utilize this concept to build a more complex calculator using more than two operands. We hope that this tutorial has been helpful in expanding your knowledge of LabVIEW programming.
You may also like to read
- How to use Transformer in Proteus
- VIPER22A SMPS Controller IC – Explained with Example Circuit
- HC-SR04 Ultrasonic Sensor with STM32 Blue Pill using STM32CubeIDE
- TCA9548A I2C Multiplexer Arduino Use Same Address I2C Devices
- Control ESP32 Outputs using Google Assistant and Adafruit IO
This concludes today’s tutorial. If you face any issues or difficulties, let us know in the comment section below.