In this tutorial, we will see how to retain or remember the last state of GPIO pins on the ESP32 board after a reset using the Preferences library in Arduino IDE. Normally, when the ESP32 loses power or restarts, the previous state of the output is lost, causing potential disruptions in the system. However, with the Preferences library, the ESP32 can remember and retain its last state even after being powered off or restarted. This valuable feature ensures that the ESP32 maintains its previous output state, offering a smooth and uninterrupted experience, even during power interruptions or restarts. By implementing this memory-saving technique, the ESP32 becomes more reliable and suitable for various IoT, automation, and embedded projects, where preserving the last known state of GPIO pins is essential for proper functionality and data integrity.
You can read an in-depth guide on the Preferences library here:

Recommended reading: Push button with ESP32 – GPIO pins as digital input
For this example, we will use an LED connected to the output GPIO of the ESP32 board and a pushbutton that will control the state of the LED.
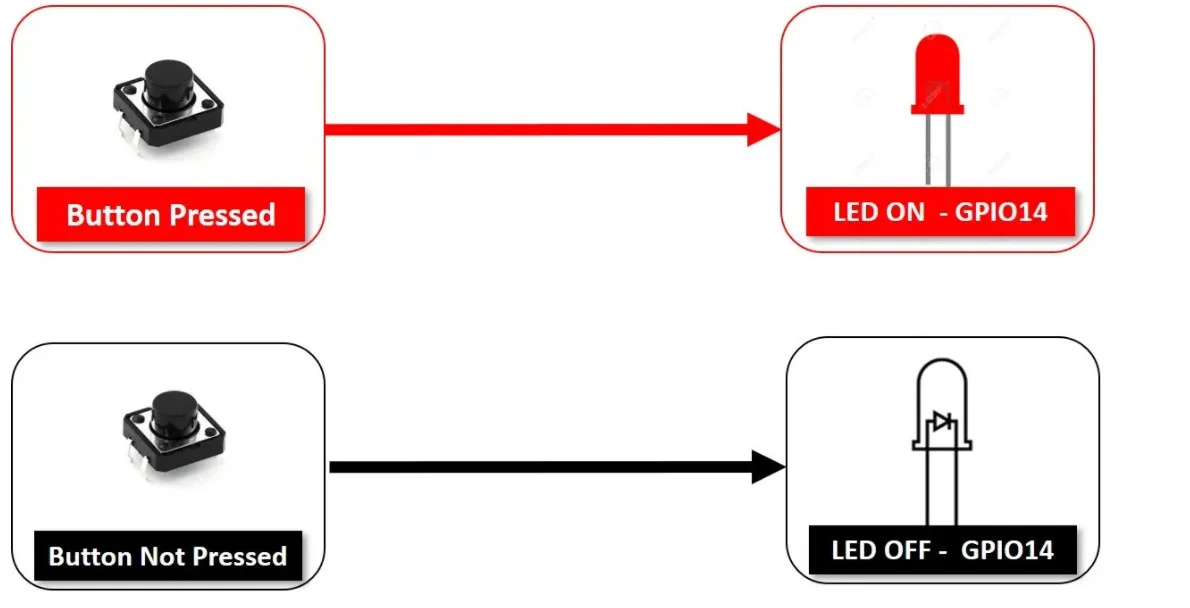
We will save the last state of the LED in the ESP32’s flash memory. The figure below shows the process.

The push-button will be pressed which will cause the LED to turn ON, logic state HIGH (1). Now we will restart the ESP32 board. Normally, after the restart the LED should be OFF but in this case, it will remember its last state and the LED will remain ON.
You will require the following components for this project:
Required Components
- ESP32 module
- One LED
- 220 ohm resistor
- 10k ohm resistor
- Breadboard
- Connecting wires
Schematic Diagram
Assemble your circuit as shown in the schematic diagram below.
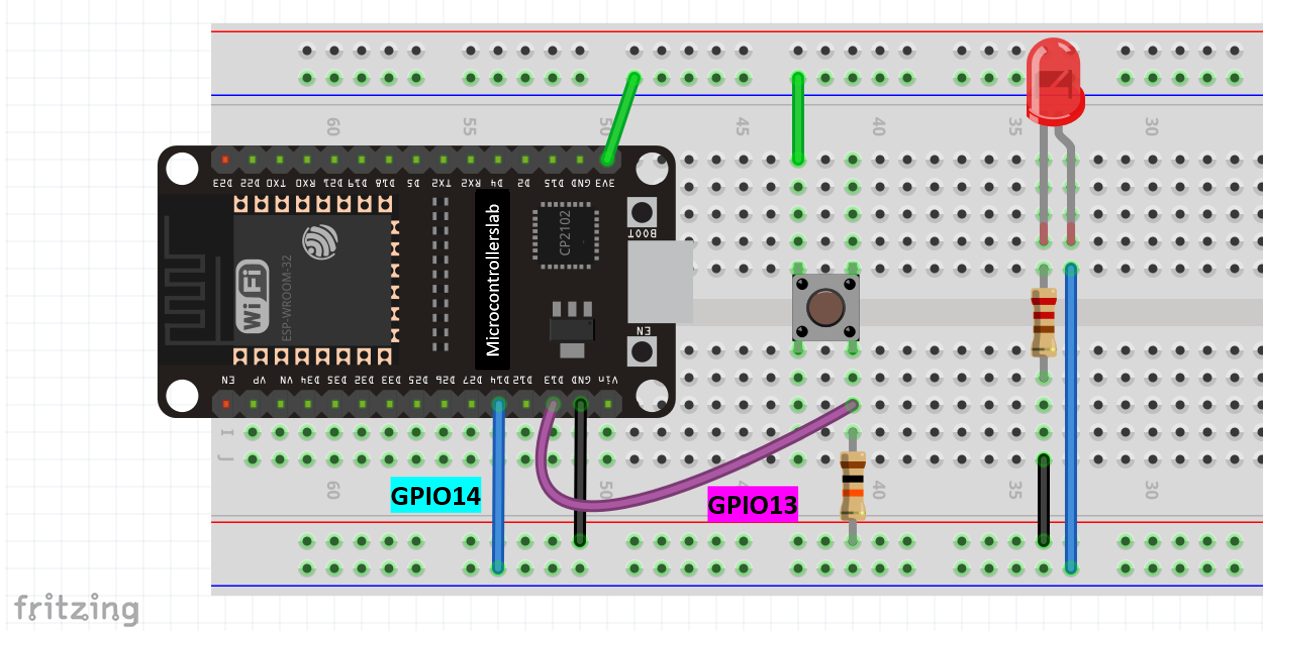
In the setup, we have GPIO14 connected to the anode pin of an LED, and the cathode pin is linked to the common ground via a 220-ohm resistor. For the push-button, it has four terminals. One terminal is powered by 3.3 volts from the ESP32, while the second terminal connects to GPIO 13 and a 10k ohm resistor, serving as a pull-down resistor. The other end of the resistor is connected to the common ground.
ESP32 Code
The ESP32 code given below, will toggle the LED state through the push button and also remember the last state of the GPIO output as we will save it on the Preferences consistently as it continues to change.
#include <Preferences.h>

Preferences preferences;

const int push_buttonPin = 13;
const int led_Pin = 14;

bool led_State;
bool buttonState;
int lastButtonState = LOW;

unsigned long lastDebounceTime = 0;  // the last time the output pin was toggled
unsigned long debounceDelay = 50;    // the debounce time; increase if the output flickers

void setup() {
  Serial.begin(115200);


  preferences.begin("GPIO", false);

  pinMode(push_buttonPin, INPUT);
  pinMode(led_Pin, OUTPUT);

  // read the last LED state from flash memory
  led_State = preferences.getBool("state", false);
  Serial.printf("LED state before reset: %d \n", led_State);
  // set the LED to the last stored state
  digitalWrite(led_Pin, led_State);
}

void loop() {
  int reading = digitalRead(push_buttonPin);

  if (reading != lastButtonState) {
    lastDebounceTime = millis();
  }
  if ((millis() - lastDebounceTime) > debounceDelay) {
    if (reading != buttonState) {
      buttonState = reading;
      if (buttonState == HIGH) {
        led_State = !led_State;
      }
    }
  }
  lastButtonState = reading;
  if (digitalRead(led_Pin)!= led_State) {
    Serial.println("State is changed");

    digitalWrite(led_Pin, led_State);

    // save the LED state in flash memory
    preferences.putBool("state", led_State);

    Serial.printf("State saved: %d \n", led_State);
  }
}
How does the Code Work?
We will start by importing the Preferences library and creating its instance named ‘preferences.’
#include <Preferences.h>
Preferences preferences;
Inside, the setup() function, we will use the begin() method on the Preferences instance to create a storage space for the namespace “GPIO.” We will be able to both read/write this namespace as we have passed false as the second argument inside the method.
preferences.begin("GPIO", false);By using, the getBool() method we will acquire the GPIO state which will be saved on the Preferences, and save it in the variable led_State.
led_State = preferences.getBool("state", false); The following line will print this LED state on the serial monitor.
Serial.printf("LED state before reset: %d \n", led_State);

digitalWrite(led_Pin, led_State);
In the infinite while loop, whenever there is a change in the state of the GPIO, the state key which was saved on the Preferences will keep on getting updated.
// save the LED state in flash memory
preferences.putBool("state", led_State);

Serial.printf("State saved: %d \n", led_State);
Demonstration
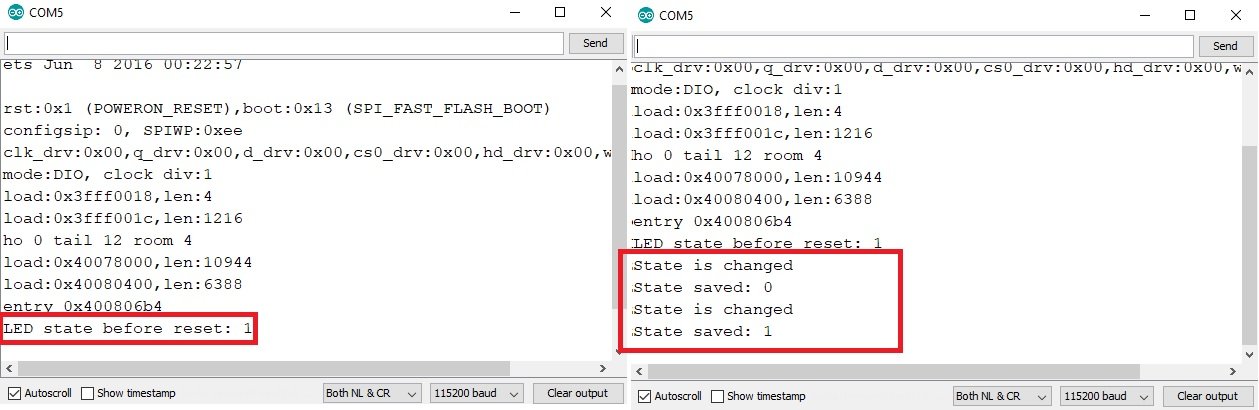
Upload this Arduino sketch to your ESP32 board. After that, press the ENABLE button on your module. Now, press the push button to change the state of the LED. The LED will turn ON.
Now, restart your ESP32 board. After restarting the board, the LED will turn ON again as the ESP32 remembered the last state which was saved on the Preferences.
Open the serial monitor to view the different messages as the states keep on getting updated as you press the push button and restart the board.
Conclusion
In summary, this article provided a practical example of how the ESP32 microcontroller can retain the last state of GPIO pins using the Preferences library. Without it, the ESP32 loses its output state when power is interrupted or during restarts. However, by using the Preferences library, the ESP32 can save and recall its last state even after power loss or restart. This valuable feature makes the ESP32 more reliable for various IoT, automation, and embedded projects. With the ability to preserve the last known state of GPIO pins, developers can ensure data integrity and maintain continuous operation, enhancing the overall performance of their applications.
You may also like to read:
Hi. Great article. Well done. I’ve bought an ESP32 controller board. Its on route. It’s for controlling 3m of WS2815B led strip for the rear of my TV. I need the last light sequence mode set on the app since power down to start automatically when I power up the tv and these lights which will both be connected to the same mains power point. Never occurred to me that the ESP32 would lose this last state. Most Christmas lights have a “Memory Function” that ensures that they come back on in that last state. Will the DSP32 do this natively? Or do I need your coding to ensure it remembers? Does that make sense. Thanks. Tommy.