In this tutorial, we will learn how to get the current date and time from the NTP server with ESP32 acting as an NTP client and Arduino IDE. Accurate timekeeping is important for IoT applications and the NTP protocol provides a reliable way to synchronize the ESP32’s internal clock with a time server on the internet. By following this step-by-step guide, you will learn how to obtain precise time information from NTP servers, enabling you to synchronize your ESP32 projects with the global standard time.
In the data logger applications, the current date and timestamp are useful to log values along with timestamps after a specific time interval.
The time.h header file provides the current updated date and time. We can update drift in RTC time using NTP server.

We have a similar guide with ESP8266 NodeMCU:
Getting Current Date and Time with ESP8266 NodeMCU using NTP Server
Recommended Components
The following components are used in this project or are helpful for building it with the ESP32.
| Component | How it’s used in this project | Buy on Amazon |
|---|---|---|
| ESP32 Development Board (DevKit V1) | The main board that runs the project firmware. | Check Price |
| Micro USB Cable | Connects the board to your computer to upload code and power it. | Check Price |
| Breadboard | Holds the board and components together while you wire up the project. | Check Price |
| Jumper Wires | Make the connections between the board and any external parts. | Check Price |
As an Amazon Associate we earn from qualifying purchases. Prices and availability are accurate as of the date/time indicated and are subject to change.
Why We Need to Get Current Date and Time of NTP Server?
In many electronic projects, working with accurate time is essential, whether it’s displaying it to the user or performing specific operations at specific times. However, the generic Real-time clock (RTC) chips may not always provide the precision required. The internal clocks of devices like ESP32 may not be highly accurate, and they can drift over time due to various factors like temperature changes or component aging. By querying an NTP server, which typically uses highly accurate time sources like atomic clocks or GPS, the ESP32 can synchronize its internal clock and maintain a more accurate time reference.
A more precise solution involves accessing the central NTP server via the Internet to obtain accurate date and time information. The NTP server is widely used worldwide and offers timestamps with a precision of a few milliseconds of the Coordinated Universal Time (UTC) without the need for additional hardware setup and costs. By utilizing the Network Time Protocol (NTP) server, we can easily request the current date and time through our local WIFI network. This ensures that our electronic projects have reliable and synchronized time information.
Network Time Protocol (NTP)
NTP is a standard internet protocol that is widely used to synchronize computer clocks to a reference network. With a precision of approximately 50ms over the wide-area network (WAN) and less than 5ms over the local area network (LAN), it synchronizes epoch time of all networked devices to the UTC.
NTP Server Architecture
The NTP Server is based on a hierarchical structure consisting of three levels where each level is known as the stratum. In the first level (Stratum 0) there are highly precise atomic/radio clocks that provide the exact time. The second level (Stratum 1) is directly connected with the first level and thus contains the most precise time available which it receives from the first level. The third and last level (Stratum 2) is the device that makes the request to the NTP server for the date/time from the second level. In the hierarchy, each level synchronizes with the level above it.

NTP Server Working
To get the date and time with our ESP32 through the NTP server, the server will operate in the client-server model. We will use the NTP server: pool.ntp.org which is easily accessible for everyone worldwide. Our ESP32 development board will be the client and will connect to the NTP server through UDP on port 123. Through this port, the server (pool.ntp.org) will be able to connect with the client. The ESP32 will send a request to the server after the connection will be established. When the NTP receives the request, it will transmit the time stamp containing the information regarding the time and date.

Getting Date & Time from the NTP Server
We will upload a program code in our ESP32 board using Arduino IDE which will connect to the NTP server through our local network and we will request the current date and time. These values will then get displayed on our serial monitor automatically.
One thing to take into account while accessing the time for your time zone is to look for the daylight savings and the Coordinated Universal Time (UTC) offset.
If your country observes daylight savings (click here to check) then you will have to incorporate it in the program code by adding 3600 (in seconds) otherwise it will be replaced by a 0. Pakistan does not observe daylight savings so we will add 0 in the daylight offset variable in the code.
For the UTC offset, click here to check for your time zone and add the offset in the program code by converting it in seconds.
For example, for the United States the UTC is -11:00 so converting it in seconds it becomes:
-39600 (-11*60*60).
For Pakistan, the UTC offset is +05:00 so in our code, we will specify the GMT offset which is the same as the UTC offset in seconds as 18000 (5*60*60).
Preparing Arduino IDE
Open your Arduino IDE and make sure you have the ESP32 add-on already installed in it.
Recommended Reading: Install ESP32 in Arduino IDE ( Windows, Linux, and Mac OS)
Now go to File > New and open a new file. Copy the code given below in that file and then save it.
ESP32 Code
#include <WiFi.h>
#include "time.h"

const char* ssid       = "SSID_NAME";   //Replace with your own SSID
const char* password   = "YOUR_PASSWORD";  //Replace with your own password

const char* ntpServer = "pool.ntp.org";
const long  gmtOffset_sec = 18000;   //Replace with your GMT offset (seconds)
const int   daylightOffset_sec = 0;  //Replace with your daylight offset (seconds)

void setup()
{
  Serial.begin(115200);

  //connect to WiFi
  Serial.printf("Connecting to %s ", ssid);
  WiFi.begin(ssid, password);
  while (WiFi.status() != WL_CONNECTED) {
      delay(500);
      Serial.print(".");
  }
  Serial.println("CONNECTED to WIFI");

  //init and get the time
  configTime(gmtOffset_sec, daylightOffset_sec, ntpServer);
  printLocalTime();

  //disconnect WiFi as it's no longer needed
  WiFi.disconnect(true);
  WiFi.mode(WIFI_OFF);
}

void loop()
{
  delay(1000);
  printLocalTime();
}
void printLocalTime()
{
  struct tm timeinfo;
  if(!getLocalTime(&timeinfo)){
    Serial.println("Failed to obtain time");
    return;
  }
  Serial.println(&timeinfo, "%A, %B %d %Y %H:%M:%S");
}
How the Code Works?
In this section, we will understand how the code will work.
First, we will define the necessary libraries at the start of the code. We will define two libraries: WiFi.h and time.h. The first library is required so that our ESP32 board can connect with the local WIFI network and hence connect with the NTP server. Also, the time library will help us to achieve the NTP synchronization and get the time.
#include <WiFi.h>
#include "time.h"
Then, we will create two global variables of type char which will hold the network credentials through which our ESP32 module will connect. These are named ssid and password. To ensure a successful connection, replace their values with your network credentials.
const char* ssid       = "SSID_NAME";
const char* password   = "YOUR_PASSWORD";
Next, we will define three more variables, one for the NTP server which we will specify as “pool.ntp.org” and the two others for the GMT and the daylight offset in seconds. We have specified the offsets for Pakistan but you can change them according to your time zone to obtain the correct time.
const char* ntpServer = "pool.ntp.org";
const long  gmtOffset_sec = 18000;   //Replace with your GMT offset (seconds)
const int   daylightOffset_sec = 0; //Replace with your daylight offset (seconds)
Inside our setup() function, we will initialize the serial communication at a baud rate of 112500 as we want to display the current date and time on our serial monitor by using serial.begin().
Serial.begin(115200);The following section of code connects the ESP32 module with the local network. We will call WiFi.begin() and pass the SSID and password variables inside it which we defined before.
After a successful connection has been established, the serial monitor will display the message “CONNECTED to WIFI”.
  Serial.printf("Connecting to %s ", ssid);
  WiFi.begin(ssid, password);
  while (WiFi.status() != WL_CONNECTED) {
      delay(500);
      Serial.print(".");
  }
  Serial.println("CONNECTED to WIFI");
Next, we will use the configTime() function and pass three arguments inside it. The arguments will be the GMT offset, the daylight offset and the NTP server respectively. All of these three values were already defined by us.
configTime(gmtOffset_sec, daylightOffset_sec, ntpServer);printLocalTime()
void printLocalTime()
{
  struct tm timeinfo;
  if(!getLocalTime(&timeinfo)){
    Serial.println("Failed to obtain time");
    return;
  }
  Serial.println(&timeinfo, "%A, %B %d %Y %H:%M:%S");
}
Inside our infinite loop function, we will call the printLocalTime() function which will display the current time and date on our serial monitor. We will define this function by first creating a time structure named timeinfo. This will hold all the information relating to the time e.g., the number of hours/minutes/seconds.
Then, we will use the getLocaltime() function to transfer our request to the NTP server and analyze the time stamp which will be received in a human-readable format. Notice that we are passing the time structure as a parameter inside this function. By accessing the members of this time structure (timeinfo) we will acquire the current date and time which we will print on our serial monitor.
The table shows the specifiers which we can use to access a particular configuration of the date/time.
| Specifier | Description | Example |
|---|---|---|
| %A | Full weekday name | Saturday |
| %a | Abbreviated weekday name | Sat |
| %B | Full month name | January |
| %b or %h | Abbreviated month name | Jan |
| %D | Short MM/DD/YY date | 09/12/07 |
| %d | Day of the month (01-31) | 12 |
| %F | Short YYYY-MM-DD date | 2007-09-12 |
| %H | The hour in 24-hour format (00-23) | 13 |
| %I | The hour in 12-hour format (01-12) | 08 |
| %j | Day of the year (001-366) | 78 |
| %Y | Year | 2021 |
| %y | Last two digits of the year (00-99) | 21 |
| %m | Month as a decimal number (01-12) | 02 |
| %M | Minute (00-59) | 12 |
| %p | AM or PM | AM |
| %r | 12-hour clock time | 05:12:32 am |
| %R | 24-hour time HH: MM | 13:22 |
| %S | Second (00-59) | 32 |
| %T | Time format HH: MM: SS | 09:12:01 |
We will access the full weekday name, the full name of the month, day of the month, the year, the hour in the 24-h format: Minute: Second in a single line and display on our serial monitor through the line which is given below.
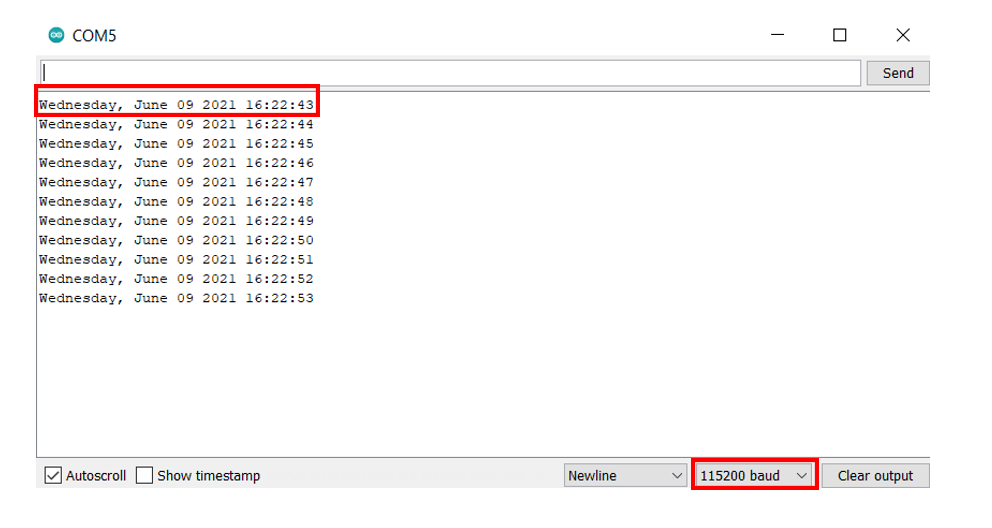
Serial.println(&timeinfo, "%A, %B %d %Y %H:%M:%S");Demonstration
After uploading the Arduino sketch to your ESP32 module press the ENABLE button.

Now open your serial monitor and you will be able to see the current date and the time after every 1 second.
Conclusion
In conclusion, the NTP server plays a crucial role in obtaining the current time and date for our ESP32 development board, which is connected to a stable WIFI connection. By querying the NTP server, we ensure that our ESP32 device has access to accurate and synchronized time information. This enables us to display the correct time to users, log events with precise timestamps, and coordinate activities with other devices in a networked environment. The NTP server’s ability to provide highly accurate time data enhances the reliability and functionality of our ESP32 projects, making it an essential component for accurate timekeeping.
You can view further articles regarding Epoch time by accessing the links below:
- Getting Epoch/Unix time with ESP8266 NodeMCU through NTP server using Arduino IDE
- Getting Epoch/Unix time with ESP32 through NTP server using Arduino IDE
Compilation error: invalid conversion from ‘const char*’ to ‘char*’ [-fpermissive]
error in code
Hi, thanks for the info, now I have a question , it is posible to obtain the time froma a local NTP server instead of “pool.ntp.org” , We have an NTP server with an IP for example (192,168,0,1), how do I replace the NTP.org with my local Server.
Thanks.