In this tutorial, we will learn to get Getting Epoch and Unix time with ESP32 through the NTP server using Arduino IDE. Accurate timekeeping is important for IoT applications and the NTP protocol provides a reliable way to synchronize the ESP32’s internal clock with a time server on the internet.
By following this step-by-step guide, you will learn how to obtain precise time information from NTP servers and convert it into Epoch or Unix time format, enabling you to synchronize your ESP32 projects with the global standard time. In the data logger application, Epoch timestamp is useful to log values along with timestamps. Epoch time is also known as Unix epoch, Unix time, POSIX time, or Unix timestamp.
To get Epoch time, we use getLocalTime() function available in Arduino. It will return the structure which contains the time elapsed since January 1, 1970.

We have a similar guide with ESP8266 NodeMCU:
Recommended Components
The following components are used in this project or are helpful for building it with the ESP32.
| Component | How it’s used in this project | Buy on Amazon |
|---|---|---|
| ESP32 Development Board (DevKit V1) | The main board that runs the project firmware. | Check Price |
| Micro USB Cable | Connects the board to your computer to upload code and power it. | Check Price |
| Breadboard | Holds the board and components together while you wire up the project. | Check Price |
| Jumper Wires | Make the connections between the board and any external parts. | Check Price |
As an Amazon Associate we earn from qualifying purchases. Prices and availability are accurate as of the date/time indicated and are subject to change.
What is epoch time?
Epoch time, also known as Unix time or POSIX time, is a system for representing time as a single integer value, which is the number of seconds that have passed since the Unix epoch which is 00:00:00 UTC on 1 January 1970, minus leap seconds. It tracks the time in seconds and is calculated from the same point in time regardless of time zones. It is commonly used in different file formats and operating systems.
This time representation has several advantages, including simplicity and ease of computation, as well as compatibility across different platforms and programming languages. By using epoch time, software developers can perform various time-related calculations, such as measuring time intervals, determining time differences, and handling timestamps, using straightforward arithmetic operations.
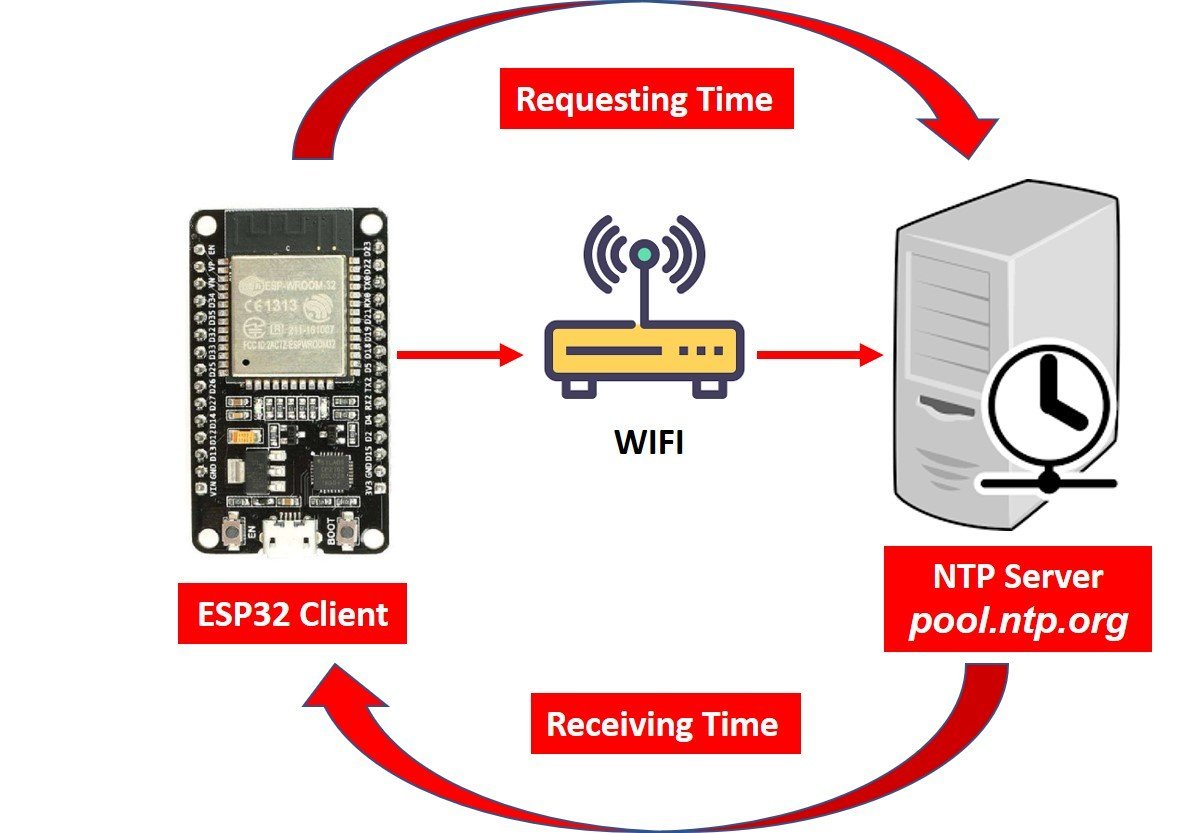
In this tutorial, we will look at an interesting feature of the ESP32 development board through which we can acquire the epoch or Unix time from an NTP server. It provides a timestamp with a precision of approximately a few milliseconds of the Coordinated Universal time (UTC). This can be achieved without any supplementary hardware setup and costs. We will use the Network Time Protocol (NTP) server to request the current epoch time through our local WIFI network.
How to USE NTP with ESP32 to Get Epoch Timestamp
NTP is a standard internet protocol that is widely used to synchronize computer clocks to a reference network. With a precision of approximately 50ms over the wide-area network (WAN) and less than 5ms over the local area network (LAN), it synchronizes the epoch time of all networked devices to the UTC.
To obtain epoch time with ESP32 through the NTP server, we’ll follow the client-server model. Our ESP32 development board acts as the client and will connect to the widely accessible NTP server, pool.ntp.org, using UDP on port 123. Through this port, the server can communicate with the client. Once the connection is established, the ESP32 board sends a request to the server. Upon receiving the request, the NTP server transmits a time stamp containing precise time information back to the client. This way, our ESP32 can synchronize its internal clock accurately with the global standard time provided by the NTP server.
Setting up Arduino IDE
We will be using Arduino IDE to program our ESP32 development board. Before we move ahead, make sure you have the latest version of Arduino installed on your computer. Moreover, you should have also an ESP32 add-on in Arduino IDE. You can check this tutorial:
ESP32 Code Getting Epoch/Unix Time from NTP Server
Now let’s proceed with our project. First, open your Arduino IDE and click on File > New to open a new file. Copy the code given below in that file. We will use the Get_Epoch_Time() function in our script which will return the current epoch time.
After you have copied the code, click the save icon to save the file.
/* For complete details visit Microcontrollerslab.com */
#include <WiFi.h>
#include "time.h"

// Replace ssid and password with your network credentials
const char* ssid = "REPLACE_WITH_YOUR_SSID";
const char* password = "REPLACE_WITH_YOUR_PASSWORD";

// a string to hold NTP server to request epoch time
const char* ntpServer = "pool.ntp.org";

// Variable to hold current epoch timestamp
unsigned long Epoch_Time;

// Get_Epoch_Time() Function that gets current epoch time
unsigned long Get_Epoch_Time() {
  time_t now;
  struct tm timeinfo;
  if (!getLocalTime(&timeinfo)) {
    //Serial.println("Failed to obtain time");
    return(0);
  }
  time(&now);
  return now;
}

// Initialize WiFi
void initWiFi() {
  WiFi.mode(WIFI_STA);
  WiFi.begin(ssid, password);
  Serial.print("Connecting to WiFi ..");
  while (WiFi.status() != WL_CONNECTED) {
    Serial.print('.');
    delay(1000);
  }
  Serial.println(WiFi.localIP());
}

void setup() {
  Serial.begin(115200);
  initWiFi();
  configTime(0, 0, ntpServer);
}

void loop() {
  Epoch_Time = Get_Epoch_Time();
  Serial.print("Epoch Time: ");
  Serial.println(Epoch_Time);
  delay(1000);
}
How does the Code Work?
In this section, we will discuss and explain above given ESP32 code.
Importing Time and WiFi Libraries
We will include two libraries, WiFi.h and time.h. The WiFi.h library is necessary as we want our ESP32 development board to connect with the local network. Also, we will be able to access the NTP server through the internet so this library is a must. Secondly, the time.h library will handle the time structures and is vital for the NTP server synchronization.
/* For complete details visit Microcontrollerslab.com */
#include <WiFi.h>
#include "time.h"
Enter Your Network Credentials
Next, to connect with our local WIFI network, we will specify our SSID and password in global variables which will be accessed throughout the code. Remember to replace them with your credentials to establish a successful connection with the NTP server.
// Replace with your network credentials
const char* ssid = "REPLACE_WITH_YOUR_SSID";
const char* password = "REPLACE_WITH_YOUR_PASSWORD";
NTP Server Address
We will specify the NTP server’s address in a global variable of type const char which will be pool.ntp.org.
// a string to hold NTP server to request epoch time
const char* ntpServer = "pool.ntp.org";
ESP32 Get Epoch/Unix Time Function
To get epoch/Unix time, we create the Get_Epoch_Time() function which will return the current epoch time whenever a request will be made to the server. This section of code shows the function and how it returns the time.
// Get_Epoch_Time() Function that gets current epoch time
unsigned long Get_Epoch_Time() {
  time_t now;
  struct tm timeinfo;
  if (!getLocalTime(&timeinfo)) {
    //Serial.println("Failed to obtain time");
    return(0);
  }
  time(&now);
  return now;
}
Inside the code, we will display the epoch time values on Arduino serial monitor. Therefore, in the setup() function, initiate the serial communication with a baud rate of 115200.
Serial.begin(115200);
Connecting to WiFi
We will also initialize the WIFI network which will help the ESP32 to connect to the local network through the WiFi.begin() function. This will take in two arguments which are the network credentials which we already specified above. Whenever a successful network connection will be established between the development board, the serial monitor will display ‘Connection established!’ and will also show the IP address of the ESP32 board.
// Initialize WiFi
void initWiFi() {
  WiFi.mode(WIFI_STA);
  WiFi.begin(ssid, password);
  Serial.print("Connecting to WiFi ..");
  while (WiFi.status() != WL_CONNECTED) {
    Serial.print('.');
    delay(1000);
  }
  Serial.println(WiFi.localIP());
}
Configure Time
The configTime() function is used to configure time. It takes in three arguments. The first is the GMT offset which we will set to 0. The second is the daylight saving time which we will also set to 0 because we only want to access the epoch time and these two parameters are not necessary for it. The third argument is the NTP server variable ‘ntpServer’ which holds the NTP server address.
configTime(0, 0, ntpServer);
Displaying Timestamp on Serial Monitor
In the infinite loop, we will call the Get_Epoch_Time() function. This function returns epoch timestamp. We save it in the variable ‘Epoch_Time.’ This value will get printed on the serial monitor continuously with a delay of 1 second. Hence, displaying the current epoch time.
Epoch_Time = Get_Epoch_Time();
Serial.print("Epoch Time: ");
Serial.println(Epoch_Time);
delay(1000);
Demonstration
After uploading the code to your ESP32 press the ENABLE button on it. After a successful connection has been established, you will notice the serial monitor display the current epoch time in seconds after every second.

In conclusion, using the NTP server allows us to obtain precise current epoch time using our ESP32 development board. All that’s required is a stable WiFi connection. This article demonstrates the step-by-step process of acquiring epoch time with ESP32 from an NTP server, ensuring accurate timekeeping for various IoT applications and time-sensitive projects. With this knowledge, you can confidently synchronize your ESP32 projects with the global standard time, ensuring reliable and precise timing in your IoT projects.
If you find this ESP32 guide useful, you may like to check these ESP32 guides:
- Getting Current Date and Time with ESP32 using NTP Server-Client and Arduino IDE
- ESP32 Web Server in Arduino IDE: Control LEDs
- ESP32 with MPU6050 Accelerometer, Gyroscope, and Temperature Sensor ( Arduino IDE)
- LM35 Temperature Sensor with ESP32 – Web Server
- Interface DHT11/DHT22 with ESP32 and display values on Web Server
- ESP32 web server control relay and 220 volt lamp
- Accessing ESP32 web server from anywhere in the world ( ESP8266 compatible)
- ESP32 BMP180 Web Server using Arduino IDE