In this guide, we will learn to use the deep sleep mode of ESP8266 modules using MicroPython firmware. Firstly, we will learn how to put the ESP8266 board to deep sleep. Lastly, we will also see different sources to wake up ESP8266 from a deep sleep mode.
The machine.deepsleep() function can be used to put ESP32 and ESP8266 into deep sleep mode.

In the previous article, we got to know how to configure the Deep Sleep mode of ESP32 using MicroPython as well as how to wake up ESP32 from a deep sleep. You can refer to the article here:
MicroPython: ESP32 Deep Sleep Mode and Wake Up Sources
Prerequisites
Before we start this tutorial, make sure you are familiar with and have the latest version of MicroPython firmware installed in your ESP8266 or NodeMCU. You should also have a running Integrated Development Environment (IDE) in which we will be doing the programming such as uPyCraft IDE or Thonny IDE. You can use either uPyCraft IDE or Thonny IDE. Follow the following guides to install these MicroPython IDEs:
- Getting Started with uPyCraft IDE on ESP32 and ESP8266
- Getting Started with Thonny MicroPython IDE for ESP32 and ESP8266
ESP8266 Deep Sleep Mode Introduction
In order to reduce power consumption significantly, we can put the ESP8266 module into deep sleep mode. When a module is in deep sleep mode, the system clock to all peripherals is disabled except RTC (real-time clock) module. That means all peripherals and units are in an off state except the RTC module which is used to keep track of time. In the later section of the tutorial, we will see how RTC is useful to wake up ESP8266 NodeMCU from a deep sleep cycle.
Only the Real time clock (RTC) consumes power during the deep sleep mode and everything else is powered off. The ESP8266 has a built-in timer (RTC). Through the crystal oscillator in the module, the RTC keeps track of time.
| Peripherals and Units | Deep Sleep Mode |
|---|---|
| RTC | ON |
| WIFI | OFF |
| System Clock | OFF |
| CPU | OFF |
| Current Consumption | ~20uA |
In deep sleep mode, an ESP8266 chip only consumes 20uA current. But when the chip is used with a development board such as NodeMCU, it consumes more current than 20uA due to other onboard components. But still it is less than the normal operating current of the baord.
Configuring ESP8266 Deep Sleep with MicroPython
In this section, we will see how to put ESP8266 NodeMCU in a deep sleep mode using MicroPython firmware. The machine module contains a method to put NodeMCU in a deep sleep.
Importing the Machine Module
The first step is to import the machine module so that we can put our esp board to deep sleep.
from machineNext, induce deep sleep by writing machine.deepsleep() in your main.py file. This initiates the deepsleep() function from the machine module and puts the board to sleep.
ESP8266 Wake Up Sources
Now we will look at ways to wake up our ESP8266 board. After activating the deep sleep mode, there are several ways through which the NodeMCU board can be woken up such as:
- Timer Wake Up
- External Wake Up
ESP8266 Timer Wake Up
The real-time controller (RTC) has a built-in timer. We have to set a predefined amount of time, after it is over, the built-in timer wakes up the chip. This is achieved through a function. We put the board in deep sleep mode for a specified amount of milliseconds. We have to use the deepsleep() function which is being accessed from the machine module. The deepsleep() function has a single argument that denotes the sleeping time in ms. For example:
machine.deepsleep(sleep_time_ms)ESP8266 ‘WAKE” Feature
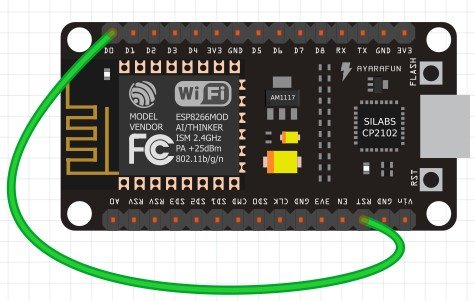
However, when using ESP8266 there is an important step that needs to be done in order to wake up the module. If it is not followed then it will not wake up. We have to make sure that the GPIO16 (D0) of the ESP8266 NodeMCU board is connected with the RST pin.
For ESP8266 NodeMCU, GPIO16 has a ‘wake’ feature attached to it. When the module is powered on, the RST pin is in a HIGH state but when its state goes to LOW, the board restarts. So in order to wake up the module, the RST pin should be in a LOW state. This is achieved by connecting it to the GPIO16. When we configure a deep sleep timer with a timer wake up in ESP8266, the GPIO16 goes to a LOW state whenever the predefined time is finished. This in return causes the development board to awaken. The figure below shows the connection between the two pins.
How to use the Timer Wake Up in ESP8266
To use the Timer Wake up of ESP8266 NodeMCU, we will define a deep_sleep() function which will make our task comparatively easier. Inside the function, we will get a trigger and a wake parameter called ALARM0 and machine.DEEPSLEEP, respectively. We will be setting an IRQ (Interrupt Service Routine) for the RTC which sets the trigger and the wake parameter inside the function.
rtc.irq(trigger=RTC.ALARM0, wake=machine.DEEPSLEEP)We have to set the triggering parameter: ALARM0 inside our code. This is done through the alarm() function which is being accessed from the RTC. This function has two arguments. The first argument specifies the alarm which we have to initialize (ALARM0) and the second argument is the time set for the alarm in milliseconds.
rtc.alarm(rtc.ALARM0,msecs)With the help of the deepsleep() function, we can set the ESP8266 board to sleep for a predetermined number of seconds. We will pass time in (ms) as an argument inside the function.
The deep_sleep() function is defined in the following way:
def deep_sleep(msec)       #defining the function
rtc=machine.RTC()            #creating an object of rtc
rtc.irq(trigger=RTC.ALARM0, wake=machine.DEEPSLEEP)     #setting the irq with ALARM0 as trigger and machine.DEEPSLEEP as a waking up parameter. rtc.alarm(rtc.ALARM0,msecs)     #initializing the alarm function
machine.deepsleep()                  #module goes to sleep
Now we will see how to set our ESP8266 board to deep sleep for 20 seconds and wake it up using a Timer Wake up. For the 20s the module will be in deep sleep, after the time has passed it will blink the in-built LED once and go back to deep sleep mode. This process will continue endlessly.
Timer Wake Up MicroPython Code
import machine               #importing modules & classes
from machine import Pin
from time import sleep
led=Pin(2,Pin.OUT)           #led configured as output on GPIO2 (in built led)

def deep_sleep(msecs):

  rtc = machine.RTC()
  rtc.irq(trigger=rtc.ALARM0, wake=machine.DEEPSLEEP)
  rtc.alarm(rtc.ALARM0, msecs)
  machine.deepsleep()

led.value(1)       #LED is ON
sleep(1)           #delay of 1 s
led.value(0)       #LED is OFF
sleep(1)           #delay of 1 sec

print('I just wake up, Going to sleep after 5 seconds')
sleep(5)           #delay of 5 sec
deep_sleep(20000)         #module goes to sleep for 20 seconds
How the Code Works?
We will start off by importing the modules which are necessary for using the Timer Wake up in ESP8266 using MicroPython. We will import the machine and the time modules and from these modules, we will access the Pin and the sleep methods, respectively.
import machine               #importing modules & methods
from machine import Pin
from time import sleep
Next, we will create a led object which will act as the output. It will be configured through GPIO2 as the in-built LED is connected through this pin.
led=Pin(2,Pin.OUT) #led configured as output on GPIO2 (onboard LED)Then we will add the deep_sleep() function which we defined before. By adding this function as it is to our program code, it makes the timer wake up very easy to configure. The rtc.ALARM0 acts as a trigger and wakes the module from a deep sleep. This is set to trigger after the number of milliseconds have passed which we will pass a parameter in the alarm() function.
def deep_sleep(msecs):

  rtc = machine.RTC()
  rtc.irq(trigger=rtc.ALARM0, wake=machine.DEEPSLEEP)

  rtc.alarm(rtc.ALARM0, msecs)

  machine.deepsleep()
After that, we have defined our function, we will access the value of the led and turn it ON and OFF with a delay of 1 second in between them to create a blinking effect. That means you will observe an LED blinking effect after every wake-up from a deep sleep.
led.value(1)       #LED is ON
sleep(1)           #delay of 1 s
led.value(0)       #LED is OFF
sleep(1)           #delay of 1 sec
The next step is very crucial. We will be incorporating a delay of 5 seconds ( sleep(5)) after the Led has gone from the ON to OFF transition once. This delay will help in establishing a serial communication when the ESP board is awake (before putting it in deep sleep). To upload newer pieces of program code, the board has to be awake. Hence, we will also print “I just wake up, Going to sleep after 5 seconds” on the screen to specify that we will be entering the deep sleep mode shortly.
print('I just wake up, Going to sleep after 5 seconds')
sleep(5)      #delay of 5 sec
After the five seconds are over, the module goes into a deep sleep for 20 seconds until the led blinks again which shows that the board has woken up and the process repeats itself.
deep_sleep(20000) #module goes to sleep for 20secondsNote: After uploading your code in main.py file make sure you have connected GPIO16 with RST to wake up your ESP8266 NodeMCU.
Demonstration
In order to select the serial port which will be connected open the uPyCraft IDE and go to Tools>Serial and select the Com port for your ESP8266.
To select the module go to Tools>Board and select ESP8266. Now, we will flash the firmware to ESP8266. In order to do that go to Tools>Burn Firmware and click on it.
You will see that the ESP8266 will blink onboard LED once and remains in the active mode for 5 seconds. After that, it will print a message “I just wake up, Going to sleep after 5 seconds” and then it goes into deep sleep mode.

ESP8266 External Wake Up
External Wake up in ESP8266 works in a different way. We will use the RST pin connected with a push button as an external wake up. The ESP8266 board will be set to deep sleep for an unlimited amount of time. In order to wake up ESP8266 with an External Wake up we need to set the RST pin to a LOW state that is when the module will restart. Whenever we will press the RST button, the module would wake up. We will need the following components to configure External Wake up in ESP8266 in a very simple example.
Required Components
- ESP 8266 NodeMCU
- One Push button
- One 10k ohm resistor
- Breadboard
- Connecting Wires
Schematic Diagram
Assemble the circuit as shown in the connection diagram below.
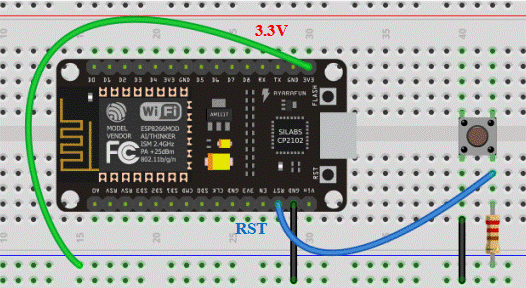
As we can see in the above diagram, one terminal of the push-button is connected by RST through the resistor and 3.3V power supply. The other end of the terminal is common ground with the board.
External Wake Up ESP8266 MicroPython Script
import machine                   #importing modules
from machine import Pin          #importing pin class
from time import sleep           #importing sleep class
led=Pin(2,Pin.OUT)               #setting LED as output on GPIO2
led.value(0)                     #led is OFF
sleep(1)                         #delay of 1s
led.value(1)                     #LED is ON
sleep(1)                         #delay of 1s
sleep(5)                         #delay of 5s
print('Going to sleep)
sleep(1)                         #delay of 1s
machine.deepsleep()              #module goes into deep sleep indefinitely
How the Code Works?
We will start off by importing the machine module and from that, we will import the pin class. From the time module, we will import the sleep class which will help us in accessing the sleep() function.
import machine                   #importing modules
from machine import Pin          #importing pin class
from time import sleep           #importing sleep class
Then we will create an object of Pin and set it as an output on GPIO2. This is the built-in led on the board.
led=Pin(2,Pin.OUT) #setting led as output on GPIO2Next, we will access the value of the led and set its parameter to 1 which shows it is ON, and the parameter of 0 which shows it is OFF. This is incorporated with a delay of 1 second between each transition. Before the board goes into deep sleep mode, we add a further delay of 5 seconds so that proper serial communication is established.
sleep(1)         #delay of 1s
led.value(1)     #led is ON
sleep(1)         #delay of 1s
sleep(5)         #delay of 5s
Print(‘Going to sleep’)
The last line, machine.deepsleep() keeps the ESP8266 board in the deep sleep mode for an undetermined time. Whenever we will press the push button, the module would wake up. This is because the RST is connected through the push-button and it resets each time. The in-built LED would blink with a delay of 1 second and then the board would go back into a deep sleep.
Demonstration
Now upload the code to ESP8266 NodeMCU and press the reset button.

Now you will see that the ESP8266 will go to the deep sleep mode after five seconds. But if you press the push button, it will wake up from deep sleep and blinks an onboard LED, and go back to deep sleep again after 5 seconds as follows:

Conclusion
In this guide, we had a look at how to configure deep sleep and how to wake up ESP8266 NodeMCU in MicroPython using two different techniques (Timer Wake Up and External Wake Up).
Excelente Tutorial, parabéns!