Whatabot and callmebot are free WhatsApp APIs that are helpful in sending message notifications, sensor readings, motion detection and door-opening alerts. In this tutorial, we will create a ESP8266 NodeMCU based motion detection notification system with WhatsApp messages using callmebot and WhataBot APIs and HTTP client library in Arduino IDE. It will send motion detection notifications to your WhatsApp number whenever mootion are detected. We will use HC-SR501 PIR motion sensor connected with ESP8266 NodeMCU development board along with an LED to detect movement.
We have a similar guide with ESP32:
WhatsApp Messenger Introduction
WhatsApp Messenger is a famous, free, and most widely used platform to share instant messages, voice messages, voice calls, video calls, and shared documents owned by an American company known as Meta or Facebook. It is available to download and install for Android and iOS based smartphones. Anyone can sign up for this service by using his mobile phone number, and users must have an active mobile internet connection to use this service.
This application was initially developed by WhatsApp Inc. of Mountain View, California, and later on, acquired by Facebook (Meta).
CallMeBot and Whatabot WhatsApp API Introduction
The Whatabot and CallMeBot are free and easy-to-use APIs to send WhatsApp messages by only calling an API from our ESP8266 using an HTTP client. These APIs are a service that allows you to send yourself messages in real-time. You only have to register your phone and take note of your API key! To send a message is necessary to execute an HTTP GET and POST from your microcontroller/app. It’s easy to use and you can receive real-time alerts in all your projects.
In case of Whatabot, we need to send HTTP GET request and with Callmebot, we send an HTTP POST request.
We will use this service to send messages on our WhatsApp number. It is a gateway service that allows us to send messages to ourselves from ESP8266 or any other HTTP client.
How to setup Whatabot API Key
In order to use this service, we need an API Key before calling API from the ESP8266 development board. Now let’s see how to get API key:
Follow these steps:
- Create the Whatabot contact in your smartphone.
- The phone number is: +54 9 1123998026
- Send: “I allow whatabot to send me messages”
- Copy the link that Whatabot sent you and change the “text” tag of the URL for whatever you want.
- Enjoy Whatabot!
Note: If you don’t receive the API key in 2 minutes, please try again after 24hs.
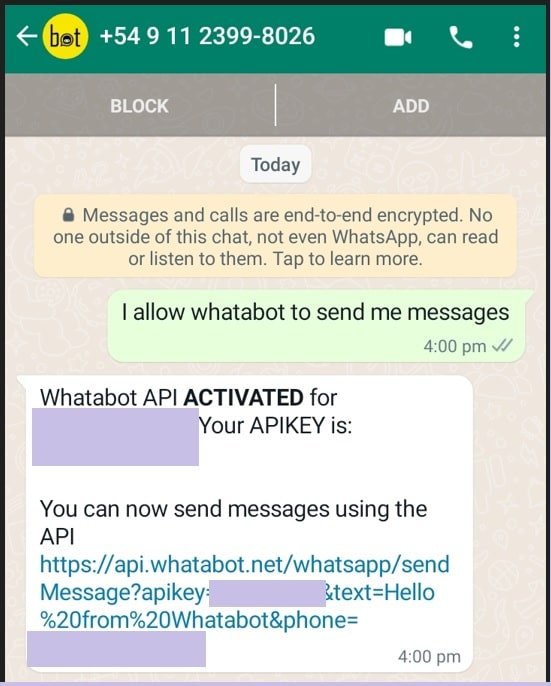
The WhatsApp message from the bot will contain the API key needed to send messages using the API. You can send text messages using the API after receiving the confirmation.
If you forgot your API key, send “I allow whatabot to send me messages” again and Whatabot will send you the key you had.
- If you want to change your api key, send “I want to update my apikey” and Whatabot will send you a new one. Note that you have to change the key in all your apps!
- If you want to delete your Whatsapp Whatabot account, sent “I want to delete my account”
How to Get CallMeBot API Key
You need to get the API key from the bot before using the API:
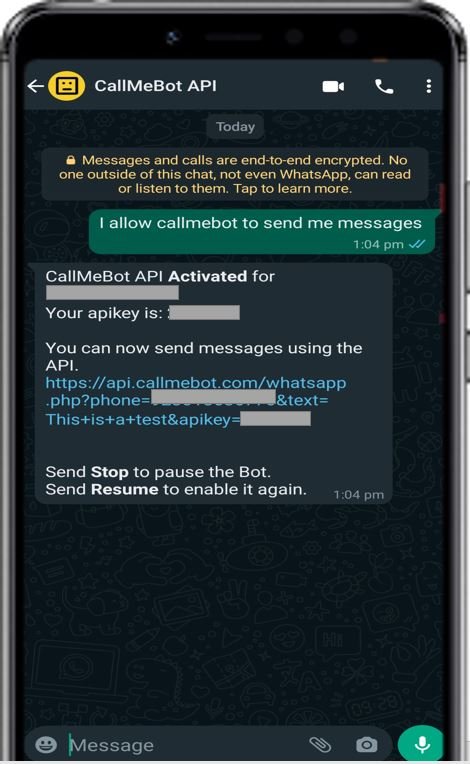
- Add the phone number +34 621073245 to your Phone Contacts. (Name it as you wish)
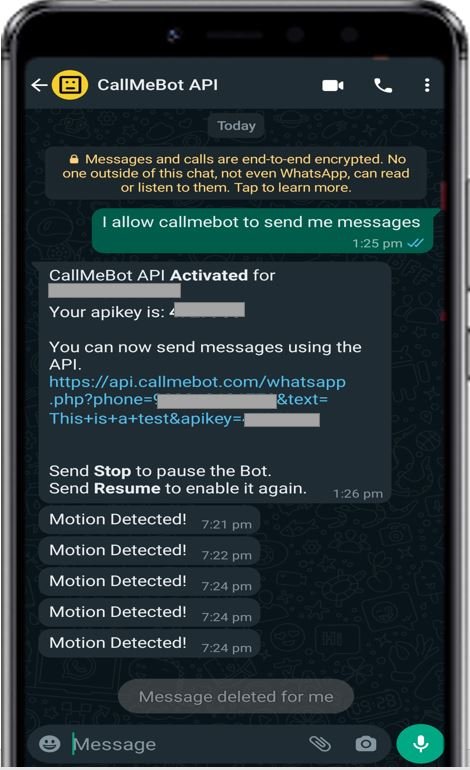
- Send this message “I allow callmebot to send me messages“ to the new Contact created (using WhatsApp of course)
- Wait until you receive the message “API Activated for your phone number. Your APIKEY is XXXXXX” from the bot.
- Note: If you don’t receive the API Key in 2 minutes, please try again after 24hs.
The WhatsApp message from the bot will contain the API key needed to send messages using the API.
How to send a WhatsApp text message with Whatabot and CallMeBot ApiKey
Now let’s see the APIs of both services one by once.
WhataBot API
To send a WhatsApp message with Whatabot API, we need to call the following API inside ESP8266 code with an HTTP GET request. In later sections of this article, we will see how to call an HTTP GET request with ESP8266.
http://api.whatabot.net/whatsapp/sendMessage?text=" + (message) + "&apikey=" + api_key + "&phone=" + mobile_number;CallMeBot API
To send a WhatsApp message with Callmebot API, we need to call the following API inside ESP8266 code with an HTTP POST request. In later sections of this article, we will see how to call an HTTP POST request with ESP8266.
https://api.callmebot.com/whatsapp.php?phone=[phone_number]&text=[message]&apikey=[your_apikey]
We need to change the following things before calling above APIs:
[phone_number]: This is the phone number which you used to sign-up for WhatsApp. Make sure to include your country code along with your mobile phone number. For example 92 301 22 222 22
[text]: This field is a message that you want to send on your WhatsApp number and it should be URL encoded. We will see later on how to convert messages into URL encoded format. For example in URL encoded format %20 is for space and %0A is for new lines).
[your_apikey]: The apikey is a key that we get from Whatabot mebot API in the last section during the activation process.
PIR Motion Sensor
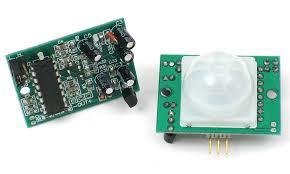
There are many PIR sensors available in the market but we are using passive PIR motion sensors in this project. It can detect a human motion within a range of 10m very easily. It has three pins and the function of each pin is described below:
- GND: It is a ground pin and you should connect it with the ground of your ESP8266 board.
- VDD: It is a power supplier pin and you should connect it with Vin of your ESP8266 board.
- Output: It is an output pin of the PIR sensor. Basically, we get output from this pin. We will connect it with one of the input GPIO pins of our ESP8266 board.
PIR Motion Sensor Working
PIR sensor is a low-cost motion detector sensor. It is a passive motion sensor that means it can only detect something around it and it cannot transmit anything. Whenever there is a motion around the sensor, it will detect the heat of the human body and produces a high output logic 1 at the output of the sensor. Every object emits infrared rays when they are heated and on the same principle, the human body emits IR rays due to body heat. Hence, whenever the motion sensor detects the human body around it, its output becomes high. We can also adjust the sensitivity of this sensor by changing the variable resistors available on the sensor. One variable resistor is for sensitivity adjustment of distance and another variable resistor is for sensitivity adjustment of time that is the amount of time for which the output should be high.
Connection Diagram
The following components are required:
- ESP8266 development board
- One PIR Sensor
- One 5mm LED
- One 220 ohm resistor
- Breadboard
- Connecting Wires
ESP8266 Motion Detection Circuit Diagram
Assemble your circuit as shown in the diagram below:
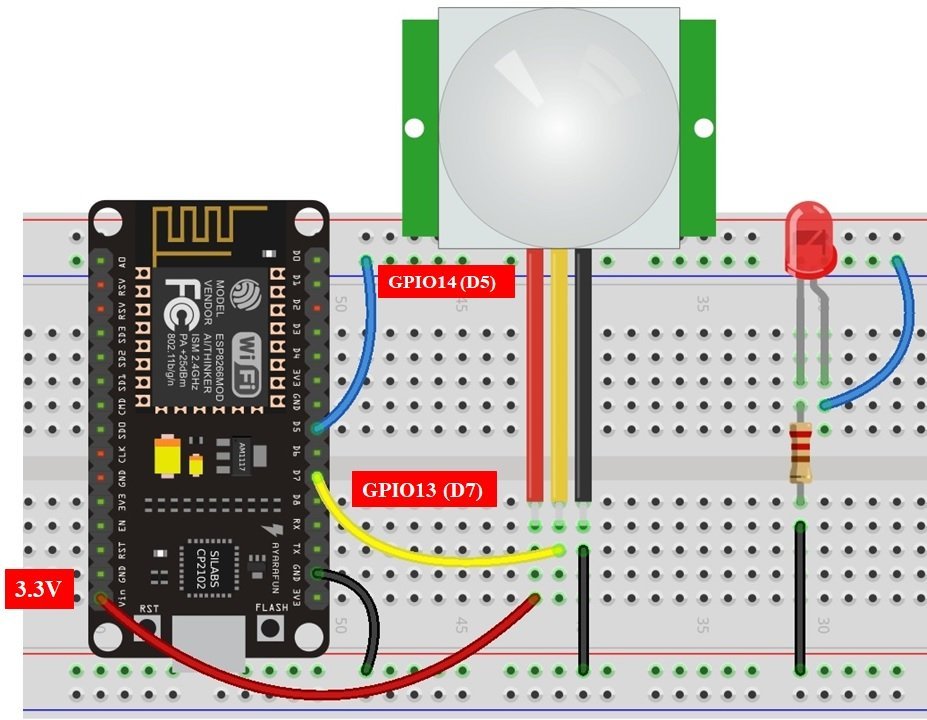
In the above schematic, we can see that GPIO14 is connected with the anode pin of LED, and the cathode pin is connected with the common ground through the 220 ohm resistor.
The PIR Sensor which we are using in this tutorial consists of three pins. Two of them are power supply pins such as VCC and ground pins. We can power PIR motion sensor directly from the ESP8266 3.3V power pin as shown in the above schematic diagram. The center pin is the output pin which provides an active high pulse whenever motion is detected. Otherwise, this pin remains active low. That means a rising edge occurs when a PIR sensor detects motion. Here we have connected the output pin of the sensor with GPIO13. You can use any appropriate ESP8266 interrupt GPIO pin which we showed you at the start. All are the grounds are in common.
In previous articles, we have used PIR motion sensor with both ESP32 and ESP8266 in Arduino IDE as well as in MicroPython. You can view the articles below:
- MicroPython: Interrupts with ESP32 and ESP8266 – PIR Sensor Interfacing Example
- ESP8266 Interrupts and Timers Arduino IDE – PIR Motion Sensor Example
- ESP32 Interrupts and Timers with PIR Sensor using Arduino IDE
Setting up Arduino IDE
Before we proceed further, you should make sure that you have the latest version of Arduino IDE installed on your system. Moreover, you should also install an ESP8266 add-on in Arduino IDE. If your IDE does not have the plugins installed you can visit the link below:
Installing URL Encode Library
To send messages through Whatabot API, the messages should be URLEncoded. URL encoding technique converts ASCII characters into a format that can be sent over the internet. For this purpose, we will use URLEncoder library available in Arduino IDE.
We will use the Library Manager in our Arduino IDE to install the latest versions of the libraries. Open your Arduino IDE and go to Sketch > Include Libraries > Manage Libraries. Type URLEncode in the search bar and install the latest version of the library by Masayuki Sugahara as shown below:

ESP8266 Code – Motion Detection Notification to WhatsApp
The following ESP8266 code sends a motion detection notification message to our WhatsApp number using Whatabot API and HTTPClient GET/POST requests whenever a movement is detected in front of the PIR sensor.
WhataBot API Code
#include <ESP8266WiFi.h>
#include <ESP8266HTTPClient.h>
#include <WiFiClient.h>
#include <UrlEncode.h>

const char* ssid = "ADD_YOUR_SSID";
const char* password = "ADD_YOUR_PASSWORD";

// add +international_country_code + phone number
// Pakistan +92, example: 913012222222
String mobile_number = "REPLACE_WITH_YOUR_PHONE_NUMBER";
String api_key = "REPLACE_WITH_API_KEY";

int led_pin = 14;
int sensor_pin = 13;

void send_whatsapp_message(String message){

 String API_URL = "http://api.whatabot.net/whatsapp/sendMessage?text=" + urlEncode(message) + "&apikey=" + api_key + "&phone=" + mobile_number;

  WiFiClient client;
  HTTPClient http;
  http.begin(client, API_URL);

  http.addHeader("Content-Type", "application/x-www-form-urlencoded");

  int http_response_code = http.GET();
  if (http_response_code == 200){
    Serial.println("Whatsapp message sent successfully");
  }
  else{
    Serial.println("Error sending the message");
    Serial.print("HTTP response code: ");
    Serial.println(http_response_code);
  }

  http.end();
}

void setup() {
  Serial.begin(115200);

  pinMode(sensor_pin, INPUT);
  pinMode(led_pin, OUTPUT);
  digitalWrite (led_pin, LOW);

  WiFi.begin(ssid, password);
  Serial.println("Connecting to Wi-Fi Access Point");
  while(WiFi.status() != WL_CONNECTED) {
    delay(500);
    Serial.print(".");
  }
  Serial.print("\nConnected to Wi-Fi Access Point network with IP Address: ");
  Serial.println(WiFi.localIP());


}

void loop() {
   int state = digitalRead(sensor_pin);
   if (state == HIGH) {            // if motion detected
   digitalWrite(led_pin, HIGH);  // turn LED ON
   sendMessage("Motion Detected!"); //send message
   delay(5000);
 }
 else {
   digitalWrite(led_pin, LOW); // turn LED OFF if we have no motion
 }

}
CallMeBot API Code
#include <ESP8266WiFi.h>
#include <ESP8266HTTPClient.h>
#include <WiFiClient.h>
#include <UrlEncode.h>

const char* ssid = "ADD_YOUR_SSID";
const char* password = "ADD_YOUR_PASSWORD";

// add +international_country_code + phone number
// Pakistan +92, example: 913012222222
String phoneNumber = "REPLACE_WITH_YOUR_PHONE_NUMBER";
String apiKey = "REPLACE_WITH_API_KEY";

int led_pin = 14;
int sensor_pin = 13;

void sendMessage(String message){

  // Data to send with HTTP POST
  String url = "http://api.callmebot.com/whatsapp.php?phone=" + phoneNumber + "&apikey=" + apiKey + "&text=" + urlEncode(message);
  WiFiClient client;
  HTTPClient http;
  http.begin(client, url);

  // Specify content-type header
  http.addHeader("Content-Type", "application/x-www-form-urlencoded");

  // Send HTTP POST request
  int httpResponseCode = http.POST(url);
  if (httpResponseCode == 200){
    Serial.println("Message sent successfully");
  }
  else{
    Serial.println("Error sending the message");
    Serial.print("HTTP response code: ");
    Serial.println(httpResponseCode);
  }

  // Free resources
  http.end();
}

void setup() {
  Serial.begin(115200);

    pinMode(sensor_pin, INPUT);
  pinMode(led_pin, OUTPUT);
  digitalWrite (led_pin, LOW);

  WiFi.begin(ssid, password);
  Serial.println("Connecting");
  while(WiFi.status() != WL_CONNECTED) {
    delay(500);
    Serial.print(".");
  }
  Serial.println("");
  Serial.print("Connected to WiFi network with IP Address: ");
  Serial.println(WiFi.localIP());
}

void loop() {
   int state = digitalRead(sensor_pin);
   if (state == HIGH) {            // if motion detected
   digitalWrite(led_pin, HIGH);  // turn LED ON
   sendMessage("Motion Detected!"); //send message
   delay(5000);
 }
 else {
   digitalWrite(led_pin, LOW); // turn LED OFF if we have no motion
 }

}
How the Code Works?
As mentioned earlier, sending messages with CallMeBot API is simply equal to an HTTP POST request by using above given URL. Therefore, we need to include HTTP client and also URL encoded libraries header files.
Start by including header files of required libraries:
#include <ESP8266WiFi.h>
#include <ESP8266HTTPClient.h>
#include <WiFiClient.h>
#include <UrlEncode.h>
Add your router/Wi-Fi credentials in the ssid and password variables respectively:
const char* ssid = "ADD_YOUR_SSID";
const char* password = "ADD_YOUR_PASSWORD";
Add your phone number and API key of CallMeBot which you got from the last section. Please note that your phone number should be in an international format including country and mobile number.
String phoneNumber = "REPLACE_WITH_YOUR_PHONE_NUMBER";
String apiKey = "REPLACE_WITH_API_KEY";
Then we will define some variables. First, the integer variable ‘led_pin’ to hold the ESP8266 GPIO pin where the LED will connected. Also, we will specify the PIR sensor middle pin as well. It is GPIO14 for the LED and GPIO13 for the PIR sensor in our case. You can use any appropriate GPIO pin.
int led_pin = 14;
int sensor_pin = 13;
sendMessage()
Create a function name sendMessage() which we will call whenever we want to send a WhatsApp message on our WhatsApp number. The input argument to this function is the message that we want to send.
void sendMessage(String message){

  // Data to send with HTTP POST
  String url = "http://api.callmebot.com/whatsapp.php?phone=" + phoneNumber + "&apikey=" + apiKey + "&text=" + urlEncode(message);
  WiFiClient client;
  HTTPClient http;
  http.begin(client, url);

  // Specify content-type header
  http.addHeader("Content-Type", "application/x-www-form-urlencoded");

  // Send HTTP POST request
  int httpResponseCode = http.POST(url);
  if (httpResponseCode == 200){
    Serial.println("Message sent successfully");
  }
  else{
    Serial.println("Error sending the message");
    Serial.print("HTTP response code: ");
    Serial.println(httpResponseCode);
  }

  // Free resources
  http.end();
}
The next step is to modify the URL according to our mobile number, apikey, and message which we want to send to our WhatsApp number. We created a string that holds url containing your mobile number, apikey and URLEncoded message. The urlEncode() function takes a UTF-8 string and generates a percent-encoded string.
String url = "http://api.callmebot.com/whatsapp.php?phone=" + phoneNumber + "&apikey=" + apiKey + "&text=" + urlEncode(message);Create an object of WiFiClient class which will initialize its constructor:
WiFiClient client; Start HTTPClient by passing url as a string to member function begin() of object http:
HTTPClient http;
http.begin(client, url);
We specify a content type in the header whenever we make an HTTP request to any server. This addHeader member function sets the content-type header.
http.addHeader("Content-Type", "application/x-www-form-urlencoded");Finally, call a member function POST() of object http to send a POST request to the CallMeBot API server. If it returns http response 200 that means http POST sent request was executed successfully and the WhatsApp message was sent successfully.
int httpResponseCode = http.POST(url);
  if (httpResponseCode == 200){
    Serial.println("Message sent successfully");
  }
  else{
    Serial.println("Error sending the message");
    Serial.print("HTTP response code: ");
    Serial.println(httpResponseCode);
  }
At the end call, the end() member function frees the resources allocated to http request object.
http.end();setup()
Inside the setup() function, initialize the serial communication with a baud rate of 115200 which will be used to show logs on the serial monitor of Arduino.
Serial.begin(115200);Then we will configure the PIR sensor pin as an input and the led pin as an output using the pinMode() function. Using digitalWrite(), we will set the led pin in a LOW state initially so that the LED is OFF at the start of the project.
  pinMode(sensor_pin, INPUT);
  pinMode(led_pin, OUTPUT);
  digitalWrite (led_pin, LOW);
To make an HTTTP request, ESP8266 should have an internet connection. Hence, make a connection to your router or access point and get an assigned IP address. The following code tries to make a connection with your router and once connected, prints the assigned IP address on Arduino serial monitor.
WiFi.begin(ssid, password);
  Serial.println("Connecting");
  while(WiFi.status() != WL_CONNECTED) {
    delay(500);
    Serial.print(".");
  }
  Serial.println("");
  Serial.print("Connected to WiFi network with IP Address: ");
  Serial.println(WiFi.localIP());
loop()
Inside the infinite loop() function, we read the state of the PIR sensor pin and save it in the int variable ‘state.’ Then by using an if-else condition, we check whether the state of the sensor pin is high or not. If the state is high which indicates motion was detected, then we turn the LED on and call the sendMessage() function to send the motion detection notification to the WhatsApp number. If there is no motion, the LED remains off.
    int state = digitalRead(sensor_pin);
   if (state == HIGH) {            // if motion detected
   digitalWrite(led_pin, HIGH);  // turn LED ON
   sendMessage("Motion Detected!"); //send message
   delay(5000);
 }
 else {
   digitalWrite(led_pin, LOW); // turn LED OFF if we have no motion
 }
Demonstration
Now let’s see the demo of the above code. Insert the Wi-Fi credentials of your router into the above code and replace the API key. After that upload the code to ESP8266.
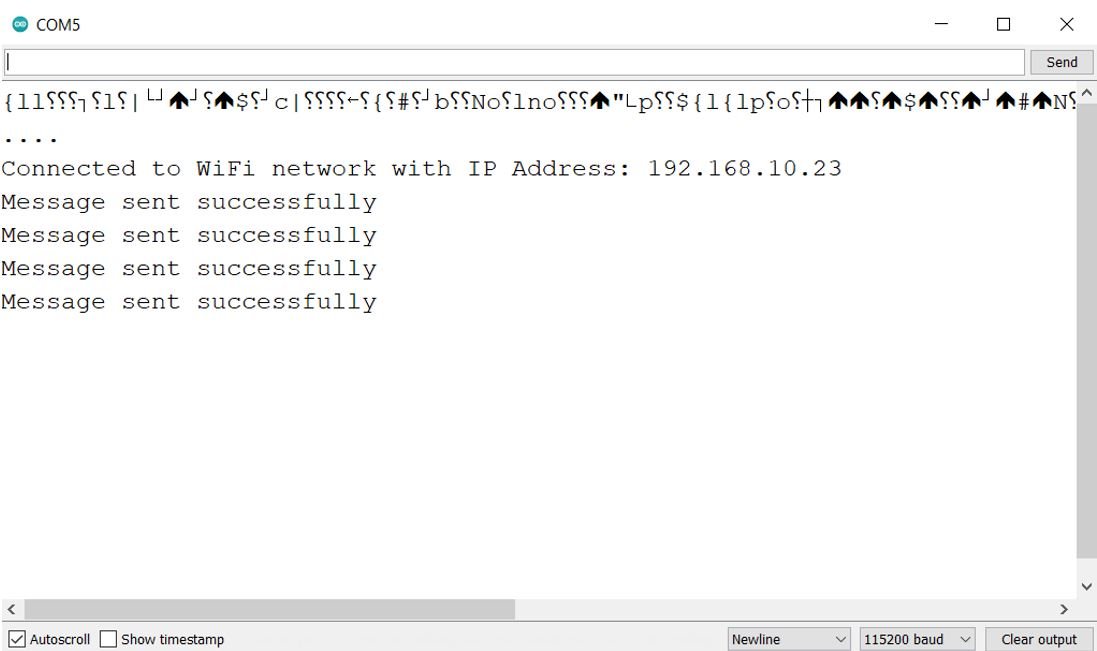
After uploading code, open the serial monitor in Arduino IDE and select baud rate of 115200.
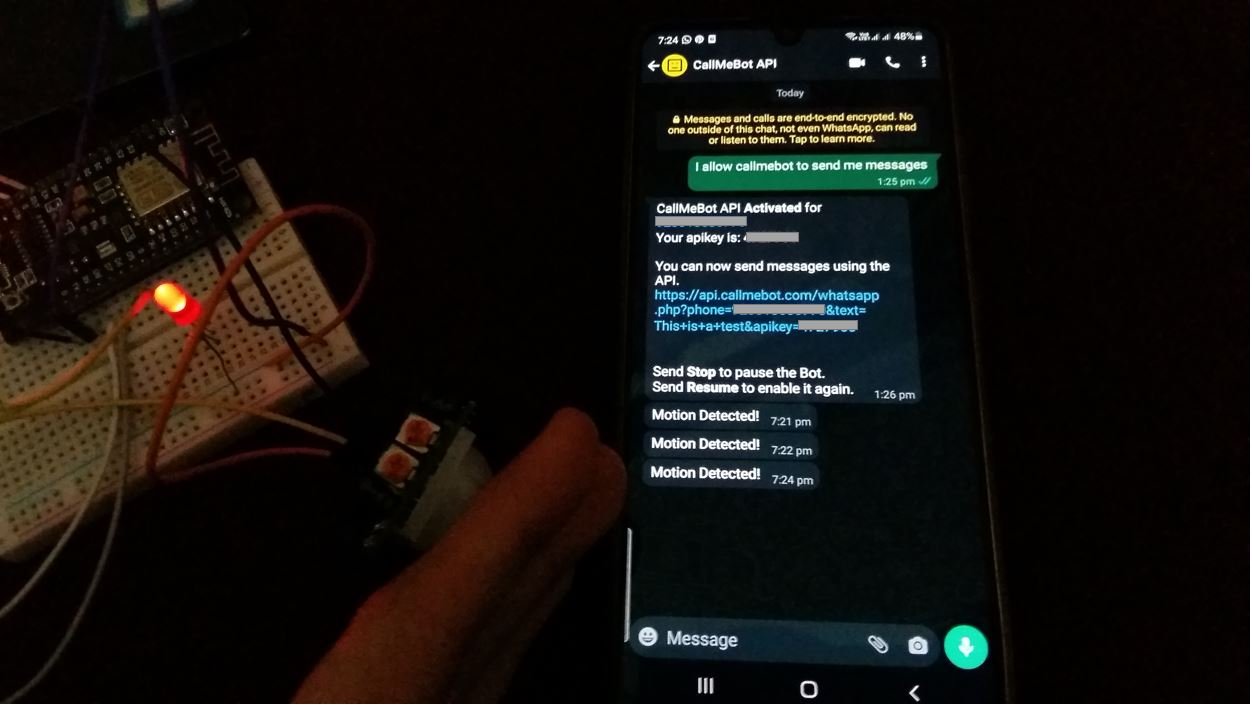
Now press the reset button on ESP8266, you will see that ESP8266 will connect with Wi-Fi network and print an IP address. Now move your hand in front of the PIR sensor and the LED turns ON. The serial monitor shows the message was successfully sent. Open WhatsApp to check the motion detection notification. You will keep on getting alerts whenever any movement is detected in front of the motion sensor.
You may also like to read: