In real-time operating systems, multitasking is achieved by dividing each application into useful tasks. But not all tasks execute throughout the execution of the program. Some tasks are more important and execute more frequently than others. Therefore, in RTOS, some tasks can be deleted during program execution when there is no need to call them in the near future or when we do not need them anymore in the program. Hence, in this tutorial, we will learn how to delete tasks using FreeRTOS API with Arduino.
Before preceding further with the tutorial, you should read to know how to use FreeRTOS with Arduino. You must read this getting started tutorial:
How to Create Tasks with FreeRTOS an Arduino
FreeRTOS Task deleting API
vTaskDelete() FreeRTOS API function is used to delete tasks. With the help of this API function, any task can delete itself and can also delete other tasks by passing reference by a handler to vTaskDelete() function.
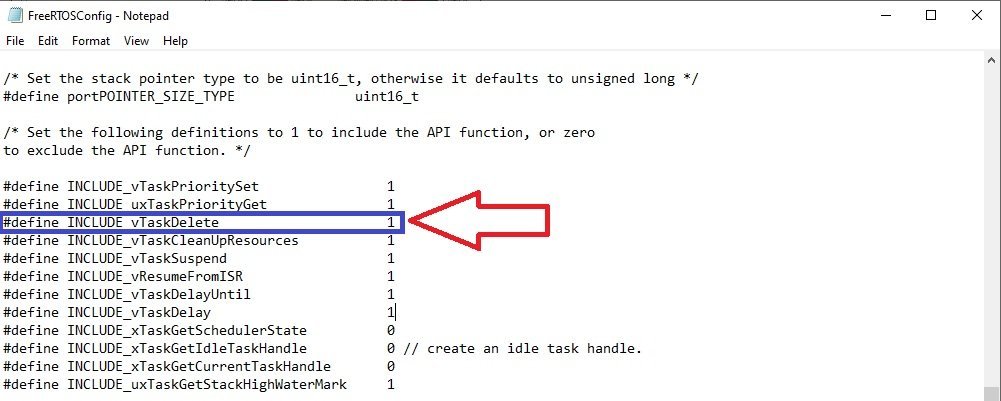
Note: Before using vTaskDelete(), you should make changes to FreeRTOSConfig.h by setting INCLUDE_vTaskDelete = 1. Otherwise, vTaskDelete() API do not work.
To set INCLUDE_vTaskDelete = 1, go to the libraries folder of Arduino IDE. After that, open Arduino FreeRTOS library folder>>scr

C:\Program Files (x86)\Arduino\libraries\Arduino_FreeRTOS_Library-master\src
After that, open to FreeRTOSConfig.h file as a administrator, because you will not able to save changes without opening this file as a administrator.
Now set INCLUDE_vTaskDelete = 1 as shown below. If it is set to one by default, leaving it as it is.
How to use vTaskDelete() API with Arduino?
This is prototype of task deletion routine. It does not return any value and input argument is reference hander of the task which you want to delete.
void vTaskDelete( TaskHandle_t pxTaskToDelete );As you know that while creating a task with xTaskCreate() API function, we define handle of the task also. For example, we created a task like this:
xTaskCreate( vTask2, "Task 2", 1000, NULL, 2, &xTask2Handle );Here the last argument is a handle of the task “vTask2”.
Now if you want to delete the above-created task any time during the program execution, you can simply call vTaskDelete() API by passing handler to the task like this:
vTaskDelete( xTask2Handle );Note: By using handler task can be deleted from any other task. Also, A task can delete itself by passing “Null” to vTaskDelete” inside its own task function definition.
If you are still confused about FreeRTOS task deletion API, you will understand when we explain with programming example.
FreeRTOS Task Deletion Example with Arduino
In order to demonstrate the use of FreeRTOS task delete API function, we create a very simple example with Arduino. We create two tasks such as Task1(LED1) and Task2(LED2).
Example with Arduino
- 1. Task1 is inside setup function with priority 1. When it runs, it creates Task2 at priority 2. Task 2 is now the highest priority task, so it starts to execute immediately.
- Task2 itself does not do anything except delete itself. It could delete itself by passing NULL to vTaskDelete() but instead, for demonstration purposes, it uses its own task handle.
- When Task 2 has been deleted, Task1 will become again the highest priority task. But this time, it calls vTaskDelay() API and enters the block state for the specified time.
- The Idle task executes while Task1 is in the blocked state and frees the memory that was allocated to the now-deleted Task2.
- When Task1 leaves the blocked state it again becomes the highest priority Ready state task and so pre-empts the Idle task. When it enters the Running state it creates Task 2 again, and so it goes on.
Arduino Code
// Include Arduino FreeRTOS library
#include <Arduino_FreeRTOS.h>
#include "task.h"

TaskHandle_t TaskHandle_2; // handler for Task2

void setup()
{
  Serial.begin(9600); // Enable serial communication library.
  pinMode(4, OUTPUT);  // define LED1 pin as a digital output
  pinMode(5, OUTPUT);  // define LED2 pin as a digital output

  //Create the first task at priority 1
  // Name of task is "LED1"
  // Stack size is set to 100
  // we do not pass any value to Task1. Hence, third agument is NULL
  // Set the priority of task to one
  // Task1 handler is not used. Therefore set to Null
  xTaskCreate(Task1, "LED1", 100, NULL, 1, NULL);
  // Start FreeRTOS scheduler in Preemptive timing silicing mode
  vTaskStartScheduler();
}

void loop()
{
// Do nothing as schduler will allocated CPU to Task1 and Task2 automatically
}
/* Task1 with priority 1 */
void Task1(void* pvParameters)
{

  while(1)
  {
    Serial.println("Task1 Running"); // print "Task1 Running" on Arduino Serial Monitor
    digitalWrite(4, HIGH); // sets the digital pin 4 on
    digitalWrite(5, LOW); // sets the digital pin 5 off
    xTaskCreate(Task2, "LED2", 100, NULL, 2, &TaskHandle_2); // create task2 with priority 2
    vTaskDelay( 100 / portTICK_PERIOD_MS ); // wait for one second
  }
}


/* Task2 with priority 2 */
void Task2(void* pvParameters)
{
    //digitalWrite(5, HIGH); // sets the digital pin 5 high
    //digitalWrite(4, LOW); // sets the digital pin 4 low
    Serial.println("Task2 is runnig and about to delete itself");
    vTaskDelete(TaskHandle_2);     //Delete own task by passing NULL(TaskHandle_2 can also be used)
}
Arduino Serial Monitor Output
This diagram shows the output of Arduino Serial monitor when program executed.
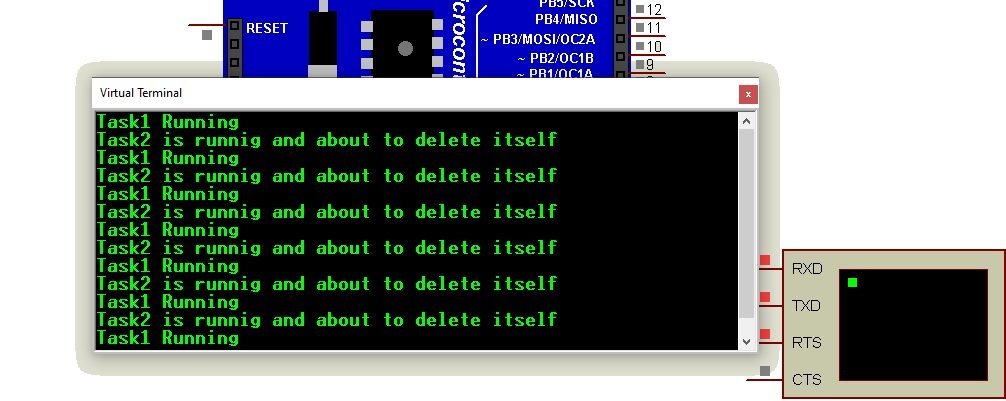
- At T1, task1 being a highest priority task starts to execute. It turns on LED1( D4) and makes LED2 low. Moreover, it also prints “Task1 running” on Arduino Serial monitor. After that, it create Task2 with priority 2 which is higher than task2. Hence, Task2 becomes the highest priority and blocked Task2.
- At T2, Task2 enters the running state and start its execution. It does nothing except deleting itself and displaying “Task2 is runnig and about to delete itself” on Serial monitor of Arduino. It also inverses the state of GPIO pins D4 and D5.
- At T3, Task1 calls vTaskDelay(), allowing the idle task to run until the delay time expires, and the whole sequence repeats.
Video Demo
Commonly Asked Questions
In RTOS, we divide a complete program into smaller mini programs that are knows as tasks. But some tasks are more important than other and critical tasks execute more frequency than non-important tasks. Therefore, sometimes we delete unnecessary tasks to free memory and create them again when require again.
When we delete task through FreeRTOS task deletion API, task does not exist and can not be called until created again. Moreover, FreeRTOS idle task free the memory that has been allocated to the task when it created.
Only memory allocated to a task by the kernel itself will be freed automatically when the task is deleted. Any memory or other resource that the implementation of the task allocated must be freed explicitly [FreeRTOS].
Where to go Next?