In this tutorial, we will learn to use binary semaphores in FreeRTOS using Arduino. First, we will see the introduction of binary semaphore and a few applications. After that, we will discuss FreeRTOS API functions that are used to create and manage binary semaphore with tasks and interrupt service routine. In the end, we will see two examples. First, we will learn to use binary semaphores to synchronize normal tasks. In the second example, we will see task synchronization using an interrupt service to unlock binary semaphore.
Recommended Components
The following are recommended for following along with these FreeRTOS Arduino tutorials.
| Component | How it’s used in this project | Buy on Amazon |
|---|---|---|
| Arduino Starter Kit (Uno R3) | An Arduino board and parts to build and run the FreeRTOS example tasks. | Check Price |
| 37-in-1 Sensor Modules Kit | Assorted sensor modules handy for the FreeRTOS tasks, queues and semaphore demos. | Check Price |
| Hands-On RTOS with Microcontrollers (Book) | Recommended reference for learning FreeRTOS concepts in depth. | Check Price |
| Hands-On RTOS with Microcontrollers (2nd Edition) | Updated second edition of the FreeRTOS reference book. | Check Price |
As an Amazon Associate we earn from qualifying purchases. Prices and availability are accurate as of the date/time indicated and are subject to change.
Binary Semaphore Introduction
It is a kernel object that a task can acquire for the purpose of tasks synchronization. Semaphore is a like a token which allows a task to carry out execution if the task can acquire semaphore. Otherwise, the task remains in the block state and can not execute unless it acquires binary semaphore. But as soon as, task acquires the intended token, it begins to carry-out its execution.
The value of binary semaphore can be either one ( available) or zero ( Empty or not available). If a binary semaphore is already acquired by task one and task 2 also tries to access binary semaphore, but it is already taken. Therefore, task 2 will enter the blocking state and remain in the blocking state until task 1 releases the binary semaphore.
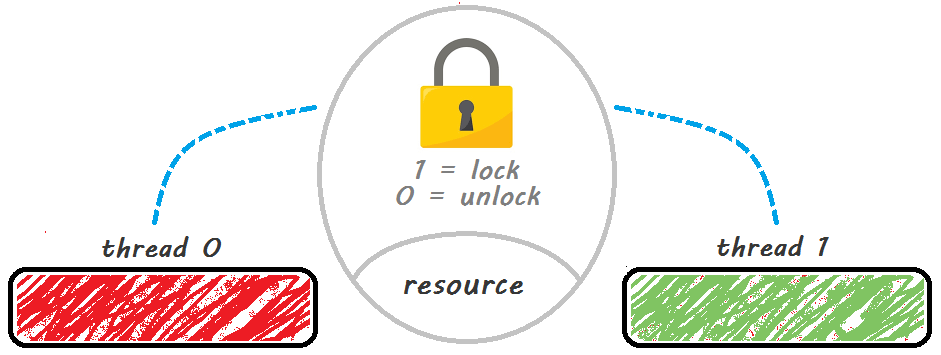
Multiple tasks can use binary semaphore within a single application. But only one task can acquire it at a time. Making the semaphore a global resource allows any task to release it, even if the task did not initially acquire it.
Where to use Binary Semaphores?
Binary semaphores can be used for different things. But most often, they are used for task synchronization. Especially, we can use a binary semaphore to synchronize an interrupt service routine in a task. Therefore, in this tutorial, what we’re going to discuss is how to use binary semaphores for synchronization of tasks
Synchronzation of FreeRTOS Tasks
But we mostly use binary semaphores to achieve deferred interrupt processing. We can use binary semaphores to synchronize tasks. It can synchronize multiple tasks. We can place semaphores at specific portions of different parts of the code and make them all meet at the same point and execute them at the same time.
FreeRTOS Binary Semaphore API
First, let’s talk about FreeRTOS API functions that are used to take and give semaphores either through normal tasks or through interrupt service routines. We’ll quickly go through the FreeRTOS semaphore APIs and after that see examples with Arduino.
FreeRTOS Create Binary Semaphore
Let’s start with his very first one. xSemaphoreCreateBinary() is used to create a Binary semaphore.
SemaphoreHandle_t xSemaphoreCreateBinary( void ); This function takes no argument. However, it returns a semaphore handler. We use this semaphore reference handler to check whether it can be created or not.
If it returns a null value, this means there isn’t enough heap memory available for freeRTOS to allocate the semaphore data structures. If it returns a non-null value, this means Binary Semaphore is successfully created and it is available to use. Therefore, we must create this token before using it.
FreeRTOS xSemaphoreTake() API
The next semaphore relatedFreeRTOS API is the xSemaphoreTake(). xSemaphoreTake() API Function is basically used for taking/acquiring a binary semaphore. To take a semaphore means to obtain or receive a semaphore. Now you know that it can be taken only if it is available or not currently acquired by any other task.
If in any application, we have two tasks that use a single binary semaphore. If one task takes the semaphores. There is no semaphore available for other tasks to take and other tasks will remain in the blocking state. Therefore, a semaphore can only be taken if it’s available.
BaseType_t xSemaphoreTake( SemaphoreHandle_t xSemaphore, TickType_t xTicksToWait ); This function takes two arguments. The first argument is the handle of the binary semaphores, the handle of the semaphore we wish to take and the second argument is the XTickstowait(), and this argument basically specifies the maximum amount of time the task should remain in the block state to wait for the binary semaphore.
FreeRTOS xSemaphoreGive() API
The last important FreeRTOS API is xSemaphoreGive(). It is used to release binary/counting semaphores. We can also give/release a semaphore. Once a particular task no longer needs it, we can give it back by using xSemaphoreGive() function.
BaseType_t xSemaphoreGive( SemaphoreHandle_t xSemaphore ); This function takes just one argument and this argument is the handle of the semaphore that is being given back. For instance, one task takes a binary semaphore. The semaphore is no longer available but after that task gives it back and it becomes available for another task to take.
But if you are releasing binary semaphore from an interrupt service routine, you should also interrupt a safe version of this function such as xsemaphoresgivegivefromISR().
BaseType_t xSemaphoreGiveFromISR( SemaphoreHandle_t xSemaphore, BaseType_t *pxHigherPriorityTaskWoken ); This interrupt safe version takes two input arguments. The first argument is similar to the first one we saw which is the handle of the semaphores and the second argument over here is called the HigherPriorityTaskWoken. HigherPriorityTaskWoken ensures that the interrupt returns directly to the highest priority Ready state task.
For more information about this funcion, check this link.
FreeRTOS Binary Semaphore Example to Synchronize Tasks
In this example, we will create two tasks. One task turn-on LED and other task turns-off LED. But both tasks can not execute at the same time. Because both share the same binary semaphore. Both tasks have the same priority level. Therefore, the FreeRTOS scheduler will schedule both tasks in a time-sharing or round-robin fashion.
If we do not use a binary semaphore to synchronize these tasks, tasks will not execute according to the order we want and it will follow a haphazard form of round-robin scheduling. We want to execute LedOnTask and after that LedOffTaks or vice versa. To maintain this order, we have to synchronize both tasks using binary semaphore.
Arduino Tasks Synchronization Code
#include <Arduino_FreeRTOS.h>
#include "semphr.h"
#define  LED  13
SemaphoreHandle_t xBinarySemaphore;
void setup()
{
  Serial.begin(9600);
  pinMode(LED ,OUTPUT);
  xBinarySemaphore = xSemaphoreCreateBinary();
  xTaskCreate(LedOnTask, "LedON",100,NULL,1,NULL);
  xTaskCreate(LedoffTask, "LedOFF", 100,NULL,1,NULL);
  xSemaphoreGive(xBinarySemaphore);
}

void loop(){}
void LedOnTask(void *pvParameters)
{
  while(1)
  {
   xSemaphoreTake(xBinarySemaphore,portMAX_DELAY);
   Serial.println("Inside LedOnTask");
   digitalWrite(LED,LOW);
   xSemaphoreGive(xBinarySemaphore);
   vTaskDelay(1);
  }
}
void LedoffTask(void *pvParameters)
{
  while(1)
  {
    xSemaphoreTake(xBinarySemaphore,portMAX_DELAY);
    Serial.println("Inside LedffTask");
    digitalWrite(LED,HIGH);
    xSemaphoreGive(xBinarySemaphore);
    vTaskDelay(1);
  }
}
Output without Semaphore
If we uncomment the semaphore functions from the above Arduino code and upload code to Arduino, you will see this type of output on the serial monitor.
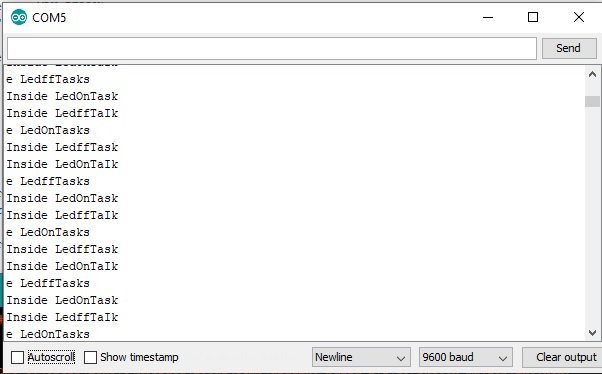
Because tasks are not synchronized and scheduler follows time-sharing scheduling. Hence, for some time, it executes “LedoffTask” and for some timer “LedOnTask”. Therefore, we get a mixed output on the Arduino Serial monitor. But, we can make it in order by using binary semaphore.
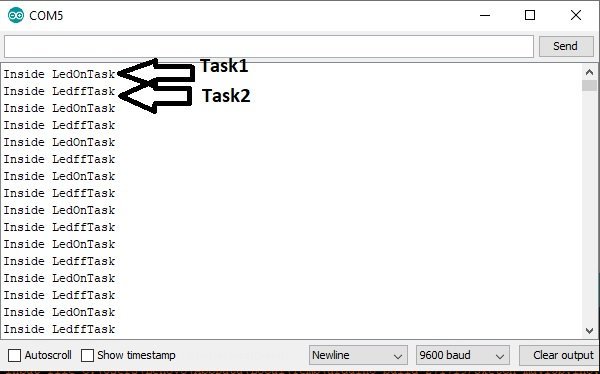
Output with Semaphore
This picture shows the output of serial monitor when the binary semaphore is used for both tasks such as “LedoffTask” and “LedOnTask”. You can see that both tasks are executing in order.
Video Demo
How code Works?
At time t1, “LedOnTask” starts to execute. Because both tasks have the same priority level. Also, the binary semaphore is available to acquire as we have already given semaphore inside the setup function. Hence, “LedOnTask” take a binary semaphore signal by using xSemaphoreTake() and complete all its execution.
Due to time-sharing scheduling technique of FreeRTOS for equal priority tasks, “LedoffTask” will try to execute by pre-empting “LedOnTask”, but enters the blocking state due to non-availability of shared resource binary semaphore. Therefore, “LedOnTask” first completes its execution and after that releases the binary semaphore.
As soon as binary semaphore becomes available, “LedoffTask” beings its execution because it entered in block state due to the non-availability of shared resource binary semaphore. Similarly, it also completes its execution and release the token. After that, the Arduino code repeats the same pattern for execution.
FreeRTOS Binary Semaphore to synchronize a task with an interrupt
In the last section, we have learned to synchronize software tasks using binary semaphore. Now, We will see an example of a task synchronization with an Interrupt service routine using binary semaphore.
Synchronizing task with Interrupt using Binary Semaphore
It can be used to unblock a task each time a particular interrupt occurs effectively synchronizing the task with the interrupt. This allows the majority of the interrupt event processing to be implemented within the synchronized task with only a very fast and short portion remaining directly in the interrupt service routine. This is also known as deferred interrupts processing.
The processing is deferred to a task. Because when we are using interrupt service routines, we want them to be very short and fast as possible. Because if we spend so much time in the interrupt service routine it would affect our real-time kernel. Therefore, what we want is just to receive the interrupt and send a quick notification to a task to perform the processing.
Interrupt Synchronization Working
For interrupt synchronization, binary semaphore works like a single queue or a queue that can hold only one item at a time either zero or one. Any interrupt synchronization task which is using this queue determines if the queue is empty or full. If Queue is full, synchronized tasks can execute. Otherwise, the task will enter the blocking state regardless of the priority of the task. It will remain in block state unless the queue becomes full again. In other words, Binary Semaphore makes itself available to acquire. We can use this technique to synchronize a task with an interrupt.
In such a case, the binary semaphore will be given inside the service routine. Whenever an interrupt occurs, it will become available and the task, waiting in the blocked state, will acquire it and complete its execution. After completing the execution task will release the semaphore. But the task will not execute again until binary semaphore becomes available again through an interrupt.
Binary Semaphore Interrupt Synchronization Example
This interactive picture shows the demonstration to use a binary semaphore to synchronize a task with an interrupt. At the start, semaphore (token) is not available. Therefore, the task is in the blocked state waiting for the queue to become full or one. After that interrupt occurs and it makes the semaphore available.
The task sees the binary semaphore and acquires it. But as soon as the task acquires the semaphore, it becomes unavailable again. Therefore, no other task can acquire it. The task can now perform its action when complete it will once again attempt to ‘take’ the semaphore which will cause it to re-enter the Blocked state.
Arduino Code
In this example, we create two tasks and an external interrupt on digital pin two of Arduino to synchronize these tasks using binary semaphore. These two tasks control an LED which we connect with digital pin 13 of Arduino. “LedOnTask” task turns on LED and prints “Inside LedOnTask” string on the Arduino Serial monitor. Similarly, “LedoffTask” turns off LED and prints “Inside LedffTask” string on Arduino serial monitor.
Both these tasks have the same priority and use the same binary semaphore. Hence, FreeRTOS schedules both tasks using a time-sharing scheduling algorithm. Moreover, both tasks remain in a blocking state unless interrupt occurs and it gives binary semaphore. Because equal priority tasks follow a time-sharing scheduling algorithm in FreeRTOS. In response, both tasks will acquire binary semaphore turn by turn.
If you don’t know to use Arduino Interrupt, check this tutorial:
#include <Arduino_FreeRTOS.h>
#include <semphr.h>
SemaphoreHandle_t interruptSemaphore;

void setup()
{
  Serial.begin(9600); // Enable serial communication library.
  pinMode(LED_BUILTIN, OUTPUT);

 // Create task for Arduino led
  xTaskCreate(TaskLedon, // Task function
              "Ledon", // Task name
              128, // Stack size
              NULL,
              0 ,// Priority
              NULL );
   xTaskCreate(TaskLedoff, // Task function
              "Ledoff", // Task name
              128, // Stack size
              NULL,
              0, // Priority
              NULL );
  interruptSemaphore = xSemaphoreCreateBinary();
  if (interruptSemaphore != NULL)
  {
    attachInterrupt(digitalPinToInterrupt(2), interruptHandler, HIGH);
  }
}

void loop() {}

void interruptHandler()
{
  Serial.println("Semaphore is given");
  BaseType_t  xHigherPriorityTaskWoken  pdFALSE;
  xSemaphoreGiveFromISR(interruptSemaphore, &xHigherPriorityTaskWoken);
}

void TaskLedon(void *pvParameters)
{
  (void) pvParameters;

  for (;;)
    {
    if (xSemaphoreTake(interruptSemaphore, portMAX_DELAY) == pdPASS)
    {
      Serial.println("TaskLedon Received Semaphore");
      digitalWrite(LED_BUILTIN, HIGH);
    }
    }
  }

void TaskLedoff(void *pvParameters)
{
  (void) pvParameters;
  for (;;)
    {
    if (xSemaphoreTake(interruptSemaphore, portMAX_DELAY) == pdPASS)
    {
      Serial.println("TaskLedoff Received Semaphore");
      digitalWrite(LED_BUILTIN, LOW);
    }

  }
}
Arduino Serial Monitor Ouput
This picture shows the output of the Arduino serial monitor when we run this code on Arduino. As you can depict from this serial monitor output, as soon as we press switch connected with digital pin two of Arduino, an interrupt will occur. This interrupt handler routine gives a binary semaphore signal and also sends a string “Semaphore is given” to the Arduino serial monitor. One of the tasks, which is in blocking state waiting for the semaphore, takes the binary semaphore, and completes its execution. Also, both tasks acquire semaphore in time-sharing fashion upon every external interrupt.

Video Demo
Related Articles:
- Arduino FreeRTOS Queue Management – How to use Queues
- FreeRTOS Arduino: How to use Queue Set
- FreeRTOS Arduino: How to Create Mailbox with Queues
- How to use Arduino interrupts explained with examples
- FreeRTOS Arduino: Changing the Priority of a Task
- FreeRTOS Arduino: How to Delete Tasks with vTaskDelete() API
- Scheduling algorithms for real-time embedded systems
- LEAST LAXITY FIRST (LLF) SCHEDULING ALGORITHM
- What is REAL TIME OPERATING SYSTEM?
- INTRODUCTION TO ARDUINO IDE
Cany anyone explain the second line in the interruptHandler()? I am confused as to what ‘BaseType_t xHigherPriorityTaskWoken pdFALSE;’ is doing.
I found an answer here. Hopefully, it can help someone else:
The xHigherPriorityTaskWoken parameter must be initialized to pdFALSE as it will get set to pdTRUE inside the interrupt safe API function if a context switch is required.
Hi,Im using Stm32wbv5 . freertos cmsis_v2
Im trying to syncronize interrupt service routine with a task .
I made the task higher priority. I used binary semapore. i create it. take it .
And also I put the xsemaphoregivefromisr() to the interrupt handler… but result is negative. i can not take the interrupt to the task. Also after i made the settings above. i can not process other tasks except the interrupt task (ehich i mentioned above.)
What could be wrong ? Can you help ?
Interrupt handler :
void HAL_GPIO_EXTI_IRQHandler(uint16_t GPIO_Pin)
{
/* EXTI line interrupt detected */
if (__HAL_GPIO_EXTI_GET_IT(GPIO_Pin) != 0x00u)
{
if(GPIO_Pin==MCU_IMU_INTERRUPT1_Pin){
extern SemaphoreHandle_t xInterruptSemaphore;
xInterruptSemaphore= xSemaphoreCreateBinary();
BaseType_t xHigherPriorityTaskWoken = pdFALSE;
xSemaphoreGiveFromISR(xInterruptSemaphore, &xHigherPriorityTaskWoken);
__HAL_GPIO_EXTI_CLEAR_IT(GPIO_Pin);
HAL_GPIO_EXTI_Callback(GPIO_Pin);
}
__HAL_GPIO_EXTI_CLEAR_IT(GPIO_Pin);
HAL_GPIO_EXTI_Callback(GPIO_Pin);
}
}
Interrupt task :
void Thread_Lsm6dsox(void *argument)
{
(void) argument;
for(;;) {
if(xSemaphoreTake(xInterruptSemaphore,portMAX_DELAY)==pdPASS) {
/* Wait Events */
HAL_GPIO_WritePin(MCU_LED1_R_GPIO_Port, MCU_LED1_R_Pin, GPIO_PIN_SET);
osDelay(1000);
HAL_GPIO_WritePin(MCU_LED1_R_GPIO_Port, MCU_LED1_R_Pin, GPIO_PIN_RESET);
}
}
}