In this tutorial, we will learn to use FreeRTOS gatekeeper tasks API. We will see examples with Arduino. Gatekeeper tasks are used to implement mutual exclusion events without the risk of priority inversion and deadlocks. As we have discussed in previous tutorials, FreeRTOS mutex suffers from priority inversion and deadlocks problems. Although, we can resolve the issue of self-deadlock by using recursive mutex and mutex can minimize the aftermath of priority inversion. But it cannot entirely remove the effects of priority inversion. In order to rectify these issues, FreeRTOS API provides gatekeeper tasks API.
Gatekeeper tasks Introduction
As you know, semaphores and mutex are used for resource management in FreeRTOS. Similarly, a gatekeeper task is also responsible for resource management between different tasks that need a resource for their execution. Gatekeeper task is the only owner of the resource and it can access the resource directly. If any other task wants to acquire a resource, it can be only done indirectly by using gatekeeper task services.
Note: Gatekeeper tasks use FreeRTOS queue API to serialize access to the shared resource.

If you don’t know about how to use queues API of FreeRTOS, you should go through these tutorials:
- Queue Management with Arduino
- Structure Queue with Arduino
- Queue Set with Arduino
- FreeRTOS: Create Mailbox with Arduino
How does the Gatekeeper Task work?
In the last tutorial, we have used mutex to provide access to a printer function. Printer function (resource) prints string on Arduino serial monitor. Two tasks want to use this resource to print a string on an Arduino serial monitor. You can read about the last tutorial in the following tutorial:
FreeRTOS Mutex Tutorial with Arduino
In this tutorial, we will use a gatekeeper task instead of mutex to serialize the use of a resource such as a printer function and an Arduino serial monitor. As we mentioned earlier, Gatekeeper tasks use FreeRTOS queue API to serialize access to the shared resource. In this example, the shared resource is an Arduino serial monitor. Whenever any task wants to write something on a serial monitor, it will send data to the gatekeeper task queue, and only the gatekeeper task access Arduino serial monitor directly and any other task will access serial monitor by using queue service of gatekeeper task as shown in the figure below.
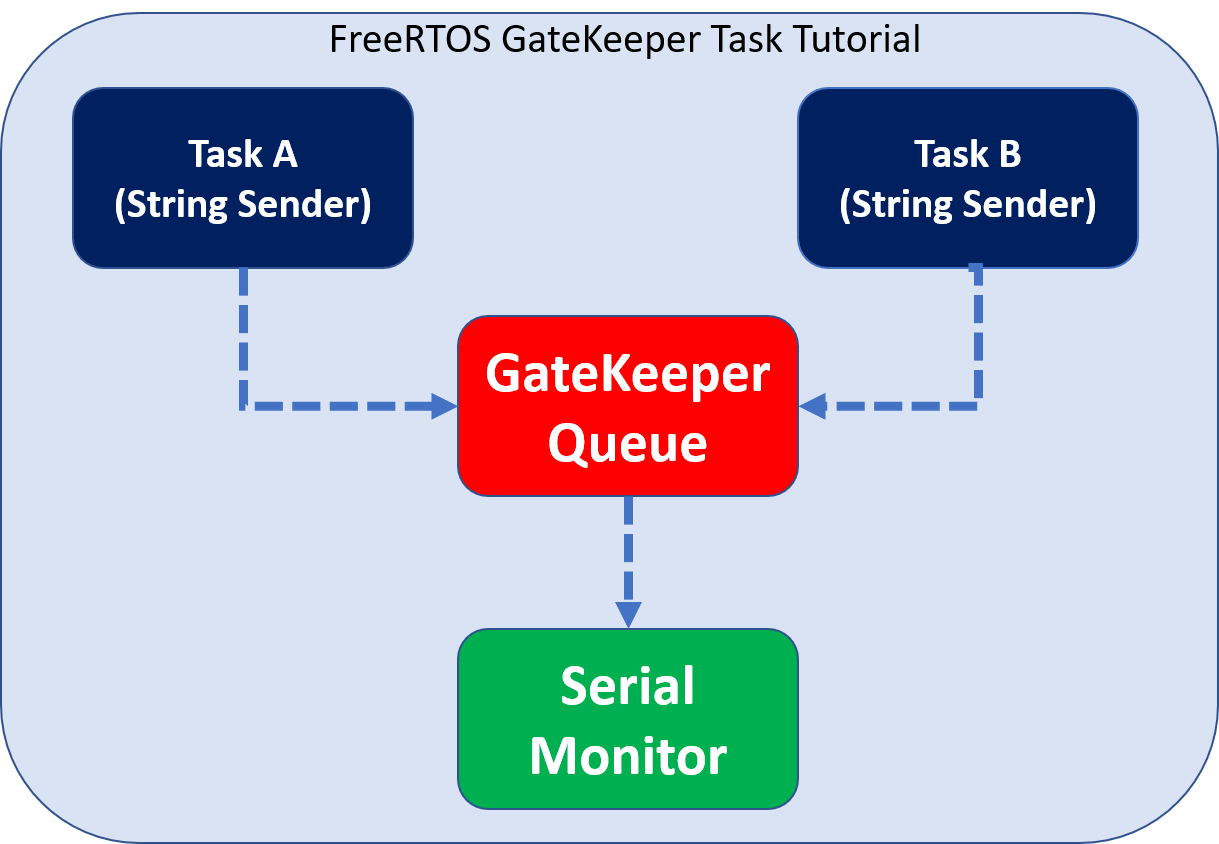
The Gatekeeper task remains in a blocked state until any task writes a string to the queue. As soon as it receives a string in the queue, it will write the received string on an arduino serial monitor. But the main point to note here is that only one task either A or B can access this queue at a given time. If TaskA is using a queue to write a string and TaskB also wants to write a message at the same time, TaskB will enter the blocking state waiting for the gatekeeper queue to become available.
In any practical project, unlike a serial monitor, shared resources can be a 16×2 LCD, servo motor, dc motor, and any output device.
FreeRTOS Gatekeeper Task Example with Arduino
For a demonstration of gatekeeper task use, we will take an example to use the Arduino serial monitor as a resource. Two tasks such as Task1 and Task2 send a string to serial monitor indirectly by using gatekeeper task queue as a service.
Now first lets see the demo code and its output on Arduino serial monitor. After that, we will see the working of Arduino Sketch.
Arduino Code
Upload this code to Arduino.
#include <Arduino_FreeRTOS.h>
#include"semphr.h"

static const char *pcStringToPrint[] =
{
  "Task 1 ############################## Task1 \r\n",
  "Task 2 ------------------------------ Task2 \r\n",
};

QueueHandle_t xPrintQueue;
void setup()
{
   Serial.begin(9600);
  xPrintQueue = xQueueCreate(5,sizeof(char *));
  xTaskCreate(SenderTask,"Printer Task1", 100,(void *)0,1,NULL );
  xTaskCreate(SenderTask,"Printer Task2", 100,(void *)1,2,NULL );
  xTaskCreate(GateKeeperTask, "GateKeeper", 100,NULL,0,NULL);

}
void SenderTask(void *pvParameters)
{
  int indexToString ;
  indexToString = (int)pvParameters;

  while(1)
  {
   xQueueSend(xPrintQueue,&(pcStringToPrint[indexToString]),portMAX_DELAY);
   vTaskDelay(pdMS_TO_TICKS(100));

  }

}

void GateKeeperTask(void *pvParameters)
{
  char *pcMessageToPrint;
  while(1)
  {
   xQueueReceive(xPrintQueue,&pcMessageToPrint,portMAX_DELAY);
   Serial.println(pcMessageToPrint);
  }
}

void loop(){}
Arduino Serial Monitor Output
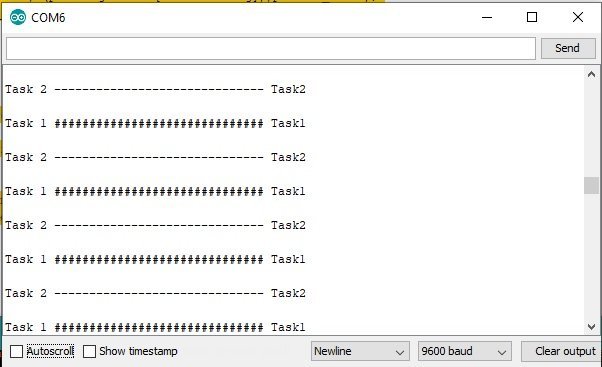
Now upload the above-given code to Arduino using Arduino IDE. You should see the output as shown in the figure below. Task2 executes first because its priority is higher than Task1. FreeRTOS scheduler is a preemptive time-sharing scheduler.
How Code Works?
First inlcude header files for Arduino and queue API of Free Arduino
#include <Arduino_FreeRTOS.h>
#include"queue.h"
We define constant character strings that will be used by Task1
and Task2 to send message to Arduino serial monitor through gatekeeper task service
static const char *pcStringToPrint[] =
{
  "Task 1 ############################## Task1 \r\n",
  "Task 2 ------------------------------ Task2 \r\n",
};
This line declares a queue type reference handler. Because we will use a queue of character type.
QueueHandle_t xPrintQueue;Inside the step() routine, first, we initialize the Arduino serial programming module with the baud rate of 9600. That means 9600 bits transfer per second from Arduino to the serial monitor.
Serial.begin(9600);Now you should create a queue of character type with a size of 5 by using xQueueCreate() API and assign it to a handler that we define above.
xPrintQueue = xQueueCreate(5,sizeof(char *));Here, We create three tasks such as Task1, Task2, and a GateKeeperTask. Task1 and Task2 send messages to the serial monitor through a Gatekeeper Task. Moreover, Task2 has the highest priority, Task1 has medium and GateKeeperTask has the lowest priority. Therefore, Task2 will execute first and GateKeeperTask will only execute when either Task1 and Task2 writes a string to the queue.
xTaskCreate(SenderTask,"Printer TaskA", 100,(void *)0,1,NULL );
xTaskCreate(SenderTask,"Printer TaskB", 100,(void *)1,2,NULL );
xTaskCreate(GateKeeperTask, "GateKeeper", 100,NULL,0,NULL);
This function is a definition of a sender Task that is used to write a string to the queue. Both Task and Task2 use this function. Here, the vTaskDelay() function is used to delay the task for 100ms. That means Task1 and Task2 will execute periodically after every 100ms.
void SenderTask(void *pvParameters)
{
  int indexToString ;
  indexToString = (int)pvParameters;
  while(1)
  {
   xQueueSend(xPrintQueue,&(pcStringToPrint[indexToString]),portMAX_DELAY);
   vTaskDelay(pdMS_TO_TICKS(100));
  }
}
This is a definition of a gatekeeper task. It reads data from the queue and sends this data to the Arduino serial monitor. Both Task1 and Task2 can access Arduin serial monitor through this task only.
void GateKeeperTask(void *pvParameters)
{
  char *pcMessageToPrint;
  while(1)
  {
   xQueueReceive(xPrintQueue,&pcMessageToPrint,portMAX_DELAY);
   Serial.println(pcMessageToPrint);
  }
}
Execution Timing Diagram
This timing diagram shows the execution pattern of all tasks according to their priorities.
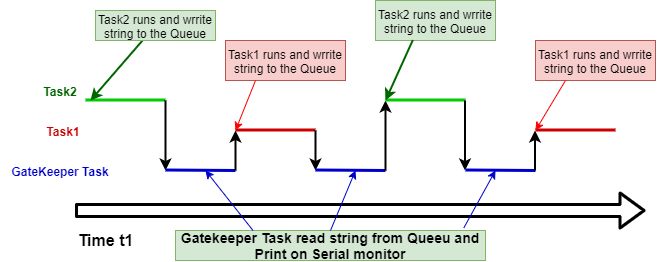
- At t1, Task2 being a high priority task enters the running state and writes a string to the Queue.
- After that Task1 one tries to enter the running state but it gets blocked because the queue is full. Hence, it remains in the blocking state until the queue becomes empty.
- Now, the Gatekeeper task executes and writes a message to the Arduino serial monitor.
- After that, Task1 executes because Task2 is in the blocked state due to vTaskDelay of 100ms. Hence, Task1 writes a string to the queue and goes to sleep for 100ms.
- Meanwhile, Task2 also enters the ready state because 100ms has been passed, but it will not be able to enter the running state. Because the queue is full, therefore, Task2 will enter the blocking state.
- In response, a gatekeeper task executes and prints string on Arduino serial monitor.
- After that execution follows the same pattern as discussed from step one.