In the last tutorial, we have seen how a single task can receive data from multiple tasks using a single Queue of structure type. In this tutorial, we will learn to use FreeRTOS queue set. Firstly, the question is why we need queue sets? Sometimes, as a programmer, we have to use separate Queues for receiving different types of data from different task resources.
Recommended Components
The following are recommended for following along with these FreeRTOS Arduino tutorials.
| Component | How it’s used in this project | Buy on Amazon |
|---|---|---|
| Arduino Starter Kit (Uno R3) | An Arduino board and parts to build and run the FreeRTOS example tasks. | Check Price |
| 37-in-1 Sensor Modules Kit | Assorted sensor modules handy for the FreeRTOS tasks, queues and semaphore demos. | Check Price |
| Hands-On RTOS with Microcontrollers (Book) | Recommended reference for learning FreeRTOS concepts in depth. | Check Price |
| Hands-On RTOS with Microcontrollers (2nd Edition) | Updated second edition of the FreeRTOS reference book. | Check Price |
As an Amazon Associate we earn from qualifying purchases. Prices and availability are accurate as of the date/time indicated and are subject to change.
Why We need to use Queue Sets?
For instance, if we want to integrated third party or external codes into application and it requires a dedicated queue to receive data from that third-party code.
Let suppose, we have a single data receiving task and multiple data sending tasks. Each sending task writes data to different queues but having a single data receiving task how we can differentiate that from which queue data is received. Therefore, we can resolve this issue by using ‘queue set’.
In summary, by using queue sets, a single task can receive data (same or different type) from multiple queues without the need of task polling to determine which holds data.
Use Queue Sets If Necessary
Note: It is recommended that not to use FreeRTOS queue sets if application design does not require to receive data from third party codes. Because FreeRTOS queue set makes program less efficient. Without the need of third-party code, as we have seen in last tutorial, we can achieve same functionality to receiving data from multiple resources by passing structure as an item to the queue.
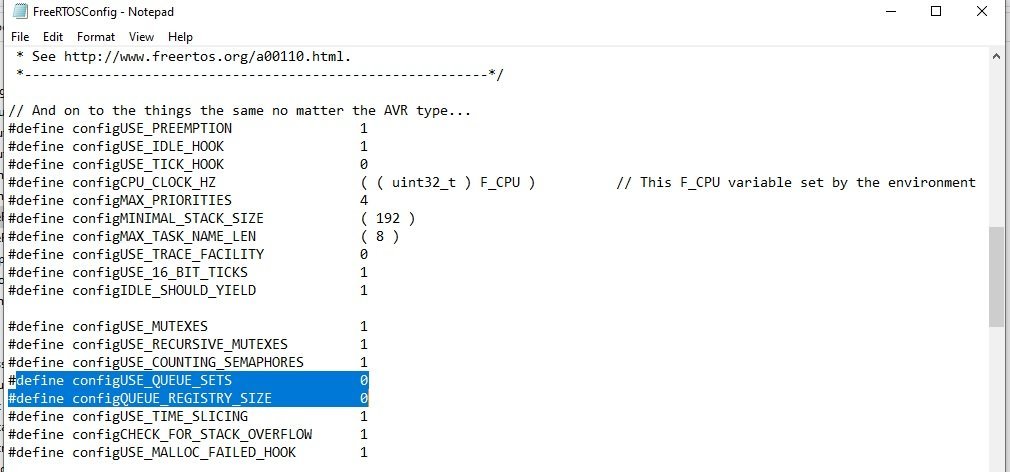
Enable FreeRTOS Queue Sets
By default, queue set function is disabled in FreeRTOS configuration file. In order to set it, go to library folder of FreeRTOS in Arduino IDE folder and open FreeRTOSConfig fil like this:

After that set compile time configuration constant “configUSE_QUEUE_SETS” to one as shown in this diagram.
Also, before learning more about how to create queue sets using FreeRTOS and Arduino, you should know how to create queues:
Queue Management using FreeRTOS and Arduino
FreeRTOS Queue Sets API
Now lets discuss FreeRTOS API function that are related to Queue sets.
How to Create Queue Set
First of all, we should create a queue set using xQueueCreateSet() function. This is a prototype of xQueueCreateSet() function.
QueueSetHandle_t xQueueCreateSet( const UBaseType_t uxEventQueueLength );Before creating a queue set, we should also create QueueSetHandle_t type reference handle. Because sets are handled by QueueSetHandle_t type handlers.
The return value of this function is a reference hander to the queue set. The input argument determines the number of queues handles it can hold. For example, if we have two queues and each queue contains 2 elements. Hence, the queue set can hold four items total ( 2 queues multiply by 2 items of each queue). Therefore, for this example, we should set uxEventQueueLength value to 4 by passing this value to xQueueCreateSet() function.
// define hanlder for queue set with name of "xQueueSet"
static QueueSetHandle_t xQueueSet = NULL;
// Create Queue_Set with that can hold two queues and 2 element each
xQueueSet = xQueueCreateSet( 2 * 2 );
Further information on this function is available on this link.
How to add Queues to Queue Set
xQueueAddToSet() function is used to add already created queues to the queue set. This is a prototype of xQueueAddToSet() function.
BaseType_t xQueueAddToSet( QueueSetMemberHandle_t xQueueOrSemaphore,
                           QueueSetHandle_t xQueueSet );
The first argument to xQueueAddToSet() is the handle of the queue to which want to add and the second argument is a handle of the queue set to which the queue is being added. You can find more information on this function on the FreeRTOS link.
For example, these line adds two queues such as xQueue1 and xQueue2 to the xQueueSet.
xQueueAddToSet( xQueue1, xQueueSet );
xQueueAddToSet( xQueue2, xQueueSet );
Note: We should create xQueue1 and xQueue2 queues before adding them to the set using xQueueAddToSet() function.
Reading Data from the Queue Set
xQueueSelectFromSet() reads a queue handle from the queue set. For example, the first argument to this function is a handle of the queue from which data is received and the second is the waiting time. The waiting time defines the maximum time for which it should wait for the data from sender tasks.
This line block on the queue set to wait for one of the queues in the set to contain data.
xQueueSelectFromSet( xQueueSet ,portMAX_DELAY );For Further information on xQueueSelectFromSet() check this link.
FreeRTOS Queue Set Example with Arduino
In this example, we create two sender tasks and one receiver task. The sender tasks send a string to the receiver task using two separate queues. By using queue sets, the receiver task decides which of the queue from two holds data.
First, we include libraries of FreeRTOS and queue managemet.
#include <Arduino_FreeRTOS.h>
#include <queue.h>
Create two variable of type QueueHandle_t that are used as a refernce for two queues.
static QueueHandle_t xQueue1 = NULL;
static QueueHandle_t xQueue2 = NULL;
Create one variable of QueueSetHandle_t. It is handler to the queue set to which both queues will be added.
static QueueSetHandle_t xQueueSet = NULL;Also, create two handler variable of type TaskHandle_t for sender task1 and task2.
TaskHandle_t TaskHandle_1; // handler for Task1
TaskHandle_t TaskHandle_2; // handler for Task2
After that create two queues such as xQueue1 and xQueue2. Both consists of one element of character array type.
 xQueue1 = xQueueCreate( 1, sizeof( char * ) );
 xQueue2 = xQueueCreate( 1, sizeof( char * ) );
Now, we also define a queue set by using xQueueCreateSet() function. We want to add two queues to this set and each having a lenght of one. Therefore, we pass “2×1” as an agument xQueueCreateSet().
xQueueSet = xQueueCreateSet( 1 * 2 );These line adds the queses ( that we created earlier) to the set.
xQueueAddToSet( xQueue1, xQueueSet );
xQueueAddToSet( xQueue2, xQueueSet );
After that, create two sender tasks and both have equal priority.
 xTaskCreate(Task1, "Sender1", 100, NULL, 1, &TaskHandle_1);
 xTaskCreate(Task2, "Sender2", 100, NULL, 1, &TaskHandle_2);
If you don’t know how to create tasks and set their priority with FreeRTOS using Arduino, you can read these tutorials:
- How to Create Task with FreeRTOS and Arduino
- Setting Priority of task with FreeRTOS and Arduino
- Delete Tasks with FreeRTOS and Arduino
The last thing inside the Arduino setup function is receiver task creation and starting a scheduler. We create one receiver task with a priority higher than the sender tasks. It reads data from the queue set and determines which of the queue contains data.
xTaskCreate(vReceiverTask, "Receiver", 100, NULL, 2, NULL );
vTaskStartScheduler();
Sender Tasks Definiton
These functions define sender tasks. Task1 uses xQueue1 to send a character string to the receiver task using a character to a pointer. It uses a block time of 100ms. Therefore, it sends string after every 100ms.
The second sending Task2 uses xQueue2 to send a character pointer to the receiving task every 200 milliseconds. The character pointers are set to point to a string that identifies the sending task.
//definition of Task1
void Task1(void* pvParameters)
{
  const char * const pcMessage = "Message from vSenderTask1";
    while(1)
    {
    vTaskDelay(100/ portTICK_PERIOD_MS);
    xQueueSend( xQueue1, &pcMessage, 0 );
    }
}
//definition of Task2
void Task2(void* pvParameters)
{
const char * const pcMessage = "Message from vSenderTask2";
while(1)
    {
    vTaskDelay(200 / portTICK_PERIOD_MS);
    xQueueSend( xQueue2, &pcMessage, 0 );
    }

}
This function defines the receiver task. It reads data from the queue set by determining from which of two queues data is written.
Whenever, a sender task writes a string to one of the queues, the handle of that queue is also passed to the queue set. Inside the receiving task, xQueueSelectFromSet() reads the handles from the queue set. By reading the handles of each queue, it determines which of the queue holds data. Therefore, it reads the data from the queue directly. After that “vReceiverTask” reads data from that queue using xQueueReceive() and prints its value on Arduino serial monitor.
//definition of  Receiver Task
void vReceiverTask( void *pvParameters )
{
QueueHandle_t xQueueThatContainsData;
char *pcReceivedString;
for( ;; )
{
xQueueThatContainsData = ( QueueHandle_t )
xQueueSelectFromSet( xQueueSet,portMAX_DELAY );
xQueueReceive( xQueueThatContainsData, &pcReceivedString, 0 );
Serial.println(pcReceivedString);
}
}
Complete Arduino Sketch
This listing is a complete Arduino sketch. Now, copy this code and upload it to Arduino board using Arduino IDE.
#include <Arduino_FreeRTOS.h>
#include <queue.h>

static QueueHandle_t xQueue1 = NULL, xQueue2 = NULL;
static QueueSetHandle_t xQueueSet = NULL;


TaskHandle_t TaskHandle_1; // handler for Task1
TaskHandle_t TaskHandle_2; // handler for Task2


void setup()
{
   Serial.begin(9600); // Enable serial communication library.
   xQueue1 = xQueueCreate( 1, sizeof( char * ) );
   xQueue2 = xQueueCreate( 1, sizeof( char * ) );
   xQueueSet = xQueueCreateSet( 1 * 2 );
   xQueueAddToSet( xQueue1, xQueueSet );
   xQueueAddToSet( xQueue2, xQueueSet );
   xTaskCreate(Task1, "Sender1", 100, NULL, 1, &TaskHandle_1);
   xTaskCreate(Task2, "Sender2", 100, NULL, 1, &TaskHandle_2);
   xTaskCreate(vReceiverTask, "Receiver", 100, NULL, 2, NULL );
   vTaskStartScheduler();
}

void loop()
{
  // put your main code here, to run repeatedly:

}

//definition of Task1
void Task1(void* pvParameters)
{
  const char * const pcMessage = "Message from vSenderTask1";
    while(1)
    {

    vTaskDelay(100/ portTICK_PERIOD_MS);
    xQueueSend( xQueue1, &pcMessage, 0 );
    }
}
//definition of Task2
void Task2(void* pvParameters)
{
const char * const pcMessage = "Message from vSenderTask2";     while(1)
    {
    vTaskDelay(200 / portTICK_PERIOD_MS);
    xQueueSend( xQueue2, &pcMessage, 0 );
    }

}
//definition of  Receiver Task
void vReceiverTask( void *pvParameters )
{
QueueHandle_t xQueueThatContainsData;
char *pcReceivedString;
for( ;; )
{
xQueueThatContainsData = ( QueueHandle_t )
xQueueSelectFromSet( xQueueSet,portMAX_DELAY );
xQueueReceive( xQueueThatContainsData, &pcReceivedString, 0 );
Serial.println(pcReceivedString);
}
}
Output Result
After uploading code, open Arduino serial monitor and observe the output. You will see output like this on serial monitor.
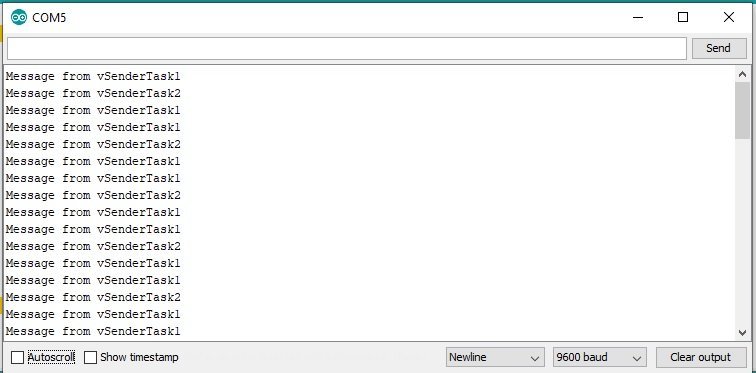
As you can see from the output diagram that “vReceiverTask” receives strings from both Task1 and Task2. The block time used by Task1() is half of the block time used by Task2(), causing the strings sent by Task1() to be printed out twice as often as those sent by Task2().
the contents is very great, thanks you so much
You are welcome.
Could this be adapted to handle serial traffic?
Very clear explaination! it is really helpful to learn FreeRTOS in much confident! Thanks