Deadlock is another issue that might occur due to the use of mutual exclusion events or mutex. In the last tutorial, we have learned to use FreeRTOS mutex API with Arduino. We have seen how mutex can be used to avoid priority inheritance. But mutex also creates an issue of deadlock between tasks. Deadlock is a phenomenon when two tasks are in a blocked state waiting for the resources held by one and another simultaneously.
Recommended Components
The following are recommended for following along with these FreeRTOS Arduino tutorials.
| Component | How it’s used in this project | Buy on Amazon |
|---|---|---|
| Arduino Starter Kit (Uno R3) | An Arduino board and parts to build and run the FreeRTOS example tasks. | Check Price |
| 37-in-1 Sensor Modules Kit | Assorted sensor modules handy for the FreeRTOS tasks, queues and semaphore demos. | Check Price |
| Hands-On RTOS with Microcontrollers (Book) | Recommended reference for learning FreeRTOS concepts in depth. | Check Price |
| Hands-On RTOS with Microcontrollers (2nd Edition) | Updated second edition of the FreeRTOS reference book. | Check Price |
As an Amazon Associate we earn from qualifying purchases. Prices and availability are accurate as of the date/time indicated and are subject to change.
Deadlock Example
For example, in a real-time embedded application, there are two tasks such as Task1 and Task2. Also there are two mutex tokens such as x and y. Task1 starts to execute and takes x mutex. After some time, Task2 preempts Task1 and starts execution after taking mutex y. But after executing some of the instructions, Task2 tries to acquire mutex x. But it is already taken by Task1. Hence, Task2 will enter the blocking state and waits until mutex x becomes available.
Now, Task1 gets to execute again, but after some, Task1 wants to take mutex y, but it is already taken by Task2. In response, it will also enter the blocking state. In consequence, both tasks enter the blocking state waiting for a mutex token that is already taken by both tasks. Therefore, no task will be able to execute. This situation is known as deadlock.
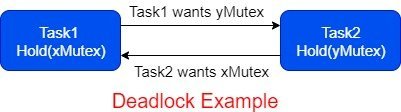
In short, in such a scenario, Task1 will be waiting for the mutex held by Task2. Similarly, Task2 will be waiting for the mutex held my Task1. Neither task will be able to execute, hence a deadlock situation arises.
How to avoid Deadlock using FreeRTOS?
In FreeRTOS, such a type of deadlock can only be avoided by the careful programming of real-time applications. Unlike the priority inheritance protocol, FreeRTOS does not provide any solution to solve the problem of deadlock. It can be only solved while designing real-time embedded systems. We must design tasks such that the deadlock does not occur.
One other possibility is to not use the indefinite waiting time for the tasks to acquire the mutex. Instead use a minimum possible blocked time for the task that will be waiting to take mutex. If a task is not able to take mutex within that time, it should release other resources also. In small real-time embedded systems, deadlock is not a big problem. Because an application designer can easily trace deadlock while designing an application and can remove it before deploying an application in the market.
FreeRTOS Mutex Deadlock Example Code
This code shows the example scenario of deadlock. If you are just starting with FreeRTOS, you can check this getting started guide:
How to use FreeRTOS with Arduino – Real-time operating system
// include libraries for FreeRTOS and semaphore
#include <Arduino_FreeRTOS.h>
#include "semphr.h"
// define two semaphore type variables. Because we will create two mutex
SemaphoreHandle_t xMutex;
SemaphoreHandle_t yMutex;

void setup()
{

  Serial.begin(9600); // Enable Serial communication
  xMutex = xSemaphoreCreateMutex(); // create mutex with name xMutex
  yMutex = xSemaphoreCreateMutex(); //  create mutex with name yMutex

  xTaskCreate(Task1, "Task1",100,NULL,1,NULL); // Create Task1 with priority 1
  xSemaphoreGive(xMutex); // make available xMutex
  xSemaphoreGive(yMutex);  // make available yMutex

}

void loop(){}
void Task1(void *pvParameters)
{
  while(1)
  {
   xSemaphoreTake(xMutex,portMAX_DELAY);
   Serial.println("Inside Task1");
   xTaskCreate(Task2, "Task2", 100,NULL,2,NULL);
   Serial.println("Task1 attempting to take yMutex");
   xSemaphoreTake(yMutex,portMAX_DELAY);
   xSemaphoreGive(xMutex);
   vTaskDelay(1);
  }
}
void Task2(void *pvParameters)
{
  while(1)
  {
    xSemaphoreTake(yMutex,portMAX_DELAY);
    Serial.println("Inside Task2");
    Serial.println("Task2 attempting to take xMutex");
    xSemaphoreTake(xMutex,portMAX_DELAY);
    xSemaphoreGive(yMutex);
    vTaskDelay(1);
  }
}
How Code Works?
In this example, we have created two mutexes such as xMutex and yMutex. At the start, Task1 starts execution and take xMutex. After that, Task1 print “Inside Task1” on Arduino serial monitor. Task1 creates another task with priority higher than itself that is Task2. Because the priority of Task2 is higher than Task1. Hence, as soon as it created, Task2 preempts Task1 and starts to execute.
Task2 takes yMutex and prints “Inside Task2” string on the serial monitor. After that it prints “Task2 attempting to take xMutex” string on serial monitor and also attempts to take xMutex. But it is already taken by Task1. Hence, Task2 will enter the blocking state and waits until xMutex becomes available.
After that, Task1 again resume its exexution from where it preempted by Task2. Its prints “Task1 attempting to take yMutex” string on serial monitor. After that, it attempts to take yMutex. But is already held by Task2. Therefore, Task1 also enters the blocking state waiting for the yMutex.
Therefore, both tasks will not be able to execute. Because Task1 is waiting for the resource held by Task2 and Task2 is waiting for the resource held by Task1. Hence, a deadlock situation occurs.
Serial Monitor Output
As you can see from the output of Arduino serial monitor, code is not able to execute further and deadlock occurs.

Video Demo
Recursive Mutex Introduction
It is also possible for a single task to deadlock with itself. A recursive mutex can be ‘taken’ more than once by the same task, and will be returned only after one call to ‘give’ the recursive mutex has been executed for every preceding call to ‘take’ the recursive mutex.
If a task which is already holder of a mutex tries to take a mutex without giving already taken mutex, it is also an issue of deadlock. FreeRTOS API provides a recursive mutex that can be used to avoid such types of deadlocks.
Recursive Mutex Example
For example, Task1 starts to execute and after some time it takes mutex. Task1 is now a holder of a mutex. But it now calls another function. But this function also requires the same mutex. Hence, the function library attempts to access the mutex but enters the blocking state due to the unavailability of the mutex.
Hence, Task1 also enters the blocking state waiting for the mutex but the task is already holding a token. In this situation, a deadlock occurs because of the task itself. But FreeRTOS provides recursive mutex to avoid this type of deadlock.
FreeRTOS Recursive mutex API
These are the API functions used for recursive mutex. The use of these API functions is similar to semaphore tutorials that we have seen earlier. You can read them here:
- FreeRTOS Binary Semaphore for Tasks Synchronization
- FreeRTOS Counting Semaphore for resource management
- Mutually Exclusive events FreeRTOS
xSemaphoreCreateRecursiveMutex() : It is used to create recursive mutex.
xSemaphoreTakeRecursive() : Task can acquire/take recursive mutex with this API.
xSemaphoreGiveRecursive() : Recursive mutexes are ‘given’ using this API.