In this getting started guide on MicroPython with ESP32 and ESP8266, we will learn how to use program and flash firmware to ESP32 and ESP8266 development boards using MU Editor. We will see how to download and install MU Editor that we will use to write firmware and flash programs to our ESP boards. At the end of the tutorial, you will be able to write and flash your first program to your ESP32 and ESP8266 boards using this beginner friendly editor.
Recommended Components
The following components are used in this project or are helpful for getting started with MicroPython on ESP32 and ESP8266.
| Component | How it’s used in this project | Buy on Amazon |
|---|---|---|
| ESP32 Development Board (DevKit V1) | The ESP32 board flashed with MicroPython firmware. | Check Price |
| ESP8266 NodeMCU (ESP-12E) | The ESP8266 NodeMCU running the same MicroPython code. | Check Price |
| Micro USB Cable | Programs and powers the board from your PC. | Check Price |
As an Amazon Associate we earn from qualifying purchases. Prices and availability are accurate as of the date/time indicated and are subject to change.
MicroPython Introduction
MicroPython is the reimplementation of the software Python3 which is specially designed for microcontrollers and embedded systems. It is very similar in use to that of Python. For example, if someone knows how to write simple programs in Python then it is very easy to work in MicroPython as the programming language is the same. The only major difference is that it does not come with a full standard library, but it can be easily used to access lower-level hardware because it has those modules present in it.
Why do We use MicroPython ?
The reason for Micro-python being used so readily in the embedded fields is because it is a simple and easy to learn software development language even for beginners than C and C++. Another important feature is that the Python programming language is easier to learn and all beginners find it very easy when comes to the learning curve for Python as compared to C and C++. Because MicroPython is similar to python. On top of that, we can use it to program embedded boards. Therefore, the main objective of MicroPython developers is to make embedded programming as simple as possible so that hobbyists, researchers, teachers, educators, and beginners can easily learn and dive into the embedded field.
Last but not the least important reason to use MicroPython is that it contains REPL (Read-Evaluate-Print Loop) which let’s run the code on ESP boards without going through program compilation process.
As compared to C and other embedded programming languages, the LED blinking code for ESP32 and ESP8266 can be written in a few lines as shown:
import time
from machine import Pin
led=Pin(2,Pin.OUT)       #create LED object from pin2, Set Pin2 to output

while True:

led.value(1)            #Set led turn on

time.sleep(0.5)

led.value(0)            #Set led turn off

time.sleep(0.5)
There are several devices which can be run through this software but for now, we will focus on ESP32 and ESP8266. As these two boards are similar they are programmed in the same way in MicroPython.
MicroPython Supported Board
There are many MicroPython supported board available in market. We have mentioned some of them below:
- ESP32
- ESP8266
- Adafruit Circuit Playground Express
- PyBoard
- Micro: Bit
- Teensy 3 Serial Boards
- WiPy – Pycom
- All types ESP32/ESP8266
You can look in these guides to find more information on supported boards for MicroPython
Installing MU Editor
Now we will learn how to use ESP32 and ESP8266 in Micro-python firmware. In order to do that we need to first install an IDE. There are many integrated development environments available that can be used to write programs for ESP32 and ESP8266.
We will be using MU Editor as it can be run in any major operating system and is always extremely interactive and easy. We will be installing MU Editor in Windows.
Installing Python3
Before we start the installation of MU Editor, make sure you have the latest version of Python installed on your windows-based. If you don’t have the python 3 package installed on your Windows, follow these steps to install one:
- First of all go this link here and download latest version of Python3.
- After you click the Download button an .exe file will start downloading. After the download is completed click on it.
- Press the run button. Make sure to tick Add Python to a path and then click Install Now.
- After the installation is complete you will receive a successful setup message.
Download and Install MU Editor
As we mentioned earlier, we will use MU Editor to program ESP32 and ESP8266 development boards. The reason we are using MU Editor is that it is simple and easy to use IDE among other MicroPython based IDE’s available in the market.
Now we will move onto the next step. Now follow these steps to download and install MU Editor:
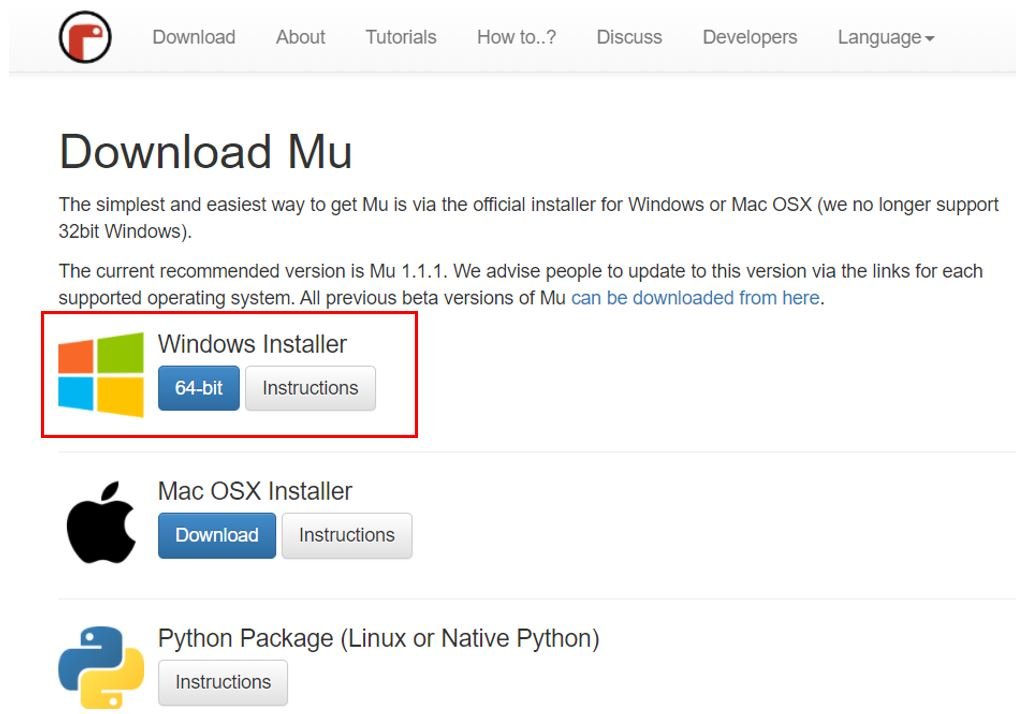
- In order to download the MU Editor, go to this link here and download it for windows as shown below. You can also download for Linux and Mac if you are using Linux or Mac operating system.
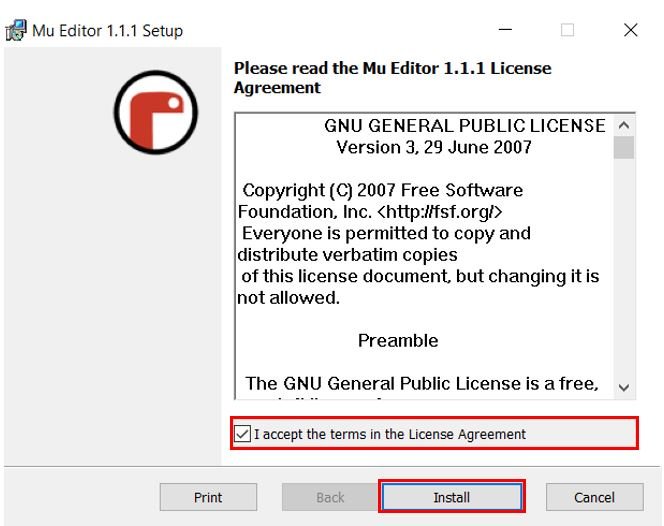
After that click on the file which you download in the previous step and start the setup installation. You will be asked to accept the terms in the License Agreement. Check that box and click ‘Install’ to continue the installation process.
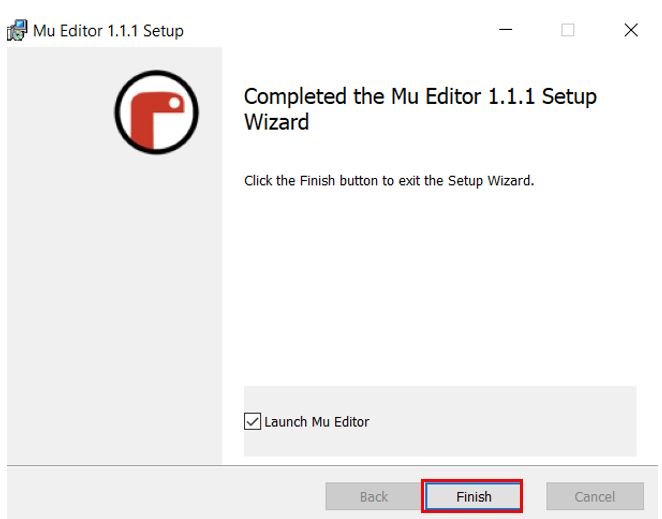
After a few moments, your set up will be successfully installed. Click the ‘Finish’ button to launch the Mu Editor.
It will take a few moments for the Mu Editor to open up for the first time.
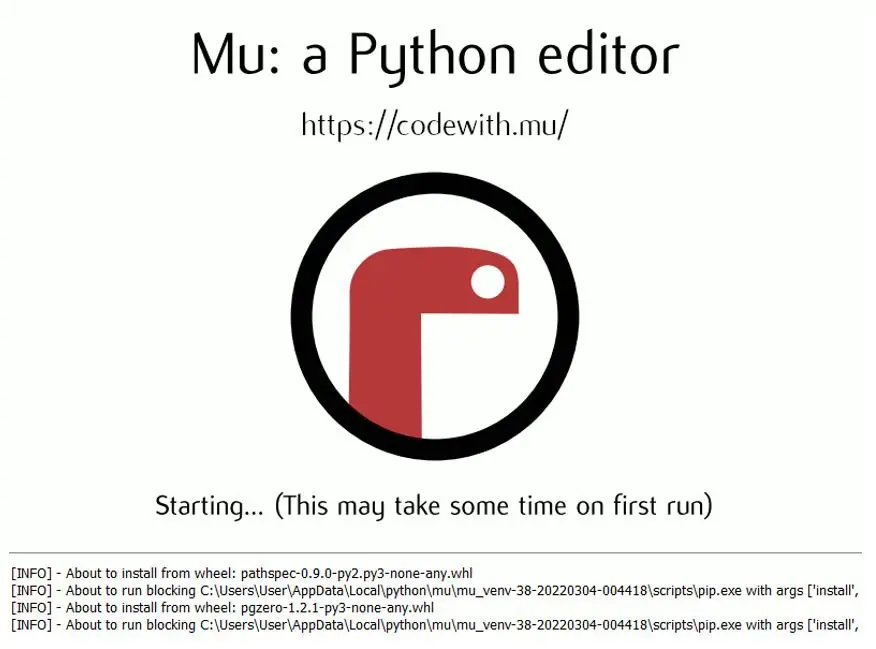
After opening, you will be able to view the following Mu Editor window:

Till now we have downloaded and installed Mu Editor IDE. We will use this IDE to write firmware and flash firmware to ESP32 and ESP8266.
Mu Editor
Now lets explore different windows and components of Mu Editor. First open Mu Editor, you will see a window like this. On the top you will be able to view various buttons like these:

Lets briefly discuss them in the table below:
| Button Label | Description |
| Mode | This button allows you to select the mode from various options. We will choose ‘ESP MicroPython’ from the list.’ |
| New | This button opens a new file for you to write the code. |
| Load | This button allows you to select a file that you want to load to the editor. |
| Save | This buttons allows you to save the currently opened file to your system. |
| Run | This will run the currently opened program code in your microcontroller. However, it does not get uploaded to the board. |
| Debug | This allows you to debug your Python script and rid it of potential errors. |
| REPL | REPL (Read-Evaluate-Print Loop) which let us run the code on our microcontroller without going through program compilation process. |
| Plotter | This opens a window that allows us to plot data on a graph. |
| Zoom-in | Increase font size of the script. |
| Zoom-out | Decreases font size of the script. |
| Theme | Allows you to choose the theme of the editor from a total of three options: day, night or high-contrast. |
| Check | This checks your script for any mistakes. |
| Tidy | This transforms the layout of the script in an orderly manner. |
| Help | This opens up a the Mu Editor help page on your web browser with guides and tutorials regarding the editor. |
| Quit | This closes the Mu Editor. |
Click the ‘Mode’ button and select the mode as ‘ESP MicroPython‘ to start programming in MicroPython on ESP32/ESP8266 boards.

Flashing MicroPython Firmware on ESP32/ESP8266
After installing Mu Editor and getting its overview, before we run a sample MicroPython program on ESP32 and ESP866, we should flash the MicroPython program to ESP development boards using this IDE.
To Flash ESP32 and ESP8266 boards with MU Editor, we need to download MicroPython firmware for ESP32 and ESP8266. Follow these steps to download MicroPython firmware for ESP boards.
Downloading MicroPython firmware
By default, the ESP32 and ESP8622 are not flashed with Micro-Python. It is very easy to flash ESP32 and ESP8622 with the help of this IDE.
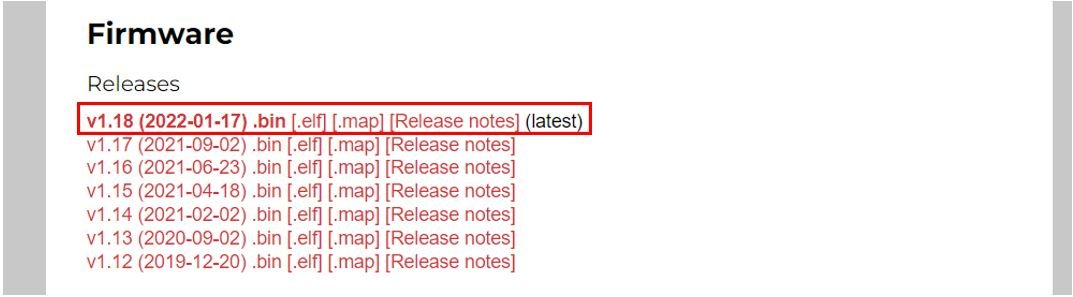
To download the latest version of Micro-Python firmware for the ESP32, go to the website Micro-python and in its download page here (https://micropython.org/download/esp32) and select the latest firmware for ESP32. The format will be of the type .bin
Similarly, you can download ESP8266 MicroPython firmware from this link.
Flashing/Uploading MicroPython Firmware
Connect your ESP32 or ESP8266 board with your computer and open the MU Editor. Now select ESP MicroPython mode on the MU editor.
Click the icon found on the bottom right corner of the editor, highlighted below.

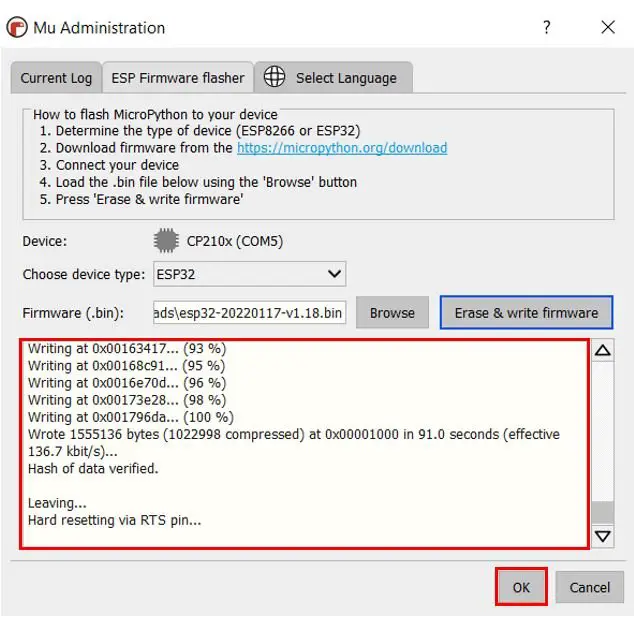
This is open the MU Administration. Head over to the ‘ESP Firmware flasher’ tab. Choose the device type as ESP32 or ESP8266. We will demonstrate through ESP32. Moreover, In the device section you will see that our board is connected with serial port COM5.

Next, in the Firmware option click the Browse button and select the .bin file that you just downloaded. Then click the ‘Erase and write firmware’ button.

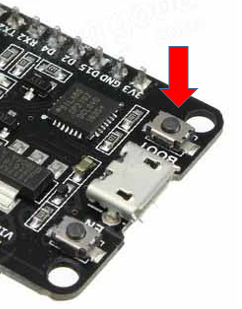
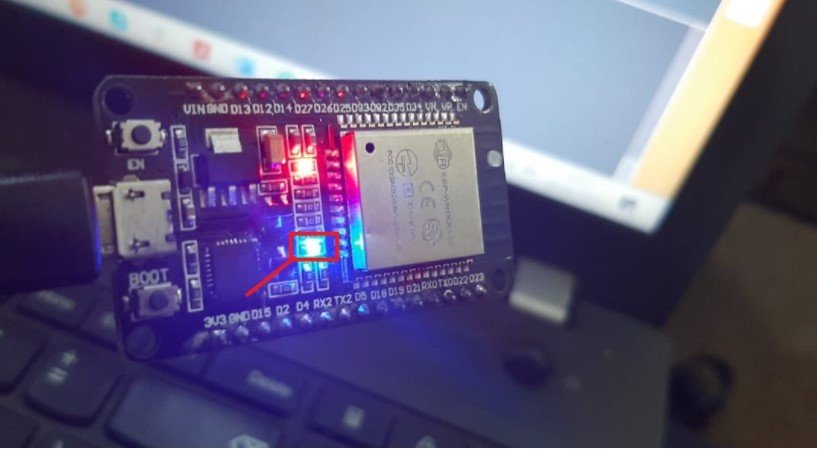
If you are using ESP32, press the hold-down “BOOT/FLASH” button on the ESP32 module for a few seconds. It can be seen clearly in the following picture
For ESP8266 you do not need to press the FLASH button.
After the burn and download process started, you can release the boot button. The burning process will be completed in a few seconds and the firmware would be flashed onto ESP32.
Press Ok to exit.
Now we are ready to program our modules in Micro-python on MU Editor.
Writing Your First MicroPython Script on MU Editor
So far in this tutorial on MicroPython MU Editor for ESP32 and ESP8266 we learned to install the software that is required to process and execute code on ESP32 and ESP8266. Now let’s write a simple script on ESP32 and execute it on the development board. We will write a simple onboard LED blinking script for the ESP32 and ESP8266 in Python programming language and will upload it to the ESP board and see how it works.
Lets start. Follow the steps below:
- Connect your boards to your computer using a USB cable.
- Go to Mode and select the mode as ‘ESP MicroPython’
- Flash ESP32/ESP8266 with MicroPython firmware
- Go to “New” and open a new file.

- Now copy this MicroPython code into your newly opened file
from machine import Pin
from time import sleep

led = Pin(2, Pin.OUT)

while True:
  led.value(not led.value())
  sleep(0.5)
The onboard LED is connected with GPIO2 in ESP32 and ESP8266.

- After that click on the “Save” button to save the file on your computer.

You can select any location in your computer where you want to save this file. Given your file a name such as main.py and save it in your computer. We have named our file blink.py
Note: You can give any name to this file. But the extension of file should always be .py.
- You can press the “Run” button to run the code directly to ESP32/ESP8266 via REPL.

- Now press the ENABLE or RESET Button of ESP32 or ESP8266.You should see that on-board LED of ESP32 or ESP8266 will start blinking with a delay of half second.
However if you want to upload the code to your board then follow the steps given below:
Uploading Code to ESP32/ESP8266
Click the “Files” button to view the files saved on your device and on your computer.

You may see that blink.py file is saved on our computer and another file called boot.py was created on our device.

Now we have to upload the code to our board. To do that drag your blink.py file from the files on the computer section to the files on the device section. Now the files saved on the device consist of the boot.py file and the blink.py file. You will also get a message in the bottom left that your file was successfully copied to the device.

If you have to make any changes to this file you will have to initially save it to your computer and then move it to files on your device and overwrite it.
Now press the ENABLE or RESET Button of ESP32 or ESP8266. You should see that the onboard LED of ESP32 or ESP8266 will start blinking with a delay of half-second.
In this user guide, we took a look at another IDE used with Micro-Python: MU Editor. We have learned to program ESP32/ESP8266 using this editor. It is easy to use to write MicroPython programs. It is available in Windows 64 bits, Linux, and Mac operating systems.
You may also like to read:
- MicroPython ESP32 and ESP8266: Program with VS Code and Pymakr
- Flash MicroPython Firmware with esptool.py to ESP32 and ESP8266
- Getting Started with MicroPython on ESP32 and ESP8266
- Getting Started with Thonny MicroPython IDE for ESP32 and ESP8266
- MicroPython Control a DC Motor using L298N Driver with ESP32 and ESP8266
- MicroPython: BME280 Web Server with ESP32/ESP8266 (Weather Station)
- MicroPython HC-SR04 Ultrasonic Sensor with ESP32 and ESP8266
- MicroPython: DS18B20 Web Server with ESP32/ESP8266(Weather Station)
- ESP32/ESP8266 MicroPython Web Server – Control Outputs