
Recommended Components
The following components are used in this project or are helpful for building it with a PIC microcontroller.
| Component | How it’s used in this project | Buy on Amazon |
|---|---|---|
| PIC16F877A microcontroller | Target 8-bit PIC that runs your first compiled XC8 program. | Check Price |
| PICkit 5 programmer/debugger | Flashes the compiled hex file onto the PIC and debugs it. | Check Price |
| 5mm LED | Blinks on RB0 to confirm your first program works. | Check Price |
| Breadboard | Solderless base for wiring the PIC and components together. | Check Price |
| Jumper Wires | Connect power, ground and signal lines between the parts. | Check Price |
As an Amazon Associate we earn from qualifying purchases. Prices and availability are accurate as of the date/time indicated and are subject to change.
Download and Install MPLAB IDE and XC8 Compiler
Microchip provides free of cost MPLAB integrated development environment (IDE). We can use this IDE to program Pic and AVR microcontrollers. Additionally, we can use it along with XC8, XC16 and XC32 compilers to program PIC10F, PIC12F, PIC16, PIC18, PIC24, PIC32 and Dspic series of microcontrollers. In this post, we will see how to use MPLAB with XC8 compiler, but you can follow the same instructions to use this IDE with compilers.Download MPLAB X IDE
First of all, we will download the MPLAB X IDE from the following link:Open this link and go to the bottom of the page. You will find many options according to version and operating systems. This IDE is available for three popular operating systems such as Windows, MAC and Linux operating systems. Download the latest version according to your system. After that click on the installation file and follow the instruction to install IDE. We are not going to explain the installation process. Because it is pretty straightforward.Download XC8 Compiler
In the last section, we only downloaded and installed IDE. MPLAB IDE by default does not include any compiler. We can use it to write assembly language programs without the need for any compiler. But if we want to write code in embedded c language, we need to install a compiler separately. Go to this link and download XC8 compiler:Go to this link and scroll to the end of the page. Click on compilers download menu and click on the XC8 compiler to download. Again make sure to download compiler according to the operating system that you are using. After that install XC8 compiler by clicking on the installation file. Once you have completed the installation process, you don’t need to do anything. XC8 got linked with MPLAB IDE automatically.Create New Project with MPLAB XC8 Compiler
To create a new project follow these steps:Create a New Project
First, open MPLAB X IDE by clicking on its icon and after that from the menu, select File>>New Project. Also, you can open existing projects, close projects and import from this menu. After that, this window will pop up. From categories option, pick “MicroChip Embedded” and from Projects window, select “Standalone Project”. After that click on the Next button.
Select Microcontroller
Now we will select a target microcontroller that we want to use. You must select a microcontroller that you want to use. Type the name of the pic microcontroller in the device window. For example, we will be using PIC16F877A microcontroller, we have typed PIC16F877A.
Programmer Hardware Tool
Now form select tool option, we can select the hardware tools such as programmers, debugger or other tools. For example, if you are using PICKit3 programmer to upload code to pic microcontroller then select PICKit3. Otherwise, you can select from other available options. Moreover, if you are not using any hardware and just want to use a simulator, you can select a simulator option.
MPLAB Compiler Selection
As we mentioned earlier, the MPLAB IDE supports many compilers. From compiler toolchains, select the compiler you want to use. Right now, it is showing only XC8 compiler and mpasm. Because we have only installed XC8 compiler and MPASM is available by default in MPLAB. But if you have installed multiple compilers all will show here. Now select the XC8 compiler and click on the next button.
Save Project Location MPLAB XC8 Compiler
In this last step, we will select the location where we want to store a PIC16F877A project in our system. Type a name for the project in the Project Name field. Click Browse to set the location of the project files. To differentiate the current project in the IDE (when multiple projects exist) as the main project, click “Set as the main project”. Now click on the finish button, it will create a new project and you will see a project window in MPLAB as shown below:
Write First Program with MPLAB XC8 Compiler
Before writing the first program with the MPLAB XC8 compiler, we need to add a source file or C file in the project. The easiest way to add source will is through a project window option. Right-click on Select New>>C Source File. After you click on the main.c file, this window will open. Give this source file a useful name as we have given it a name “pic16f877aLED” and select extension ‘c’. Similarly, we can add header files also. But for header files, select extension ‘h’ from the menu.
 After that click on the “Finish” button. It will create a new source file. This file “pic16f877aled” with your specified name will also appear in the project window. The file contains this minimum code. This is a starting point of your first project with MPLAB XC8 Compiler.
#include <xc.h>

void main(void)
{
return;
}
#include <xc.h> this header file contains definition of all registers of PIC16F877A microcontroller. This header file microcontroller specific features.How to Compile Code with MPLAB XC8 Compiler
After you finish writing your first program, you will need to compile the code to generate hex file and to see if there is an error in the code. To compile code, click on a building project button. If there is no error in the code, it will display a message of successfully built and generate a hex file. You can upload this hex file to your microcontroller. You can read this tutorial on how to upload code to pic microcontroller using PICKit3 programmer:If you are using proteus, you can get a hex file from your project folder and upload it to the proteus.
MPLAB XC8 Compiler Example
In this section, we will take an example code and compile this code. After that, we will upload hex file into proteus file and see how it works.How to generate Configuration Bits File ?
First of all, we need to generate an configuration bit file with MPLAB XC8 compiler. Configuration bits file defines main features of pic microcontroller such as oscillator setting, watchdog timer, Power-on Reset, Brownout detect settings, etc. To know more about configuration bits, read this post:To generate configuration bits file, go to window>>target memory views>>Configuration Bits and click on it.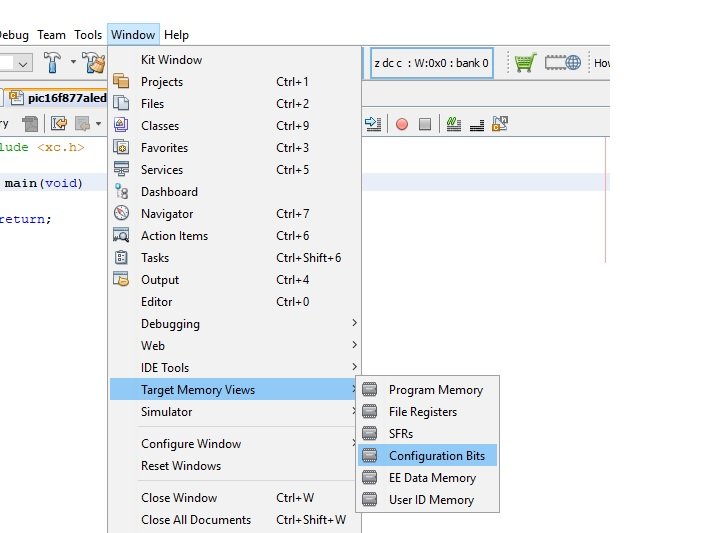 After that, you will see this configuration bit settings field. Click on “Generate Source Code to Output”. It will generate a file. Copy that file and add it to your project. One other possible way to add this file in the project is through a header file. Create a header file and add this file to your main code.
 We add this configuration file inside the main code.
// PIC16F877A Configuration Bit Settings

// 'C' source line config statements

// CONFIG
#pragma config FOSC = EXTRC // Oscillator Selection bits (RC oscillator)
#pragma config WDTE = ON // Watchdog Timer Enable bit (WDT enabled)
#pragma config PWRTE = OFF // Power-up Timer Enable bit (PWRT disabled)
#pragma config BOREN = ON // Brown-out Reset Enable bit (BOR enabled)
#pragma config LVP = ON // Low-Voltage (Single-Supply) In-Circuit Serial Programming Enable bit (RB3/PGM pin has PGM function; low-voltage programming enabled)
#pragma config CPD = OFF // Data EEPROM Memory Code Protection bit (Data EEPROM code protection off)
#pragma config WRT = OFF // Flash Program Memory Write Enable bits (Write protection off; all program memory may be written to by EECON control)
#pragma config CP = OFF // Flash Program Memory Code Protection bit (Code protection off)

// #pragma config statements should precede project file includes.
// Use project enums instead of #define for ON and OFF.

#include <xc.h>
#include <xc.h>

void main(void)
{
return;
}
We are not going to explain how this code works. Because this tutorial is getting started guide only. The purpose of this tutorial is to teach you how to create your first project and compile code with MPLAB XC8 compiler.PIC Microcontroller LED Blinking Example
In this section, we will see an LED blinking example. For instance, we use an LED with RB0 pin of PIC16F877A microcontroller. We connect an LED with pin0 of PORTB through a current limiting resistor.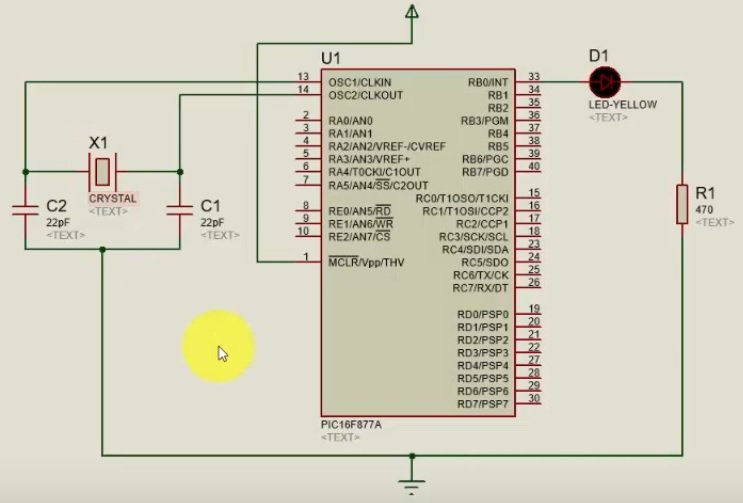 Now copy this code to your MPLAB project and generate a hex file.
// PIC16F877A Configuration Bit Settings
// 'C' source line config statements
// CONFIG
#pragma config FOSC = EXTRC // Oscillator Selection bits (RC oscillator)
#pragma config WDTE = ON // Watchdog Timer Enable bit (WDT enabled)
#pragma config PWRTE = OFF // Power-up Timer Enable bit (PWRT disabled)
#pragma config BOREN = ON // Brown-out Reset Enable bit (BOR enabled)
#pragma config LVP = ON // Low-Voltage (Single-Supply) In-Circuit Serial Programming Enable bit (RB3/PGM pin has PGM function; low-voltage programming enabled)
#pragma config CPD = OFF // Data EEPROM Memory Code Protection bit (Data EEPROM code protection off)
#pragma config WRT = OFF // Flash Program Memory Write Enable bits (Write protection off; all program memory may be written to by EECON control)
#pragma config CP = OFF // Flash Program Memory Code Protection bit (Code protection off)

#define _XTAL_FREQ 8000000
#include <xc.h>

void main(void)
{
TRISB=0x00;
while(1)
{
RB0 = 1 ;
__delay_ms(500);
RB0 = 0 ;
__delay_ms(500);

}
return;
}
This example code will blink an LED with a delay of half-second. LED will turn on for half second and then remain off for half-second.
please after installing the xc8 compiler it worked perfectly, but now it doesnt not even a simple blink code. it always compiles with error such as (
CLEAN SUCCESSFUL (total time: 5ms)
make: *** No rule to make target ‘language’. Stop.
BUILD FAILED (exit value 2, total time: 85ms))
please how do i fix this problem.
is you code in C or assembly