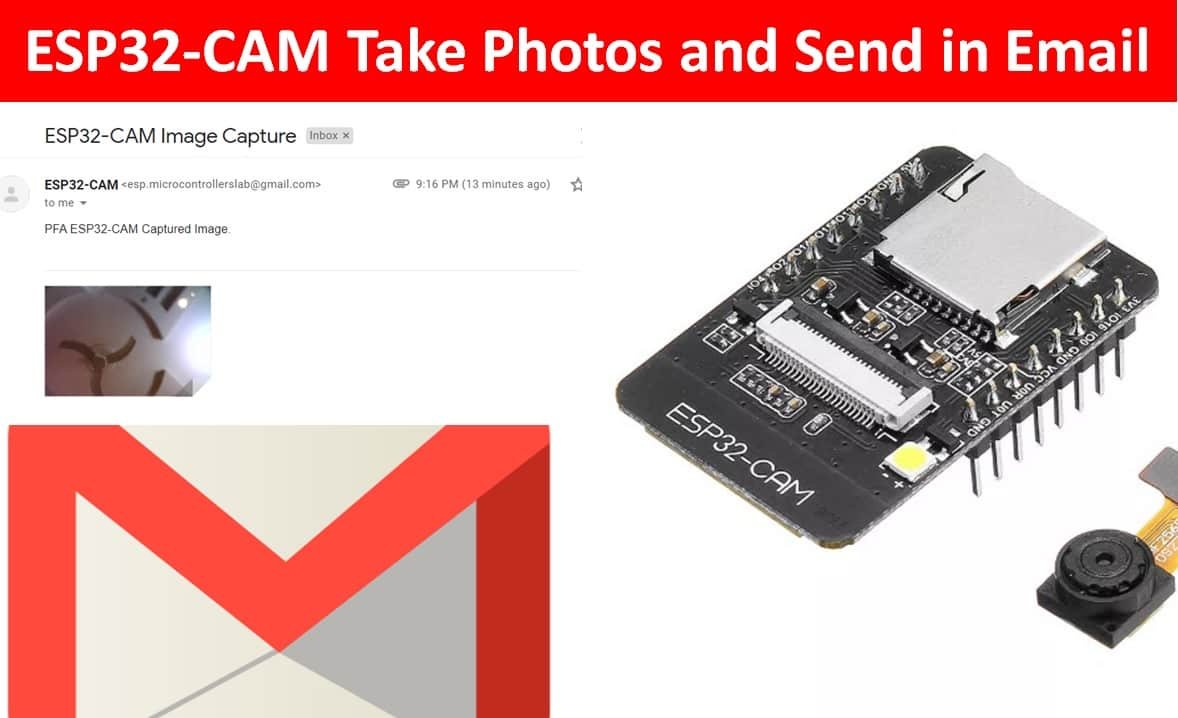
This ESP32-CAM tutorial will help the readers to understand how to capture a photo with ESP32-CAM and send it as an attachment via email. The email will be sent through an SMTP server. This project takes a picture, saves it to its SPIFFS filesystem temporarily, and then sends an email with the picture attached to it. In order to send a new email, the user will press the reset button of ESP32 CAM.
You can also read this getting started guide on ESP32 CAM:
- ESP32 CAM Video Streaming and Face Recognition with Arduino IDE
- ESP32-CAM AI-Thinker Board – All about GPIO Pins
ESP32-CAM Introduction
The ESP32-CAM development board is another member of the ESP32 module family. It is an inexpensive board consisting of an ESP32-S chip, an OV2640 video camera, and a micro-SD card slot that is extremely useful in major IoT applications. It can be used with advanced projects where facial recognition, image tracking, wireless monitoring, and identification are required.
Key Features
The ESP32-CAM consists of the ESP32 chip so it shares the same specifications as that of the generic ESP32 module. The key features of the ESP32-CAM module are given below:
- 802.11b/g/n Wi-Fi, Classic Bluetooth 4.2 and BLE
- Consists of two 32-bit LX6 CPUs
- Has 7 stage pipeline architecture
- Equipped with Hall, on-chip and temperature sensor
- Main frequency ranges from 80MHz-240MHz
- Supports UART/SPI/I2C/PWM/ADC/DAC interfaces
- 520 KB SRAM and 4MB PSRAM
- 160MHz clock speed with computing power up to 600 DMIPS
- Supports OV2640/OV7670 video cameras with built-in flash, image Wi-Fi upload, TF card, FOTA upgrades and various sleep modes
- FreeRTOS and embedded Lwip
OV2640 Video Camera Specifications
As mentioned before, the ESP32-CAM module consists of an OV2640 camera module. It has the following specifications:
- 2 Megapixel sensor
- UXGA 1622×1200
- Output formats include: YUV422, YUV420, RGB565, RGB555
- 15-60 fps image transfer rate
Connecting ESP32-CAM with FTDI programmer
For this project we will require the following components:
Required Components
- ESP32-CAM board with camera
- FTDI Programmer
- microSD card
- Connecting Wires
- External 5V Power Supply (optional)
Unlike the ESP32 development board, the ESP32-CAM does not come with the USB port attached to it. So to upload a program sketch to the ESP32-CAM, we will need to use an FTDI programmer (USB to TTL Serial converter).
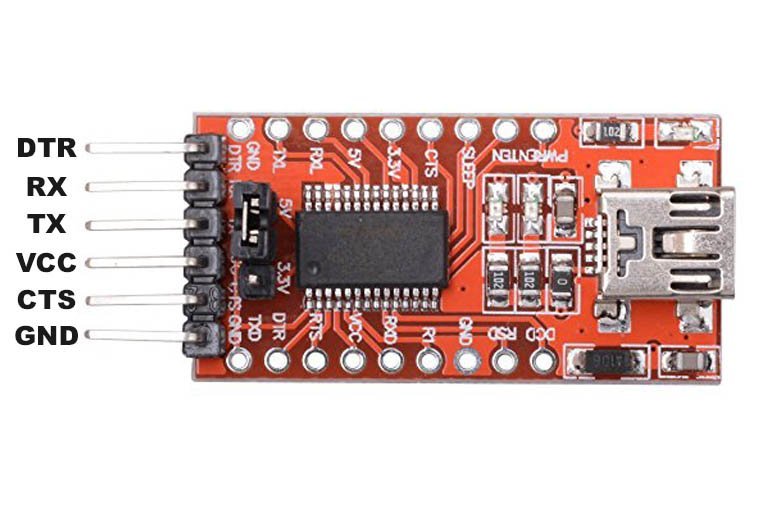
You can learn more about this FTDI cable here:
The table shows the connections between the ESP32-CAM and FTDI programmer:
| ESP32-CAM | FTDI Programmer |
| 5V | VCC |
| UOR (GPIO3) | TX |
| UOT (GPIO1) | RX |
| GND | GND |
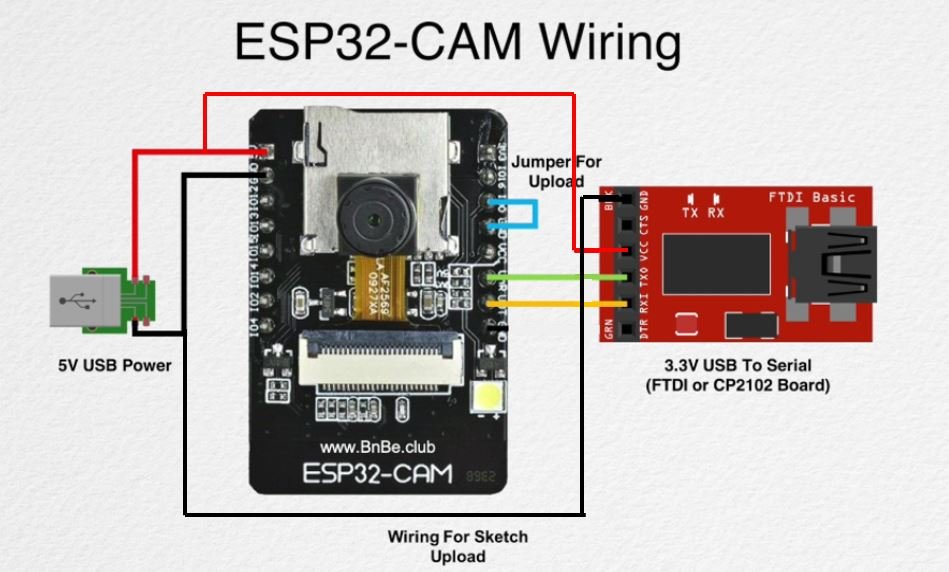
Connect the 5V pin of ESP32-CAM with the VCC pin of the FTDI programmer to power up. Both grounds of the two devices will be connected in common. The TX pin of the FTDI programmer will be connected with UOR (GPIO3) of ESP32-CAM. Likewise, the RX pin will be connected with the UOT (GPIO1) of the ESP32-CAM module.
Additionally, you will need to connect GPIO0 with GND to enable the ESP32-CAM module to go in flashing mode. Remove this connection after uploading the program sketch to the module.
On some ESP32-CAM boards, you will get a brown-out detector error which is due to the insufficient voltage provided by the FTDI cable. In that case, you should connect an external 5V power supply to ESP32 as shown below:
SMTP Server Introduction
Simple Mail Transfer Protocol server or SMTP server for short is responsible for sending and receiving emails between the senders and the receivers. Each email provider e.g., Gmail, Yahoo, Hotmail, Outlook etc. has a unique SMTP address and settings. These can usually be accessed through your account settings. Whenever a user sends an email, the SMTP server processes it and sends it to the particular server accordingly. The recipient’s email service provides obtains the message which then turns up in the recipient’s inbox.
Sending Email using ESP32-CAM
To send an email using ESP32-CAM through an SMTP server you will require the following:
- ESP32 Mail Client Library by Mobizt
- The sender’s email address
- Recipient’s email address
- Email content: The message body will be simple text and attachment in this project.
Setting up Arduino IDE
We will use Arduino IDE to program our ESP32 development board. Thus, you should have the latest version of Arduino IDE. Additionally, you also need to install the ESP32 plugin. If your IDE does not have the plugin installed you can visit the link below:
Installing ESP32 Mail Client Library
To use SMTP with our ESP32-CAM board we will require a library. We will install the ESP32 Mail Client library from Arduino Library Manager.
Go to Sketch > Include Libraries > Manage Libraries. Type ‘ESP32 Mail Client’ in the search bar and press enter. Install the library highlighted below.
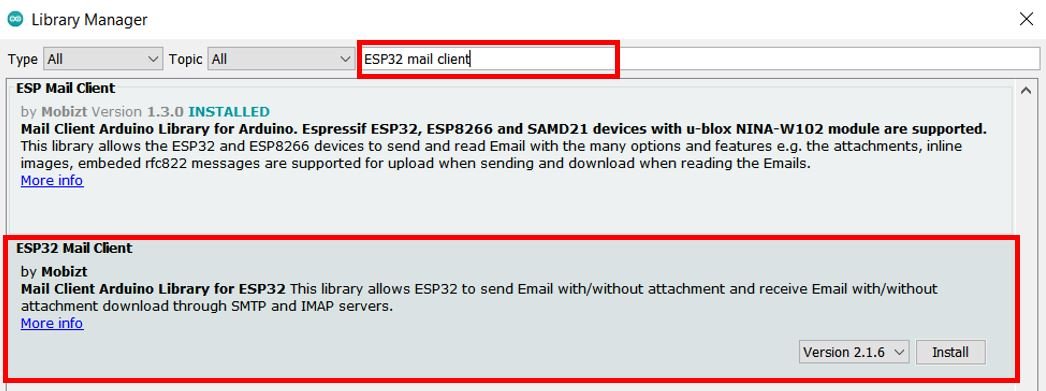
With the help of this library, the user can send/receive emails using the ESP32-CAM module easily.
Setting up Gmail Account
To send emails using our ESP32-CAM board we would require two email accounts. One for the sender and one for the recipient. You can use your email account as the sender account but it is recommended to create a new one just in case something goes wrong in the program code. For this article, we will use Gmail as the primary email provider. You can use any other provider according to your preference.
Creating a new account in Gmail (Sender side) for ESP32-CAM
For this tutorial, we have created a new Gmail account and we also recommend you create a new Gmail account. Because if something wrong happens with your ESP32-CAM code and you may incidentally make too many email requests from your personal account, Google may ban your account or block it temporarily. The receiver’s email address can be your personal email address.
To create a Google account:
- Go to the Google Sign Up page: https://www.google.com/gmail/about/ in the required information, such as first and last name, desired email address, password, phone number, and date of birth.
- Click “Next” to proceed with the verification process.
- Read and accept the terms of service and privacy policy.
- Click “Create Account.”

Now type all the relevant information and click ‘Next’. You can give in details according to your preference.

Proceed with all the steps accordingly to create your account successfully.
Create an App Password
To send an email with ESP32, first, you need to create an App password using your Gmail account. An app password in Gmail is a unique password generated for an app or device that does not support 2-step verification. When 2-step verification is enabled for a Gmail account, users are required to enter a verification code in addition to their password when signing in. However, some apps or devices may not be able to prompt for the verification code. In these cases, users can generate an app password to use instead of their regular password for accessing Gmail on the app or device. The app password is only valid for a specific app or device and can be revoked at any time from the Google Account security settings.
First, enable 2-step verification on your account by following these steps:
- Log in to your Google Account.
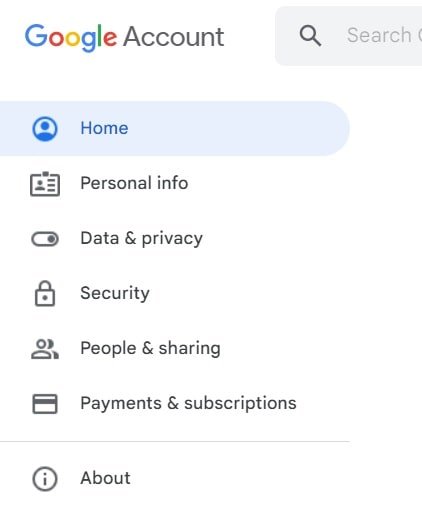
- Go to the “Security” section in your Google Account settings.
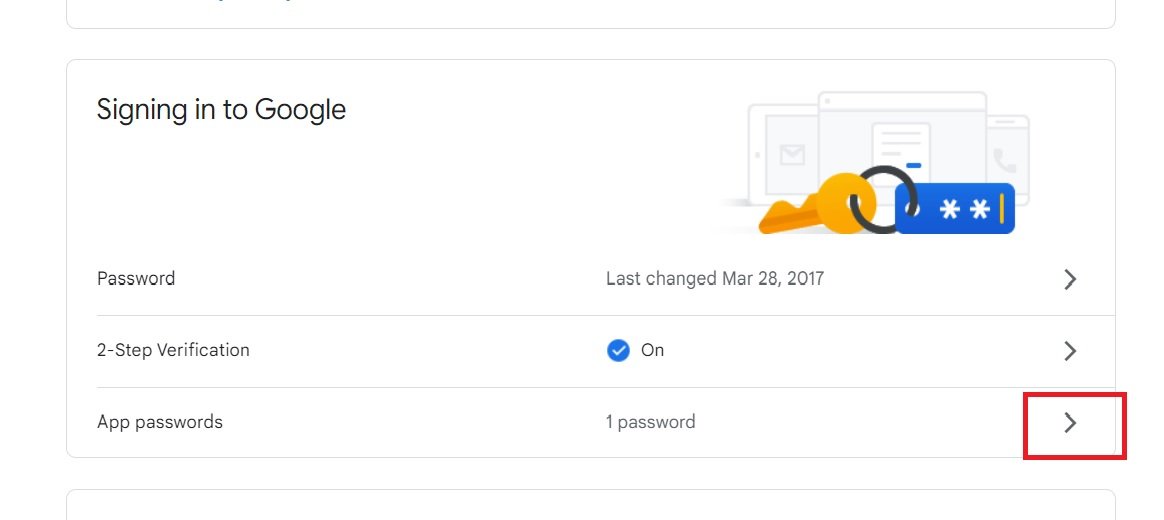
- Scroll down to “Signing in to Google.”
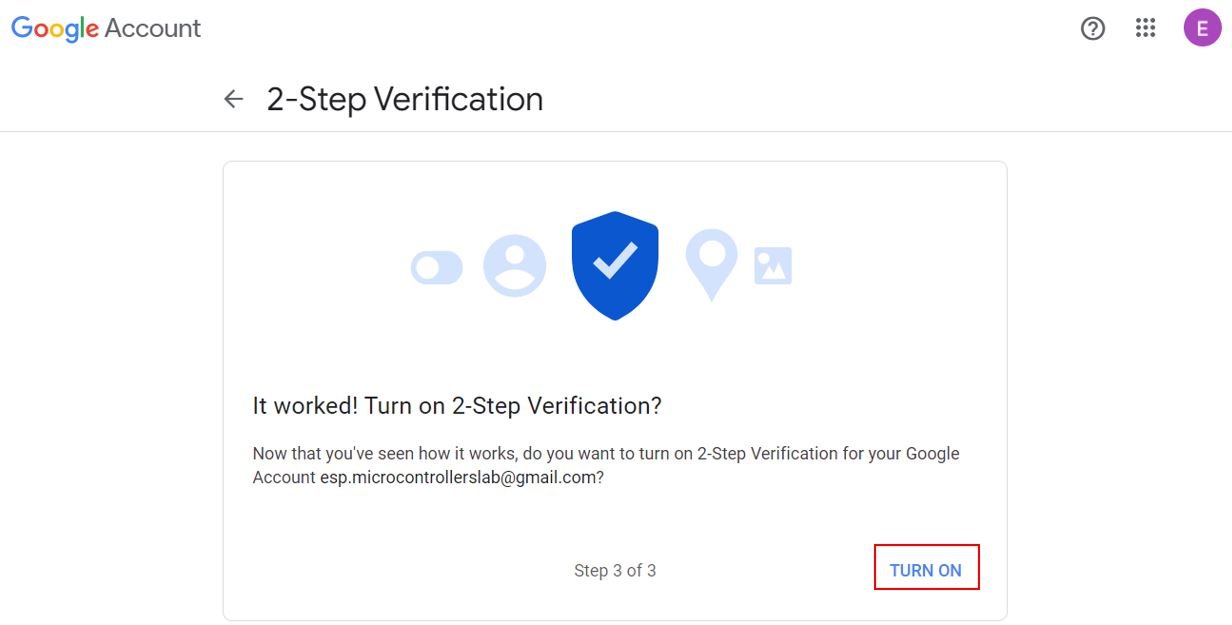
- Under “2-Step Verification,” click “Get Started.”
- Follow the prompts to set up 2-step authentication, which may include adding a phone number to receive verification codes via text or voice call.
- After setting up 2-step authentication, you will be prompted to enter a verification code whenever you sign in to your Google Account on a new device or browse
To get an app password:
Log in to your Google Account and Go to the “Security” section in your Google Account settings.
Scroll down to “Signing in to Google.” and Click “App Passwords.”
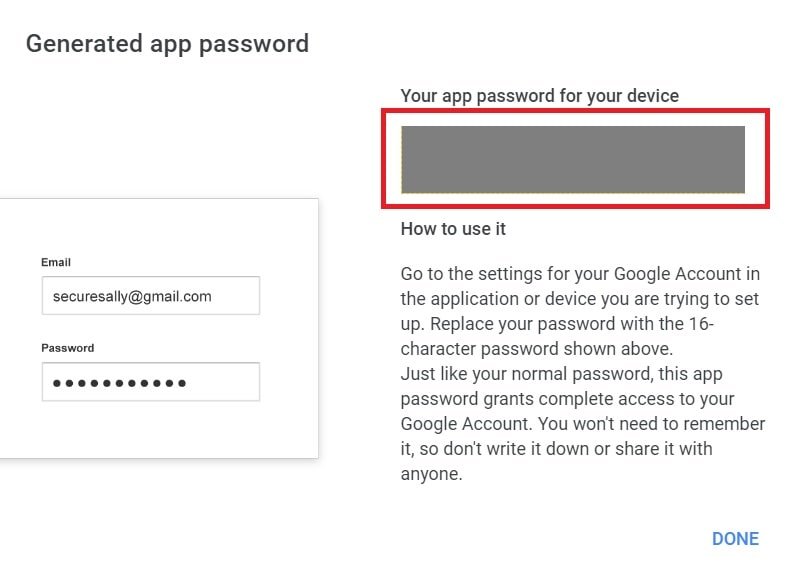
Follow the prompts to generate a unique password for the app you want to use with your Google Account. From the select app field, chose mail and device as other. Give any name to this device. After that click on generate.
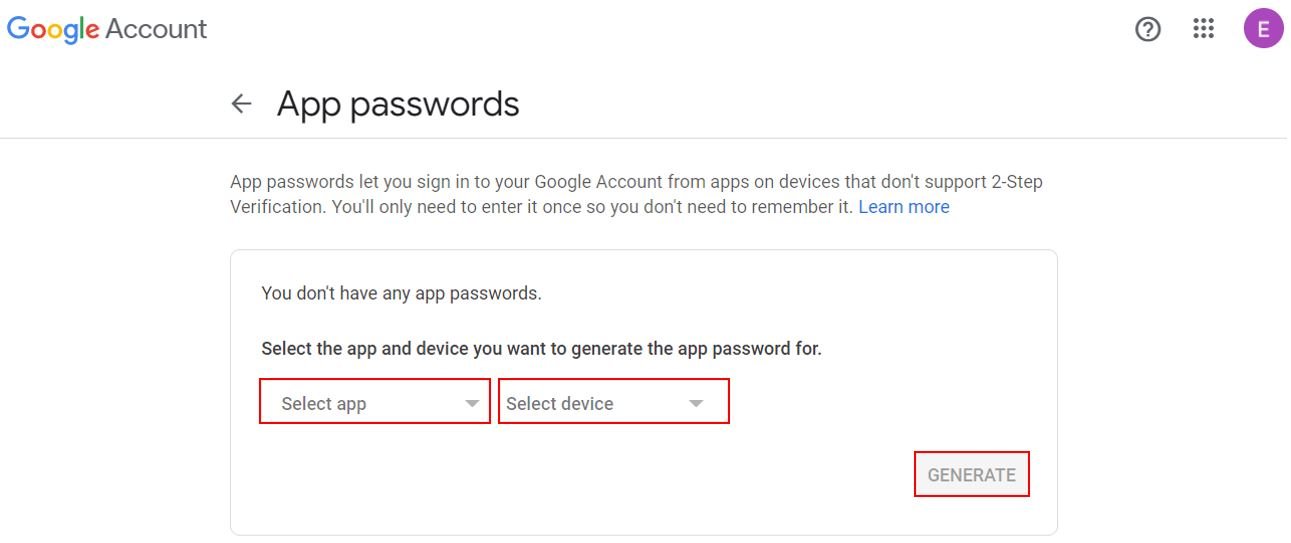
It will generate an app password for this specific device. Save this for later use. Because we will use it inside our code instead of the Gmail password.
SMTP Server Settings for Gmail Server
You can view the Gmail server settings as shown below. Knowing this is important because we have to include them in our program code to configure our account properly.
- Server: smtp.gmail.com
- Sender Username: the complete email address of the sender account.
- Sender Password: the password of the sender account
- Server port (TLS): 587
- Server port (SSL): 465
- SMTP TLS/SSL required: yes
If you are using a different email provider e.g., outlook or yahoo you can access its SMTP server settings online.
You may like to read more about ESP32 SMTP email project here:
Arduino Sketch: ESP32-CAM Capture Photo and Send Email
Open your Arduino IDE and go to File > New to open a new file. Copy the code given below in that file. You need to enter your network credentials. Additionally, you also have to provide your SMTP server parameters, the sender’s email details, and the recipient’s email address.
This Arduino sketch will send an email with the captured image through the SMTP server whenever the ESP32-CAM board boots.
#include "esp_camera.h"
#include "SPI.h"
#include "driver/rtc_io.h"
#include "ESP32_MailClient.h"
#include <FS.h>
#include <SPIFFS.h>
#include <WiFi.h>

const char* ssid = "YOUR_SSID";
const char* password = "YOUR_PASSWORD";

#define sender_email    "SENDER_EMAIL@gmail.com"
#define sender_email_password   "SENDER_EMAIL_PASSWORD"
#define SMTP_Server            "smtp.gmail.com"
#define SMTP_Server_Port        465
#define email_subject          "ESP32-CAM Image Capture"
#define email_recipient        "RECIPIENT_EMAIL@gmail.com"

#define CAMERA_MODEL_AI_THINKER

#if defined(CAMERA_MODEL_AI_THINKER)
  #define PWDN_GPIO_NUM     32
  #define RESET_GPIO_NUM    -1
  #define XCLK_GPIO_NUM      0
  #define SIOD_GPIO_NUM     26
  #define SIOC_GPIO_NUM     27

  #define Y9_GPIO_NUM       35
  #define Y8_GPIO_NUM       34
  #define Y7_GPIO_NUM       39
  #define Y6_GPIO_NUM       36
  #define Y5_GPIO_NUM       21
  #define Y4_GPIO_NUM       19
  #define Y3_GPIO_NUM       18
  #define Y2_GPIO_NUM        5
  #define VSYNC_GPIO_NUM    25
  #define HREF_GPIO_NUM     23
  #define PCLK_GPIO_NUM     22
#else
  #error "Camera model not selected"
#endif

SMTPData smtpData;

#define IMAGE_PATH "/image.jpg"

void setup() {
  WRITE_PERI_REG(RTC_CNTL_BROWN_OUT_REG, 0); //disable brownout detector

  Serial.begin(115200);
  Serial.println();
  WiFi.begin(ssid, password);
  Serial.print("Connecting to WiFi...");
  while (WiFi.status() != WL_CONNECTED) {
    delay(500);
    Serial.print(".");
  }
  Serial.println();

  if (!SPIFFS.begin(true)) {
    Serial.println("An Error has occurred while mounting SPIFFS");
    ESP.restart();
  }
  else {
    delay(500);
    Serial.println("SPIFFS mounted successfully");
  }
  Serial.print("IP Address: http://");
  Serial.println(WiFi.localIP());

  camera_config_t config;
  config.ledc_channel = LEDC_CHANNEL_0;
  config.ledc_timer = LEDC_TIMER_0;
  config.pin_d0 = Y2_GPIO_NUM;
  config.pin_d1 = Y3_GPIO_NUM;
  config.pin_d2 = Y4_GPIO_NUM;
  config.pin_d3 = Y5_GPIO_NUM;
  config.pin_d4 = Y6_GPIO_NUM;
  config.pin_d5 = Y7_GPIO_NUM;
  config.pin_d6 = Y8_GPIO_NUM;
  config.pin_d7 = Y9_GPIO_NUM;
  config.pin_xclk = XCLK_GPIO_NUM;
  config.pin_pclk = PCLK_GPIO_NUM;
  config.pin_vsync = VSYNC_GPIO_NUM;
  config.pin_href = HREF_GPIO_NUM;
  config.pin_sscb_sda = SIOD_GPIO_NUM;
  config.pin_sscb_scl = SIOC_GPIO_NUM;
  config.pin_pwdn = PWDN_GPIO_NUM;
  config.pin_reset = RESET_GPIO_NUM;
  config.xclk_freq_hz = 20000000;
  config.pixel_format = PIXFORMAT_JPEG;

  if(psramFound()){
    config.frame_size = FRAMESIZE_UXGA;
    config.jpeg_quality = 10;
    config.fb_count = 2;
  } else {
    config.frame_size = FRAMESIZE_SVGA;
    config.jpeg_quality = 12;
    config.fb_count = 1;
  }

  esp_err_t err = esp_camera_init(&config);
  if (err != ESP_OK) {
    Serial.printf("Camera init failed with error 0x%x", err);
    return;
  }
  captureSave_image();
  sendImage();
}

void loop() {

}

// Check if photo capture was successful
bool check_photo( fs::FS &fs ) {
  File f_pic = fs.open( IMAGE_PATH );
  unsigned int pic_sz = f_pic.size();
  return ( pic_sz > 100 );
}

// Capture Photo and Save it to SPIFFS
void captureSave_image( void ) {
  camera_fb_t * fb = NULL;
  bool ok = 0;

  do {
    Serial.println("ESP32-CAM capturing photo...");

    fb = esp_camera_fb_get();
    if (!fb) {
      Serial.println("Failed");
      return;
    }
    Serial.printf("Picture file name: %s\n", IMAGE_PATH);
    File file = SPIFFS.open(IMAGE_PATH, FILE_WRITE);
    if (!file) {
      Serial.println("Failed to open file in writing mode");
    }
    else {
      file.write(fb->buf, fb->len);
      Serial.print("The picture has been saved in ");
      Serial.print(IMAGE_PATH);
      Serial.print(" - Size: ");
      Serial.print(file.size());
      Serial.println(" bytes");
    }

    file.close();
    esp_camera_fb_return(fb);

    ok = check_photo(SPIFFS);
  } while ( !ok );
}

void sendImage( void ) {
  smtpData.setLogin(SMTP_Server, SMTP_Server_Port, sender_email, sender_email_password);
  smtpData.setSender("ESP32-CAM", sender_email);
  smtpData.setPriority("High");
  smtpData.setSubject(email_subject);
  smtpData.setMessage("PFA ESP32-CAM Captured Image.", false);
  smtpData.addRecipient(email_recipient);
  smtpData.addAttachFile(IMAGE_PATH, "image/jpg");
  smtpData.setFileStorageType(MailClientStorageType::SPIFFS);
  smtpData.setSendCallback(sendCallback);

  if (!MailClient.sendMail(smtpData))
    Serial.println("Error sending Email, " + MailClient.smtpErrorReason());

  smtpData.empty();
}

void sendCallback(SendStatus msg) {
  Serial.println(msg.info());
}
How the Code Works?
We will start off by including the necessary libraries required for this project.
#include "esp_camera.h"
#include "SPI.h"
#include "driver/rtc_io.h"
#include "ESP32_MailClient.h"
#include <FS.h>
#include <SPIFFS.h>
#include <WiFi.h>
Next, we will define the network credentials. One for the SSID and the other for the password. These will be our network credentials which will be used to connect to our wireless network. Replace both of them with your credentials to ensure a successful connection.
const char* ssid = "YOUR_SSID";
const char* password = "YOUR_PASSWORD";
Next, we will define the server settings as shown below. We will specify the SMTP server, port, the sender’s email address, sender email’s password, the email subject and the recipient email address. The sender’s account details are the ones which we newly created. Make sure that you have granted access to less secure apps for the sender account.
We will also specify the subject of the email. You can use your preferred text. In our case, we have set the subject to ‘ESP32-CAM Image Capture’.
#define sender_email    "SENDER_EMAIL@gmail.com"
#define sender_email_password   "SENDER_EMAIL_PASSWORD"
#define SMTP_Server            "smtp.gmail.com"
#define SMTP_Server_Port        465
#define email_subject          "ESP32-CAM Image Capture"
#define email_recipient        "RECIPIENT_EMAIL@gmail.com"
The following definitions are for OV2640 camera module pins. We are using CAMERA_MODEL_AI_THINKER.
#define CAMERA_MODEL_AI_THINKER

#if defined(CAMERA_MODEL_AI_THINKER)
  #define PWDN_GPIO_NUM     32
  #define RESET_GPIO_NUM    -1
  #define XCLK_GPIO_NUM      0
  #define SIOD_GPIO_NUM     26
  #define SIOC_GPIO_NUM     27
  #define Y9_GPIO_NUM       35
  #define Y8_GPIO_NUM       34
  #define Y7_GPIO_NUM       39
  #define Y6_GPIO_NUM       36
  #define Y5_GPIO_NUM       21
  #define Y4_GPIO_NUM       19
  #define Y3_GPIO_NUM       18
  #define Y2_GPIO_NUM        5
  #define VSYNC_GPIO_NUM    25
  #define HREF_GPIO_NUM     23
  #define PCLK_GPIO_NUM     22
#else
  #error "Camera model not selected"
#endif
We will create a SMTPData object called ‘smtpData.’ This will be used later on in the program code while setting the email configurations.
SMTPData smtpData;Moreover, we will also define photo path with its name for the photo to get saved on the ESP32-CAM SPIFFS.
#define IMAGE_PATH "/image.jpg"setup()
Inside the setup() function, we will open a serial connection at a baud rate of 115200.
Serial.begin(115200);The following section of code will connect our ESP32-CAM board with the local network whose network credentials we already specified above. We will use the WiFi.begin() function. The arguments will be the SSID and the password which we defined earlier in the code. After a successful connection is established, the IP address gets displayed on the serial monitor. Moreover the ESP32-CAM SPIFFS will also get initialized.
  WiFi.begin(ssid, password);
  Serial.print("Connecting to WiFi...");
  while (WiFi.status() != WL_CONNECTED) {
    delay(500);
    Serial.print(".");
  }
  Serial.println();

  if (!SPIFFS.begin(true)) {
    Serial.println("An Error has occurred while mounting SPIFFS");
    ESP.restart();
  }
  else {
    delay(500);
    Serial.println("SPIFFS mounted successfully");
  }
  Serial.print("IP Address: http://");
  Serial.println(WiFi.localIP());
The following code sets the OV2640 camera module and the settings required for the photo capturing.
 camera_config_t config;
  config.ledc_channel = LEDC_CHANNEL_0;
  config.ledc_timer = LEDC_TIMER_0;
  config.pin_d0 = Y2_GPIO_NUM;
  config.pin_d1 = Y3_GPIO_NUM;
  config.pin_d2 = Y4_GPIO_NUM;
  config.pin_d3 = Y5_GPIO_NUM;
  config.pin_d4 = Y6_GPIO_NUM;
  config.pin_d5 = Y7_GPIO_NUM;
  config.pin_d6 = Y8_GPIO_NUM;
  config.pin_d7 = Y9_GPIO_NUM;
  config.pin_xclk = XCLK_GPIO_NUM;
  config.pin_pclk = PCLK_GPIO_NUM;
  config.pin_vsync = VSYNC_GPIO_NUM;
  config.pin_href = HREF_GPIO_NUM;
  config.pin_sscb_sda = SIOD_GPIO_NUM;
  config.pin_sscb_scl = SIOC_GPIO_NUM;
  config.pin_pwdn = PWDN_GPIO_NUM;
  config.pin_reset = RESET_GPIO_NUM;
  config.xclk_freq_hz = 20000000;
  config.pixel_format = PIXFORMAT_JPEG;

  if(psramFound()){
    config.frame_size = FRAMESIZE_UXGA;
    config.jpeg_quality = 10;
    config.fb_count = 2;
  } else {
    config.frame_size = FRAMESIZE_SVGA;
    config.jpeg_quality = 12;
    config.fb_count = 1;
  }
Initializing ESP32-CAM:
  esp_err_t err = esp_camera_init(&config);
  if (err != ESP_OK) {
    Serial.printf("Camera init failed with error 0x%x", err);
    return;
  }
The captureSave_image() will be used to capture the photo by the ESP32-CAM and then save it on the SPIFFS filesystem. The sendImage() function is responsible for sending the email through the SMTP server with the image attachment.
 captureSave_image();
 sendImage();
Capturing Photo and saving on SPIFFS
The check_photo() function returns true if a valid picture got saved on the SPIFFS. This is achieved by opening the file on the photo path specified and checking its size.
bool check_photo( fs::FS &fs ) {
  File f_pic = fs.open( IMAGE_PATH );
  unsigned int pic_sz = f_pic.size();
  return ( pic_sz > 100 );
}
The captureSave_image() function is responsible to capture the photo and then save it on the SPIFFS on the photo path specified.
void captureSave_image( void ) {
  camera_fb_t * fb = NULL;
  bool ok = 0;

  do {
    Serial.println("ESP32-CAM capturing photo...");

    fb = esp_camera_fb_get();
    if (!fb) {
      Serial.println("Failed");
      return;
    }
    Serial.printf("Picture file name: %s\n", IMAGE_PATH);
    File file = SPIFFS.open(IMAGE_PATH, FILE_WRITE);
    if (!file) {
      Serial.println("Failed to open file in writing mode");
    }
    else {
      file.write(fb->buf, fb->len);
      Serial.print("The picture has been saved in ");
      Serial.print(IMAGE_PATH);
      Serial.print(" - Size: ");
      Serial.print(file.size());
      Serial.println(" bytes");
    }

    file.close();
    esp_camera_fb_return(fb);

    ok = check_photo(SPIFFS);
  } while ( !ok );
}
Sending Email
The sendImage() function sets all the parameters for the email and configures the session. It contains details of the email such as sender’s name, sender’s email, priority, and the subject of the email. We will send a simple text message “PFA ESP32-CAM Captured Image” using the setMessage() method on the smtpData object. The image will be attached through the addAttachFile() method on the smtpData object. We will pass the image path as the argument. As our image is saved in the SPIFFS hence we will configure that inside setFileStorageType(). If the email was not successfully sent, it will print an error message in the serial monitor.
void sendImage( void ) {
  smtpData.setLogin(SMTP_Server, SMTP_Server_Port, sender_email, sender_email_password);
  smtpData.setSender("ESP32-CAM", sender_email);
  smtpData.setPriority("High");
  smtpData.setSubject(email_subject);
  smtpData.setMessage("PFA ESP32-CAM Captured Image.", false);
  smtpData.addRecipient(email_recipient);
  smtpData.addAttachFile(IMAGE_PATH, "image/jpg");
  smtpData.setFileStorageType(MailClientStorageType::SPIFFS);
  smtpData.setSendCallback(sendCallback);

  if (!MailClient.sendMail(smtpData))
    Serial.println("Error sending Email, " + MailClient.smtpErrorReason());

  smtpData.empty();
}
ESP32-CAM Capture Photo and Send Email Demonstration
Now, we are ready to compile and upload the code to our ESP32-CAM. Make sure the FTDI programmer is properly connected with the module and GPIO0 is grounded as well.
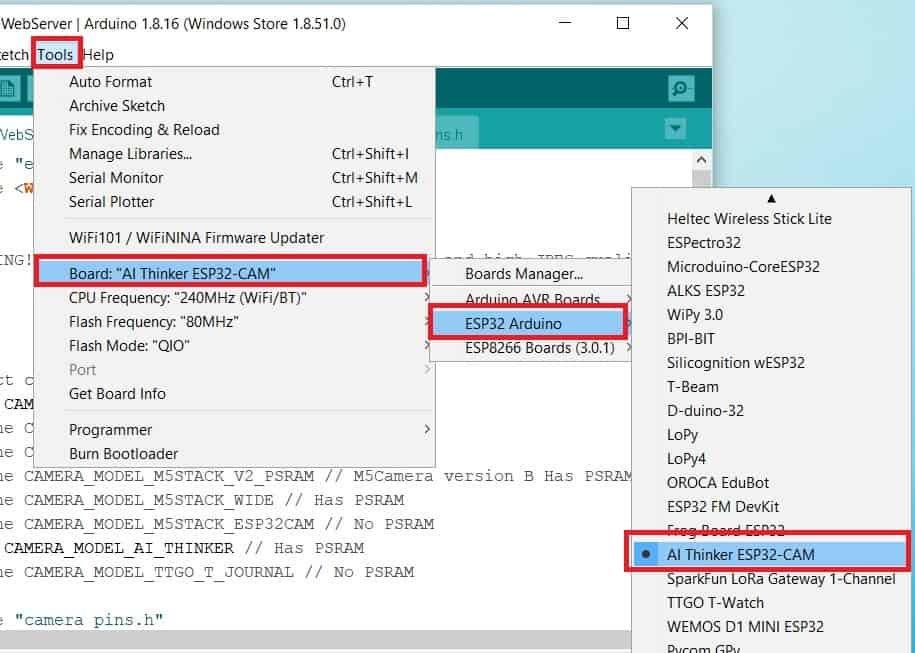
Choose the correct board and COM port before uploading your code to the ESP32-CAM board. Go to Tools > Board and select ESP32 AI Thinker.
Next, go to Tools > Port and select the appropriate port through which your board is connected.
Click on the upload button to upload the code into the ESP32-CAM board.
If you view Connecting….._____….._____….. in the error window, press the RESET button present on the ESP32-CAM as shown below:

After you have successfully uploaded your code to the board, remove the connecting wire from GPIO0 and GND.
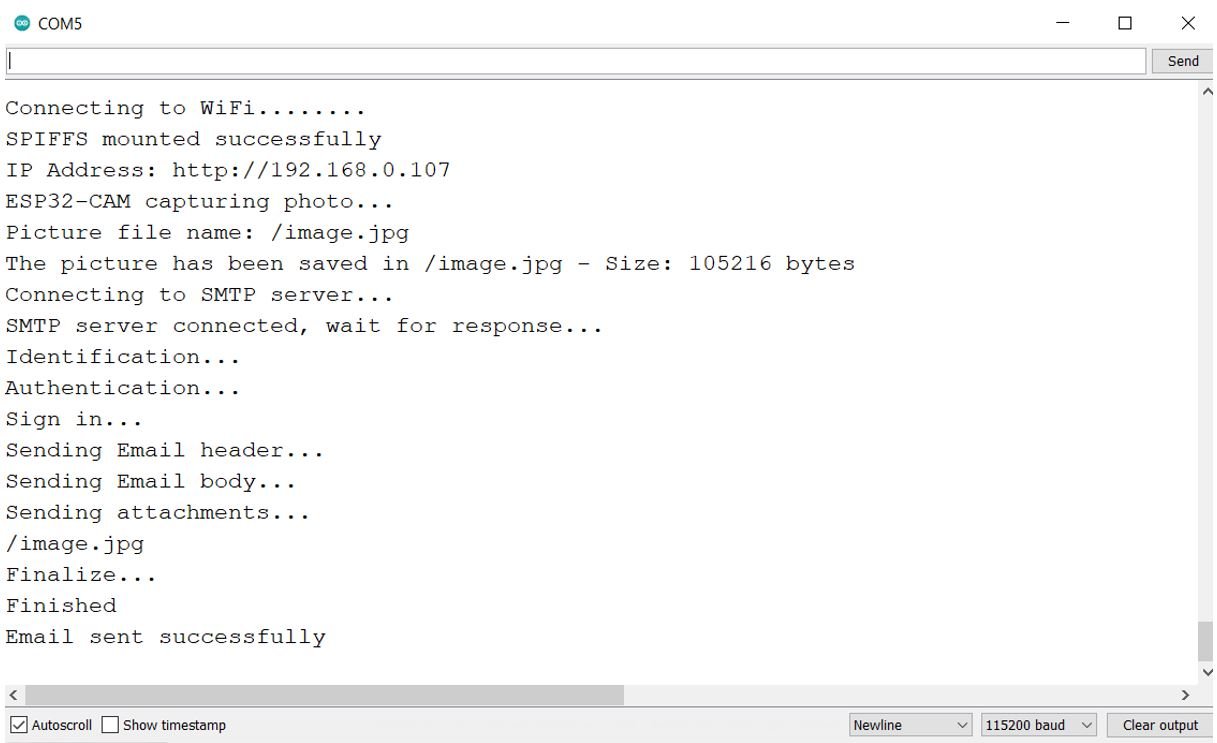
Now open the serial monitor and press the RESET button on the ESP32-CAM.
You will be able to view the following messages including connecting to the local network, capturing the photo, saving it to SPIFFS, connecting to the SMTP server and finally sending the email with the image attached.
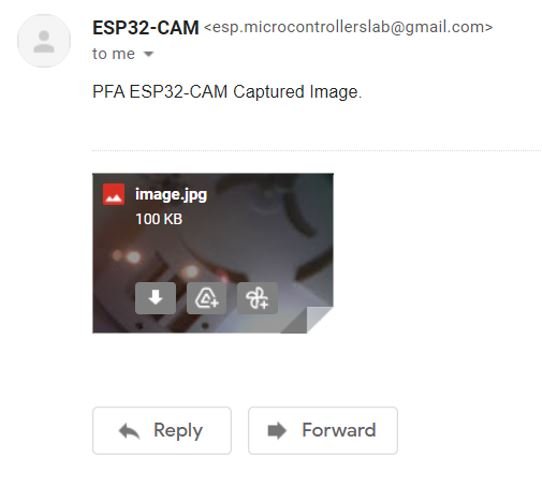
Open the recipient’s email account. You will already have received the email from your ESP32-CAM module. It consists of a simple text message and an image attachment.

Now press the RESET button of the ESP32-CAM and you will receive a new email with another image attached.

You have the option to download the image, Add it to Drive, and Save it to Photos.
You may also like to read:
Hi,
Nice example.
I received a photo by email, but it is 100% black.
Looking into the file with an hex editor, the photo is a jpeg file with start FFD8 and end FFD9 (hex editor).
Cameramodel used is AI THinker
Not sure why this happens. (Lens is clear, and works with other SW).
Thanks in advance for any suggestion.
Regards
Ludo
I only get a partial image or no image at all in the attachment.