This ESP32-CAM guide shows an easy way to capture photos through ESP32-CAM and upload or store them to Google Firebase storage. Firstly, we will create a Firebase project to store photos or any files. The Firebase project data will be secured by enabling email/password authentication as well. Hence, the photos captured by ESP32-CAM and uploaded to the Firebase storage will available to view only for the authorized users.
Recommended Components
The following components are used in this project or are helpful for building it with the ESP32.
| Component | How it’s used in this project | Buy on Amazon |
|---|---|---|
| ESP32 Development Board | General ESP32 board for development alongside the camera module. | Check Price |
| ESP32-CAM board | Captures the photos uploaded to Firebase Storage. | Check Price |
| FTDI / USB-TTL programmer | Required to upload code to the ESP32-CAM, which has no onboard USB. | Check Price |
| Micro USB Cable | Powers the boards during development. | Check Price |
| Jumper Wires | Wire the ESP32-CAM to the FTDI programmer for flashing. | Check Price |
As an Amazon Associate we earn from qualifying purchases. Prices and availability are accurate as of the date/time indicated and are subject to change.
Store Photos and Files to Firebase Project Overview
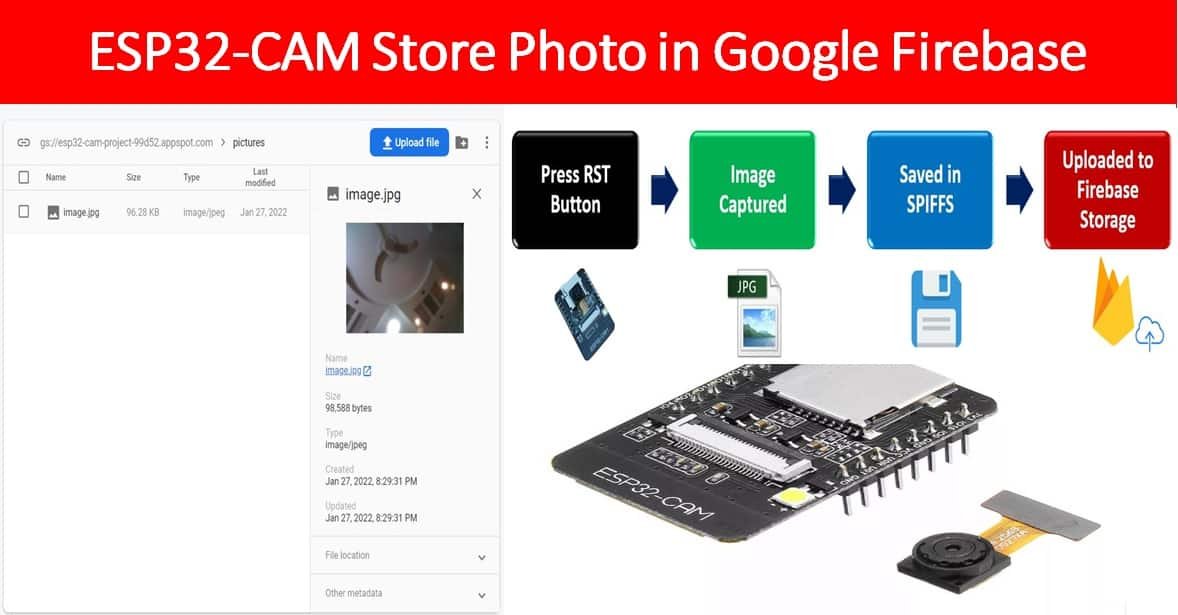
The aim of this project is to capture photos using ESP32-CAM and upload them to google Firebase Storage where an authorized user will have access to them. A new image is captured and sent to the Firebase Storage whenever the ESP32-CAM board resets.
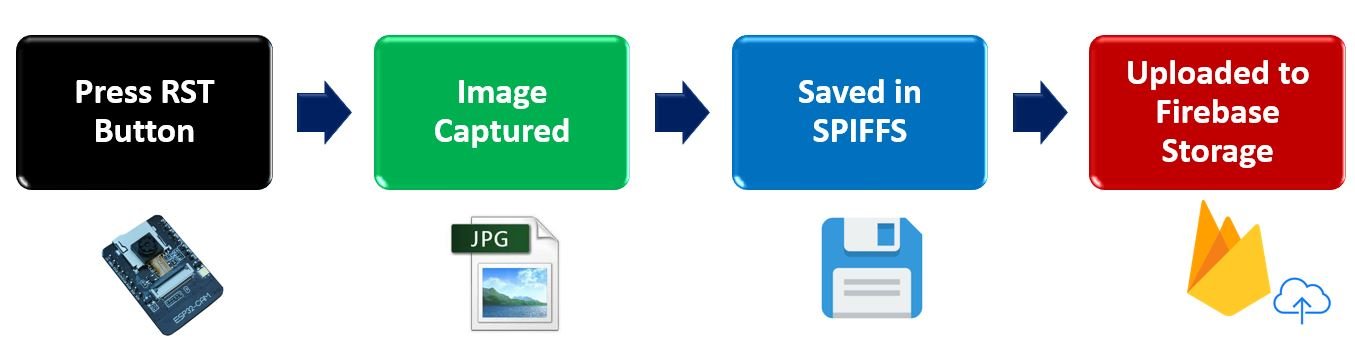
- We will capture photos through the ESP32-CAM development board with OV2640 camera when the RST button will be pressed.
- After capturing the photo, the photo will get saved in the ESP32-CAM’s SPIFFS files and will be fetched from the filesystem.
- ESP32-CAM secures a connection with Goggle Firebase through an authorized email/password. After a successful connection is established, the development board sends the latest image captured to the firebase storage.
- The image gets uploaded to the Storage and can be viewed by the authorized user by navigating to the Firebase Console.
Follow the figure below which shows the whole project process:
Connecting ESP32-CAM with FTDI programmer
We will require the following components for this project:
- ESP32-CAM development board
- FTDI Programmer/ USB Serial to TTL Converter
- Connecting Wires
- External 5V power supply (optional)
Unlike the ESP32 development board, the ESP32-CAM does not come with the USB port attached to it. So to upload a program sketch to the ESP32-CAM, we will need to use an FTDI programmer (USB to TTL Serial converter).
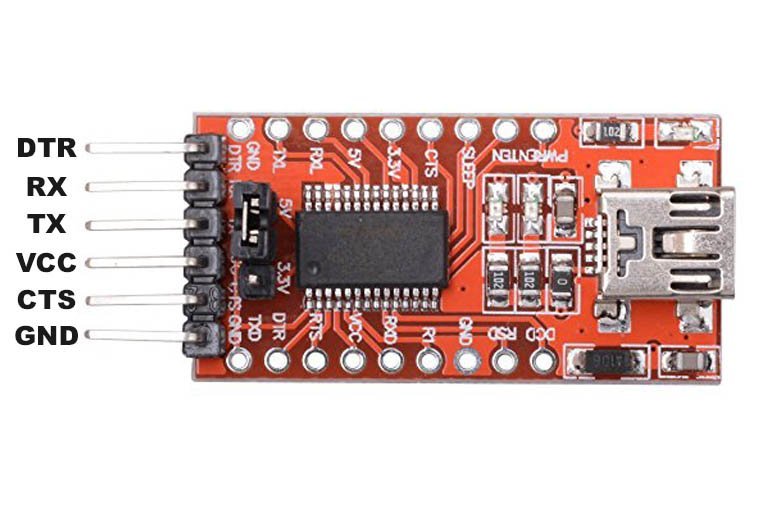
You can learn more about this FTDI cable here:
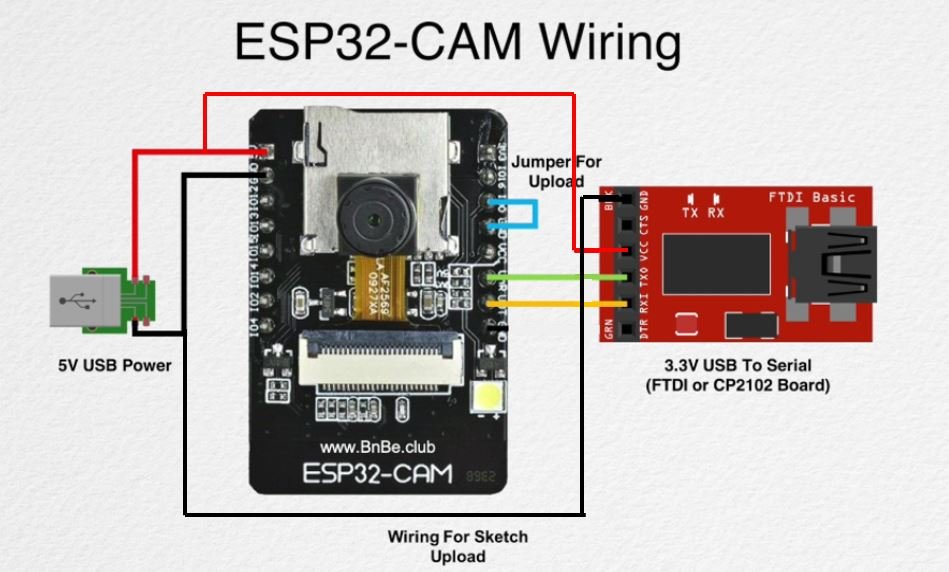
The table shows the connections between the ESP32-CAM and FTDI programmer:
| ESP32-CAM | FTDI Programmer |
| 5V | VCC |
| UOR (GPIO3) | TX |
| UOT (GPIO1) | RX |
| GND | GND |
Connect the 5V pin of ESP32-CAM with the VCC pin of the FTDI programmer to power up. Both grounds of the two devices will be connected in common. The TX pin of the FTDI programmer will be connected with UOR (GPIO3) of ESP32-CAM. Likewise, the RX pin will be connected with the UOT (GPIO1) of the ESP32-CAM module.
Additionally, you will need to connect GPIO0 with GND to enable the ESP32-CAM module to go in flashing mode. Remove this connection after uploading the program sketch to the module.
On some ESP32-CAM boards, you will get a brown-out detector error which is due to the insufficient voltage provided by the FTDI cable. In that case, you should connect an external 5V power supply to ESP32 as shown below:
Google Firebase Introduction
Google Firebase is an application development software created by Google. It can be used with any android/IOS application, IoT sensors, and web services to create and alter the data obtained from them. It is a helpful software for building mobile/web applications easily and interactively. Paid services include a Real-time database, firebase storage, hosting, and test lab. However, you can use Analytics for advanced messaging for free although you will have to create an account before accessing it.
One of the significant attributes of this software is that it is beginner friendly. It is very simple to connect your application to Google Firebase. You have to follow each step carefully. If you have any difficulty or want to access further information, take a look at the official Google Firebase Documentation.
Setting up Google Firebase Console
Before proceeding with the project let us understand the steps which have to be followed to successfully connect with the Google Firebase application.
Firstly, type https://firebase.google.com/ in your browser search tab and press enter.
This will open the Firebase main page. Click ‘Go to Console’ as highlighted in the red rectangular box.

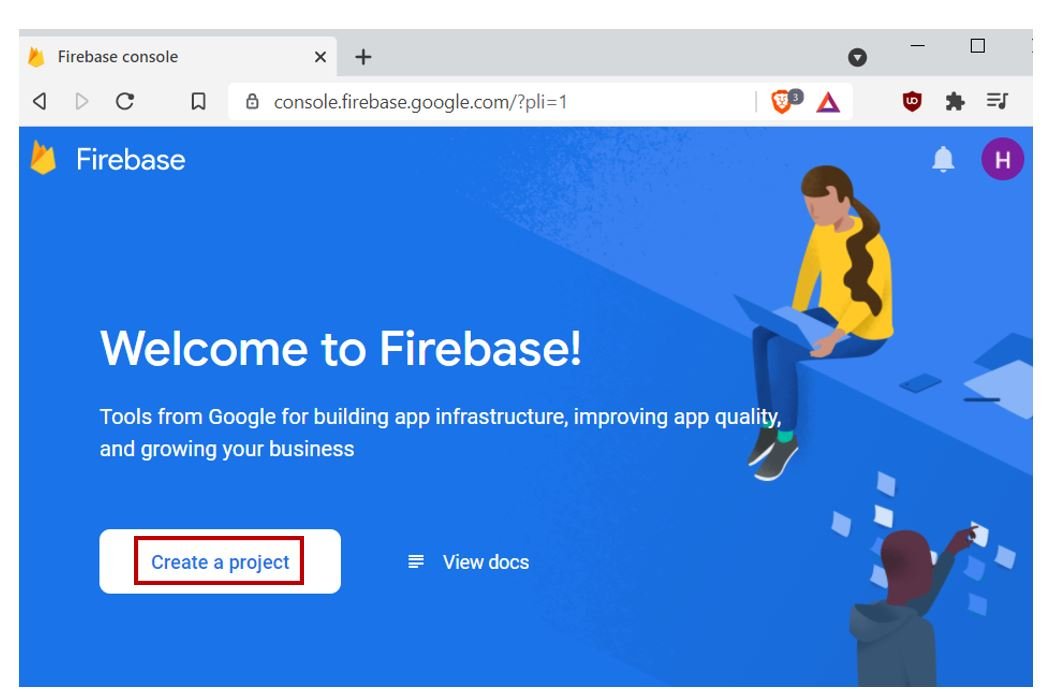
You will be redirected to a new web page with the welcome message. Click the button ‘Create a Project’ as shown below.
The following page opens up.
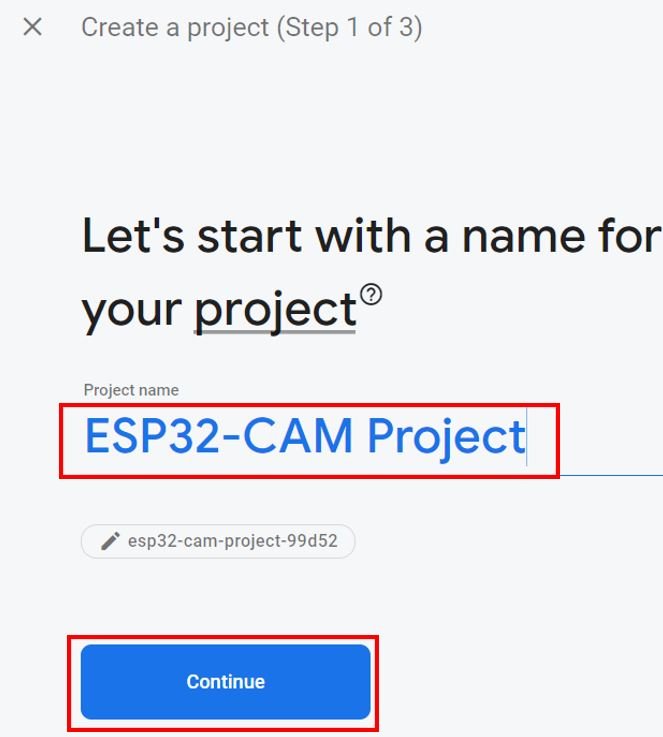
Step 1: Write the name of your project. Remember to tick the Firebase term agreement. Now click ‘Continue.’
Step 2: There is no need to enable ‘Google analytics for this project’ as we do not require it. Click ‘Create project’ to proceed further.

After a few moments, your project will be created.
Click ‘Continue’

Setting Authentication Methods
You will be redirected to the page of your newly created project. Go to Build > Authentication.

The following will open up. Click ‘Get Started’ to start the authentication process.

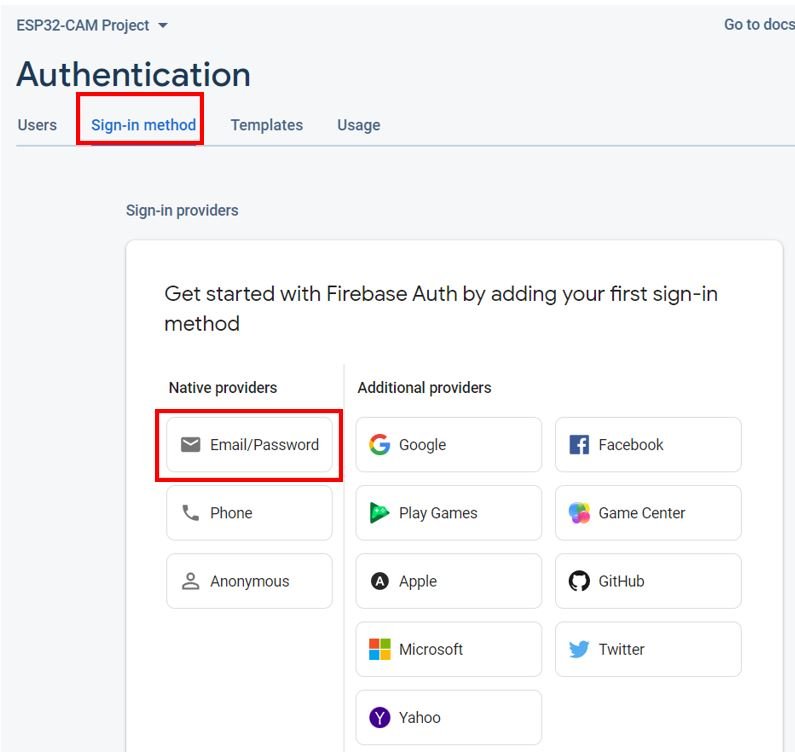
The following page will appear. Here we will head over to ‘Email/Password’ option as the sign-in method.
Enable the ‘Email/Password’ option by sliding the slider to the right. Then save the settings.
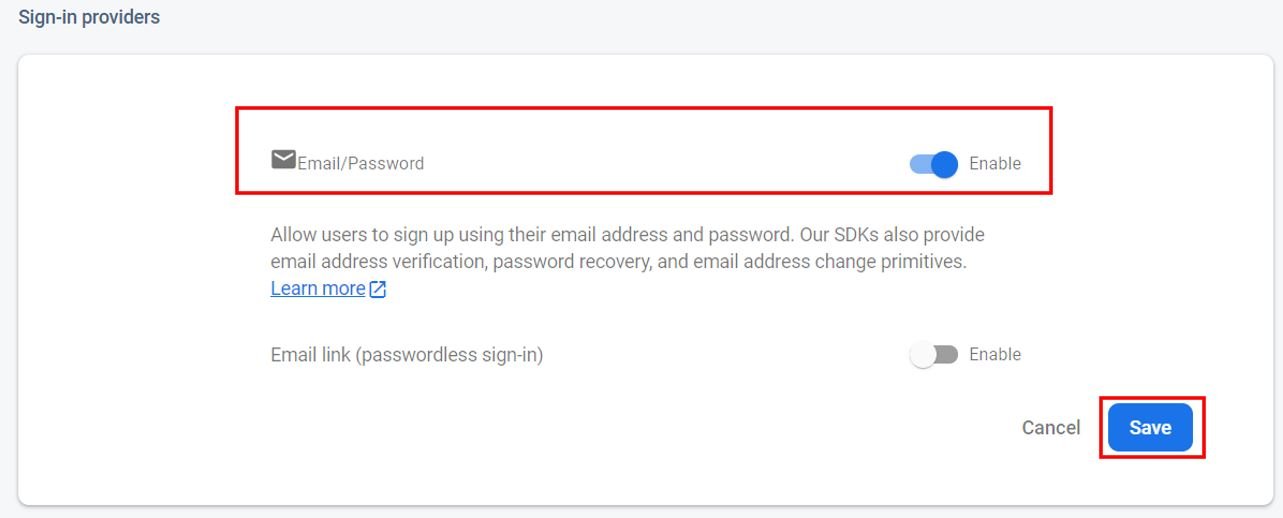
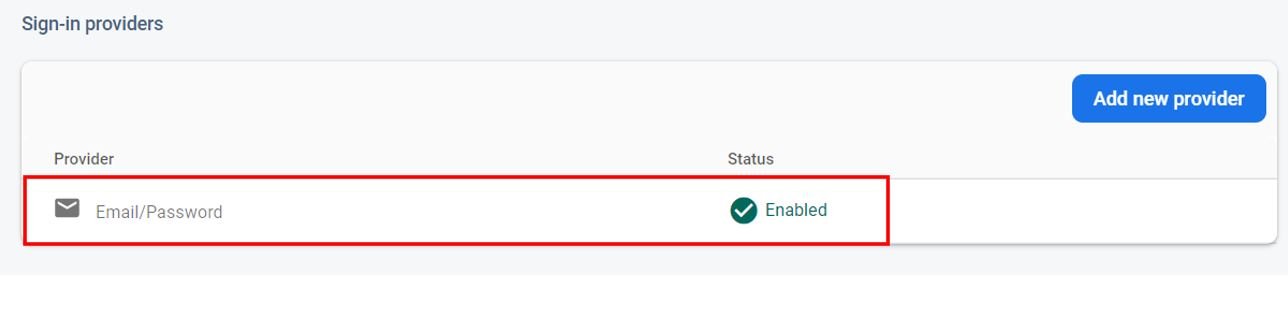
This authenitcation method will now be enabled as seen below:
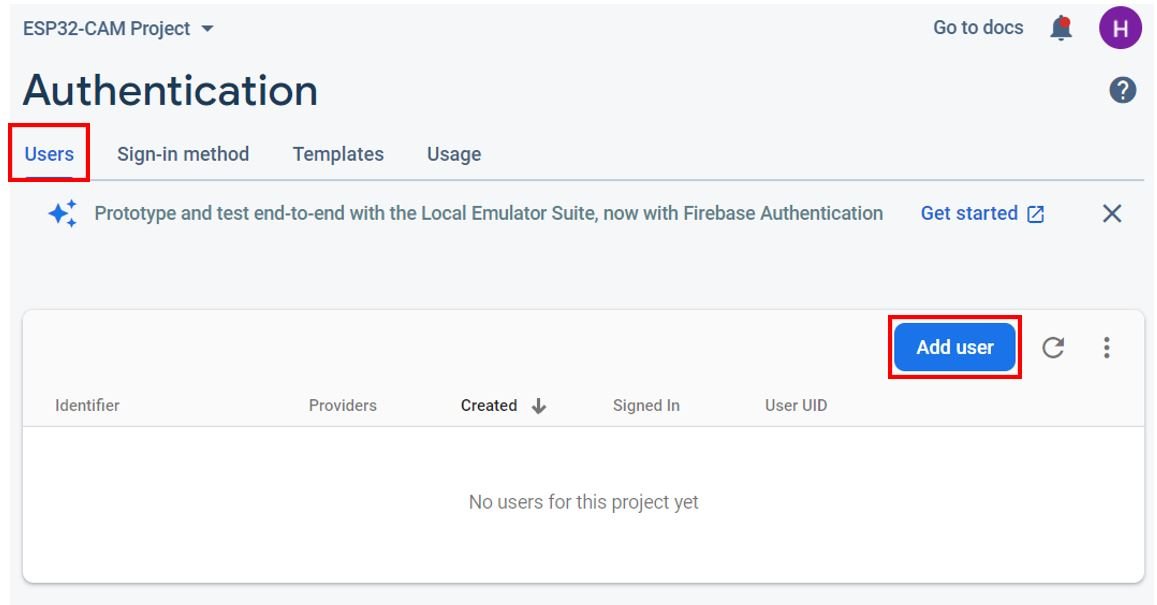
Now, you will have to provide the Email/Password of the user that will have access to the firebase project. First, click ‘Users’ in the tab and then head over to ‘Add user.’
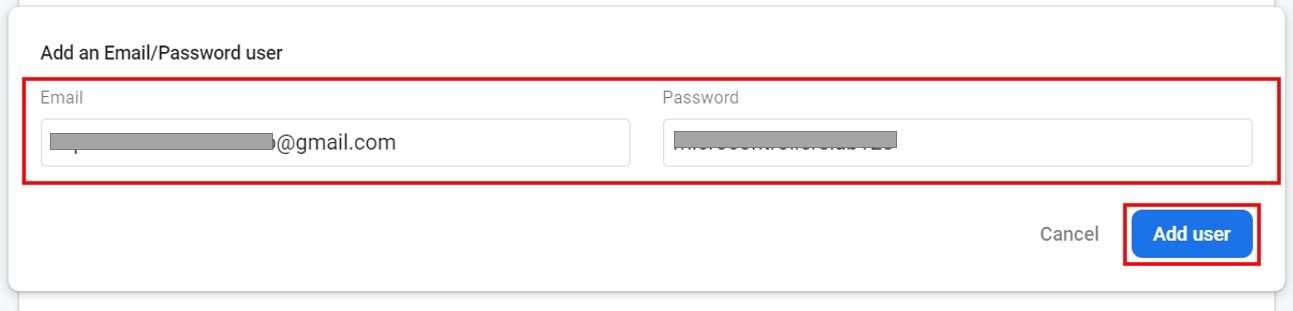
Specify the email and password of the user. Then click ‘Add user.’
After adding the user, you will be able to view the email, date created and user UUID associated with the user you just authorized. You may notice that the ‘Signed in’ section is empty. This is because this particular user has not yet signed in to the Firebase project.

Creating Storage Bucket
Go to Build > Storage. Then click ‘Get Started.’

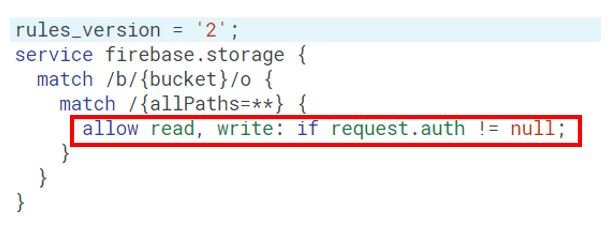
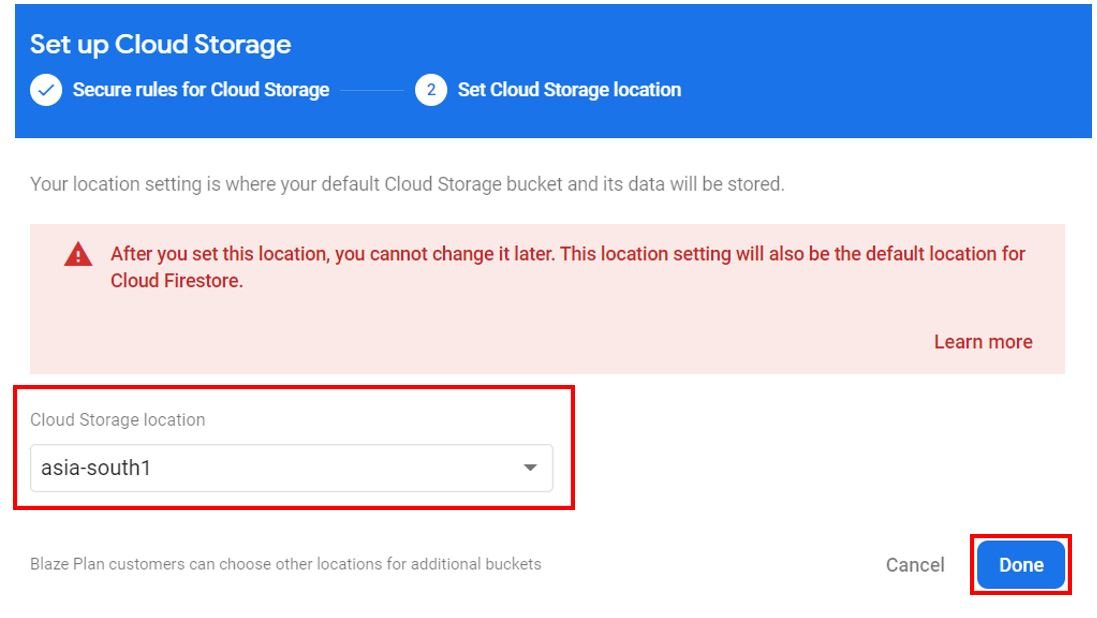
To set the cloud storage we will first he asked to set the rules to secure our data. Go for the default rules which allow all reads and writes from authenticated users.
Choose your cloud storage location and click ‘Done.’
It will take a few moments for the storage bucket to be created.
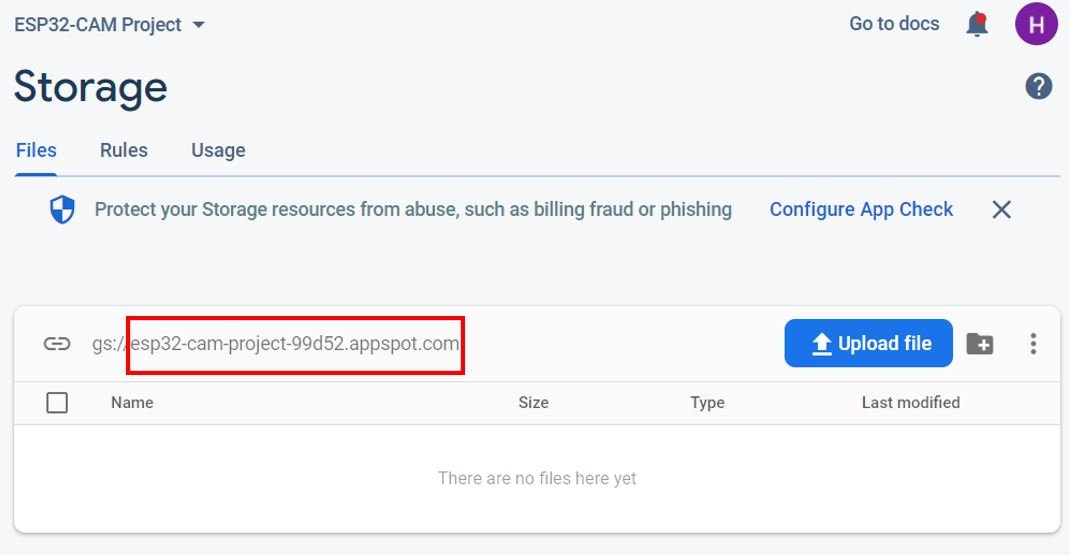
After the creation of the storage bucket, head over to the Files tab and you will be able to see the storage bucket ID. This is shown below. In our case it is “esp32-cam-project-99d52.appspot.com”
We will require it while programming our board.
Obtaining API Key
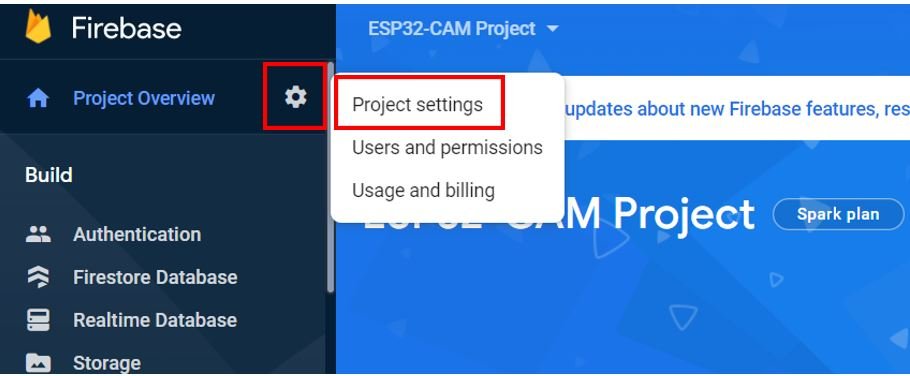
Go to the settings icon and click ‘Project Settings’.
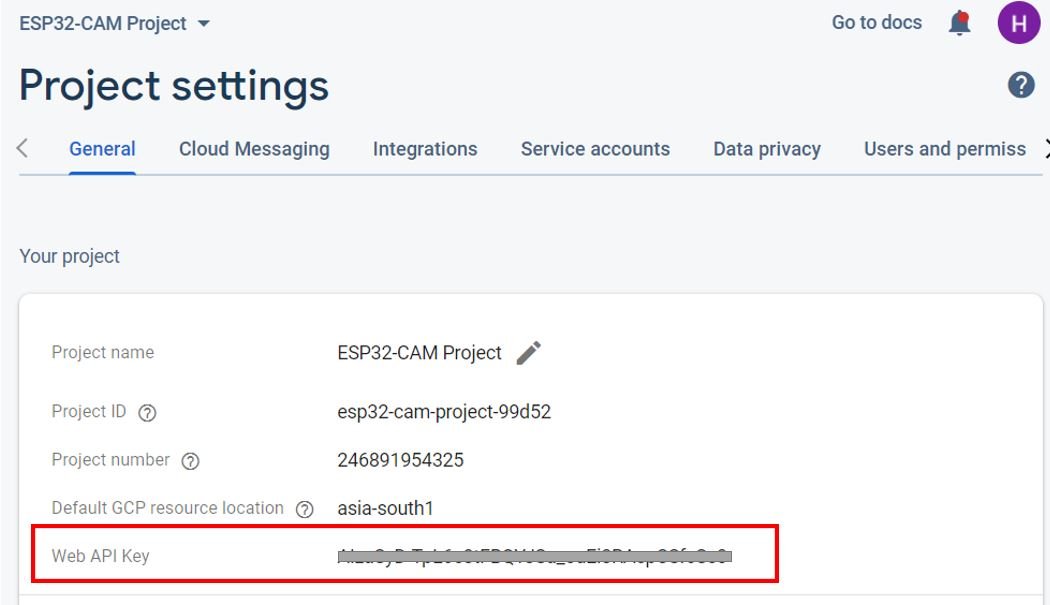
Under the project settings, you will be able to view the API key as highlighted below. This is unique for your project. Keep it safe. We will need it while programming our ESP32-CAM development board.
We have successfully set up our ESP32-CAM Google Firebase Storage project with Email/Password authentication. Let us now move ahead and program our board.
Setting up Arduino IDE
We will use Arduino IDE to program our ESP32-CAM development board. Thus, you should have the latest version of Arduino IDE. Additionally, you also need to install the plugin for the board which you will use.
If your IDE does not have the plugin installed you can visit the link below:
Installing Google Firebase ESP Client Library
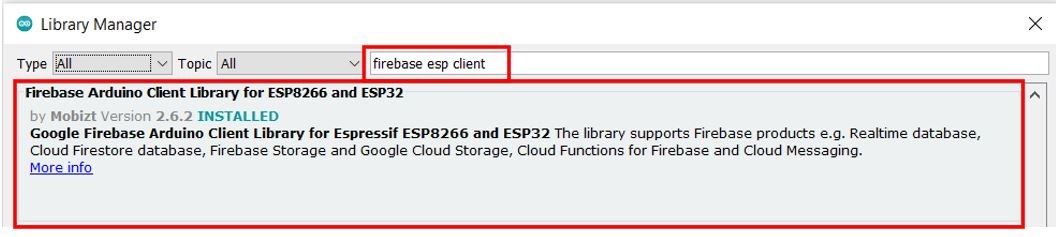
We will require the firebase ESP client library for this project. This library is compatible with both ESP32 and ESP8266 development boards. We will use the Library Manager in Arduino IDE to install it succefuuly.
Open Arduino IDE and click on Sketch > Library > Manage Libraries. Type ‘Firebase ESP Client’ in the search tab and install the latest version of Firebase Arduino Client Library for ESP8266 and ESP32 that is shown below.
After installation of the library, restart your IDE.
Arduino Sketch
Open your Arduino IDE and go to File > New to open a new file.
Copy the code given below in that file. You need to enter your network credentials. You also have to provide your web API key and storage bucket ID which were saved previously. Moreover, you will have to specify the email and password that you used in Firebase authentication to authorize the user.
#include "WiFi.h"
#include "esp_camera.h"
#include "Arduino.h"
#include "soc/soc.h"
#include "soc/rtc_cntl_reg.h"
#include "driver/rtc_io.h"
#include <SPIFFS.h>
#include <FS.h>
#include <Firebase_ESP_Client.h>
#include <addons/TokenHelper.h>

//Enter your network credentials
const char* ssid = "YOUR_SSID";
const char* password = "YOUR_PASSWORD";

#define API_KEY "AIzaSyD-TpL6e8tFBQYJSa_ouEi3RAepCSfc***"

// ENter Authorized Email and Password
#define USER_EMAIL "WRITE_AUTHORIZED_EMAIL"
#define USER_PASSWORD "WRITE_AUTHORIZED_PASSWORD"

// Enter Firebase storage bucket ID
#define STORAGE_BUCKET_ID "WRITE_YOUR_BUCKET_ID"

#define IMAGE_PATH "/pictures/image.jpg"

// OV2640 camera module pins (CAMERA_MODEL_AI_THINKER)
#define PWDN_GPIO_NUM     32
#define RESET_GPIO_NUM    -1
#define XCLK_GPIO_NUM      0
#define SIOD_GPIO_NUM     26
#define SIOC_GPIO_NUM     27
#define Y9_GPIO_NUM       35
#define Y8_GPIO_NUM       34
#define Y7_GPIO_NUM       39
#define Y6_GPIO_NUM       36
#define Y5_GPIO_NUM       21
#define Y4_GPIO_NUM       19
#define Y3_GPIO_NUM       18
#define Y2_GPIO_NUM        5
#define VSYNC_GPIO_NUM    25
#define HREF_GPIO_NUM     23
#define PCLK_GPIO_NUM     22

boolean new_image = true;

FirebaseData fbdo;
FirebaseAuth authentication;
FirebaseConfig configuration;

bool done = false;

bool check_photo( fs::FS &fs ) {
  File f_pic = fs.open( IMAGE_PATH );
  unsigned int pic_sz = f_pic.size();
  return ( pic_sz > 100 );
}

// Capture Photo and Save it to SPIFFS
void captureSave_photo( void ) {
  camera_fb_t * fb = NULL;
  bool ok = 0;
  do {
    Serial.println("ESP32-CAM capturing photo...");

    fb = esp_camera_fb_get();
    if (!fb) {
      Serial.println("Failed");
      return;
    }
    Serial.printf("Picture file name: %s\n", IMAGE_PATH);
    File file = SPIFFS.open(IMAGE_PATH, FILE_WRITE);
    if (!file) {
      Serial.println("Failed to open file in writing mode");
    }
    else {
      file.write(fb->buf, fb->len);
      Serial.print("The picture has been saved in ");
      Serial.print(IMAGE_PATH);
      Serial.print(" - Size: ");
      Serial.print(file.size());
      Serial.println(" bytes");
    }
    file.close();
    esp_camera_fb_return(fb);
    ok = check_photo(SPIFFS);
  } while ( !ok );
}

void setup() {
  Serial.begin(115200);

  WiFi.begin(ssid, password);
  while (WiFi.status() != WL_CONNECTED) {
    delay(1000);
    Serial.println("Connecting to WiFi...");
  }

  if (!SPIFFS.begin(true)) {
    Serial.println("An Error has occurred while mounting SPIFFS");
    ESP.restart();
  }
  else {
    delay(500);
    Serial.println("SPIFFS mounted successfully");
  }

  WRITE_PERI_REG(RTC_CNTL_BROWN_OUT_REG, 0);

 // initialize OV2640 camera module
  camera_config_t config;
  config.ledc_channel = LEDC_CHANNEL_0;
  config.ledc_timer = LEDC_TIMER_0;
  config.pin_d0 = Y2_GPIO_NUM;
  config.pin_d1 = Y3_GPIO_NUM;
  config.pin_d2 = Y4_GPIO_NUM;
  config.pin_d3 = Y5_GPIO_NUM;
  config.pin_d4 = Y6_GPIO_NUM;
  config.pin_d5 = Y7_GPIO_NUM;
  config.pin_d6 = Y8_GPIO_NUM;
  config.pin_d7 = Y9_GPIO_NUM;
  config.pin_xclk = XCLK_GPIO_NUM;
  config.pin_pclk = PCLK_GPIO_NUM;
  config.pin_vsync = VSYNC_GPIO_NUM;
  config.pin_href = HREF_GPIO_NUM;
  config.pin_sscb_sda = SIOD_GPIO_NUM;
  config.pin_sscb_scl = SIOC_GPIO_NUM;
  config.pin_pwdn = PWDN_GPIO_NUM;
  config.pin_reset = RESET_GPIO_NUM;
  config.xclk_freq_hz = 20000000;
  config.pixel_format = PIXFORMAT_JPEG;

  if (psramFound()) {
    config.frame_size = FRAMESIZE_UXGA;
    config.jpeg_quality = 10;
    config.fb_count = 2;
  } else {
    config.frame_size = FRAMESIZE_SVGA;
    config.jpeg_quality = 12;
    config.fb_count = 1;
  }

  esp_err_t err = esp_camera_init(&config);
  if (err != ESP_OK) {
    Serial.printf("Camera init failed with error 0x%x", err);
    ESP.restart();
  }

  configuration.api_key = API_KEY;
  authentication.user.email = USER_EMAIL;
  authentication.user.password = USER_PASSWORD;
  configuration.token_status_callback = tokenStatusCallback;

  Firebase.begin(&configuration, &authentication);
  Firebase.reconnectWiFi(true);
}

void loop() {
  if (new_image) {
    captureSave_photo();
    new_image = false;
  }
  delay(1);
  if (Firebase.ready() && !done){
    done = true;
    Serial.print("Uploading Photo... ");

    if (Firebase.Storage.upload(&fbdo, STORAGE_BUCKET_ID, IMAGE_PATH, mem_storage_type_flash, IMAGE_PATH, "image/jpeg" ){
      Serial.printf("\nDownload URL: %s\n", fbdo.downloadURL().c_str());
    }
    else{
      Serial.println(fbdo.errorReason());
    }
  }
}
How the Code Works?
We will start off by including all the necessary libraries required for this project.
#include "WiFi.h"
#include "esp_camera.h"
#include "Arduino.h"
#include "soc/soc.h"
#include "soc/rtc_cntl_reg.h"
#include "driver/rtc_io.h"
#include <SPIFFS.h>
#include <FS.h>
#include <Firebase_ESP_Client.h>
#include <addons/TokenHelper.h>
Next, we will create two global variables, one for the SSID and another for the password. These will hold our network credentials which will be used to connect to our wireless router. Replace both of them with your network credentials to ensure a successful connection.
//Enter your network credentials
const char* ssid = "YOUR_SSID";
const char* password = "YOUR_PASSWORD";
Next, we will define the Google firebase web API key which we accessed and saved previously
#define API_KEY "AIzaSyD-TpL6e8tFBQYJSa_ouEi3RAepCSfc***"
The next step is to specify the user email and password that we used while authorizing the user in our firebase project. Both of these should correspond to the ones you saved while adding the user.
// Enter Authorized Email and Password
#define USER_EMAIL "WRITE_AUTHORIZED_EMAIL"
#define USER_PASSWORD "WRITE_AUTHORIZED_PASSWORD"
We will now define the storage bucket ID that we accessed and saved previously. In our case it is “esp32-cam-project-99d52.appspot.com”.
// Enter Firebase storage bucket ID
#define STORAGE_BUCKET_ID "WRITE_YOUR_BUCKET_ID"
Moreover, we will also define the image path with its name for the image to get saved on the ESP32 SPIFFS.
#define IMAGE_PATH "/pictures/image.jpg"The following definitions are for OV2640 camera module pins. We are using CAMERA_MODEL_AI_THINKER.
// OV2640 camera module pins (CAMERA_MODEL_AI_THINKER)
#define PWDN_GPIO_NUM     32
#define RESET_GPIO_NUM    -1
#define XCLK_GPIO_NUM      0
#define SIOD_GPIO_NUM     26
#define SIOC_GPIO_NUM     27
#define Y9_GPIO_NUM       35
#define Y8_GPIO_NUM       34
#define Y7_GPIO_NUM       39
#define Y6_GPIO_NUM       36
#define Y5_GPIO_NUM       21
#define Y4_GPIO_NUM       19
#define Y3_GPIO_NUM       18
#define Y2_GPIO_NUM        5
#define VSYNC_GPIO_NUM    25
#define HREF_GPIO_NUM     23
#define PCLK_GPIO_NUM     22
We will define a Boolean variable called ‘new_image’ and set it as true. This will be used later on in the code to check if a new photo is captured.
boolean new_image = true;Next, we will create some objects for some firebase functionalities: data, authentication and configuration.
FirebaseData fbdo;
FirebaseAuth authentication;
FirebaseConfig configuration;
This will check if a successful connection with Firebase has been established or not.
bool done = false;Capturing Photo and saving on SPIFFS
The check_photo() function returns true if a valid picture got saved on the SPIFFS. This is achieved by opening the file on the photo path specified and checking its size.
The captureSave_photo() function is responsible to capture the photo and then save it on the SPIFFS on the photo path specified.
bool check_photo( fs::FS &fs ) {
  File f_pic = fs.open( IMAGE_PATH );
  unsigned int pic_sz = f_pic.size();
  return ( pic_sz > 100 );
}

// Capture Photo and Save it to SPIFFS
void captureSave_photo( void ) {
  camera_fb_t * fb = NULL;
  bool ok = 0;
  do {
    Serial.println("ESP32-CAM capturing photo...");

    fb = esp_camera_fb_get();
    if (!fb) {
      Serial.println("Failed");
      return;
    }
    Serial.printf("Picture file name: %s\n", IMAGE_PATH);
    File file = SPIFFS.open(IMAGE_PATH, FILE_WRITE);
    if (!file) {
      Serial.println("Failed to open file in writing mode");
    }
    else {
      file.write(fb->buf, fb->len);
      Serial.print("The picture has been saved in ");
      Serial.print(IMAGE_PATH);
      Serial.print(" - Size: ");
      Serial.print(file.size());
      Serial.println(" bytes");
    }
    file.close();
    esp_camera_fb_return(fb);
    ok = check_photo(SPIFFS);
  } while ( !ok );
}
setup()
Inside the setup() function, we will open a serial connection at a baud rate of 115200.
Serial.begin(115200);The following section of code will connect our ESP32-CAM board with the local network whose network credentials we already specified above. We will use the WiFi.begin() function. The arguments will be the SSID and the password which we defined earlier in the code. After a successful connection is established, the IP address gets displayed on the serial monitor. We will use this IP address to access our web server. SPIFFS will also get initialized and if there is error in the initialization then the ESP board will be restarted.
  WiFi.begin(ssid, password);
  while (WiFi.status() != WL_CONNECTED) {
    delay(1000);
    Serial.println("Connecting to WiFi...");
  }

  if (!SPIFFS.begin(true)) {
    Serial.println("An Error has occurred while mounting SPIFFS");
    ESP.restart();
  }
  else {
    delay(500);
    Serial.println("SPIFFS mounted successfully");
  }
The following code sets the OV2640 camera module and the settings required for the photo capturing.
WRITE_PERI_REG(RTC_CNTL_BROWN_OUT_REG, 0);

 // initialize OV2640 camera module
  camera_config_t config;
  config.ledc_channel = LEDC_CHANNEL_0;
  config.ledc_timer = LEDC_TIMER_0;
  config.pin_d0 = Y2_GPIO_NUM;
  config.pin_d1 = Y3_GPIO_NUM;
  config.pin_d2 = Y4_GPIO_NUM;
  config.pin_d3 = Y5_GPIO_NUM;
  config.pin_d4 = Y6_GPIO_NUM;
  config.pin_d5 = Y7_GPIO_NUM;
  config.pin_d6 = Y8_GPIO_NUM;
  config.pin_d7 = Y9_GPIO_NUM;
  config.pin_xclk = XCLK_GPIO_NUM;
  config.pin_pclk = PCLK_GPIO_NUM;
  config.pin_vsync = VSYNC_GPIO_NUM;
  config.pin_href = HREF_GPIO_NUM;
  config.pin_sscb_sda = SIOD_GPIO_NUM;
  config.pin_sscb_scl = SIOC_GPIO_NUM;
  config.pin_pwdn = PWDN_GPIO_NUM;
  config.pin_reset = RESET_GPIO_NUM;
  config.xclk_freq_hz = 20000000;
  config.pixel_format = PIXFORMAT_JPEG;

  if (psramFound()) {
    config.frame_size = FRAMESIZE_UXGA;
    config.jpeg_quality = 10;
    config.fb_count = 2;
  } else {
    config.frame_size = FRAMESIZE_SVGA;
    config.jpeg_quality = 12;
    config.fb_count = 1;
  }
Initializing ESP32-CAM:
  esp_err_t err = esp_camera_init(&config);
  if (err != ESP_OK) {
    Serial.printf("Camera init failed with error 0x%x", err);
    ESP.restart();
  }
Now, first we will use the firebase data object we created for configuration and set the API key. Then we will specify the user email and password to the firebase authentication object.
configuration.api_key = API_KEY;
  authentication.user.email = USER_EMAIL;
  authentication.user.password = USER_PASSWORD;
The following line of code will be used to set the call-back function for long running token generation task. This will be set to the Firebase configuration object as well.
configuration.token_status_callback = tokenStatusCallback; Using Firebase.begin() on the configuration and authentication paths, we will initialize the firebase library connection.
  Firebase.begin(&configuration, &authentication);
  Firebase.reconnectWiFi(true);
loop()
Inside the loop() function we will check if the ESP32-CAM reset, then call the captureSave_photo() function and set the ‘new_image’ variable to false. The captureSave_photo() will be used to capture the photo by the ESP32-CAM and then save it on the SPIFFS filesystem.
  if (new_image) {
    captureSave_photo();
    new_image = false;
  }
  delay(1);
Upload the image to Firebase Storage using Firebase.Storage.upload(). It takes in six arguments:
- &fbdo
- storage bucket ID
- current path of the photo
- storage type
- path of the photo in Firebase storage
- media type
  if (Firebase.ready() && !done){
    done = true;
    Serial.print("Uploading Photo... ");

    if (Firebase.Storage.upload(&fbdo, STORAGE_BUCKET_ID, IMAGE_PATH , mem_storage_type_flash, IMAGE_PATH , "image/jpeg" )
    {
      Serial.printf("\nDownload URL: %s\n", fbdo.downloadURL().c_str());
    }
    else{
      Serial.println(fbdo.errorReason());
    }
  }
ESP32 CAM Firebase Storage Demo
Now, we are ready to compile and upload the code to our ESP32-CAM. Make sure the FTDI programmer is properly connected with the module and GPIO0 is grounded as well.
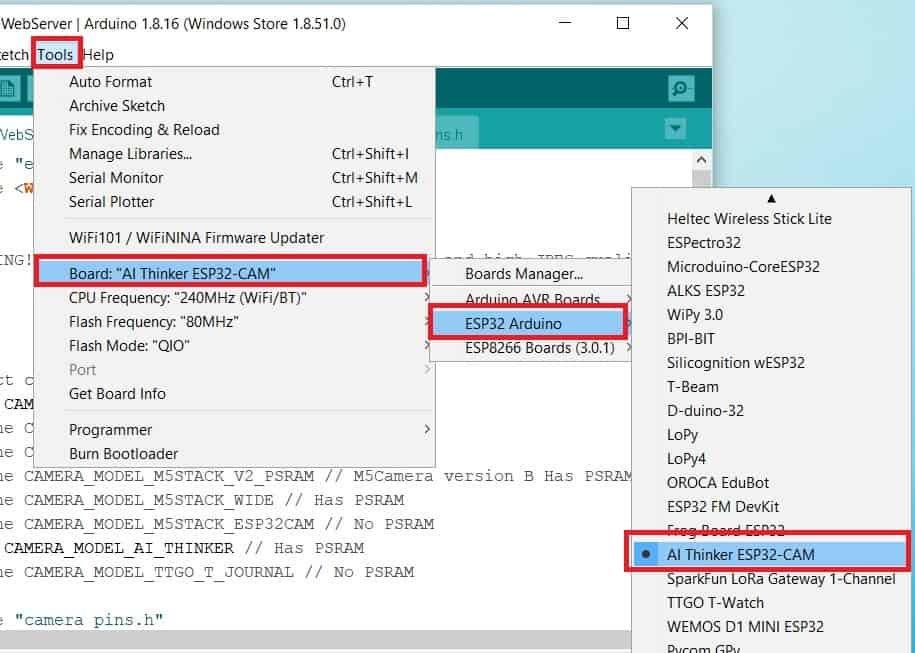
Choose the correct board and COM port before uploading your code to the ESP32-CAM board. Go to Tools > Board and select ESP32 AI Thinker.
Next, go to Tools > Port and select the appropriate port through which your board is connected.
Click on the upload button to upload the code into the ESP32-CAM board.
If you view Connecting….._____….._____….. in the error window, press the RESET button present on the ESP32-CAM as shown below:

After you have successfully uploaded your code to the board, remove the connecting wire from GPIO0 and GND.
Now open the serial monitor. In a few moments, the Wi-Fi will get connected, the image will get captured and saved in SPIFFS, then successful connection with Firebase and sending the image to Firebase storage.

In your Firebase project go to Storage > Files
You will be able to view the pictures folder. Click this folder to view the captured image.
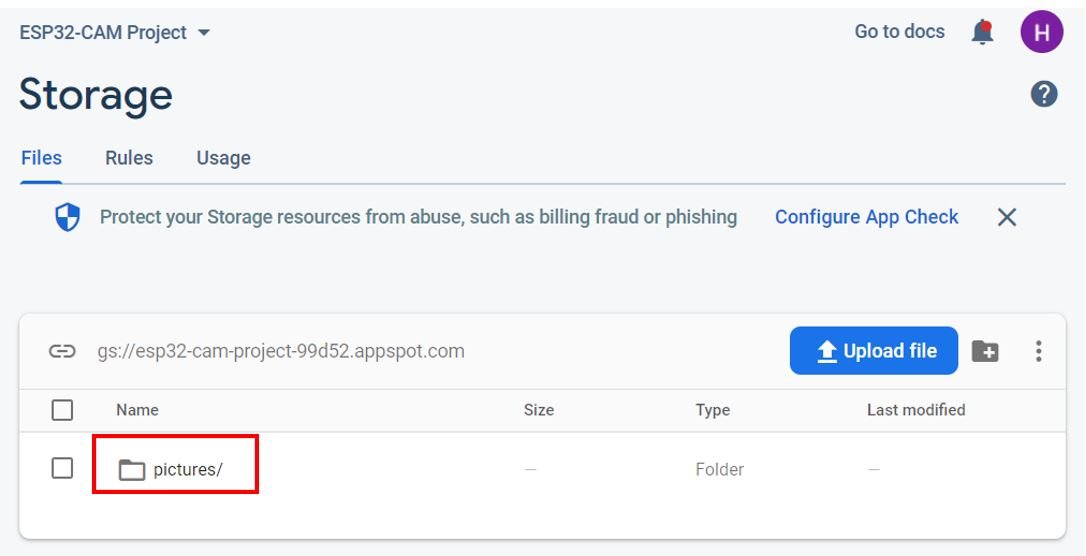
The captured photo will be present in this folder as image.jpg.

Click this .jpg file to view the photo along with some other details.
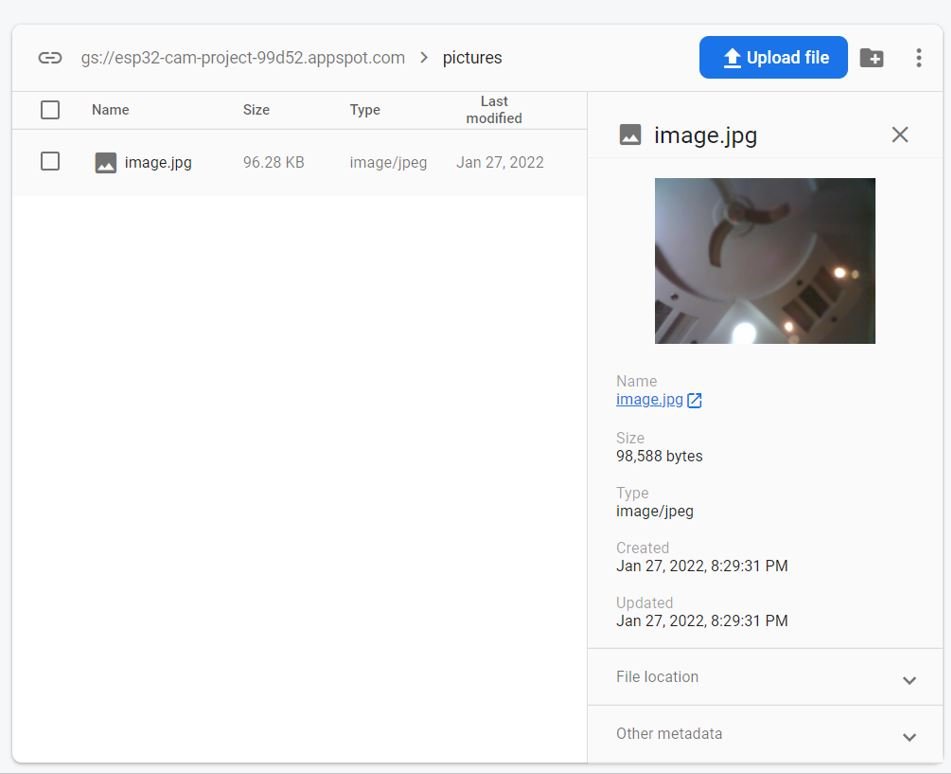
Thus, we were successfully able to send our ESP32-CAM captured photo to Firebase Storage.
You may also like to read:
After clicking the picture, it shows uploading the picture, then i’m getting error of file not found.
WiFi connected
SPIFFS mounted successfully
Token info: type = id token (GITKit token), status = on request
Token info: type = id token (GITKit token), status = ready
Taking a photo…
Picture file name: /data/photo.jpg
The picture has been saved in /data/photo.jpg – Size: 53248 bytes
Uploading picture… File not found.
Thank you for this great project:
After copying and pasting your sketch into the Arduino IDE, the compilation returns the following error on line 172:
exit status 1
Compilation error: expected ‘)’ before ‘{‘ token
Isn’t there a missing character?
Many thanks from France
Daniel
On line 172 : one caracter “)” was missing : so the compilation matches no error now ;
if (Firebase.Storage.upload(&fbdo, STORAGE_BUCKET_ID, IMAGE_PATH, mem_storage_type_flash, IMAGE_PATH, “image/jpeg” )){
Thanks
Daniel