Sending emails using the ESP32 development board has become a valuable capability in various IoT projects. In this tutorial, we will explore how to send emails through an SMTP server using the ESP32 and Arduino IDE. We will cover the process of setting up the necessary libraries, configuring the SMTP server settings, and incorporating different types of emails, including plain text, HTML text, and attachments like images.

We have a similar guide with ESP8266 NodeMCU:
ESP8266 Send Emails (Plain text, HTML, and Attachments) through the SMTP Server
Recommended Components
The following components are used in this project or are helpful for building it with the ESP32.
| Component | How it’s used in this project | Buy on Amazon |
|---|---|---|
| ESP32 Development Board | Connects to Wi-Fi and sends emails through the SMTP server. | Check Price |
| Micro USB Cable | Powers the ESP32 and uploads the sketch from your computer. | Check Price |
| Breadboard | Holds the ESP32 and any attached parts for prototyping. | Check Price |
| Jumper Wires | Connect the ESP32 to power and any peripherals you add. | Check Price |
As an Amazon Associate we earn from qualifying purchases. Prices and availability are accurate as of the date/time indicated and are subject to change.
Prerequisites
We will use Arduino IDE to program our ESP32 development board. Thus, you should have the latest version of Arduino IDE. Additionally, you also need to install the ESP32 plugin. If your IDE does not have the plugin installed you can visit the link below:
Installing ESP32 library in Arduino IDE and uploading code
In this tutorial, we learn two examples:
- Sending plain text and HTML email
- ESP32 send attachments (Images+Files) with email
SMTP Server Introduction
Simple Mail Transfer Protocol server or SMTP server for short is responsible for sending and receiving emails between the senders and the receivers. Each email provider e.g., Gmail, Yahoo, Hotmail, Outlook, etc. has a unique SMTP address and settings. These can usually be accessed through your account settings. Whenever a user sends an email, the SMTP server processes it and sends it to the particular server accordingly. The recipient’s email service provides obtains the message which then turns up in the recipient’s inbox.
Here are some popular SMTP servers:
- Gmail: smtp.gmail.com (port 587)
- Outlook: smtp-mail.outlook.com (port 587)
- Yahoo Mail: smtp.mail.yahoo.com (port 465)
- Hotmail: smtp.live.com (port 587)
Please note that different email providers may have different policies and requirements for using their SMTP servers. You should consult the provider’s documentation for more information on how to use their SMTP servers.
Gmail SMTP Server Settings
You can view the Gmail server settings as shown below. Knowing this is important because we have to include them in our program code to configure our account properly.
- Server: smtp.gmail.com
- Sender Username: the complete email address of the sender account.
- Sender Password: the password of the sender account
- Server port (TLS): 587
- Server port (SSL): 465
- SMTP TLS/SSL required: yes
Outlook SMTP Server Settings
These are the common SMTP server settings for Outlook:
- Server: smtp-mail.outlook.com
- Port: 587
- Encryption method: TLS
- User name: Your full Outlook email address
- Password: Your Outlook email password
Hotmail SMTP Server Settings
These are the common SMTP server settings for Outlook.com:
- Server: smtp-mail.outlook.com
- Port: 587
- Encryption method: TLS
- User name: Your full Outlook.com email address
- Password: Your Outlook.com email password
Sending Email using ESP32
To send an email using ESP32 through an SMTP server you will require the following:
- ESP Mail Client Library
- The sender’s email address
- Recipient’s email address
- Email content: The message body can be sent as plain text or as HTML text. We will cover simple text, HTML and attachments.
Installing ESP Mail Client Library
To use SMTP with our ESP board we will require a library. We will install the ESP Mail Client library from Github. To download the library, click here. Click on ‘Code’ and then ‘Download Zip’.
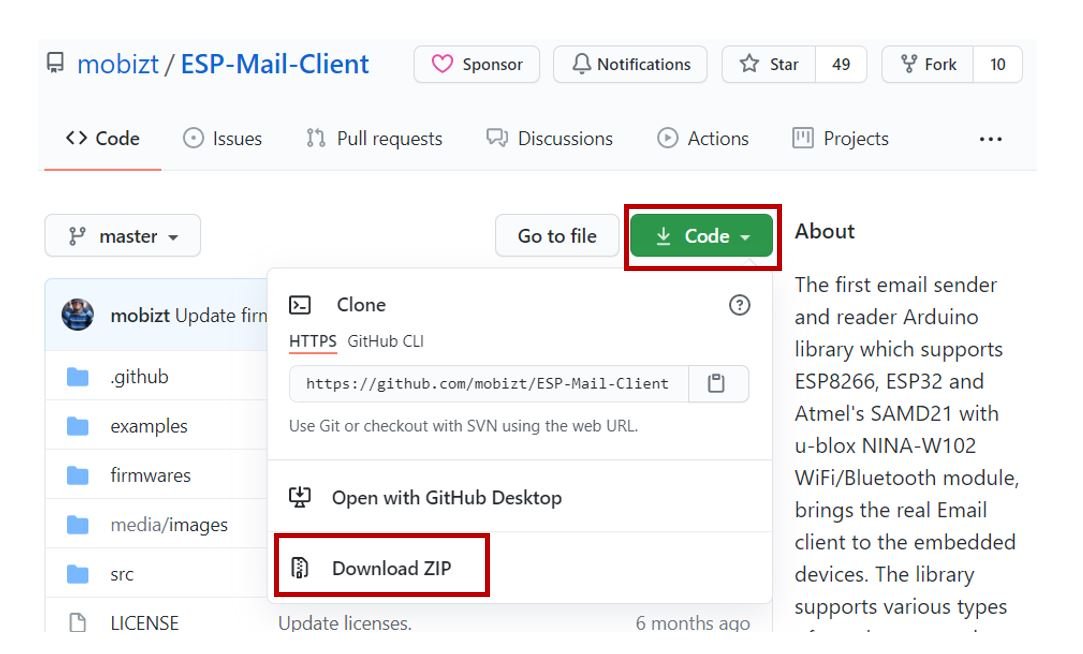
You will download the library as a .zip folder which you will extract and rename as ‘ESP_Mail_Client.h’. Then, transfer this folder to the installation library folder in your Arduino IDE. Likewise, you can also go to Sketch > Include Library > Add .zip Library inside the IDE to add the library as well. After installation of the library, restart your IDE.
With the help of this library, the user can send/receive emails using the ESP32 module easily.
Setting up a Gmail Account
As discussed above, to send emails using our ESP32 board we would require two email accounts. One for the sender and one for the recipient. You can use your own email account as the sender account but it is recommended to create a new one just in case something goes wrong in the program code. For this article, we will use Gmail as the primary email provider. You can use any other provider as your preference.
Creating a new account in Gmail (Sender side) for ESP32
For this tutorial, we have created a new Gmail account and we also recommend you create a new Gmail account. If something wrong happens with your ESP32 code and you may incidentally make too many email requests from your personal account, Google may ban your account or block it temporarily. The receiver’s email address can be your personal email address.
To create a Google account:
- Go to the Google Sign Up page: https://www.google.com/gmail/about/ in the required information, such as first and last name, desired email address, password, phone number, and date of birth.
- Click “Next” to proceed with the verification process.
- Read and accept the terms of service and privacy policy.
- Click “Create Account.”

Now type all the relevant information and click ‘Next’. You can give in details according to your preference.

Proceed with all the steps accordingly to create your account successfully.
Create an App Password
To send an email with ESP32, first, you need to create an App password using your Gmail account. An app password in Gmail is a unique password generated for an app or device that does not support 2-step verification. When 2-step verification is enabled for a Gmail account, users are required to enter a verification code in addition to their password when signing in. However, some apps or devices may not be able to prompt for the verification code. In these cases, users can generate an app password to use instead of their regular password for accessing Gmail on the app or device. The app password is only valid for a specific app or device and can be revoked at any time from the Google Account security settings.
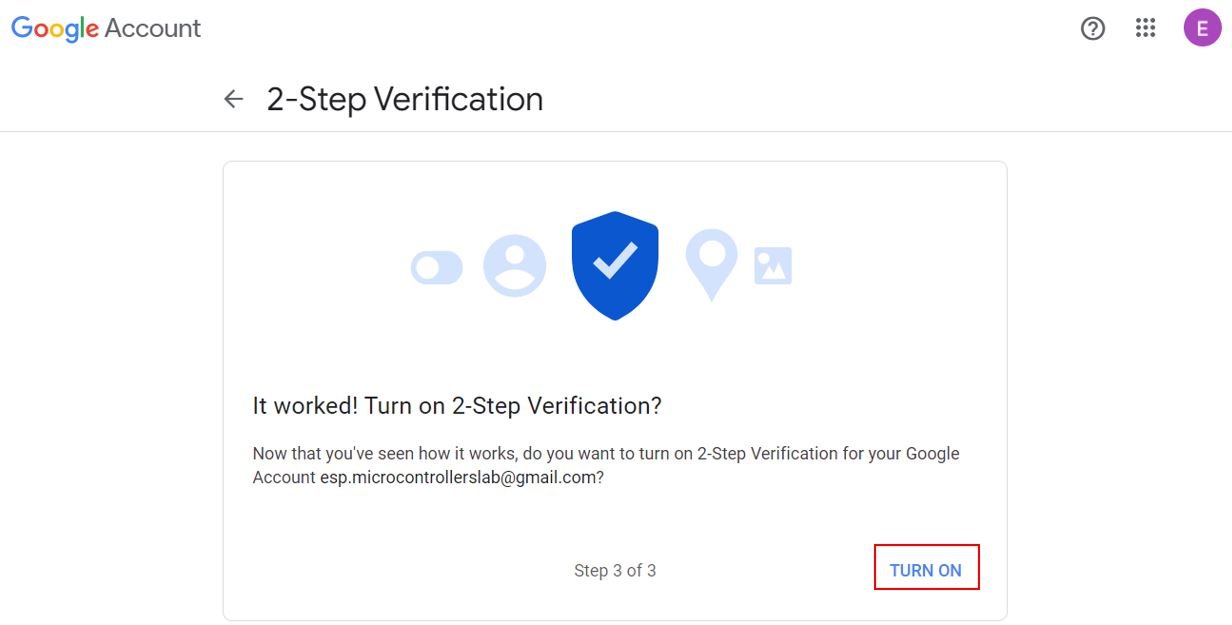
First, enable 2-step verification on your account by following these steps:
- Log in to your Google Account.
- Go to the “Security” section in your Google Account settings.
- Scroll down to “Signing in to Google.”
- Under “2-Step Verification,” click “Get Started.”
- Follow the prompts to set up 2-step authentication, which may include adding a phone number to receive verification codes via text or voice call.
- After setting up 2-step authentication, you will be prompted to enter a verification code whenever you sign in to your Google Account on a new device or browse
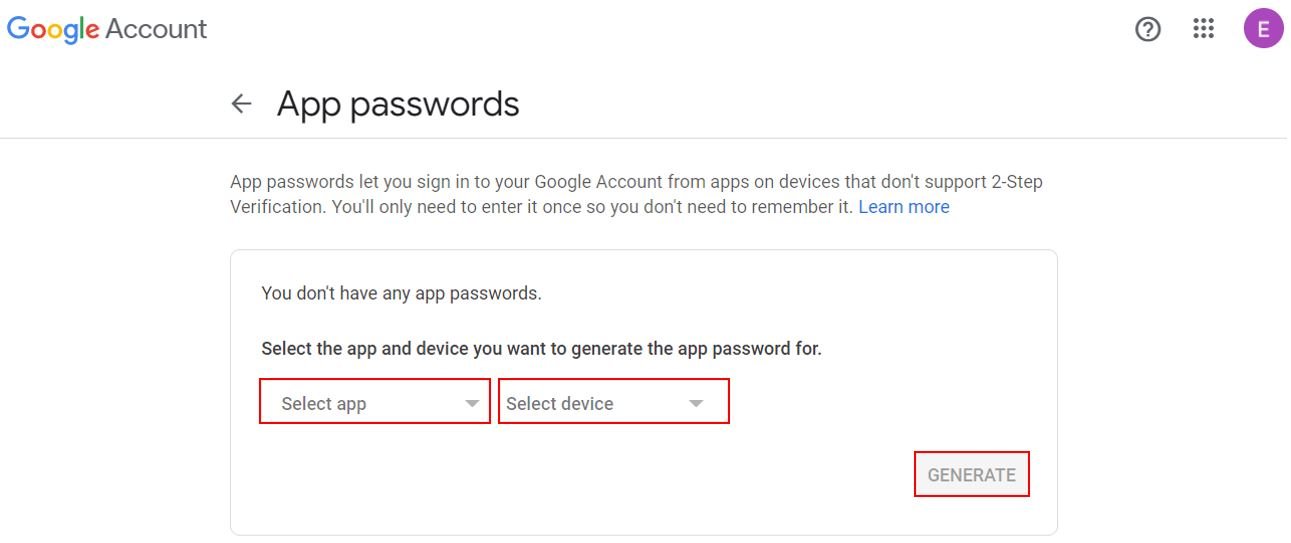
To get an app password:
Log in to your Google Account and Go to the “Security” section in your Google Account settings.
Scroll down to “Signing in to Google.” and Click “App Passwords.”
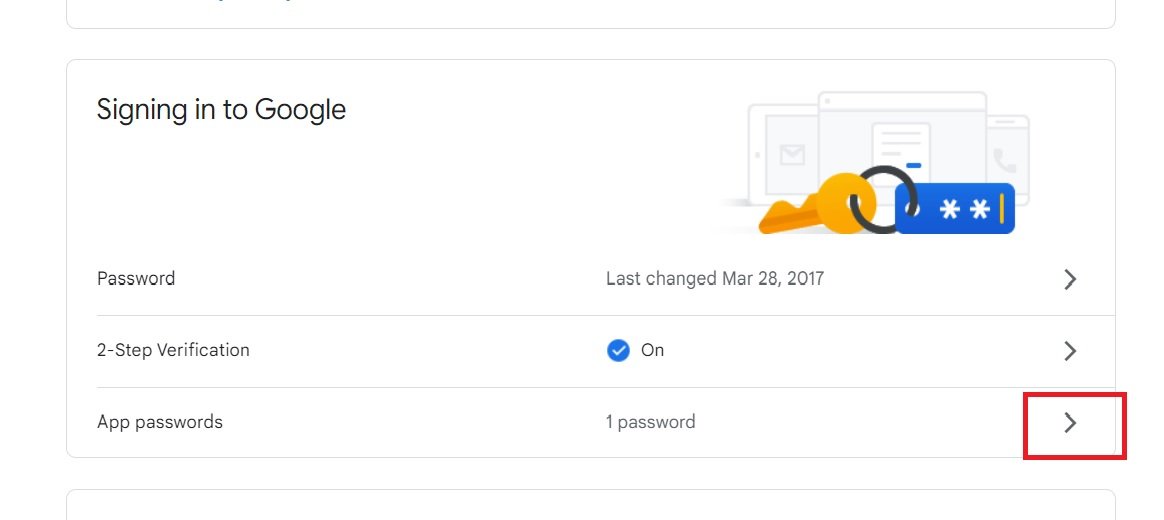
Follow the prompts to generate a unique password for the app you want to use with your Google Account. From the select app field, choose mail and device as other. Give any name to this device. After that click on generate.
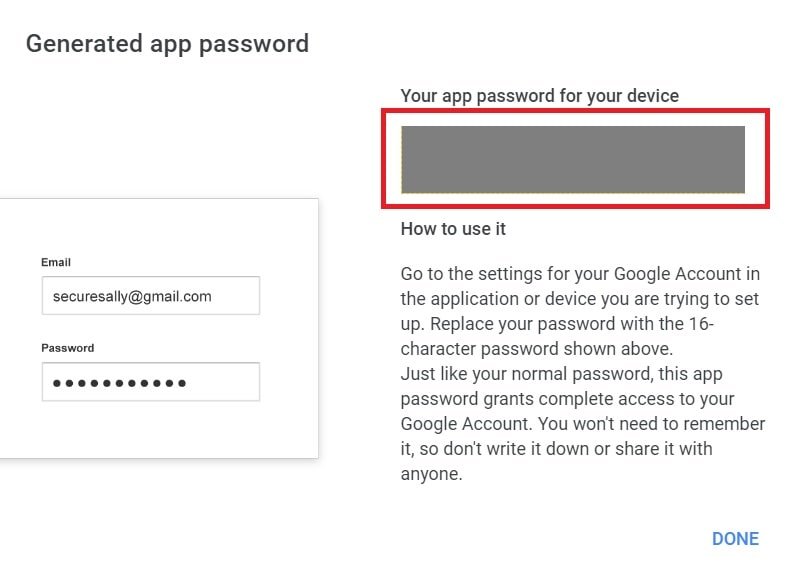
It will generate an app password for this specific device. Save this for later use. Because we will use it inside our code instead of the Gmail password.
Sending HTML and Plain Text Email with ESP32
First, let’s see an example of sending plain text and HTML through an email ESP32 and SMTP client using Arduino IDE.
ESP32 Code: Sending Plain Text Email
Open your Arduino IDE and go to File > New to open a new file. Copy the code given below in that file. You need to enter your network credentials. Additionally, you also have to provide your SMTP server parameters, the sender’s email details, and the recipient’s email address.
This ESP32 code will send an email through the SMTP server whenever the ESP32 board boots.
#include <Arduino.h>
#include <WiFi.h>
#include <ESP_Mail_Client.h>

#define WIFI_SSID "Your_SSID"
#define WIFI_PASSWORD "Your_Password"

#define SMTP_server "smtp.gmail.com"
#define SMTP_Port 465


#define sender_email "Write_Sender_Email_address"
#define sender_password "Write_Sender_Email_Password"

#define Recipient_email "Write_recipient_Email_address"


SMTPSession smtp;

void setup(){
  Serial.begin(115200);
  Serial.println();
  Serial.print("Connecting...");
  WiFi.begin(WIFI_SSID, WIFI_PASSWORD);
  while (WiFi.status() != WL_CONNECTED){
    Serial.print(".");
    delay(200);
  }
  Serial.println("");
  Serial.println("WiFi connected.");
  Serial.println("IP address: ");
  Serial.println(WiFi.localIP());
  Serial.println();
  smtp.debug(1);


  ESP_Mail_Session session;


  session.server.host_name = SMTP_server ;
  session.server.port = SMTP_Port;
  session.login.email = sender_email;
  session.login.password = sender_password;
  session.login.user_domain = "";

  /* Declare the message class */
  SMTP_Message message;


  message.sender.name = "ESP32";
  message.sender.email = sender_email;
  message.subject = "ESP32 Testing Email";
  message.addRecipient("Microcontrollerslab",Recipient_email);

   //Send HTML message
  String htmlMsg = "<div style=\"color:#FF0000;\"><h1>Hello Microcontrollerslab!</h1><p>This is an HTML email sent from ESP Board</p></div>";
  message.html.content = htmlMsg.c_str();
  message.html.content = htmlMsg.c_str();
  message.text.charSet = "us-ascii";
  message.html.transfer_encoding = Content_Transfer_Encoding::enc_7bit;

 /*
  //Send simple text message
  String textMsg = "Hello Microcontrollerslab! This is a simple text sent from ESP board";
  message.text.content = textMsg.c_str();
  message.text.charSet = "us-ascii";
  message.text.transfer_encoding = Content_Transfer_Encoding::enc_7bit; */


  if (!smtp.connect(&session))
    return;


  if (!MailClient.sendMail(&smtp, &message))
    Serial.println("Error sending Email, " + smtp.errorReason());

}

void loop(){

}
How does the Code Work?
Firstly, we will include the necessary libraries required for this project. WiFi.h will help in establishing the connection between the ESP32 module to a wireless network. We will also include the ESP Mail Client library to successfully send emails via the SMTP server.
#include <Arduino.h>
#include <WiFi.h>
#include <ESP_Mail_Client.h>
Defining Network credentials
Next, we will define the network credentials. One for the SSID and the other for the password. These will be our network credentials which will be used to connect to our wireless network. Replace both of them with your credentials to ensure a successful connection.
#define WIFI_SSID "Your_SSID"
#define WIFI_PASSWORD "Your_Password"
Defining Server Settings
Next, we will define the server settings as shown below. We will specify the SMTP server, port, the sender’s email address, and its password. The sender’s account details are the ones which we newly created. Make sure that you have granted access to less secure apps for the sender account.
#define SMTP_server "smtp.gmail.com"
#define SMTP_Port 465
#define sender_email "Write_Sender_Email_address"
#define sender_password "Write_Sender_Email_Password"
Defining Recipient Account
Now give the complete email address of the account you want to send the email to.
#define Recipient_email "Write_recipient_Email_address"Setup() function
Inside the setup() function, we will open a serial connection at a baud rate of 115200.
Serial.begin(115200);The following section of code will connect our ESP32 board with the local network whose network credentials we already specified above. We will use the WiFi.begin() function. The arguments will be the SSID and the password which we defined earlier in the code.
WiFi.begin(WIFI_SSID, WIFI_PASSWORD);
  while (WiFi.status() != WL_CONNECTED){
    Serial.print(".");
    delay(200);
  }
  Serial.println("");
  Serial.println("WiFi connected.");
  Serial.println("IP address: ");
  Serial.println(WiFi.localIP());
Configuring Session
We will configure our session by specifying the details of the server as shown below. All of the parameters were defined earlier on in the code.
  session.server.host_name = SMTP_server ;
  session.server.port = SMTP_Port;
  session.login.email = sender_email;
  session.login.password = sender_password;
  session.login.user_domain = "";
Setting the Message Header
The following lines of code specify the contents of the message header. It will consist of the sender’s name, the sender’s email, and the subject of the email. You can give the subject according to your choice.
  message.sender.name = "ESP32";
  message.sender.email = sender_email;
  message.subject = "ESP32 Testing Email";
  message.addRecipient("Microcontrollerslab",Recipient_email);
HTML message body
The following lines of code define the HTML text body. For the heading we are specifying ‘Hello Microcontrollerslab!’. The next line will consist of ‘This is an HTML email sent from ESP Board’. This message will in red colour as we have specified that as well. You can add your own HTML text and settings according to your preference.
String htmlMsg = "<div style=\"color:#FF0000;\"><h1>Hello Microcontrollerslab!</h1><p>This is an HTML email sent from ESP Board</p></div>";
  message.html.content = htmlMsg.c_str();
  message.html.content = htmlMsg.c_str();
  message.text.charSet = "us-ascii";
  message.html.transfer_encoding = Content_Transfer_Encoding::enc_7bit;
Simple Text Message body
If you want to send the email as a simple text then uncomment the block of code given below. Comment on the HTML text block which was described above. We will specify the same message but this time it will be sent as a simple text.
  String textMsg = "Hello Microcontrollerslab! This is a simple text sent from ESP board";
  message.text.content = textMsg.c_str();
  message.text.charSet = "us-ascii";
  message.text.transfer_encoding = Content_Transfer_Encoding::enc_7bit;
The following lines will start the connection and send the email.
if (!smtp.connect(&session))
    return;
if (!MailClient.sendMail(&smtp, &message))
    Serial.println("Error sending Email, " + smtp.errorReason());
Demonstration
Choose the correct board and COM port before uploading your code to the board.
Go to Tools > Board and select ESP32 Dev Module.

Next, go to Tools > Port and select the appropriate port through which your board is connected.

Click on the upload button to upload the code to your ESP32 development board.
After you have uploaded your code to the development board, press its ENABLE button.

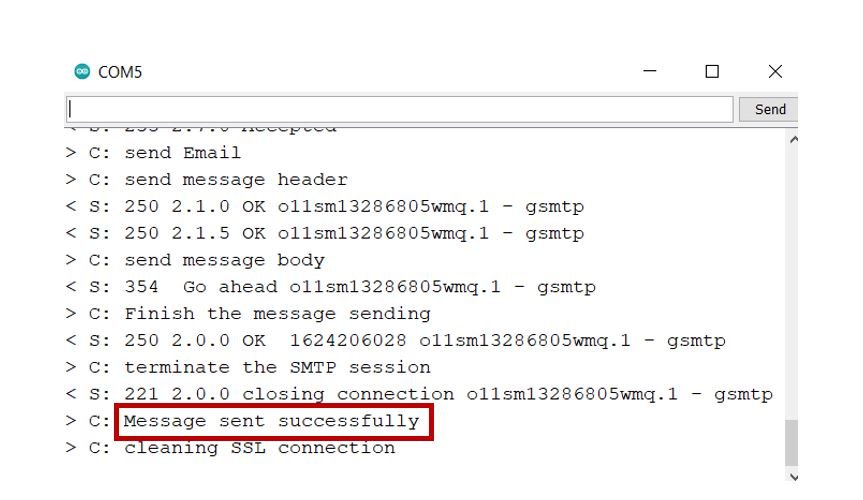
In your Arduino IDE, open up the serial monitor and you will be able to see the status of your WIFI connection and several other details.
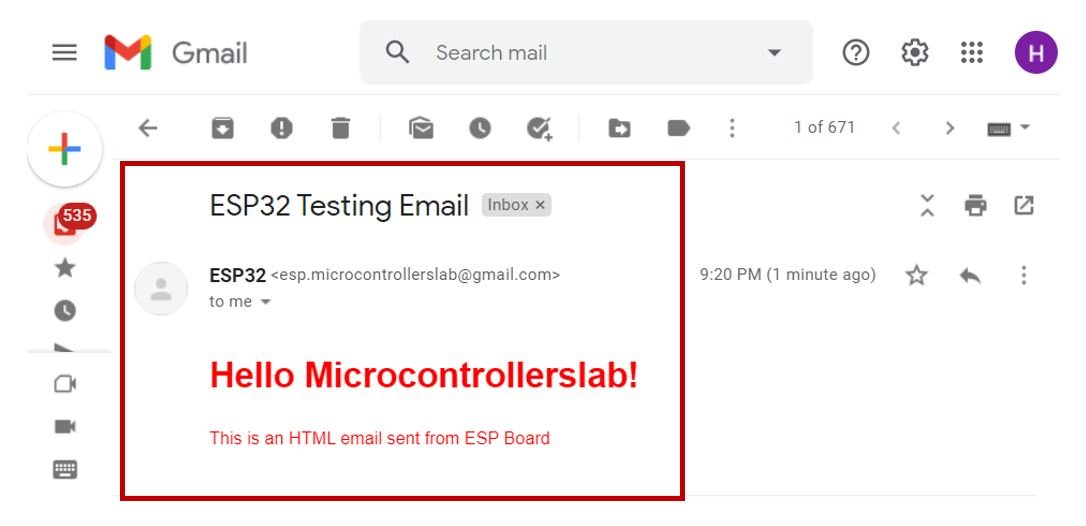
Open the recipient’s email account. You will already have received the email from your ESP32 module. For HTML text, the following email was received:
If you sent a simple text then the following email will be received.

Sending Email Attachments with ESP32 and SMTP
Now, we will look at another type of email we can send from our ESP32 module via the SMTP server. Besides, a text message body which we previously learned how to send now let us move ahead and learn how to send attachments. We will send a .txt file and a .png image file. We will save both of these files in the SPI Flash File System (SPIFFS) of the ESP32. The SPIFFS will help us access the flash memory of the ESP32 core.
Recommended Readings regarding SPIFFS:
- Displaying Images in ESP32 and ESP8266 Web Server
- ESP32 Web Server with SPIFFS (SPI Flash File System)
Setting up Arduino IDE
Filesystem Uploader Plugin
You will have to download and install the ESP32 Filesystem Uploader Plugin in your Arduino IDE. This will help you to upload the SPIFFS files on your ESP32 board. You can access the link below to learn how to install the plugin smoothly.
Install ESP32 Filesystem Uploader in Arduino IDE – SPIFFS
ESP32 Code
Open your Arduino IDE and go to File > New to open a new file. Copy the code given below in that file. You need to enter your network credentials. Additionally, you also have to provide your SMTP server parameters, the sender’s email details, and the recipient’s email address. You will also have to specify the name of your .txt file and .png file in the program code.
This ESP32 code will send an email with two attachments (a text file and an image) through the SMTP server whenever the ESP32 boots.
#include <Arduino.h>
#include <WiFi.h>
#include <ESP_Mail_Client.h>

#define WIFI_SSID "Your_SSID"
#define WIFI_PASSWORD "Your_Password"

#define SMTP_server "smtp.gmail.com"
#define SMTP_Port 465

#define sender_email "Write_Sender_email_address"
#define sender_password "Write_Sender_email_password"

#define Recipient_email "Write_recipient_email_address"
SMTPSession smtp;

void setup(){
  Serial.begin(115200);
  Serial.println();
  Serial.print("Connecting...");
  WiFi.begin(WIFI_SSID, WIFI_PASSWORD);
  while (WiFi.status() != WL_CONNECTED){
    Serial.print(".");
    delay(200);
  }
  Serial.println("");
  Serial.println("WiFi connected.");
  Serial.println("IP address: ");
  Serial.println(WiFi.localIP());
  Serial.println();

  if (!SPIFFS.begin(true)) {
    Serial.println("An error has occurred while mounting SPIFFS");
  }
  else{
    Serial.println("SPIFFS mounted successfully");
  }

  smtp.debug(1);

  ESP_Mail_Session session;

  session.server.host_name = SMTP_server ;
  session.server.port = SMTP_Port;
  session.login.email = sender_email;
  session.login.password = sender_password;
  session.login.user_domain = "mydomain.net";

  SMTP_Message message;

  message.enable.chunking = true;


  message.sender.name = "ESP32";
  message.sender.email = sender_email;

  message.subject = "ESP32 Testing Email with Attachments";
  message.addRecipient("Microcontrollerslab",Recipient_email);


  String htmlMsg = "This attachment message was sent by ESP32 board";
  message.html.content = htmlMsg.c_str();
  message.html.charSet = "utf-8";
  message.html.transfer_encoding = Content_Transfer_Encoding::enc_qp;

  message.priority = esp_mail_smtp_priority::esp_mail_smtp_priority_normal;
  message.response.notify = esp_mail_smtp_notify_success | esp_mail_smtp_notify_failure | esp_mail_smtp_notify_delay;

  SMTP_Attachment attachment;

  attachment.descr.filename = "image.png";
  message.resetAttachItem(attachment);
  attachment.descr.mime = "image/png";
  attachment.file.path = "/image.png";
  attachment.file.storage_type = esp_mail_file_storage_type_flash;
  attachment.descr.transfer_encoding = Content_Transfer_Encoding::enc_base64;

  message.addAttachment(attachment);

  attachment.descr.filename = "File.txt";
  attachment.descr.mime = "text/plain";
  attachment.file.path = "/File.txt";
  attachment.file.storage_type = esp_mail_file_storage_type_flash;
  attachment.descr.transfer_encoding = Content_Transfer_Encoding::enc_base64;

  message.addAttachment(attachment);

  if (!smtp.connect(&session))
    return;

  if (!MailClient.sendMail(&smtp, &message, true))
    Serial.println("Error sending Email, " + smtp.errorReason());
}

void loop()
{
}
How does the Code work?
Most of the code is similar to the one which we discussed previously so we will look over the parts which are different.
After providing all the necessary details for a successful connection with the SMTP server, we will initialize the SPIFFS.
if (!SPIFFS.begin(true)) {
    Serial.println("An error has occurred while mounting SPIFFS");
  }
  else{
    Serial.println("SPIFFS mounted successfully");
  }
Next, we will create an attachment object. This will be used to specify the details of the two attachments. First, we will include the image file. This will consist of the file name, MIME type, file path, and file storage type. Replace the name of your file and path destination with your parameters.
SMTP_Attachment attachment;
  attachment.descr.filename = "Your_image_file_name.png";
  attachment.descr.mime = "image/png";
  attachment.file.path = "/Your_image_file_name.png";
  attachment.file.storage_type = esp_mail_file_storage_type_flash;
  attachment.descr.transfer_encoding = Content_Transfer_Encoding::enc_base64;
You can add this attachment to the message body through message.addAttachment(). This takes in the attachment object as the parameter inside it.
message.addAttachment(attachment);To include further attachments, insert the following line of code:
message.resetAttachItem(attachment);Similarly, we will give the information about the text file. Replace the name of your file and path destination with your own parameters.
attachment.descr.filename = "Your_text_file_name.txt";
  attachment.descr.mime = "text/plain";
  attachment.file.path = "/Your_text_file_name.txt";
  attachment.file.storage_type = esp_mail_file_storage_type_flash;
  attachment.descr.transfer_encoding = Content_Transfer_Encoding::enc_base64;
This attachment will be attached with the message through the following line:
message.addAttachment(attachment);The following lines will start the connection and send the email.
 if (!smtp.connect(&session))
    return;
 if (!MailClient.sendMail(&smtp, &message, true))
    Serial.println("Error sending Email, " + smtp.errorReason());
Uploading Files to ESP32 SPIFFS
Now follow the steps closely to ensure both the files are properly uploaded to the flash memory of your development board. We saved the Arduino sketch given above as ‘ESP32_Email_Attachments.’ Choose the correct board and COM port. Go to Tools > Board and select ESP32 Dev Module. Next, go to Tools > Port and select the appropriate port through which your board is connected.
Before uploading to your ESP board first go to Sketch > Show Sketch Folder.

This will open up the folder where your Arduino sketch is saved. Now create a new folder inside that folder and save it as ‘data.’
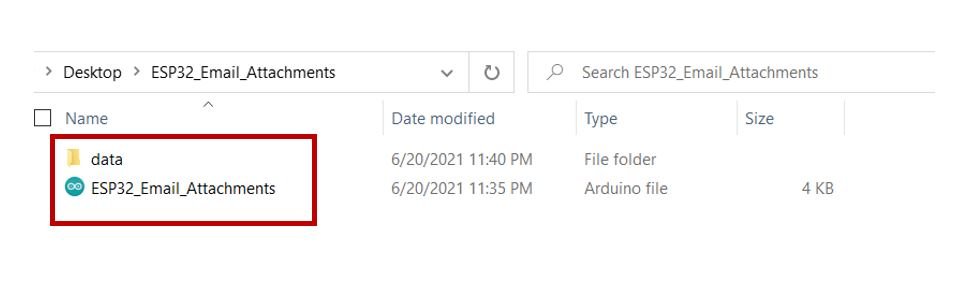
Place both the .txt and the .png file inside the data folder. Otherwise, the SPIFFS library will not be able to read them.
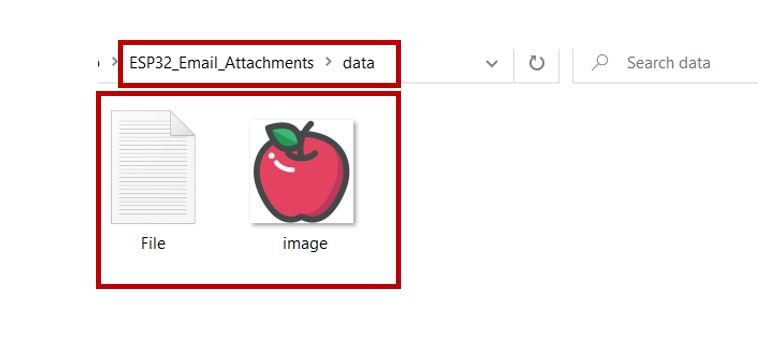
The figure below shows how all the files should be placed:

Now, we will upload the files to our ESP32 board. For ESP32 go to Tools > ESP32 Data Sketch Upload.
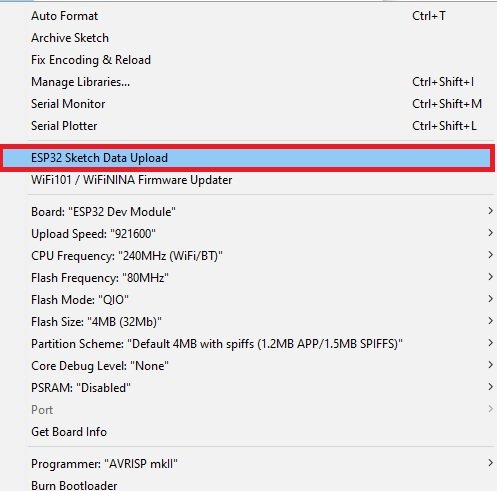
After a few moments, the file will be uploaded. You will receive the message ‘SPIFFS Image Uploaded’ on the debugging window.
Make sure that the total size of the data file is within the flash memory size of your board.
Demonstration
After you have uploaded your code and the files to the ESP32 development board, press its ENABLE button. In your Arduino IDE, open up the serial monitor and you will be able to see the status of your WIFI connection and several other details.
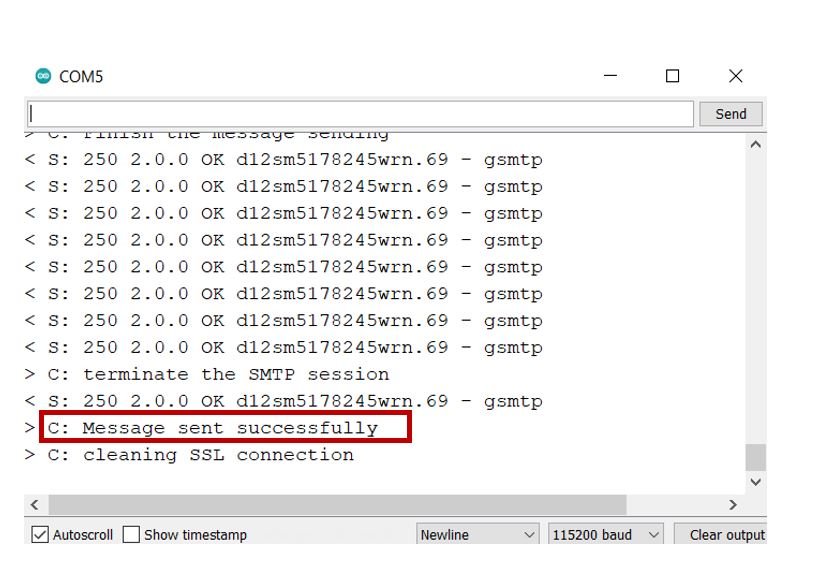
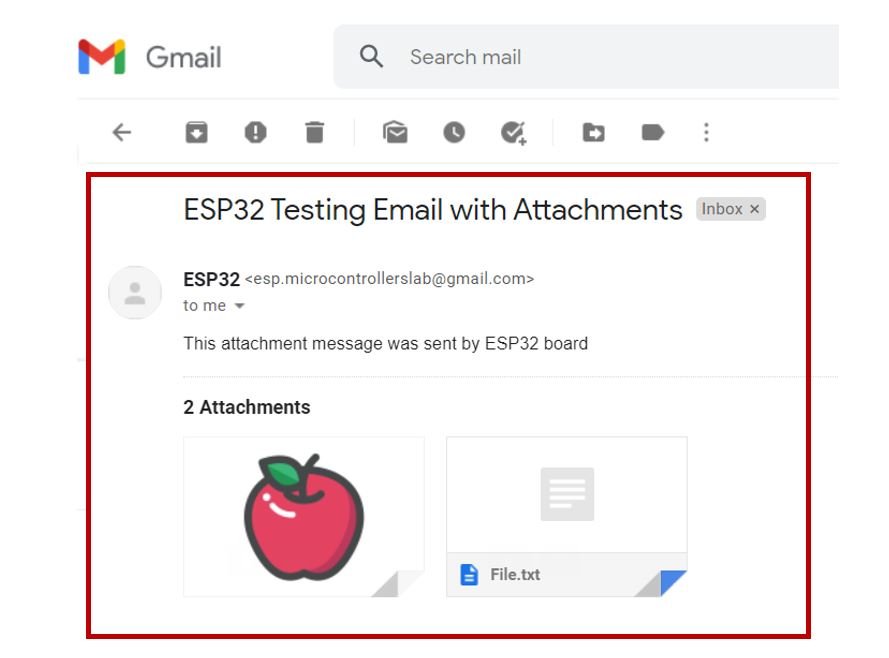
Open the recipient’s email account. You will already have received the email from your ESP32 module. The two attachments can be clearly seen.
Conclusion
In conclusion, we learned how to send different types of emails using the ESP32 module through the SMTP client. This can be highly useful for sending sensor readings, publishing data, or transferring images using the ESP32 module.
Related content:
- ESP32 Send Email Notifications with IFTTT
- ESP32 ESP8266 SMTP Client Send Sensor Readings via Email using MicroPython
- Raspberry Pi Pico W SMTP Client Send Sensor Readings via Email
- ESP32 MicroPython Send Emails with SMTP Client
- Raspberry Pi Pico W Send Emails with SMTP Client and MicroPython
- Node-RED Send Email Alerts and Notifications
- ESP32-CAM Take and Send Photos via Email using an SMTP Server
If you find this ESP32 project useful, you may also like to read:
- Control ESP32 Outputs using Google Assistant and Adafruit IO with Arduino IDE
- Google Firebase: Control ESP32 Outputs with Arduino IDE
- Control ESP32 Outputs using Blynk App and Arduino IDE
- Set ESP32 Custom Hostname with Arduino IDE
- ESP32/ESP8266 Momentary Switch Web Server
- Telegram ESP32 and ESP8266: Control GPIOs and LEDs using Arduino IDE
- ESP32/ESP8266 Web Server to Control Outputs with a Timer (Pulse Width)
In this example the file name of the picture will be lost.
the result is a noname in the received email
SMTP_Attachment attachment;
attachment.descr.filename = “image.png”;
message.resetAttachItem(attachment);
attachment.descr.mime = “image/png”;
……
Should be:
SMTP_Attachment attachment;
message.resetAttachItem(attachment);
attachment.descr.filename = “image.png”;
attachment.descr.mime = “image/png”;
…..
This sketch no longer works as of May, 2022 since Google disabled the setting to work with “less secure apps”
Thanks for the update Chris, we will see and update the article accordingly.
Good afternoon friend, how are you?
Would it be possible to send an array with several information in the simple send application?