In this tutorial, we will show you how to install a file system uploader plugin in Arduino IDE to upload files to ESP8266 NodeMCU flash (LittleFS). By default, there is no support in Arduino IDE to upload files to ESP8266 flash filesystem. But we can install a plugin to add a file uploading feature in Arduino IDE.
To use LittleFS, we just need to include LittleFS.h file in our Arduino sketch.

We have a similar guide with ESP32:
ESP8266 Filesystem Introduction
ESP8266 provides a filesystem on the same flash where the program is stored. A file system is created by partitioning the flash of ESP8266 into Arduino sketch, OTA update, File system, EEPROM, and WiFi config regions. There are two file systems available with ESP8266 to use flash such as SPIFFS and LittleFS.
Note: SPIFFS is going to deprecate and may be removed from ESP8266 Arduino code future releases. Therefore, it is recommended to use LittleFS. Because it supports real directories and is many times faster than SPIFFS for most operations.
Difference Between SPIFFS and LittleFS
| Features | SPIFFS | LittleFS |
|---|---|---|
| Directories support | No | Yes |
| Per file overhead | 256 bytes minimum | 4K minimum |
| Speed | slow | faster |
| File Timestamp | No | Yes |
LittleFS Introduction
LittleFS is recently added and focuses on higher performance and directory support but has higher filesystem and per-file overhead (4K minimum vs. SPIFFS’ 256-byte minimum file allocation unit).
We can use LittleFS to store files in flash without having to use any external memory with ESP8266 NodeMCU. LittleFS allows users to read and write files to/from the flash memory of microcontrollers.
To convert most applications from SPIFFS to LittleFS simply requires changing the SPIFFS.begin() to LittleFS.begin() and SPIFFS.open() to LittleFS.open() with the rest of the code remaining untouched.
In short, you can port your all existing project which are developed by using SPIFFS just by replacing SPIFFS.h with LittleFS.h and SPIFFS methods with LittleFS.
Directories Support
Like a file system in Linux, ESP8266 LittleFS support real directories. We can create a file name upto 31 characters and as many directories and sub-directories based on file system size in ESP8266 flash.
If there is no directory created, files will be saved by default in root directory “/”.
Applications
The use of LittleFS with ESP8266 NodeMCU becomes very handy in various applications such as follows:
- Saving mesh and network configuration settings in permanent memory without any SD card
- While using ESP8266 as a Bluetooth mesh Node, its provisioning and configuration data must store in permanent memory
- In the case of ESP8266 NodeMCU web server, server HTML and CSS files from LittleFS
- Saving look-up tables to perform a query and retrieve data from PHP database
In most of our ESP8266 web server projects, we have included HTML and CSS files inside our Arduino sketch. We save these HTML documents inside Arduino sketch by converting them into strings. Whenever a web client makes an HTTTP request, we send this string as a response which is basically a web page.
On the contrary, with LittleFS, we can save HTML, CSS, and Javascript files into the ESP8266 NodeMCU flash file system. Whenever a web client makes an HTTTP request, we can serve these files directly from LittleFS.
Related Projects: ESP32 Web Server with SPIFFS (SPI Flash File System)
Installing File System Uploader Plugin in Arduino IDE
ESP8266 NodeMCU LittleFS allows use to write files to flash. We can write our own code to upload files from the file system. However, by doing so, we have to write code ourselves and include the code in our application. Additionally, it will increase the actual size of our application.
Hence, we can use a plugin available for Arduino IDE to upload files. This plugin allows users to upload files to LittleFS directly from their computers. It will make the whole process easier and let us work with files easily.
Installing ESP8266 NodeMCU Arduino IDE
Before starting with the file system uploader plugin installation process, you should make sure that you have the latest version of Arduino IDE installed on your system. Moreover, you should also install an ESP8266 NodeMCU add-on in Arduino IDE. You can check this tutorial:
Download File Uploader Plugin
(1) First download the file uploader plugin for Arduino IDE. Go to this link and click on the ESP8266LittleFS-2.6.0.zip. When you click on the zip folder, it will be downloaded to your selected location.

(2) After that extract the zip folder and you will find the ESP8266LittleFS folder inside ESP8266LittleFS-2.6.0.zip.

(3) Copy the ESP8266LittleFS folder and paste it to the tools folder in your Arduino IDE installation folder. the tools folder is available inside the Arduino IDE installation folder. In our case it is available at:
C:\Program Files (x86)\Arduino\tools

(4) You have successfully added the ESP8266 NodeMCU filesystem uploader plugin in Arduino IDE. You just need to restart your Arduino IDE.
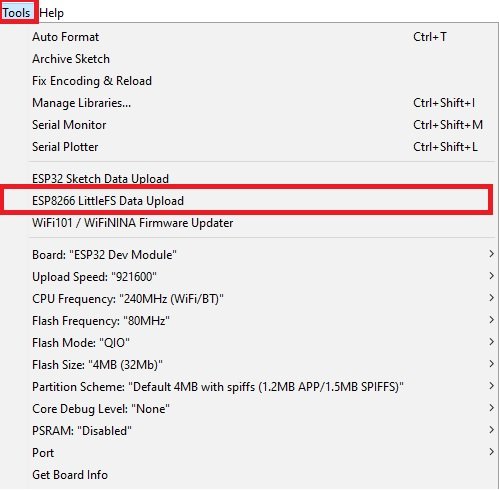
In order to check if the ESP8266 NodeMCU FileSystem plugin has installed correctly, open your Arduino IDE. After that, go to tools. You will find the “ESP8266 LittleFS Data Upload” option there.
Upload File to ESP8266 using the Filesystem Uploader
In this section, let’s see an example to upload an example file to ESP8266 LittleFS using the plugin we have just installed. Follow these step by step instructions:
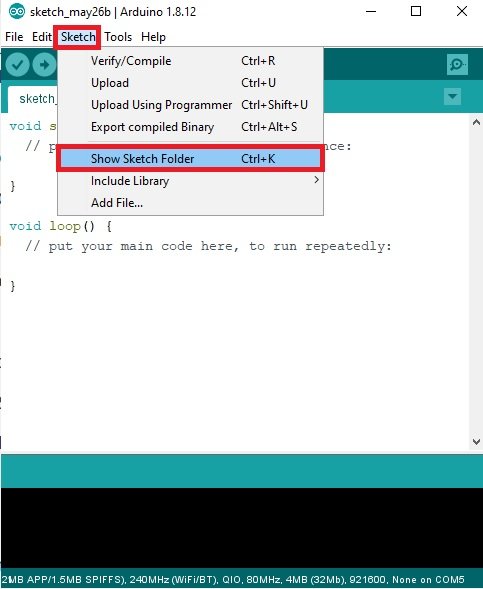
- First, open Arduino IDE and save the empty sketch file with a project file name of your choice.
- Next, open the sketch folder. To open the sketch folder, go to sketch>>Show Sketch Folder. It will open the default folder where your sketch is being saved.
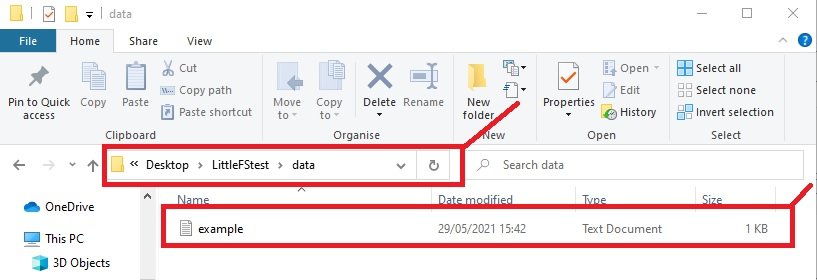
- Inside the sketch folder, you will find a sample Arduino sketch and a data folder. In case your sketch folder does not have a data folder. You should create one. Because we put the files inside the data folder which we want to upload to ESP8266 LittleFS.

- Create a sample text file with any name. But you should use the same name in the Arduino sketch while reading the file with LittleFS. For example, we have created a txt file with the name of “example”.

- Copy this example.txt file inside data folder.
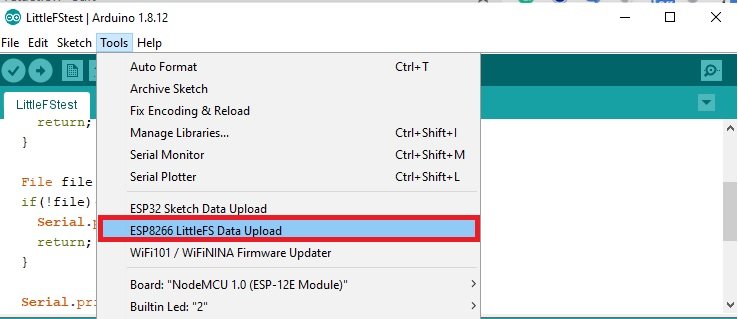
- Finally, we can upload the file saved in the data folder to the filesystem of ESP8266 NodeMCU. To upload a file, go to tools and select ESP8266 NodeMCU from tools>boards, and after that press “ESP8266 LittleFS Data Upload“.
Note: Make sure to select the ESP8266 NodeMCU board before uploading the file. Otherwise you will get this error SPIFFS Not Supported on avr.
As soon as you click the “ESP8266 LittleFS Data Upload“ option, Arduino IDE will start uploading LittleFS file to ESP8266 flash memory as follows:
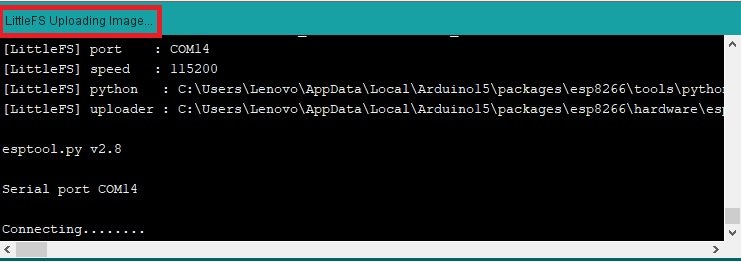
Note: If you see the Connecting …….____……” message in your Arduino console. That means Arduino IDE is trying to connect with ESP8266. But in some versions of ESP8266 boards you need to press and hold the BOOT button on the ESP8266 board when you see the Connecting …….____……” message.
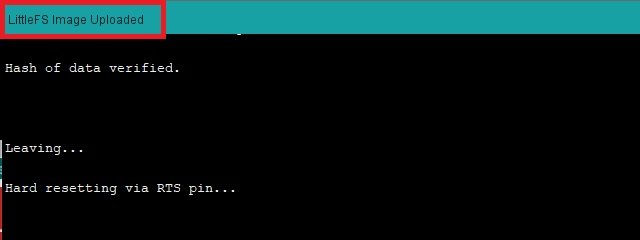
After some time, you will see the message “LittleFS Image Uploaded“. That means files are uploaded successfully to ESP8266 LittleFS.
In this example, we are using only one file. But you can save more than one file in the data folder inside the sketch folder. It will upload all files to the LittleFS filesystem.
Example Sketch to Read ESP8266 LittleFS File
Now let’s see an example sketch to read the example.txt file which we just uploaded to the ESP8266 filesystem and print its content on Arduino serial monitor.
Copy the following code to your .ino file of Arduino sketch and upload it to Arduino.
#include "LittleFS.h"

void setup() {
  Serial.begin(115200);

  if(!LittleFS.begin()){
    Serial.println("An Error has occurred while mounting LittleFS");
    return;
  }

  File file = LittleFS.open("/example.txt", "r");
  if(!file){
    Serial.println("Failed to open file for reading");
    return;
  }

  Serial.println("File Content:");
  while(file.available()){
    Serial.write(file.read());
  }
  file.close();
}

void loop() {

}
After uploading the sketch, open the serial monitor in Arduino IDE by going to Tools > Serial Monitor. Also, set the baud rate to 115200. Finally, press the enable button on the ESP8266 NodeMCU board:
As soon as you press the enable button, it will print the content of example.txt file on the serial monitor as follows:
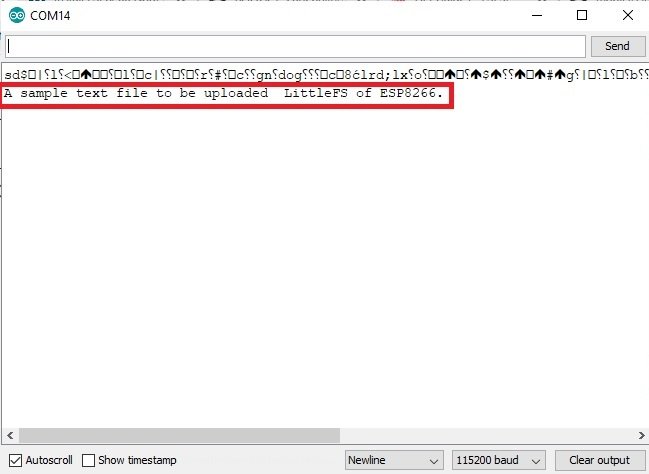
That means you have successfully uploaded the file to the ESP8266 NodeMCU filesystem and also able to read the file.
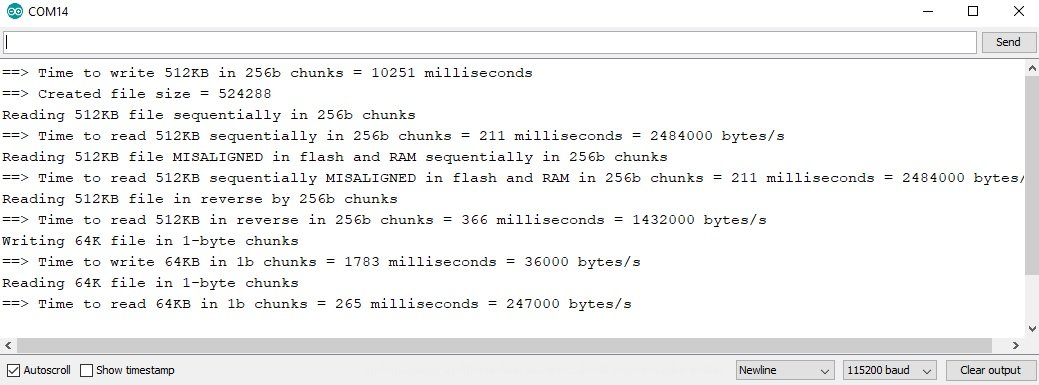
LittleFS Speed Test Sketch
In this section, we will see a sample ESP8266 Arduino sketch to test the speed of LittleFS. In other words, we will see how much time LittleFS takes to write bytes into the file system. To open a sample sketch go to File > Examples > LittleFS(esp8266) > SpeedTest.
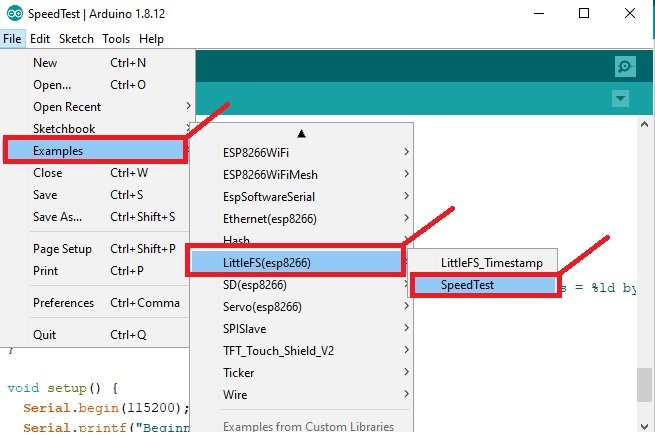
This example sketch will open. Upload this code to ESP8266 NodeMCU.
// Simple speed test for filesystem objects
// Released to the public domain by Earle F. Philhower, III

#include <FS.h>
#include <LittleFS.h>

// Choose the filesystem to test
// WARNING:  The filesystem will be formatted at the start of the test!

#define TESTFS LittleFS
//#define TESTFS SPIFFS
//#define TESTFS SDFS

// How large of a file to test
#define TESTSIZEKB 512

void DoTest(FS *fs) {
  if (!fs->format()) {
    Serial.printf("Unable to format(), aborting\n");
    return;
  }
  if (!fs->begin()) {
    Serial.printf("Unable to begin(), aborting\n");
    return;
  }

  uint8_t data[256];
  for (int i = 0; i < 256; i++) {
    data[i] = (uint8_t) i;
  }

  Serial.printf("Creating %dKB file, may take a while...\n", TESTSIZEKB);
  long start = millis();
  File f = fs->open("/testwrite.bin", "w");
  if (!f) {
    Serial.printf("Unable to open file for writing, aborting\n");
    return;
  }
  for (int i = 0; i < TESTSIZEKB; i++) {
    for (int j = 0; j < 4; j++) {
      f.write(data, 256);
    }
  }
  f.close();
  long stop = millis();
  Serial.printf("==> Time to write %dKB in 256b chunks = %ld milliseconds\n", TESTSIZEKB, stop - start);

  f = fs->open("/testwrite.bin", "r");
  Serial.printf("==> Created file size = %d\n", f.size());
  f.close();

  Serial.printf("Reading %dKB file sequentially in 256b chunks\n", TESTSIZEKB);
  start = millis();
  f = fs->open("/testwrite.bin", "r");
  for (int i = 0; i < TESTSIZEKB; i++) {
    for (int j = 0; j < 4; j++) {
      f.read(data, 256);
    }
  }
  f.close();
  stop = millis();
  Serial.printf("==> Time to read %dKB sequentially in 256b chunks = %ld milliseconds = %ld bytes/s\n", TESTSIZEKB, stop - start, TESTSIZEKB * 1024 / (stop - start) * 1000);

  Serial.printf("Reading %dKB file MISALIGNED in flash and RAM sequentially in 256b chunks\n", TESTSIZEKB);
  start = millis();
  f = fs->open("/testwrite.bin", "r");
  f.read();
  for (int i = 0; i < TESTSIZEKB; i++) {
    for (int j = 0; j < 4; j++) {
      f.read(data + 1, 256);
    }
  }
  f.close();
  stop = millis();
  Serial.printf("==> Time to read %dKB sequentially MISALIGNED in flash and RAM in 256b chunks = %ld milliseconds = %ld bytes/s\n", TESTSIZEKB, stop - start, TESTSIZEKB * 1024 / (stop - start) * 1000);


  Serial.printf("Reading %dKB file in reverse by 256b chunks\n", TESTSIZEKB);
  start = millis();
  f = fs->open("/testwrite.bin", "r");
  for (int i = 0; i < TESTSIZEKB; i++) {
    for (int j = 0; j < 4; j++) {
      if (!f.seek(256 + 256 * j * i, SeekEnd)) {
        Serial.printf("Unable to seek to %d, aborting\n", -256 - 256 * j * i);
        return;
      }
      if (256 != f.read(data, 256)) {
        Serial.printf("Unable to read 256 bytes, aborting\n");
        return;
      }
    }
  }
  f.close();
  stop = millis();
  Serial.printf("==> Time to read %dKB in reverse in 256b chunks = %ld milliseconds = %ld bytes/s\n", TESTSIZEKB, stop - start, TESTSIZEKB * 1024 / (stop - start) * 1000);


  Serial.printf("Writing 64K file in 1-byte chunks\n");
  start = millis();
  f = fs->open("/test1b.bin", "w");
  for (int i = 0; i < 65536; i++) {
    f.write((uint8_t*)&i, 1);
  }
  f.close();
  stop = millis();
  Serial.printf("==> Time to write 64KB in 1b chunks = %ld milliseconds = %ld bytes/s\n", stop - start, 65536 / (stop - start) * 1000);

  Serial.printf("Reading 64K file in 1-byte chunks\n");
  start = millis();
  f = fs->open("/test1b.bin", "r");
  for (int i = 0; i < 65536; i++) {
    char c;
    f.read((uint8_t*)&c, 1);
  }
  f.close();
  stop = millis();
  Serial.printf("==> Time to read 64KB in 1b chunks = %ld milliseconds = %ld bytes/s\n", stop - start, 65536 / (stop - start) * 1000);


}

void setup() {
  Serial.begin(115200);
  Serial.printf("Beginning test\n");
  Serial.flush();
  DoTest(&TESTFS);
}

void loop() {
  delay(10000);
}
After uploading the code, click on the serial monitor and select 115200 baud rate. Finally, click on enable button of ESP8266 NodeMCU. You will see that the time LittleFS takes to write different numbers of bytes to a filesystem.
LittleFS Timestamp Support
LittleFS filesystems support a file timestamp and it is updated when the file is opened for writing. By default, it uses internal time returned from time(NULL). But we can also update the time using an NTP server before doing file operations.
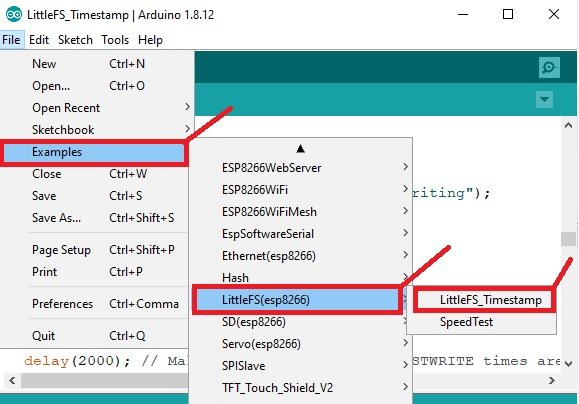
To open a sample sketch go to File > Examples > LittleFS(esp8266) > LittleFS_Timestamp.
This example sketch takes update the timestamp from NTP server before performing file operation.
/* Example showing timestamp support in LittleFS */
/* Released into the public domain. */
/* Earle F. Philhower, III <earlephilhower@yahoo.com> */

#include <FS.h>
#include <LittleFS.h>
#include <time.h>
#include <ESP8266WiFi.h>

#ifndef STASSID

#define STASSID "Your_WiFi_Name"
#define STAPSK  "Your_WiFi_Password"
#endif

const char *ssid = STASSID;
const char *pass = STAPSK;

long timezone = 2;
byte daysavetime = 1;


bool getLocalTime(struct tm * info, uint32_t ms) {
  uint32_t count = ms / 10;
  time_t now;

  time(&now);
  localtime_r(&now, info);

  if (info->tm_year > (2016 - 1900)) {
    return true;
  }

  while (count--) {
    delay(10);
    time(&now);
    localtime_r(&now, info);
    if (info->tm_year > (2016 - 1900)) {
      return true;
    }
  }
  return false;
}


void listDir(const char * dirname) {
  Serial.printf("Listing directory: %s\n", dirname);

  Dir root = LittleFS.openDir(dirname);

  while (root.next()) {
    File file = root.openFile("r");
    Serial.print("  FILE: ");
    Serial.print(root.fileName());
    Serial.print("  SIZE: ");
    Serial.print(file.size());
    time_t cr = file.getCreationTime();
    time_t lw = file.getLastWrite();
    file.close();
    struct tm * tmstruct = localtime(&cr);
    Serial.printf("    CREATION: %d-%02d-%02d %02d:%02d:%02d\n", (tmstruct->tm_year) + 1900, (tmstruct->tm_mon) + 1, tmstruct->tm_mday, tmstruct->tm_hour, tmstruct->tm_min, tmstruct->tm_sec);
    tmstruct = localtime(&lw);
    Serial.printf("  LAST WRITE: %d-%02d-%02d %02d:%02d:%02d\n", (tmstruct->tm_year) + 1900, (tmstruct->tm_mon) + 1, tmstruct->tm_mday, tmstruct->tm_hour, tmstruct->tm_min, tmstruct->tm_sec);
  }
}


void readFile(const char * path) {
  Serial.printf("Reading file: %s\n", path);

  File file = LittleFS.open(path, "r");
  if (!file) {
    Serial.println("Failed to open file for reading");
    return;
  }

  Serial.print("Read from file: ");
  while (file.available()) {
    Serial.write(file.read());
  }
  file.close();
}

void writeFile(const char * path, const char * message) {
  Serial.printf("Writing file: %s\n", path);

  File file = LittleFS.open(path, "w");
  if (!file) {
    Serial.println("Failed to open file for writing");
    return;
  }
  if (file.print(message)) {
    Serial.println("File written");
  } else {
    Serial.println("Write failed");
  }
  delay(2000); // Make sure the CREATE and LASTWRITE times are different
  file.close();
}

void appendFile(const char * path, const char * message) {
  Serial.printf("Appending to file: %s\n", path);

  File file = LittleFS.open(path, "a");
  if (!file) {
    Serial.println("Failed to open file for appending");
    return;
  }
  if (file.print(message)) {
    Serial.println("Message appended");
  } else {
    Serial.println("Append failed");
  }
  file.close();
}

void renameFile(const char * path1, const char * path2) {
  Serial.printf("Renaming file %s to %s\n", path1, path2);
  if (LittleFS.rename(path1, path2)) {
    Serial.println("File renamed");
  } else {
    Serial.println("Rename failed");
  }
}

void deleteFile(const char * path) {
  Serial.printf("Deleting file: %s\n", path);
  if (LittleFS.remove(path)) {
    Serial.println("File deleted");
  } else {
    Serial.println("Delete failed");
  }
}

void setup() {
  Serial.begin(115200);
  // We start by connecting to a WiFi network
  Serial.println();
  Serial.println();
  Serial.print("Connecting to ");
  Serial.println(ssid);

  WiFi.begin(ssid, pass);

  while (WiFi.status() != WL_CONNECTED) {
    delay(500);
    Serial.print(".");
  }
  Serial.println("WiFi connected");
  Serial.println("IP address: ");
  Serial.println(WiFi.localIP());
  Serial.println("Contacting Time Server");
  configTime(3600 * timezone, daysavetime * 3600, "time.nist.gov", "0.pool.ntp.org", "1.pool.ntp.org");
  struct tm tmstruct ;
  delay(2000);
  tmstruct.tm_year = 0;
  getLocalTime(&tmstruct, 5000);
  Serial.printf("\nNow is : %d-%02d-%02d %02d:%02d:%02d\n", (tmstruct.tm_year) + 1900, (tmstruct.tm_mon) + 1, tmstruct.tm_mday, tmstruct.tm_hour, tmstruct.tm_min, tmstruct.tm_sec);
  Serial.println("");
  Serial.println("Formatting LittleFS filesystem");
  LittleFS.format();
  Serial.println("Mount LittleFS");
  if (!LittleFS.begin()) {
    Serial.println("LittleFS mount failed");
    return;
  }
  listDir("/");
  deleteFile("/hello.txt");
  writeFile("/hello.txt", "Hello ");
  appendFile("/hello.txt", "World!\n");
  listDir("/");

  Serial.println("The timestamp should be valid above");

  Serial.println("Now unmount and remount and perform the same operation.");
  Serial.println("Timestamp should be valid, data should be good.");
  LittleFS.end();
  Serial.println("Now mount it");
  if (!LittleFS.begin()) {
    Serial.println("LittleFS mount failed");
    return;
  }
  readFile("/hello.txt");
  listDir("/");


}

void loop() { }
To test the above code, make sure to replace your WiFi name and password in the following lines:
#define STASSID "Your_WiFi_Name"
#define STAPSK  "Your_WiFi_Password"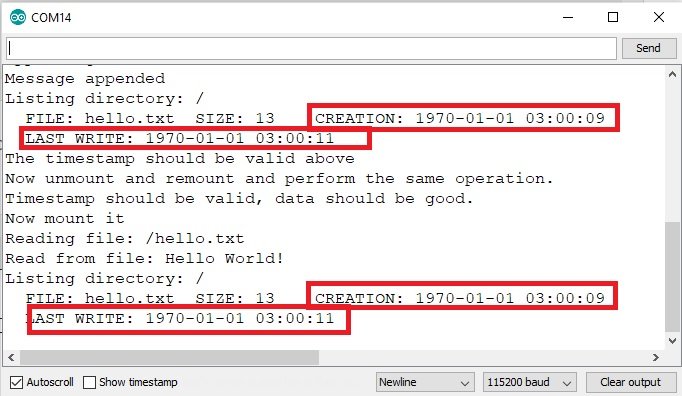
In summary:
By using the file system uploader plugin, we can easily upload files to ESP8266 NodeMCU Flash. On top of that, we can also read, write, delete and close files inside our Arduino sketch using the LittleFS.h library available in Arduino IDE. You can check the following project to learn to serve HTML, CSS files to a web client stored on the ESP8266 file system:
- ESP8266 Web Server with LittleFS (Flash File System)
More ESP8266 NodeMCU tutorials and projects:
Спасибо большое!