In this comprehensive user guide, we will learn to interface SSD1306 OLED with ESP8266 NodeMCU using Arduino IDE. We will discuss how to display simple texts, set pixels, draw lines and shapes on OLED display with ESP8266. Additionally, we will also display monochrome bitmap images on the OLED screen.
An OLED (organic light-emitting diode) is used frequently in displaying texts, bitmap images, shapes, and different types of clocks. They offer good view angles and pixel density in a cost-effective manner. At first, we will take a look at the 0.96-inch OLED display, its pinout, connections with the ESP8266 board, and then use Arduino IDE to program our module to display texts, different shapes, and bitmap images on the OLED display.
We have a similar guide with ESP32 and Arduino:
- OLED Display Interfacing with Arduino – Display Text, Draw shapes and Images
- OLED Display Interfacing with ESP32 – Display Text, Draw shapes and Images
SSD1306 0.96 inch OLED Display
OLED stands for organic light-emitting diode. Its name shows that it is a flat light emitting technology that is developed when two organic thin films are connected in series between two electric conductors. When an electric current is supplied to these conductors then the organic compound is made which emits the bright light. Typically, one conductor is the transparent conductor between these two conductors therefore there is no need for any backlight to emits the light. Therefore, this OLED display has improved image quality, full viewing angle, high brightness, better contrast, wide color range, low power consumption, more efficient and reliable as compared to a simple LCD display. It is mainly used in digital display devices such as computer monitors, mobile phones, handheld games, and televisions screens, etc.
Although there are several types of OLED displays available in the market the one which we will be using is the SSD1306 0.96-inch OLED display. The main component of all different types of OLED displays is an SSD1306 controller which uses I2C or SPI protocol to communicate with the microcontrollers. The OLED performs faster in SPI communication but it is popular with I2C communication. The reason for the popularity is the lower number of pins. The OLED displays can vary in size, color, and shape but are primarily programmed in a similar way.
Let us take a look at the OLED display which we will be using in this article. It is called SSD 1306 0.96-inch OLED display which has 128×64 pixels and communicates only via I2C protocol with the ESP development boards. It is cheap and readily available in the market.
Below you can see the pinout of this OLED Display.
Recommended Reading: Monochrome 0.96” OLED Display
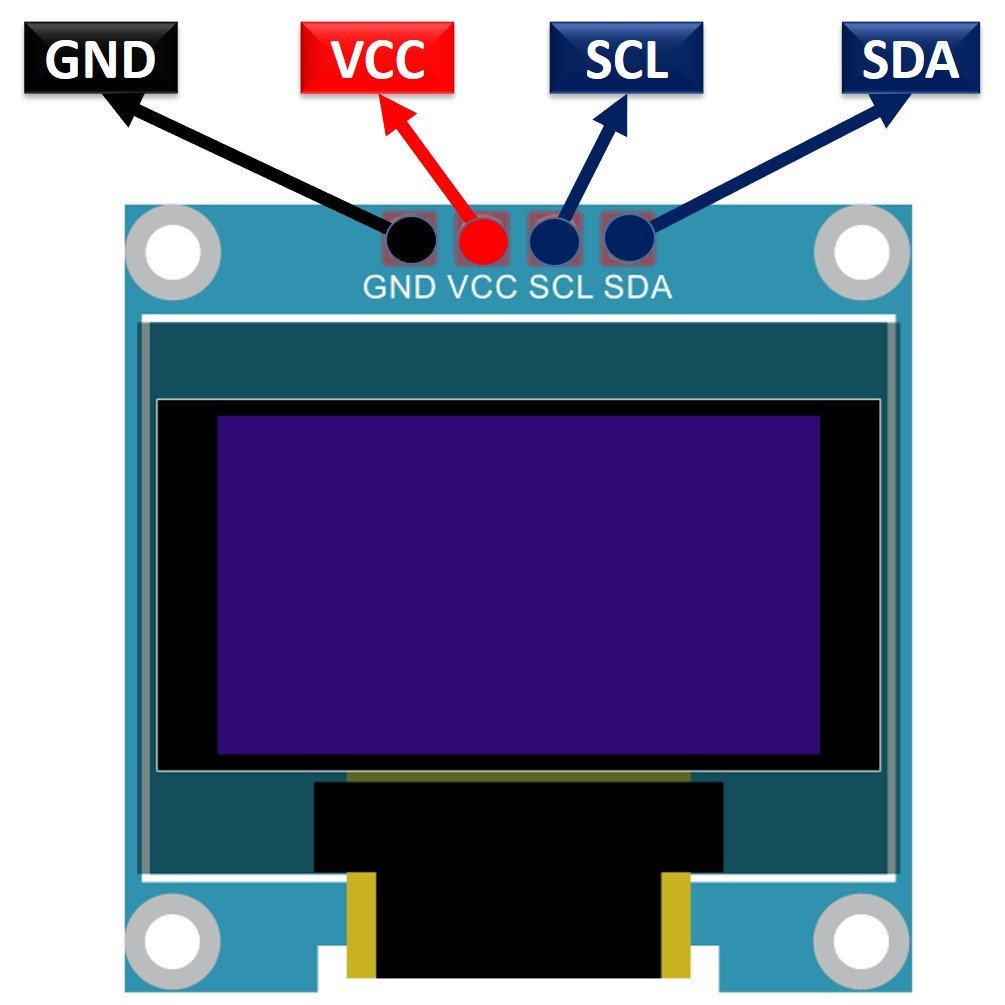
SSD1306 OLED Pinout
There are four pins in this display. Imprinted as VCC, GND, SCL, and SDA respectively. The VCC and GND pins will power the OLED display and will be connected with the ESP board’s power supply pins as they require a driving voltage of 3.3-5V. The SCL and SDA pins are necessary for generating the clock signal and in the transmission of data respectively. Both of these pins will be connected with the I2C pins of the ESP8266 board.
Now let us have a look at the specifications for this model:
| Size | 0.96 inch |
| Terminals | 4 |
| Pixels | 128×64 |
| Communication | I2C only |
| VCC | 3.3V-5V |
| Operating Temperature | -40℃ to +80℃ |
Interfacing SSD1306 OLED Display with ESP8266
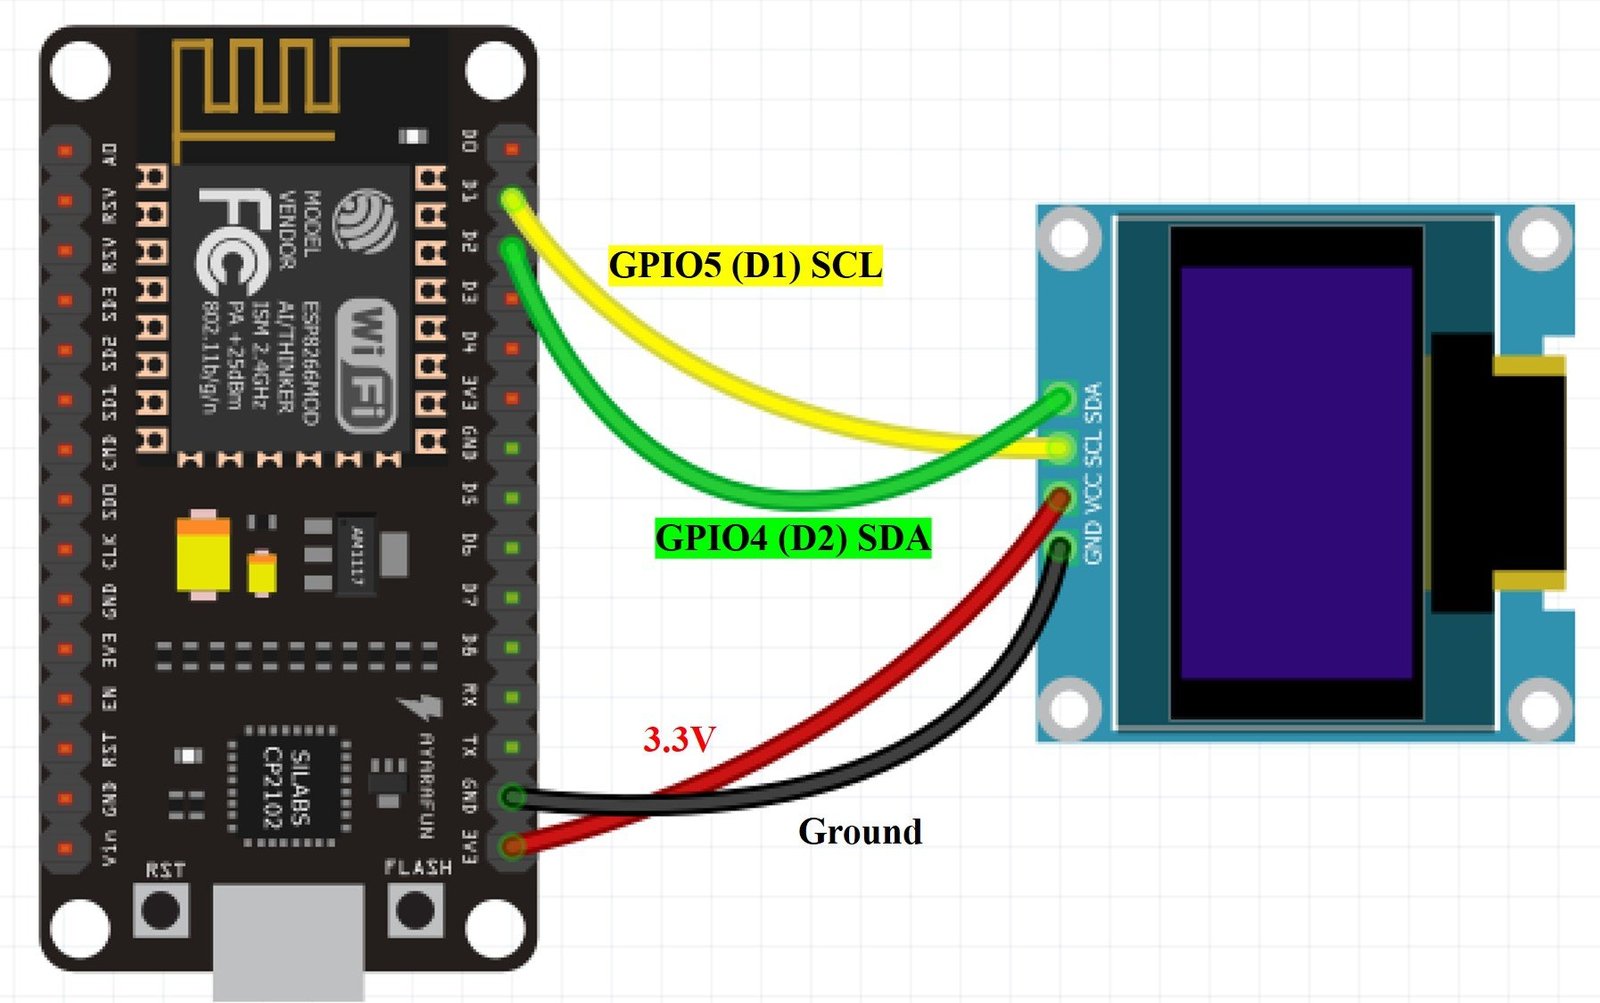
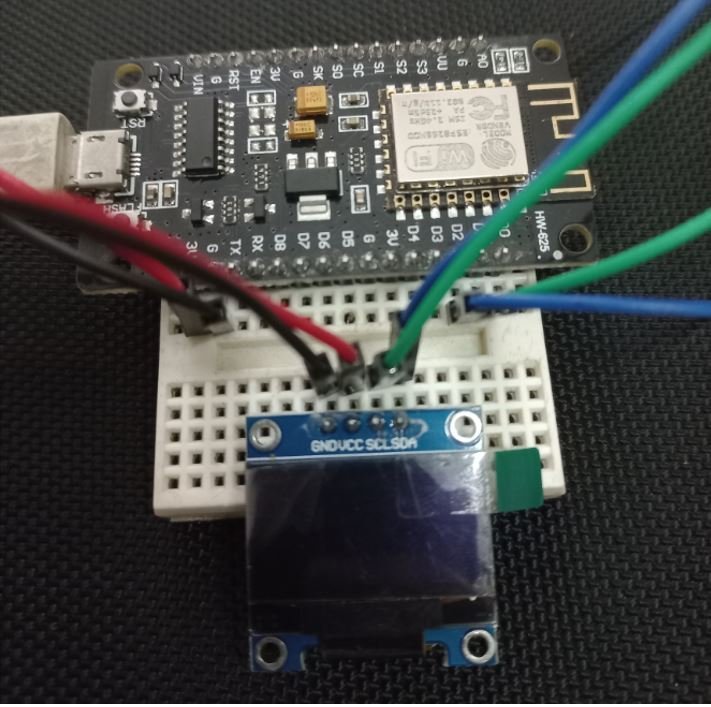
As we have seen above, the OLED display has 4 terminals which we will connect with the ESP8266 board. As the OLED display requires an operating voltage in the range of 3.3-5V hence we will connect the VCC terminal with 3.3V which will be in common with the ESP8266 board. SCL of the display will be connected with the SCL pin of the module and the SDA of the display will be connected with the SDA of the module. By default, the I2C pin in ESP8266 for SDA is GPIO4 (D2), and for SCL is GPIO5 (D1). The connections between the two devices can be seen below.
| ESP8266 board | SSD1306 OLED Display |
|---|---|
| VCC=3.3V | VCC |
| GPIO4 (D2) | SDA |
| GPIO5 (D1) | SCL |
| GND | GND |
The I2C pins stated above are set in default. If you want to use any GPIO pins for I2C, you will have to set it in code using SoftI2C().
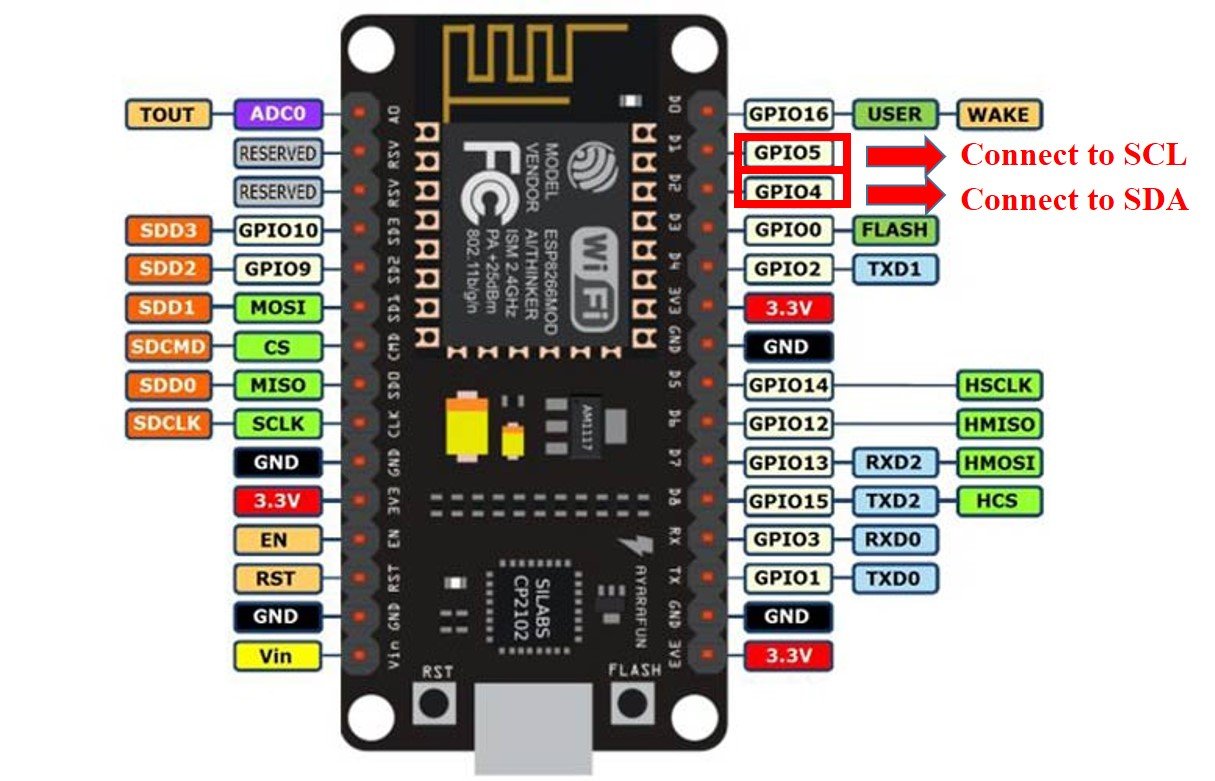
ESP8266 I2C Pins
The I2C pins stated above are set in default. If we want to change the GPIO pins we have to set them in code. The diagram below shows the pinout for the ESP8266.
Components Required:
We will need the following components to connect our ESP8266 board with the OLED Display.
- ESP8266 board
- SSD1306 OLED Display
- Connecting Wires
- Breadboard
Schematic ESP8266 with OLED
Follow the schematic diagram below for the ESP8266 module and connect them accordingly.
Installing OLED Library in Arduino IDE
We will use Arduino IDE to program our ESP8266 development board. Thus, you should have the latest version of Arduino IDE. Additionally, you also need to install the ESP8266 plugin.
If your IDE does not have the plugin installed you can visit the link below: Installing ESP8266 library in Arduino IDE and upload code
To use the OLED display in our project, we have to install the Adafruit SSD 1306 library and Adafruit GFX library in Arduino IDE. Follow the steps below to successfully install them.
Open Arduino IDE and click on Sketch > Library > Manage Libraries
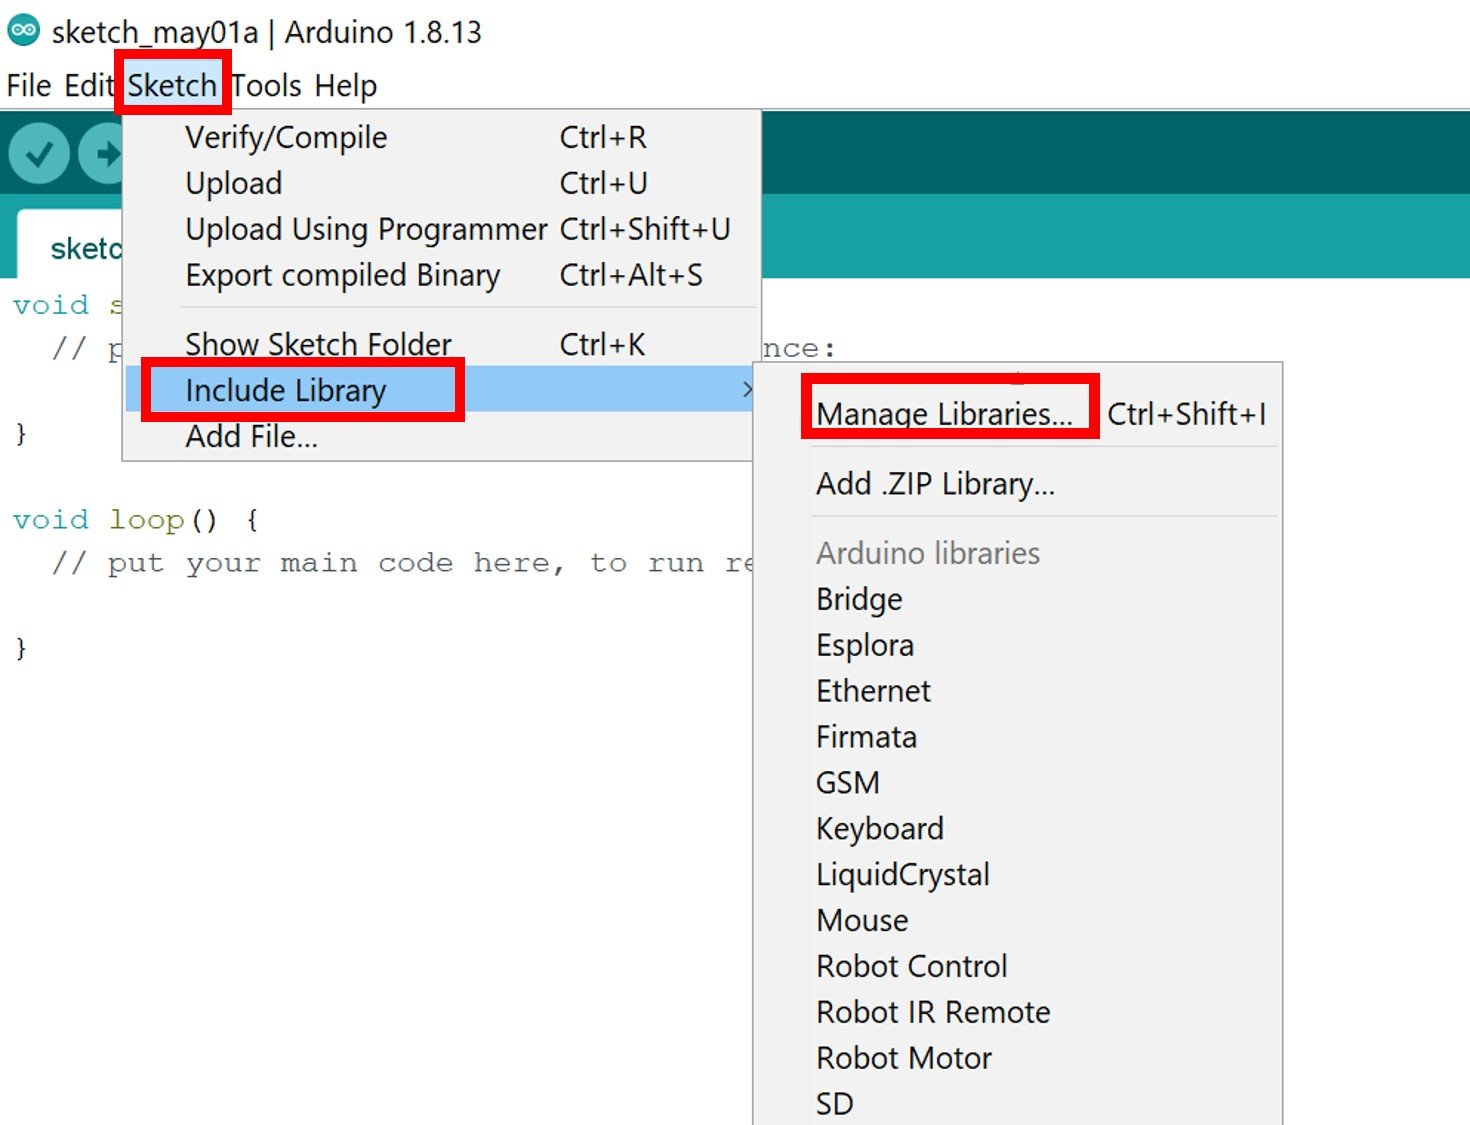
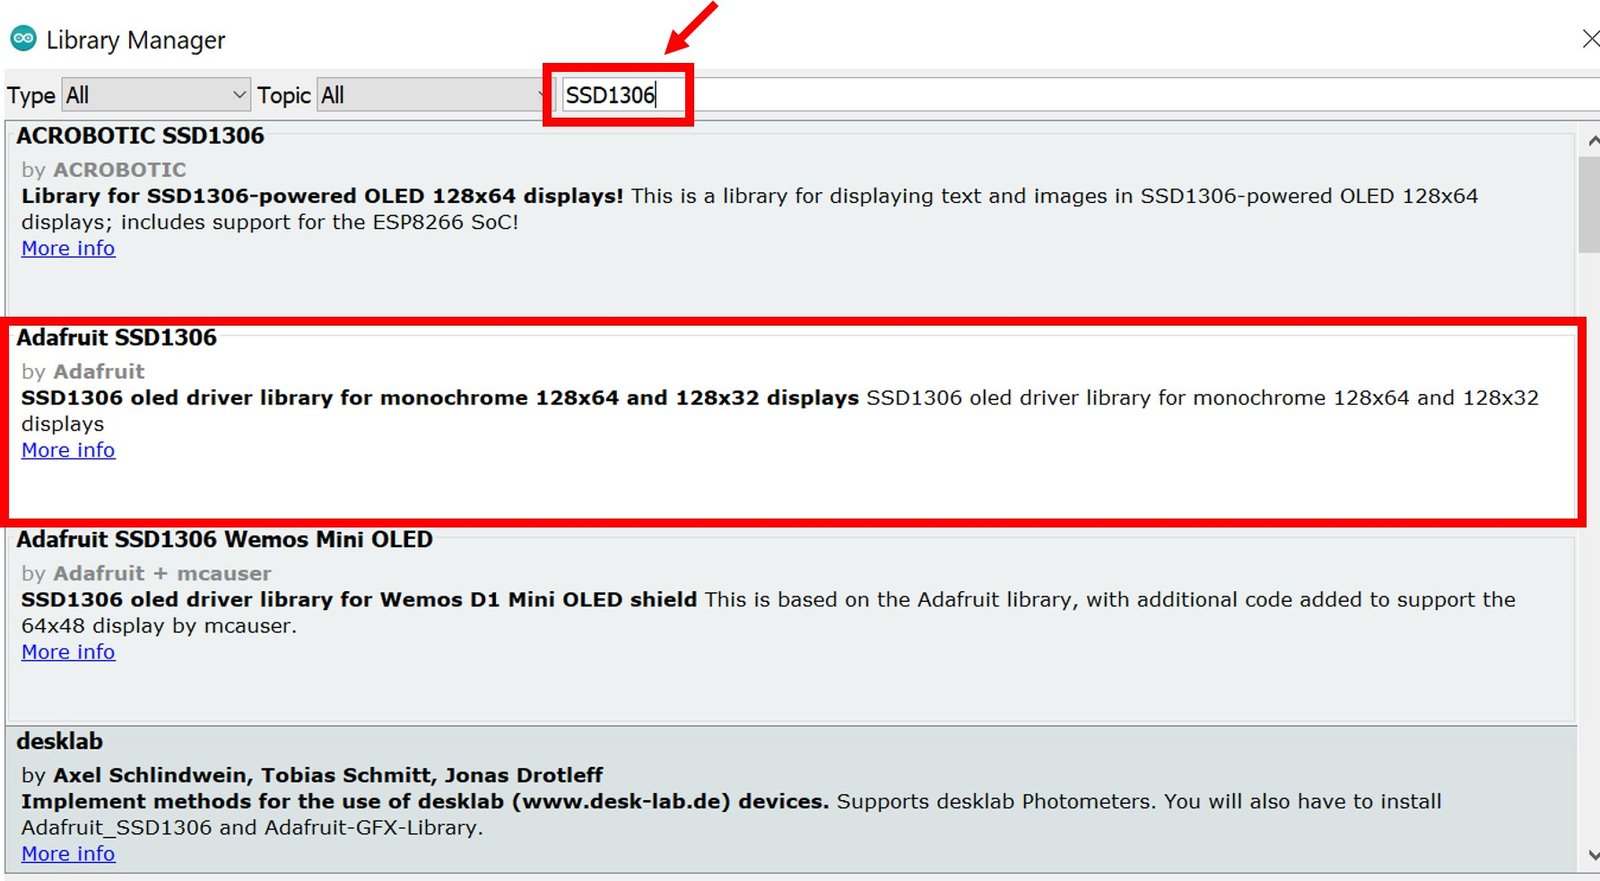
The following window will open up.

Type ‘SSD1306’ in the search tab and install the Adafruit SSD1306 OLED library.
We will also require the Adafruit GFX library which is a dependency for SSD1306. Type ‘Adafruit GFX’ in the search tab and install it as well.
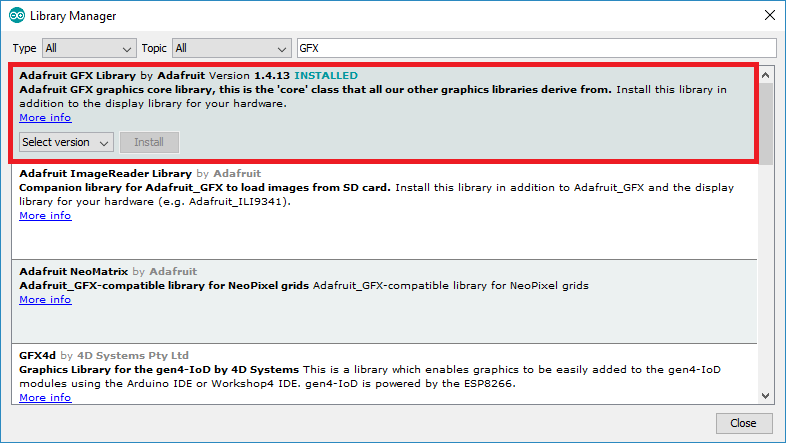
After installing the libraries, restart your IDE.
Arduino Sketch: Finding SSD1306 OLED Display’s Address
The sketch below scans for I2C devices and displays their addresses in the serial monitor. We will be able to find the address of our OLED display through this sketch. This will help us in the program codes which we will demonstrate later on.
Open your Arduino IDE and go to File > New. A new file will open. Copy the code given below in that file and save it.
#include <Wire.h>
void setup() {
Wire.begin();
Serial.begin(115200);
}
void loop() {
byte Error, address;
int DeviceCount;
Serial.println("Scanning I2C devices...");
DeviceCount = 0;
for(address = 1; address < 127; address++ ) {
Wire.beginTransmission(address);
Error = Wire.endTransmission();
if (Error == 0) {
Serial.print("I2C device found at address 0x");
if (address<16) {
Serial.print("0");
}
Serial.println(address,HEX);
DeviceCount++;
}
else if (Error==4) {
Serial.print("Unknown Error at address 0x");
if (address<16) {
Serial.print("0");
}
Serial.println(address,HEX);
}
}
if (DeviceCount == 0) {
Serial.println("No I2C devices found!");
}
else {
Serial.println("Success!\n");
}
delay(5000);
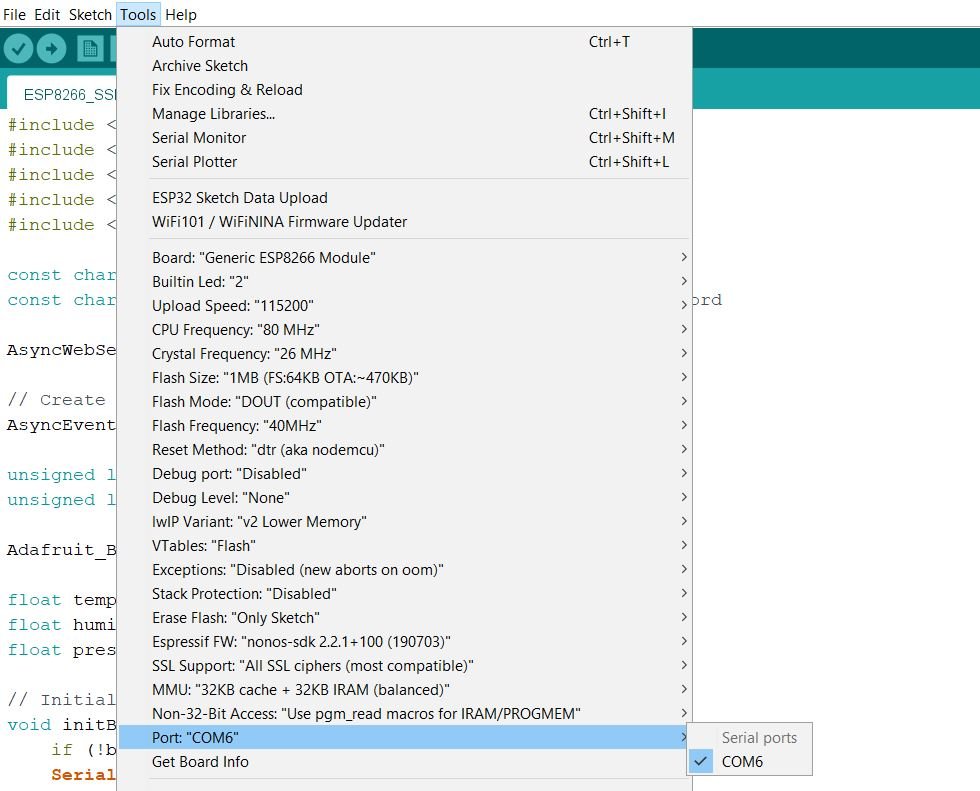
}To see the demonstration of the above code, upload the code to your board. Before uploading the code, make sure to select NodeMCU 1.0 from Tools > Board and also select the correct COM port to which the ESP8266 board is connected from Tools > Port.
Once the code is uploaded to ESP8266, open the serial monitor of Arduino IDE and set the baud rate to 115200. Finally, we can see the address of our OLED display as shown below:
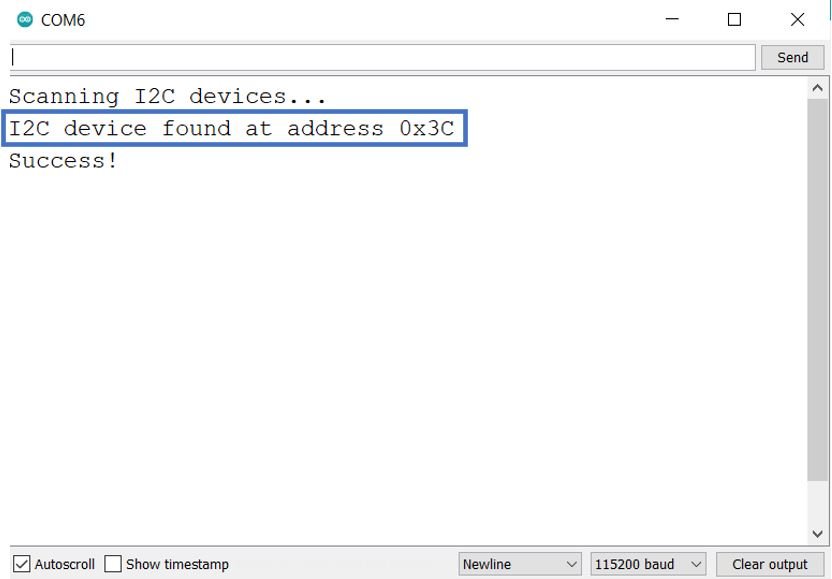
Our OLED address is 0x3C. Check the address of your OLED display as well before proceeding further.
Testing SSD1306 OLED Display with Example Sketch
Now after assembling the OLED display and the ESP8266 board together, let us proceed with an example sketch from the Adafruit SSD1306 library to test whether our OLED display is working fine or not.
Open your Arduino IDE and go to File > Examples > Adafruit SSD1306 > ssd1306_128x64_i2c. The following program code will open. This example sketch will display different texts/shapes on the OLED.
/**************************************************************************
 This is an example for our Monochrome OLEDs based on SSD1306 drivers

 Pick one up today in the adafruit shop!
 ------> http://www.adafruit.com/category/63_98

 This example is for a 128x64 pixel display using I2C to communicate
 3 pins are required to interface (two I2C and one reset).

 Adafruit invests time and resources providing this open
 source code, please support Adafruit and open-source
 hardware by purchasing products from Adafruit!

 Written by Limor Fried/Ladyada for Adafruit Industries,
 with contributions from the open source community.
 BSD license, check license.txt for more information
 All text above, and the splash screen below must be
 included in any redistribution.
 **************************************************************************/

#include <SPI.h>
#include <Wire.h>
#include <Adafruit_GFX.h>
#include <Adafruit_SSD1306.h>

#define SCREEN_WIDTH 128 // OLED display width, in pixels
#define SCREEN_HEIGHT 64 // OLED display height, in pixels

// Declaration for an SSD1306 display connected to I2C (SDA, SCL pins)
// The pins for I2C are defined by the Wire-library.
// On an arduino UNO:       A4(SDA), A5(SCL)
// On an arduino MEGA 2560: 20(SDA), 21(SCL)
// On an arduino LEONARDO:   2(SDA),  3(SCL), ...
#define OLED_RESET     -1 // Reset pin # (or -1 if sharing Arduino reset pin)
#define SCREEN_ADDRESS 0x3C ///< See datasheet for Address; 0x3D for 128x64, 0x3C for 128x32
Adafruit_SSD1306 display(SCREEN_WIDTH, SCREEN_HEIGHT, &Wire, OLED_RESET);

#define NUMFLAKES     10 // Number of snowflakes in the animation example

#define LOGO_HEIGHT   16
#define LOGO_WIDTH    16
static const unsigned char PROGMEM logo_bmp[] =
{ 0b00000000, 0b11000000,
  0b00000001, 0b11000000,
  0b00000001, 0b11000000,
  0b00000011, 0b11100000,
  0b11110011, 0b11100000,
  0b11111110, 0b11111000,
  0b01111110, 0b11111111,
  0b00110011, 0b10011111,
  0b00011111, 0b11111100,
  0b00001101, 0b01110000,
  0b00011011, 0b10100000,
  0b00111111, 0b11100000,
  0b00111111, 0b11110000,
  0b01111100, 0b11110000,
  0b01110000, 0b01110000,
  0b00000000, 0b00110000 };

void setup() {
  Serial.begin(9600);

  // SSD1306_SWITCHCAPVCC = generate display voltage from 3.3V internally
  if(!display.begin(SSD1306_SWITCHCAPVCC, SCREEN_ADDRESS)) {
    Serial.println(F("SSD1306 allocation failed"));
    for(;;); // Don't proceed, loop forever
  }

  // Show initial display buffer contents on the screen --
  // the library initializes this with an Adafruit splash screen.
  display.display();
  delay(2000); // Pause for 2 seconds

  // Clear the buffer
  display.clearDisplay();

  // Draw a single pixel in white
  display.drawPixel(10, 10, SSD1306_WHITE);

  // Show the display buffer on the screen. You MUST call display() after
  // drawing commands to make them visible on screen!
  display.display();
  delay(2000);
  // display.display() is NOT necessary after every single drawing command,
  // unless that's what you want...rather, you can batch up a bunch of
  // drawing operations and then update the screen all at once by calling
  // display.display(). These examples demonstrate both approaches...

  testdrawline();      // Draw many lines

  testdrawrect();      // Draw rectangles (outlines)

  testfillrect();      // Draw rectangles (filled)

  testdrawcircle();    // Draw circles (outlines)

  testfillcircle();    // Draw circles (filled)

  testdrawroundrect(); // Draw rounded rectangles (outlines)

  testfillroundrect(); // Draw rounded rectangles (filled)

  testdrawtriangle();  // Draw triangles (outlines)

  testfilltriangle();  // Draw triangles (filled)

  testdrawchar();      // Draw characters of the default font

  testdrawstyles();    // Draw 'stylized' characters

  testscrolltext();    // Draw scrolling text

  testdrawbitmap();    // Draw a small bitmap image

  // Invert and restore display, pausing in-between
  display.invertDisplay(true);
  delay(1000);
  display.invertDisplay(false);
  delay(1000);

  testanimate(logo_bmp, LOGO_WIDTH, LOGO_HEIGHT); // Animate bitmaps
}

void loop() {
}

void testdrawline() {
  int16_t i;

  display.clearDisplay(); // Clear display buffer

  for(i=0; i<display.width(); i+=4) {
    display.drawLine(0, 0, i, display.height()-1, SSD1306_WHITE);
    display.display(); // Update screen with each newly-drawn line
    delay(1);
  }
  for(i=0; i<display.height(); i+=4) {
    display.drawLine(0, 0, display.width()-1, i, SSD1306_WHITE);
    display.display();
    delay(1);
  }
  delay(250);

  display.clearDisplay();

  for(i=0; i<display.width(); i+=4) {
    display.drawLine(0, display.height()-1, i, 0, SSD1306_WHITE);
    display.display();
    delay(1);
  }
  for(i=display.height()-1; i>=0; i-=4) {
    display.drawLine(0, display.height()-1, display.width()-1, i, SSD1306_WHITE);
    display.display();
    delay(1);
  }
  delay(250);

  display.clearDisplay();

  for(i=display.width()-1; i>=0; i-=4) {
    display.drawLine(display.width()-1, display.height()-1, i, 0, SSD1306_WHITE);
    display.display();
    delay(1);
  }
  for(i=display.height()-1; i>=0; i-=4) {
    display.drawLine(display.width()-1, display.height()-1, 0, i, SSD1306_WHITE);
    display.display();
    delay(1);
  }
  delay(250);

  display.clearDisplay();

  for(i=0; i<display.height(); i+=4) {
    display.drawLine(display.width()-1, 0, 0, i, SSD1306_WHITE);
    display.display();
    delay(1);
  }
  for(i=0; i<display.width(); i+=4) {
    display.drawLine(display.width()-1, 0, i, display.height()-1, SSD1306_WHITE);
    display.display();
    delay(1);
  }

  delay(2000); // Pause for 2 seconds
}

void testdrawrect(void) {
  display.clearDisplay();

  for(int16_t i=0; i<display.height()/2; i+=2) {
    display.drawRect(i, i, display.width()-2*i, display.height()-2*i, SSD1306_WHITE);
    display.display(); // Update screen with each newly-drawn rectangle
    delay(1);
  }

  delay(2000);
}

void testfillrect(void) {
  display.clearDisplay();

  for(int16_t i=0; i<display.height()/2; i+=3) {
    // The INVERSE color is used so rectangles alternate white/black
    display.fillRect(i, i, display.width()-i*2, display.height()-i*2, SSD1306_INVERSE);
    display.display(); // Update screen with each newly-drawn rectangle
    delay(1);
  }

  delay(2000);
}

void testdrawcircle(void) {
  display.clearDisplay();

  for(int16_t i=0; i<max(display.width(),display.height())/2; i+=2) {
    display.drawCircle(display.width()/2, display.height()/2, i, SSD1306_WHITE);
    display.display();
    delay(1);
  }

  delay(2000);
}

void testfillcircle(void) {
  display.clearDisplay();

  for(int16_t i=max(display.width(),display.height())/2; i>0; i-=3) {
    // The INVERSE color is used so circles alternate white/black
    display.fillCircle(display.width() / 2, display.height() / 2, i, SSD1306_INVERSE);
    display.display(); // Update screen with each newly-drawn circle
    delay(1);
  }

  delay(2000);
}

void testdrawroundrect(void) {
  display.clearDisplay();

  for(int16_t i=0; i<display.height()/2-2; i+=2) {
    display.drawRoundRect(i, i, display.width()-2*i, display.height()-2*i,
      display.height()/4, SSD1306_WHITE);
    display.display();
    delay(1);
  }

  delay(2000);
}

void testfillroundrect(void) {
  display.clearDisplay();

  for(int16_t i=0; i<display.height()/2-2; i+=2) {
    // The INVERSE color is used so round-rects alternate white/black
    display.fillRoundRect(i, i, display.width()-2*i, display.height()-2*i,
      display.height()/4, SSD1306_INVERSE);
    display.display();
    delay(1);
  }

  delay(2000);
}

void testdrawtriangle(void) {
  display.clearDisplay();

  for(int16_t i=0; i<max(display.width(),display.height())/2; i+=5) {
    display.drawTriangle(
      display.width()/2  , display.height()/2-i,
      display.width()/2-i, display.height()/2+i,
      display.width()/2+i, display.height()/2+i, SSD1306_WHITE);
    display.display();
    delay(1);
  }

  delay(2000);
}

void testfilltriangle(void) {
  display.clearDisplay();

  for(int16_t i=max(display.width(),display.height())/2; i>0; i-=5) {
    // The INVERSE color is used so triangles alternate white/black
    display.fillTriangle(
      display.width()/2  , display.height()/2-i,
      display.width()/2-i, display.height()/2+i,
      display.width()/2+i, display.height()/2+i, SSD1306_INVERSE);
    display.display();
    delay(1);
  }

  delay(2000);
}

void testdrawchar(void) {
  display.clearDisplay();

  display.setTextSize(1);      // Normal 1:1 pixel scale
  display.setTextColor(SSD1306_WHITE); // Draw white text
  display.setCursor(0, 0);     // Start at top-left corner
  display.cp437(true);         // Use full 256 char 'Code Page 437' font

  // Not all the characters will fit on the display. This is normal.
  // Library will draw what it can and the rest will be clipped.
  for(int16_t i=0; i<256; i++) {
    if(i == '\n') display.write(' ');
    else          display.write(i);
  }

  display.display();
  delay(2000);
}

void testdrawstyles(void) {
  display.clearDisplay();

  display.setTextSize(1);             // Normal 1:1 pixel scale
  display.setTextColor(SSD1306_WHITE);        // Draw white text
  display.setCursor(0,0);             // Start at top-left corner
  display.println(F("Hello, world!"));

  display.setTextColor(SSD1306_BLACK, SSD1306_WHITE); // Draw 'inverse' text
  display.println(3.141592);

  display.setTextSize(2);             // Draw 2X-scale text
  display.setTextColor(SSD1306_WHITE);
  display.print(F("0x")); display.println(0xDEADBEEF, HEX);

  display.display();
  delay(2000);
}

void testscrolltext(void) {
  display.clearDisplay();

  display.setTextSize(2); // Draw 2X-scale text
  display.setTextColor(SSD1306_WHITE);
  display.setCursor(10, 0);
  display.println(F("scroll"));
  display.display();      // Show initial text
  delay(100);

  // Scroll in various directions, pausing in-between:
  display.startscrollright(0x00, 0x0F);
  delay(2000);
  display.stopscroll();
  delay(1000);
  display.startscrollleft(0x00, 0x0F);
  delay(2000);
  display.stopscroll();
  delay(1000);
  display.startscrolldiagright(0x00, 0x07);
  delay(2000);
  display.startscrolldiagleft(0x00, 0x07);
  delay(2000);
  display.stopscroll();
  delay(1000);
}

void testdrawbitmap(void) {
  display.clearDisplay();

  display.drawBitmap(
    (display.width()  - LOGO_WIDTH ) / 2,
    (display.height() - LOGO_HEIGHT) / 2,
    logo_bmp, LOGO_WIDTH, LOGO_HEIGHT, 1);
  display.display();
  delay(1000);
}

#define XPOS   0 // Indexes into the 'icons' array in function below
#define YPOS   1
#define DELTAY 2

void testanimate(const uint8_t *bitmap, uint8_t w, uint8_t h) {
  int8_t f, icons[NUMFLAKES][3];

  // Initialize 'snowflake' positions
  for(f=0; f< NUMFLAKES; f++) {
    icons[f][XPOS]   = random(1 - LOGO_WIDTH, display.width());
    icons[f][YPOS]   = -LOGO_HEIGHT;
    icons[f][DELTAY] = random(1, 6);
    Serial.print(F("x: "));
    Serial.print(icons[f][XPOS], DEC);
    Serial.print(F(" y: "));
    Serial.print(icons[f][YPOS], DEC);
    Serial.print(F(" dy: "));
    Serial.println(icons[f][DELTAY], DEC);
  }

  for(;;) { // Loop forever...
    display.clearDisplay(); // Clear the display buffer

    // Draw each snowflake:
    for(f=0; f< NUMFLAKES; f++) {
      display.drawBitmap(icons[f][XPOS], icons[f][YPOS], bitmap, w, h, SSD1306_WHITE);
    }

    display.display(); // Show the display buffer on the screen
    delay(200);        // Pause for 1/10 second

    // Then update coordinates of each flake...
    for(f=0; f< NUMFLAKES; f++) {
      icons[f][YPOS] += icons[f][DELTAY];
      // If snowflake is off the bottom of the screen...
      if (icons[f][YPOS] >= display.height()) {
        // Reinitialize to a random position, just off the top
        icons[f][XPOS]   = random(1 - LOGO_WIDTH, display.width());
        icons[f][YPOS]   = -LOGO_HEIGHT;
        icons[f][DELTAY] = random(1, 6);
      }
    }
  }
}
Modifications to the example sketch
We will have to modify two lines in this example sketch according to our OLED display model.
- As we are using 128X64 OLED Display with 4 pins (GND, VCC, SDA and SCL) thus it does not contain the reset pin. Define the ‘OLED_RESET’ to -1 as we are not using the reset pin. By default, it was set to 4.
#define OLED_RESET -1 // Reset pin # (or -1 if sharing Arduino reset pin)- Secondly, while defining the address of the OLED display use the address you obtained from the previous sketch. In our case, it was ‘0x3C’ so we will replace the address accordingly. By default ‘SCREEN_ADDRESS’ was set as ‘0x3D.’
#define SCREEN_ADDRESS 0x3CDemonstration
To see the demonstration of the above code, upload the code to your board. Before uploading the code, make sure to select NodeMCU 1.0 from Tools > Board and also select the correct COM port to which the ESP8266 board is connected from Tools > Port.
Once the code is uploaded to ESP8266, the OLED Display will start displaying various texts/shapes on its screen. You can have a look at it in the video given below.
Arduino Sketch: Displaying Simple Text on OLED Display
Now we will proceed further and learn how to display simple text on the OLED display. We will be using the Adafruit SSD1306 library to access useful functions to show you how to display texts easily on the OLED.
Open your Arduino IDE and go to File > New to open a new file. Copy the code given below in that file.
This sketch will display ‘Welcome!’ on the OLED display.
#include <Wire.h>
#include <Adafruit_GFX.h>
#include <Adafruit_SSD1306.h>

#define SCREEN_WIDTH 128
#define SCREEN_HEIGHT 64

Adafruit_SSD1306 display(SCREEN_WIDTH, SCREEN_HEIGHT, &Wire, -1);

void setup() {
  Serial.begin(115200);
  display.begin(SSD1306_SWITCHCAPVCC, 0x3C);
  display.clearDisplay();

  //Display Text
  display.setTextSize(1);
  display.setTextColor(WHITE);
  display.setCursor(0, 10);
  display.println("Welcome!");
  display.display();
}

void loop() {

}
How the Code Works?
Now let us understand how each part of the code works.
Including Libraries
Firstly, we will include all the following libraries which are required for this project. Wire.h will allow us to communicate through the I2C protocol. Whereas the other libraries are the ones which we previously installed and are required for the proper functionality of the OLED display.
#include <Wire.h>
#include <Adafruit_GFX.h>
#include <Adafruit_SSD1306.h>
Defining OLED Display
We will first define the width and height of our OLED display in pixels. We are using a 128×64 display hence the width will be 128 and the height will be 64.
#define SCREEN_WIDTH 128
#define SCREEN_HEIGHT 64
Next, we will initialize the display by creating an object of Adafruit_SSD1306 and specifying the width, height, I2C instance (&Wire), and -1 as parameters inside it.’ -1′ specifies that the OLED display which we are using does not have a RESET pin. If you are using the RESET pin then specify the GPIO through which you are connecting it with your development board.
Adafruit_SSD1306 display(SCREEN_WIDTH, SCREEN_HEIGHT, &Wire, -1);setup() function
Inside the setup() function, we will open a serial connection at a baud rate of 115200. Moreover, we will also initialize the OLED display by using display.begin(). Make sure you specify the correct address of your display. In our case, it is 0X3C.
Serial.begin(115200);
display.begin(SSD1306_SWITCHCAPVCC, 0x3C);
Then, we will clear the buffer by using clearDisplay() on the Adafruit_SSD1306 object.
display.clearDisplay();Displaying Text
To show the text on the OLED the following commands will help. In the text display command the fonts, size, and types are changeable.
First, we will set the size of the text using setTextSize() and pass the size as a parameter inside it. 1 denotes the smallest size and it increases relatively after incrementing it. We have set the font size as default which is 1. Whenever we increase the size by +1, the pixel resolution of the text increases by 10 in height.
Next, we will control the color of the text by using the setTextColor() function and passing WHITE as an argument. If we have a dark background, we will display our text in white and if we have a bright background then we will display the text in black.
We will use the setCursor() function to denote the x and the y axis position from where the text should start. We have passed (0,10) as the parameter hence the text starts from the upper left corner downwards. The first parameter is the x-axis position that (+x) increases towards the right. The second parameter is the y-axis position that (+y) increases downwards.
Then by using println() we will pass the text which we want to display on the OLED. It is ‘Welcome!’ in our case. You can display any message. Just specify it like you do when printing strings/variables of serial objects.
Finally, we will call the display() function on the display object so that the text displays on the OLED.
  display.setTextSize(1);
  display.setTextColor(WHITE);
  display.setCursor(0, 10);
  display.println("Welcome!");
  display.display();
Demonstration
To see the demonstration of the above code, upload the code to ESP8266. Before uploading the code, make sure to select NodeMCU 1.0 from Tools > Board.

Also, select the correct COM port to which the ESP8266 board is connected from Tools > Port.
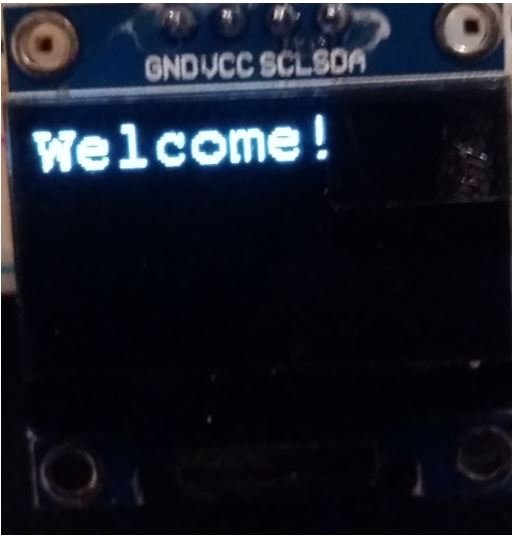
Once the code is uploaded to ESP8266, the OLED Display will start displaying the text on its screen. You can have a look at it in the picture given below.

Arduino Sketch: Scrolling Text OLED
Open your Arduino IDE and go to File > New to open a new file. Copy the code given below in that file.
This sketch will scroll the ‘Welcome!’ text in all directions (left to right, right to left, left bottom corner to right upper corner, right bottom corner to left upper corner) on the OLED screen.
#include <Wire.h>
#include <Adafruit_GFX.h>
#include <Adafruit_SSD1306.h>

#define SCREEN_WIDTH 128
#define SCREEN_HEIGHT 64

Adafruit_SSD1306 display(SCREEN_WIDTH, SCREEN_HEIGHT, &Wire, -1);

void setup() {
  Serial.begin(115200);

  display.begin(SSD1306_SWITCHCAPVCC, 0x3C);
  display.clearDisplay();

  display.setTextSize(2);
  display.setTextColor(WHITE);
  display.setCursor(0, 0);
  display.println("Welcome!");
  display.display();
  delay(100);

}

void loop() {
  display.startscrollright(0x00, 0x0F);

  delay(2000);

  display.stopscroll();
  delay(1000);
  display.startscrollleft(0x00, 0x0F);

  delay(2000);
  display.stopscroll();
  delay(1000);
  display.startscrolldiagright(0x00, 0x07);

  delay(2000);
  display.startscrolldiagleft(0x00, 0x07);

  delay(2000);
  display.stopscroll();
  delay(1000);
}
We will discuss the parts where we are incorporating the scrolling feature. Rest of the code is similar to the one which we discussed above.
loop()
In the loop() function, we will include the scrolling functionality so it runs indefinitely. After every 2 seconds, we will change the orientation of the scrolling and stop for 1 second in between.
Firstly, we will scroll the ‘Welcome!’ text from left to right across the screen. This is achieved by using the startscrollright() function and 0x00 as the first parameter and 0x0F as the second parameter. The first parameter indicates the start page and the second parameter indicates the stop page. To know more about this refer to the OLED Memory Map section for more information.
display.startscrollright(0x00, 0x0F);In between we will use stopscroll() function, to stop the scrolling and move to the next orientation.
display.stopscroll();Secondly, we will scroll the ‘Welcome!’ text from right to left across the screen. This is achieved by using the startscrollleft() function and 0x00 as the first parameter and 0x0F as the second parameter. The first parameter indicates the start page and the second parameter indicates the stop page.
display.startscrollleft(0x00, 0x0F);Thirdly, we will scroll the ‘Welcome!’ text from left bottom corner to right upper corner. This is achieved by using the startscrolldiagright() function and 0x00 as the first parameter and 0x07 as the second parameter. The first parameter indicates the start page and the second parameter indicates the stop page.
display.startscrolldiagright(0x00, 0x07);Lastly, we will scroll the ‘Welcome!’ text from right bottom corner to left upper corner. This is achieved by using the startscrolldiagleft() function and 0x00 as the first parameter and 0x07 as the second parameter. The first parameter indicates the start page and the second parameter indicates the stop page.
display.startscrolldiagleft(0x00, 0x07);OLED Changing Fonts Type and Size
We can also use different fonts (Serif, Sans, and Mono) to display our texts on the OLED display. But in this case, the setTextSize() method does not set the sizes of the fonts instead the fonts come in different point sizes including 9, 12, 18, and 24.
Font Types
We can use the following fonts:
- FreeMono12pt7b.h
- FreeSansBoldOblique12pt7b.h
FreeMono18pt7b.h - FreeSansBoldOblique18pt7b.h
FreeMono24pt7b.h - FreeSansBoldOblique24pt7b.h
FreeMono9pt7b.h - FreeSansBoldOblique9pt7b.h
FreeMonoBold12pt7b.h - FreeSansOblique12pt7b.h
FreeMonoBold18pt7b.h - FreeSansOblique18pt7b.h
FreeMonoBold24pt7b.h - FreeSansOblique24pt7b.h
FreeMonoBold9pt7b.h - FreeSansOblique9pt7b.h
FreeMonoBoldOblique12pt7b.h - FreeSerif12pt7b.h
FreeMonoBoldOblique18pt7b.h - FreeSerif18pt7b.h
FreeMonoBoldOblique24pt7b.h - FreeSerif24pt7b.h
FreeMonoBoldOblique9pt7b.h - FreeSerif9pt7b.h
FreeMonoOblique12pt7b.h - FreeSerifBold12pt7b.h
FreeMonoOblique18pt7b.h - FreeSerifBold18pt7b.h
FreeMonoOblique24pt7b.h - FreeSerifBold24pt7b.h
FreeMonoOblique9pt7b.h - FreeSerifBold9pt7b.h
FreeSans12pt7b.h - FreeSerifBoldItalic12pt7b.h
FreeSans18pt7b.h - FreeSerifBoldItalic18pt7b.h
FreeSans24pt7b.h - FreeSerifBoldItalic24pt7b.h
FreeSans9pt7b.h - FreeSerifBoldItalic9pt7b.h
FreeSansBold12pt7b.h - FreeSerifItalic12pt7b.h
FreeSansBold18pt7b.h - FreeSerifItalic18pt7b.h
- FreeSansBold24pt7b.h
- FreeSerifItalic24pt7b.h
FreeSansBold9pt7b.h - FreeSerifItalic9pt7b.h
It is advisable to use fonts that have a point size of 9 or 12. We will be using FreeMono9pt7b font to demonstrate how to change the font from the default one.
Arduino sketch: Changing Fonts
Open your Arduino IDE and go to File > New to open a new file. Copy the code given below in that file.
This sketch shows you how to change the font to FreeMono9pt7b.
#include <Wire.h>
#include <Adafruit_GFX.h>
#include <Adafruit_SSD1306.h>
#include <Fonts/FreeMono9pt7b.h>

#define SCREEN_WIDTH 128
#define SCREEN_HEIGHT 64

Adafruit_SSD1306 display(SCREEN_WIDTH, SCREEN_HEIGHT, &Wire, -1);

void setup() {
  Serial.begin(115200);
  display.begin(SSD1306_SWITCHCAPVCC, 0x3C);
  display.setFont(&FreeMono9pt7b);
  display.clearDisplay();
  display.setTextColor(WHITE);
  display.setCursor(0,10);
  display.println("Welcome!");
  display.display();
  delay(2000);
}
void loop() {

}
To incorporate a different font, we will have to include it at the start of our program code. As we will be using the font FreeMono9pt7b, thus we will add the following line while we are including the libraries.
#include <Fonts/FreeMono9pt7b.h>Next, we will use setFont() method and pass the font that we want to use as a parameter inside it. This will enable this font. Now we will be able to display any text in this font.
display.setFont(&FreeMono9pt7b);Demonstration
To see the demonstration of the above code, upload the code to your board. Before uploading the code, make sure to select NodeMCU 1.0 from Tools > Board and also select the correct COM port to which the ESP8266 board is connected from Tools > Port.
Once the code is uploaded to ESP8266, the OLED display will display the ‘Welcome!’ text in the new font which we have set. You can view it in the picture below.
Likewise, you can change all the different fonts which we listed above in a similar manner.
Draw Pixels, Lines and Shapes on OLED with ESP8266 NodeMCU
Now let us move ahead and learn how to display pixels, lines, and different shapes on the OLED display. By the end of this section you will be able to display the following on your OLED screen:
- Pixel
- Line
- Rectangle (Unfilled, Filled and Rounded)
- Circle (Unfilled and Filled)
- Triangle (Unfilled and Filled)
- Inverting the display colours (Dark/Bright)
Arduino Sketch
Open your Arduino IDE and go to File > New to open a new file. Copy the code given below in that file.
This sketch will display all the above listed illustrations after a delay of 2 seconds.
#include <Wire.h>
#include <Adafruit_GFX.h>
#include <Adafruit_SSD1306.h>

#define SCREEN_WIDTH 128
#define SCREEN_HEIGHT 64

Adafruit_SSD1306 display(SCREEN_WIDTH, SCREEN_HEIGHT, &Wire, -1);

void setup() {
  Serial.begin(115200);
  display.begin(SSD1306_SWITCHCAPVCC, 0x3C);
  display.clearDisplay();

  // Draw a single pixel in white
  display.drawPixel(64, 32, WHITE);
  display.display();
  delay(2000);

  // Draw line
  display.clearDisplay();
  display.drawLine(0, 64, 100, 30, WHITE);
  display.display();
  delay(2000);

  // Draw rectangle
  display.clearDisplay();
  display.drawRect(20, 20, 50, 20, WHITE);
  display.display();
  delay(2000);
  // Fill rectangle
  display.fillRect(20, 20, 50, 20, WHITE);
  display.display();
  delay(2000);

  // Draw round rectangle
  display.clearDisplay();
  display.drawRoundRect(20, 20, 50, 20, 5, WHITE);
  display.display();
  delay(2000);
  // Fill round rectangle
  display.clearDisplay();
  display.fillRoundRect(20, 20, 50, 20, 5, WHITE);
  display.display();
  delay(2000);

  // Draw circle
  display.clearDisplay();
  display.drawCircle(64, 32, 20, WHITE);
  display.display();
  delay(2000);
  // Fill circle
  display.fillCircle(64, 32, 20, WHITE);
  display.display();
  delay(2000);

  // Draw triangle
  display.clearDisplay();
  display.drawTriangle(64, 20, 30, 50, 100, 50, WHITE);
  display.display();
  delay(2000);
  // Fill triangle
  display.fillTriangle(64, 20, 30, 50, 100, 50, WHITE);
  display.display();
  delay(2000);

  // Invert and restore display, pausing in-between
  display.invertDisplay(true);
  delay(2000);
  display.invertDisplay(false);
  delay(2000);
}

void loop() {

}
In this part, we will show you how to display the different illustrations. Inside the void setup() function, after setting the serial baud rate and clearing the buffer we will include the code to display the pixels, lines, and different shapes. Each illustration will display on the OLED screen for 2 seconds and then the next one follows.
Before displaying each shape we will call the clearDisplay() function to clear the buffer for the next illustration.
Displaying a Pixel
Firstly, we will display a pixel on the OLED screen. This is achieved by using the drawPixel() function on the Adafruit_SSD1306 object that is ‘display.’ This function takes in three parameters. The first parameter is the x coordinate, the second parameter is the y coordinate and the third parameter is the colour of the pixel. We have passed (64,32) as the (x, y) coordinates of the pixel that denotes the centre of the screen. It will be white in color. Additionally, we will call the display() function on the display object so that the pixel displays on the OLED.
 display.drawPixel(64, 32, WHITE);
 display.display();
Draw Line
Secondly, we will display a line on the OLED screen. This is achieved by using the drawLine() function on the Adafruit_SSD1306 object that is ‘display.’ This function takes in five parameters. The first two parameters are the starting (x1, y1) coordinates and the next two parameters are the ending (x2, y2) coordinates of the line. Lastly the fifth parameter is the colour of the line. We have passed (0,64) as the starting coordinates and (100, 30) as the ending coordinates of the line. It will be white in colour. Additionally, we will call the display() function on the display object so that the line displays on the OLED.
display.drawLine(0, 64, 100, 30, WHITE);
display.display();
Draw Rectangle (Unfilled, Filled and rounded) OLED
Next, we will display a series of different rectangles on the OLED screen that include an unfilled, a filled and a rounded rectangle. First, we will display an unfilled rectangle. This is achieved by using the drawRect() function on the Adafruit_SSD1306 object that is ‘display.’ This function takes in five parameters. The first two parameters are the starting (x1, y1) coordinates that indicate the top left corner of the rectangle. The next two parameters are the width and height of the rectangle. Lastly the fifth parameter is the colour of the rectangle. We have passed (20,20) as the starting coordinates and 50 as the width and 20 as the height of the rectangle. It will be white in colour. Additionally, we will call the display() function on the display object so that the rectangle displays on the OLED.
display.drawRect(20, 20, 50, 20, WHITE);
display.display();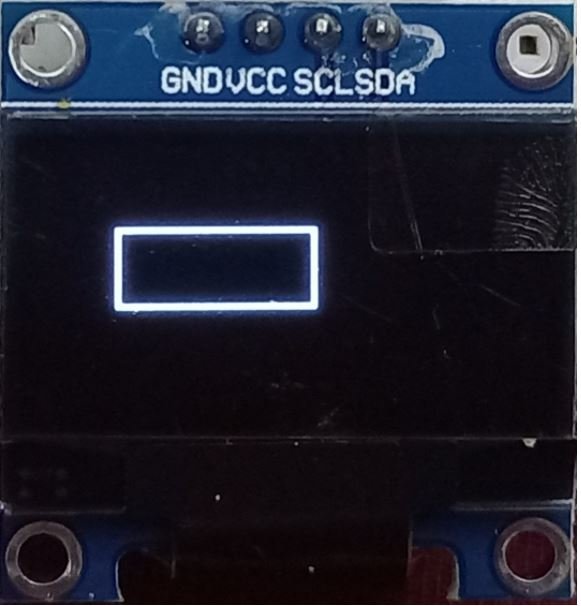
Next, we will display a filled rectangle. This is achieved by using the fillRect() function on the Adafruit_SSD1306 object that is ‘display.’ This function takes in five parameters. The first two parameters are the starting (x1, y1) coordinates that indicate the top left corner of the rectangle. The next two parameters are the width and height of the rectangle. Lastly the fifth parameter is the colour of the rectangle. We have passed (20,20) as the starting coordinates and 50 as the width and 20 as the height of the rectangle. It will be white in colour. Additionally, we will call the display() function on the display object so that the rectangle displays on the OLED.
display.fillRect(20, 20, 50, 20, WHITE);
display.display();
Draw Rounded Rectangle on OLED
Additionally, we will also display a rounded rectangle. This is achieved by using the drawRoundRect() function on the Adafruit_SSD1306 object that is ‘display.’ This function takes in six parameters. The first two parameters are the starting (x1, y1) coordinates that indicate the top left corner of the rectangle. The next two parameters are the width and height of the rectangle. The fifth parameter is the radius of the corner. We have passed (20,20) as the starting coordinates and 50 as the width and 20 as the height of the rectangle. For the radius of the corners we have set it to 5. The rectangle will be white in colour. Additionally, we will call the display() function on the display object so that the rounded rectangle displays on the OLED.
display.drawRoundRect(20, 20, 50, 20, 5, WHITE);
display.display();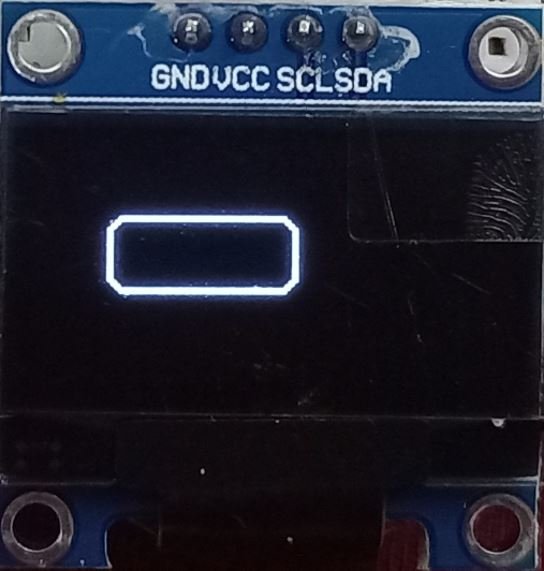
Moreover, we can also display a filled rounded rectangle by using fillRoundRect() function. The rest of the parameters remain the same.
display.fillRoundRect(20, 20, 50, 20, 5, WHITE);
display.display();
Draw Circle on OLED (Unfilled and Filled)
Now, we will display a circle. This is achieved by using the drawCircle() function on the Adafruit_SSD1306 object that is ‘display.’ This function takes in four parameters. The first two parameters are the (x, y) coordinates that indicate the center of the circle. The next parameter is the radius of the circle. The last parameter is the color of the circle. We have passed (64,32) as the center coordinates of the circle and the radius as 20. The circle will be white in color. Additionally, we will call the display() function on the display object so that the circle displays on the OLED.
display.drawCircle(64, 32, 20, WHITE);
display.display();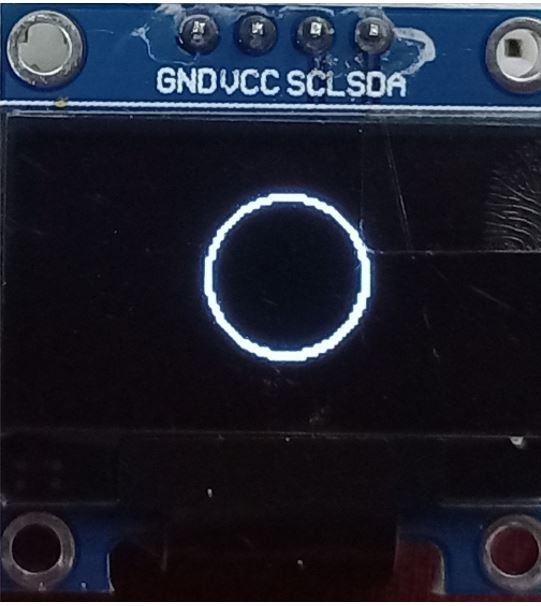
To display a filled circle we will use the fillCircle() function. The rest of the parameters remain the same.
display.fillCircle(64, 32, 20, WHITE);
display.display();
Drawing a Triangle (Unfilled and Filled)
To display a triangle we will use the drawTriangle() function on the Adafruit_SSD1306 object that is ‘display.’ This function takes in seven parameters. The first two parameters are the (x1, y1) coordinates of the first corner of the triangle. The next two parameters are the (x2, y2) coordinates of the second corner of the triangle. Likewise the fifth and sixth parameters are the (x3, y3) coordinates of the third corner of the triangle. The last parameter is the colour of the triangle. We have passed (64,20) as the first corner, (30, 50) as the second corner and (100, 50) as the third corner of the triangle. The triangle will be white in colour. Additionally, we will call the display() function on the display object so that the triangle displays on the OLED.
display.drawTriangle(64, 20, 30, 50, 100, 50, WHITE);
display.display();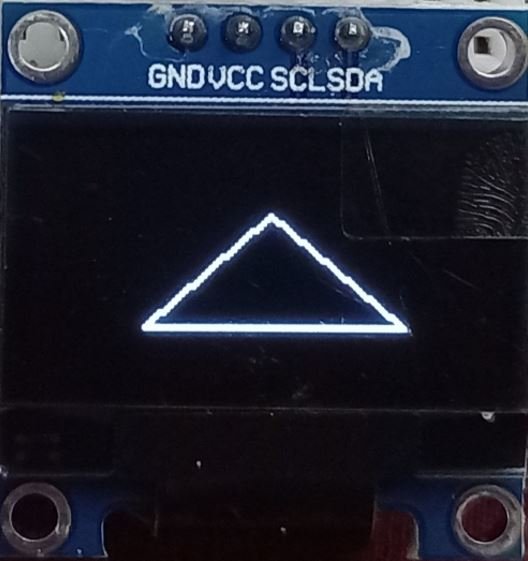
To display a filled triangle we will use the fillTriangle() function. The rest of the parameters will remain the same.
display.fillTriangle(64, 20, 30, 50, 100, 50, WHITE);
display.display();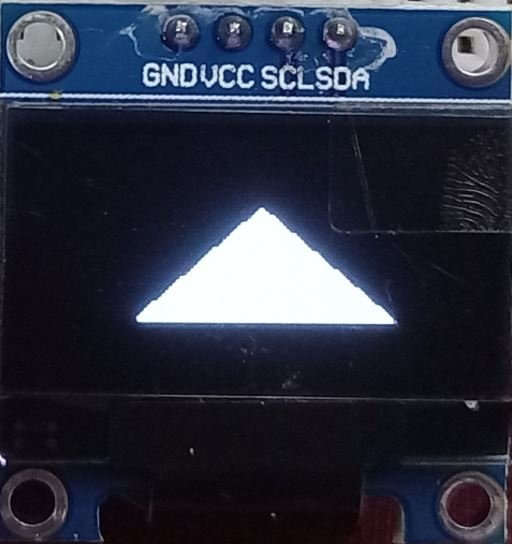
Inverting OLED Display
Additionally, we can also invert the colour of the OLED display by using the invertDisplay() function and passing ‘true’ as a parameter inside it. This will change the colour from dark-bright or bright-dark depending on the initial colour of the screen. As our display was initially dark, so it will turn bright. Moreover, if we pass ‘false’ as an argument inside the function then the colour goes back to its initial one.
display.invertDisplay(true);
delay(5000);
display.invertDisplay(false);
delay(5000);
Demonstration
To see the demonstration of the above code, upload the code to ESP8266. Before uploading the code, make sure to select Node MCU 1.0 from Tools > Board.

Also select the correct COM port to which the ESP8266 board is connected from Tools > Port.
Once the code is uploaded to ESP8266, you will be able to view all the above mentioned figures on the OLED display after a gap of 2 seconds. Watch the video below to have a look.
Displaying Bitmap Images on OLED with ESP8266 NodeMCU
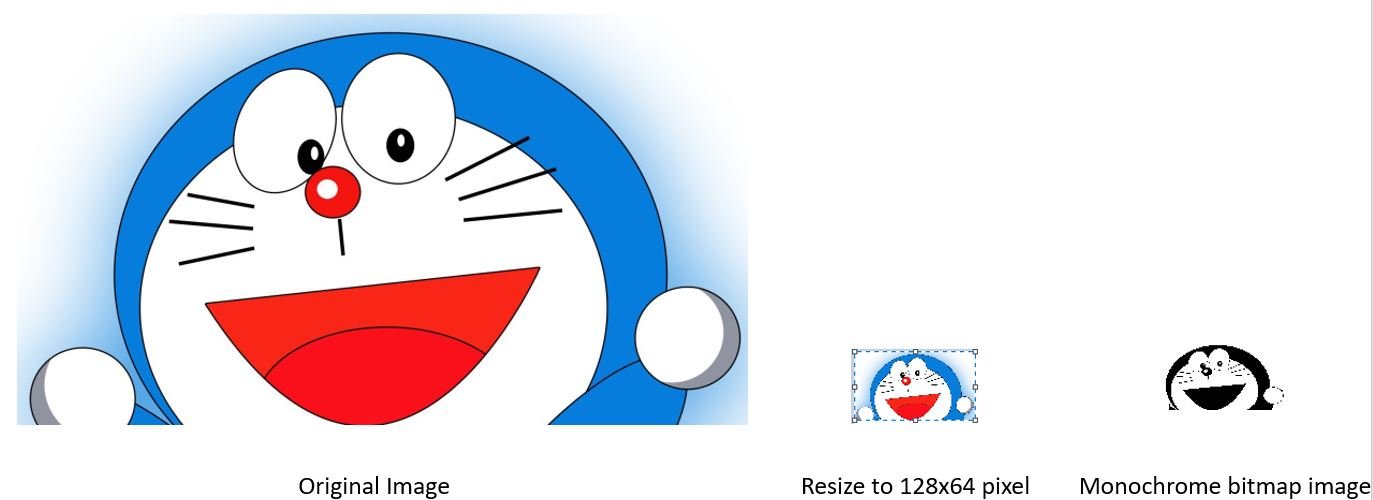
Now let us look at something more interesting to display on our OLED screen. We can display 128×64 (pixels) monochrome bitmap images on our screen very easily by following a couple of steps. We will just need a 128×64 .bmp image and the image array that we will obtain through an image to array converter. The rest of the steps we have already seen in the examples above.
First, we will need an image of size 128×64 in pixels. We will use MS Paint to resize our image and save it in .bmp format. Below is the image that we will use.
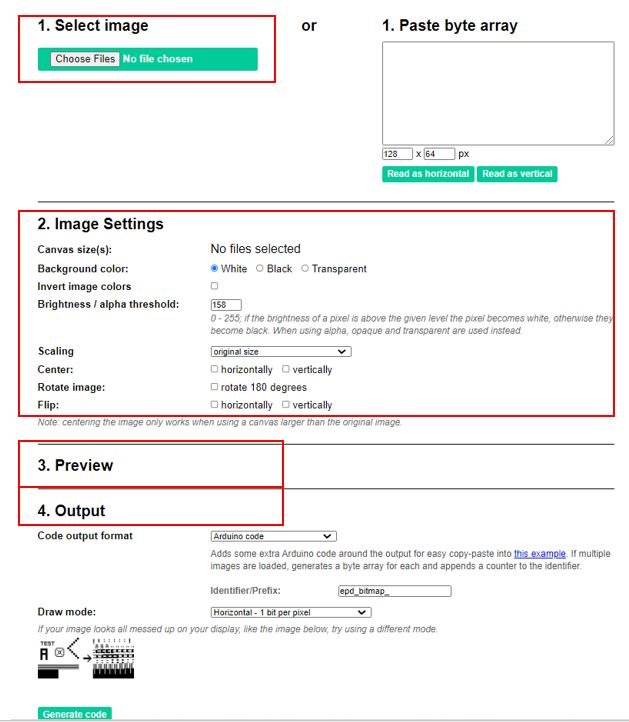
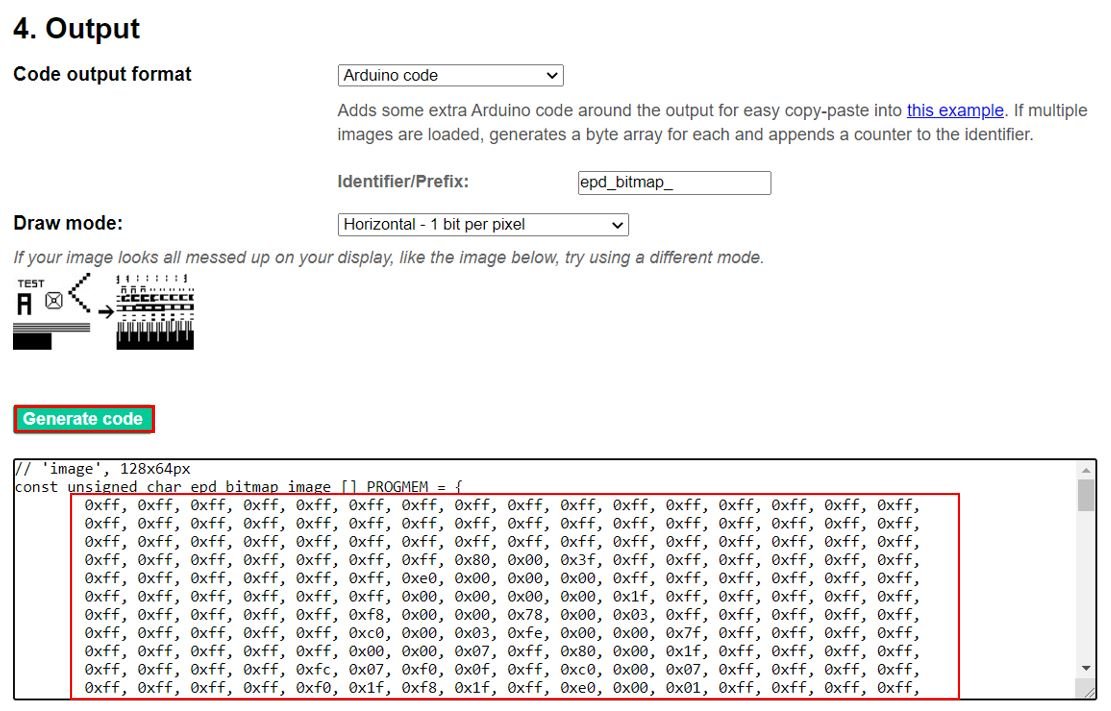
Next, we will go to an online image to array converter called ‘image2cpp.’ Click here to go the application. The following page appears. There are four sections: Select Image, Image Settings, Preview and Output.
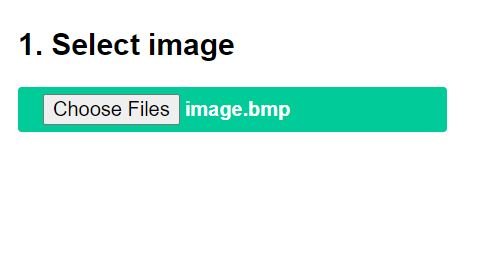
In the select image option click ‘Choose Files’ and select the .bmp file that we saved previously. We have named it as image.bmp.
Now move ahead to the image settings. Set the canvas size to 128×64 and change the brightness according to your needs. You can view in the preview section how the bitmap image looks like. This is how it will get displayed on the OLED screen. Thus, set the brightness appropriately.
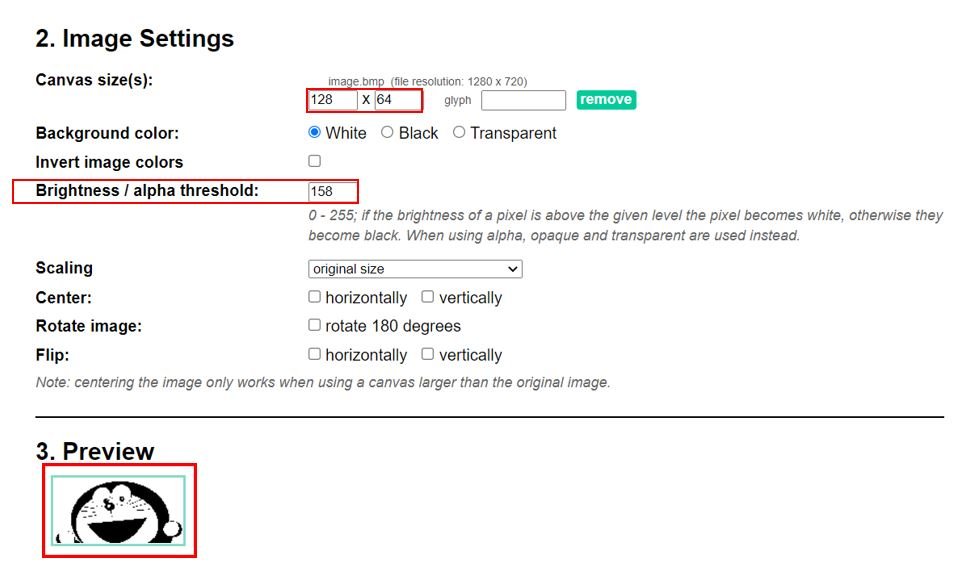
When you are satisfied with your preview then go to output and click ‘Generate code.’ Now we will obtain the array. Copy that array and save it. We will use it while programming our ESP8266 board with the OLED display.
Arduino Sketch
Open your Arduino IDE and go to File > New to open a new file. Copy the code given below in that file.
This sketch will display the monochrome bitmap image on the OLED display.
#include <SPI.h>
#include <Wire.h>
#include <Adafruit_GFX.h>
#include <Adafruit_SSD1306.h>

#define SCREEN_WIDTH 128
#define SCREEN_HEIGHT 64

Adafruit_SSD1306 display(SCREEN_WIDTH, SCREEN_HEIGHT, &Wire, -1);

static const uint8_t image[1024] = {
  0xff, 0xff, 0xff, 0xff, 0xff, 0xff, 0xff, 0xff, 0xff, 0xff, 0xff, 0xff, 0xff, 0xff, 0xff, 0xff,
  0xff, 0xff, 0xff, 0xff, 0xff, 0xff, 0xff, 0xff, 0xff, 0xff, 0xff, 0xff, 0xff, 0xff, 0xff, 0xff,
  0xff, 0xff, 0xff, 0xff, 0xff, 0xff, 0xff, 0xff, 0xff, 0xff, 0xff, 0xff, 0xff, 0xff, 0xff, 0xff,
  0xff, 0xff, 0xff, 0xff, 0xff, 0xff, 0xff, 0x80, 0x00, 0x3f, 0xff, 0xff, 0xff, 0xff, 0xff, 0xff,
  0xff, 0xff, 0xff, 0xff, 0xff, 0xff, 0xe0, 0x00, 0x00, 0x00, 0xff, 0xff, 0xff, 0xff, 0xff, 0xff,
  0xff, 0xff, 0xff, 0xff, 0xff, 0xff, 0x00, 0x00, 0x00, 0x00, 0x1f, 0xff, 0xff, 0xff, 0xff, 0xff,
  0xff, 0xff, 0xff, 0xff, 0xff, 0xf8, 0x00, 0x00, 0x78, 0x00, 0x03, 0xff, 0xff, 0xff, 0xff, 0xff,
  0xff, 0xff, 0xff, 0xff, 0xff, 0xc0, 0x00, 0x03, 0xfe, 0x00, 0x00, 0x7f, 0xff, 0xff, 0xff, 0xff,
  0xff, 0xff, 0xff, 0xff, 0xff, 0x00, 0x00, 0x07, 0xff, 0x80, 0x00, 0x1f, 0xff, 0xff, 0xff, 0xff,
  0xff, 0xff, 0xff, 0xff, 0xfc, 0x07, 0xf0, 0x0f, 0xff, 0xc0, 0x00, 0x07, 0xff, 0xff, 0xff, 0xff,
  0xff, 0xff, 0xff, 0xff, 0xf0, 0x1f, 0xf8, 0x1f, 0xff, 0xe0, 0x00, 0x01, 0xff, 0xff, 0xff, 0xff,
  0xff, 0xff, 0xff, 0xff, 0xe0, 0x3f, 0xfc, 0x3f, 0xff, 0xe0, 0x00, 0x00, 0xff, 0xff, 0xff, 0xff,
  0xff, 0xff, 0xff, 0xff, 0x80, 0x7f, 0xfe, 0x3f, 0xff, 0xf0, 0x00, 0x00, 0x3f, 0xff, 0xff, 0xff,
  0xff, 0xff, 0xff, 0xff, 0x00, 0xff, 0xfe, 0x3f, 0xff, 0xf0, 0x00, 0x00, 0x1f, 0xff, 0xff, 0xff,
  0xff, 0xff, 0xff, 0xfc, 0x00, 0xff, 0xff, 0x7f, 0xff, 0xf0, 0x00, 0x00, 0x07, 0xff, 0xff, 0xff,
  0xff, 0xff, 0xff, 0xf8, 0x01, 0xff, 0xff, 0xff, 0xff, 0xf0, 0x00, 0x00, 0x03, 0xff, 0xff, 0xff,
  0xff, 0xff, 0xff, 0xf0, 0x01, 0xff, 0xff, 0xff, 0xff, 0xf4, 0x00, 0x00, 0x01, 0xff, 0xff, 0xff,
  0xff, 0xff, 0xff, 0xe0, 0x03, 0xff, 0xff, 0xff, 0xff, 0xf7, 0x00, 0x00, 0x00, 0xff, 0xff, 0xff,
  0xff, 0xff, 0xff, 0xc0, 0x03, 0xff, 0xfe, 0xff, 0x87, 0xf7, 0xe0, 0x00, 0x00, 0x7f, 0xff, 0xff,
  0xff, 0xff, 0xff, 0x80, 0x03, 0xff, 0xff, 0xbf, 0x97, 0xff, 0xf8, 0x00, 0x00, 0x3f, 0xff, 0xff,
  0xff, 0xff, 0xff, 0x00, 0x03, 0xff, 0xc7, 0xff, 0x93, 0xff, 0xfc, 0x00, 0x00, 0x1f, 0xff, 0xff,
  0xff, 0xff, 0xfe, 0x00, 0x0f, 0xff, 0x89, 0xff, 0x87, 0xef, 0xf3, 0x80, 0x00, 0x1f, 0xff, 0xff,
  0xff, 0xff, 0xfe, 0x00, 0x1f, 0xff, 0x83, 0xff, 0xc7, 0xdf, 0xdf, 0xc0, 0x00, 0x0f, 0xff, 0xff,
  0xff, 0xff, 0xfc, 0x00, 0x3d, 0xff, 0x83, 0xff, 0xff, 0xff, 0x7f, 0xe0, 0x00, 0x07, 0xff, 0xff,
  0xff, 0xff, 0xfc, 0x00, 0xff, 0xff, 0xc0, 0x3f, 0xff, 0x79, 0xff, 0xf0, 0x00, 0x07, 0xff, 0xff,
  0xff, 0xff, 0xf8, 0x01, 0xff, 0xff, 0xe0, 0x1d, 0xff, 0xef, 0xff, 0x9c, 0x00, 0x03, 0xff, 0xff,
  0xff, 0xff, 0xf0, 0x03, 0xff, 0xff, 0xe7, 0x0f, 0xcf, 0xff, 0xf9, 0xfe, 0x00, 0x01, 0xff, 0xff,
  0xff, 0xff, 0xf0, 0x07, 0xff, 0xde, 0xc7, 0x0f, 0xff, 0xff, 0x9f, 0xff, 0x00, 0x01, 0xff, 0xff,
  0xff, 0xff, 0xe0, 0x0c, 0x3f, 0xff, 0xc6, 0x0f, 0xff, 0xfc, 0xff, 0xff, 0x80, 0x01, 0xff, 0xff,
  0xff, 0xff, 0xe0, 0x1f, 0xf0, 0xff, 0xe0, 0x0f, 0xff, 0xff, 0xff, 0xff, 0x80, 0x00, 0xff, 0xff,
  0xff, 0xff, 0xe0, 0x1f, 0xff, 0xff, 0xf0, 0x1f, 0xff, 0xff, 0xff, 0xf9, 0xc0, 0x00, 0xff, 0xff,
  0xff, 0xff, 0xc0, 0x3f, 0xff, 0xff, 0xf8, 0x7f, 0xff, 0xff, 0xc0, 0x7f, 0xe0, 0x00, 0x7f, 0xff,
  0xff, 0xff, 0xc0, 0x60, 0x7f, 0xff, 0xff, 0x7f, 0xff, 0xff, 0xff, 0xff, 0xe0, 0x00, 0x7f, 0xff,
  0xff, 0xff, 0xc0, 0x7f, 0xfc, 0x7f, 0xff, 0x7f, 0xff, 0xff, 0xff, 0xff, 0xf0, 0x00, 0x7f, 0xff,
  0xff, 0xff, 0x80, 0xff, 0xff, 0xff, 0xff, 0x7f, 0xff, 0xff, 0xff, 0xff, 0xf8, 0x00, 0x7f, 0xff,
  0xff, 0xff, 0x80, 0xff, 0xff, 0xff, 0xff, 0xff, 0xff, 0xff, 0xff, 0xff, 0xf8, 0x00, 0x3f, 0xff,
  0xff, 0xff, 0x81, 0xff, 0xff, 0x3f, 0xff, 0xff, 0xff, 0xff, 0xff, 0xff, 0xf8, 0x00, 0x3f, 0xff,
  0xff, 0xff, 0x81, 0xff, 0xc3, 0xff, 0xff, 0xbf, 0xff, 0xff, 0xff, 0xff, 0xfc, 0x00, 0x3f, 0xff,
  0xff, 0xff, 0x81, 0xf8, 0xff, 0xff, 0xff, 0xff, 0xff, 0xff, 0xff, 0xff, 0xfc, 0x00, 0x3f, 0xff,
  0xff, 0xff, 0x83, 0xff, 0xff, 0xff, 0xff, 0xff, 0xff, 0xff, 0xff, 0x8f, 0xfc, 0x00, 0x3f, 0xff,
  0xff, 0xff, 0x83, 0xff, 0xff, 0xff, 0xff, 0xff, 0xff, 0xfe, 0x00, 0x1f, 0xfe, 0x00, 0x3f, 0xff,
  0xff, 0xff, 0x83, 0xff, 0xff, 0xff, 0xff, 0xff, 0xf8, 0x00, 0x00, 0x1f, 0xfe, 0x00, 0x3f, 0xff,
  0xff, 0xff, 0x83, 0xff, 0xff, 0xff, 0xff, 0xc0, 0x00, 0x00, 0x00, 0x3f, 0xfe, 0x00, 0x21, 0xff,
  0xff, 0xff, 0x83, 0xff, 0xff, 0xff, 0x00, 0x00, 0x00, 0x00, 0x00, 0x7f, 0xfe, 0x00, 0x7f, 0xbf,
  0xff, 0xff, 0x83, 0xff, 0xf8, 0x00, 0x00, 0x00, 0x00, 0x00, 0x00, 0x7f, 0xfe, 0x01, 0xff, 0xcf,
  0xff, 0xff, 0x83, 0xff, 0x80, 0x00, 0x00, 0x00, 0x00, 0x00, 0x00, 0xff, 0xfe, 0x03, 0xff, 0xe7,
  0xff, 0xff, 0x83, 0xff, 0xc0, 0x00, 0x00, 0x00, 0x00, 0x00, 0x01, 0xff, 0xfe, 0x03, 0xff, 0xe3,
  0xff, 0xff, 0xc3, 0xff, 0xe0, 0x00, 0x00, 0x00, 0x00, 0x00, 0x01, 0xff, 0xfe, 0x07, 0xff, 0xe3,
  0xff, 0xff, 0xc3, 0xff, 0xe0, 0x00, 0x00, 0x00, 0x00, 0x00, 0x03, 0xff, 0xfe, 0x07, 0xff, 0xf3,
  0xff, 0xff, 0xc3, 0xff, 0xf0, 0x00, 0x00, 0x00, 0x00, 0x00, 0x07, 0xff, 0xfe, 0x0f, 0xff, 0xf1,
  0xff, 0xff, 0xe3, 0xff, 0xf8, 0x00, 0x00, 0x00, 0x00, 0x00, 0x0f, 0xff, 0xfe, 0x0f, 0xff, 0xf1,
  0xff, 0xff, 0xe3, 0xff, 0xfc, 0x00, 0x00, 0x00, 0x00, 0x00, 0x1f, 0xff, 0xfe, 0x0f, 0xff, 0xe1,
  0xff, 0xfd, 0xe1, 0xff, 0xfe, 0x00, 0x00, 0x00, 0x00, 0x00, 0x1f, 0xff, 0xfc, 0x07, 0xff, 0xe3,
  0xff, 0xff, 0xf1, 0xff, 0xff, 0x00, 0x00, 0x00, 0x00, 0x00, 0x3f, 0xff, 0xfc, 0x07, 0xff, 0xe3,
  0xff, 0xff, 0xd1, 0xff, 0xff, 0x80, 0x00, 0x00, 0x00, 0x00, 0x7f, 0xff, 0xfc, 0x03, 0xff, 0xc3,
  0xf7, 0xff, 0xf8, 0xff, 0xff, 0xc0, 0x00, 0x00, 0x00, 0x00, 0xff, 0xff, 0xf8, 0x01, 0xff, 0x87,
  0xe7, 0xff, 0xf8, 0xff, 0xff, 0xe0, 0x00, 0x00, 0x00, 0x01, 0xff, 0xff, 0xf8, 0x00, 0xfe, 0x0f,
  0xe7, 0xff, 0xfc, 0x7f, 0xff, 0xf0, 0x00, 0x00, 0x00, 0x07, 0xff, 0xff, 0xf0, 0x00, 0x00, 0x3f,
  0xc7, 0xff, 0xf6, 0x7f, 0xff, 0xf8, 0x00, 0x00, 0x00, 0x0f, 0xff, 0xff, 0xf0, 0x00, 0x03, 0xff,
  0xc7, 0xff, 0xf6, 0x3f, 0xff, 0xfe, 0x00, 0x00, 0x00, 0x1f, 0xff, 0xff, 0xc0, 0x00, 0x07, 0xff,
  0xc7, 0xff, 0xf7, 0x1f, 0xff, 0xff, 0x00, 0x00, 0x00, 0x7f, 0xff, 0xff, 0x80, 0x00, 0x07, 0xff,
  0xc3, 0xff, 0xf1, 0x9f, 0xff, 0xff, 0xc0, 0x00, 0x01, 0xff, 0xff, 0xff, 0x00, 0x00, 0x07, 0xff,
  0xe3, 0xff, 0xf0, 0x4f, 0xff, 0xff, 0xf0, 0x00, 0x07, 0xff, 0xff, 0xfe, 0x00, 0x00, 0x0f, 0xff,
  0xe1, 0xff, 0xf0, 0x27, 0xff, 0xff, 0xfe, 0x00, 0x3f, 0xff, 0xff, 0xf8, 0x00, 0x00, 0x0f, 0xff
};

void setup()
{
  display.begin(SSD1306_SWITCHCAPVCC, 0x3C);
  display.clearDisplay();
  display.drawBitmap(0, 0, image, 128, 64, 1);
  display.display();
}

void loop() {
}
How the Code Works?
This part shows how to include the image array and display the bitmap image on the OLED screen.
After including the necessary libraries and defining the OLED display we will define the image array which we got from the image2cpp application as follows. Define it as ‘static const uint8_t NAME_OF_.bmp_FILE[1024].’
static const uint8_t image[1024] = {
  0xff, 0xff, 0xff, 0xff, 0xff, 0xff, 0xff, 0xff, 0xff, 0xff, 0xff, 0xff, 0xff, 0xff, 0xff, 0xff,
  0xff, 0xff, 0xff, 0xff, 0xff, 0xff, 0xff, 0xff, 0xff, 0xff, 0xff, 0xff, 0xff, 0xff, 0xff, 0xff,
  0xff, 0xff, 0xff, 0xff, 0xff, 0xff, 0xff, 0xff, 0xff, 0xff, 0xff, 0xff, 0xff, 0xff, 0xff, 0xff,
  0xff, 0xff, 0xff, 0xff, 0xff, 0xff, 0xff, 0x80, 0x00, 0x3f, 0xff, 0xff, 0xff, 0xff, 0xff, 0xff,
  0xff, 0xff, 0xff, 0xff, 0xff, 0xff, 0xe0, 0x00, 0x00, 0x00, 0xff, 0xff, 0xff, 0xff, 0xff, 0xff,
  0xff, 0xff, 0xff, 0xff, 0xff, 0xff, 0x00, 0x00, 0x00, 0x00, 0x1f, 0xff, 0xff, 0xff, 0xff, 0xff,
  0xff, 0xff, 0xff, 0xff, 0xff, 0xf8, 0x00, 0x00, 0x78, 0x00, 0x03, 0xff, 0xff, 0xff, 0xff, 0xff,
  0xff, 0xff, 0xff, 0xff, 0xff, 0xc0, 0x00, 0x03, 0xfe, 0x00, 0x00, 0x7f, 0xff, 0xff, 0xff, 0xff,
  0xff, 0xff, 0xff, 0xff, 0xff, 0x00, 0x00, 0x07, 0xff, 0x80, 0x00, 0x1f, 0xff, 0xff, 0xff, 0xff,
  0xff, 0xff, 0xff, 0xff, 0xfc, 0x07, 0xf0, 0x0f, 0xff, 0xc0, 0x00, 0x07, 0xff, 0xff, 0xff, 0xff,
  0xff, 0xff, 0xff, 0xff, 0xf0, 0x1f, 0xf8, 0x1f, 0xff, 0xe0, 0x00, 0x01, 0xff, 0xff, 0xff, 0xff,
  0xff, 0xff, 0xff, 0xff, 0xe0, 0x3f, 0xfc, 0x3f, 0xff, 0xe0, 0x00, 0x00, 0xff, 0xff, 0xff, 0xff,
  0xff, 0xff, 0xff, 0xff, 0x80, 0x7f, 0xfe, 0x3f, 0xff, 0xf0, 0x00, 0x00, 0x3f, 0xff, 0xff, 0xff,
  0xff, 0xff, 0xff, 0xff, 0x00, 0xff, 0xfe, 0x3f, 0xff, 0xf0, 0x00, 0x00, 0x1f, 0xff, 0xff, 0xff,
  0xff, 0xff, 0xff, 0xfc, 0x00, 0xff, 0xff, 0x7f, 0xff, 0xf0, 0x00, 0x00, 0x07, 0xff, 0xff, 0xff,
  0xff, 0xff, 0xff, 0xf8, 0x01, 0xff, 0xff, 0xff, 0xff, 0xf0, 0x00, 0x00, 0x03, 0xff, 0xff, 0xff,
  0xff, 0xff, 0xff, 0xf0, 0x01, 0xff, 0xff, 0xff, 0xff, 0xf4, 0x00, 0x00, 0x01, 0xff, 0xff, 0xff,
  0xff, 0xff, 0xff, 0xe0, 0x03, 0xff, 0xff, 0xff, 0xff, 0xf7, 0x00, 0x00, 0x00, 0xff, 0xff, 0xff,
  0xff, 0xff, 0xff, 0xc0, 0x03, 0xff, 0xfe, 0xff, 0x87, 0xf7, 0xe0, 0x00, 0x00, 0x7f, 0xff, 0xff,
  0xff, 0xff, 0xff, 0x80, 0x03, 0xff, 0xff, 0xbf, 0x97, 0xff, 0xf8, 0x00, 0x00, 0x3f, 0xff, 0xff,
  0xff, 0xff, 0xff, 0x00, 0x03, 0xff, 0xc7, 0xff, 0x93, 0xff, 0xfc, 0x00, 0x00, 0x1f, 0xff, 0xff,
  0xff, 0xff, 0xfe, 0x00, 0x0f, 0xff, 0x89, 0xff, 0x87, 0xef, 0xf3, 0x80, 0x00, 0x1f, 0xff, 0xff,
  0xff, 0xff, 0xfe, 0x00, 0x1f, 0xff, 0x83, 0xff, 0xc7, 0xdf, 0xdf, 0xc0, 0x00, 0x0f, 0xff, 0xff,
  0xff, 0xff, 0xfc, 0x00, 0x3d, 0xff, 0x83, 0xff, 0xff, 0xff, 0x7f, 0xe0, 0x00, 0x07, 0xff, 0xff,
  0xff, 0xff, 0xfc, 0x00, 0xff, 0xff, 0xc0, 0x3f, 0xff, 0x79, 0xff, 0xf0, 0x00, 0x07, 0xff, 0xff,
  0xff, 0xff, 0xf8, 0x01, 0xff, 0xff, 0xe0, 0x1d, 0xff, 0xef, 0xff, 0x9c, 0x00, 0x03, 0xff, 0xff,
  0xff, 0xff, 0xf0, 0x03, 0xff, 0xff, 0xe7, 0x0f, 0xcf, 0xff, 0xf9, 0xfe, 0x00, 0x01, 0xff, 0xff,
  0xff, 0xff, 0xf0, 0x07, 0xff, 0xde, 0xc7, 0x0f, 0xff, 0xff, 0x9f, 0xff, 0x00, 0x01, 0xff, 0xff,
  0xff, 0xff, 0xe0, 0x0c, 0x3f, 0xff, 0xc6, 0x0f, 0xff, 0xfc, 0xff, 0xff, 0x80, 0x01, 0xff, 0xff,
  0xff, 0xff, 0xe0, 0x1f, 0xf0, 0xff, 0xe0, 0x0f, 0xff, 0xff, 0xff, 0xff, 0x80, 0x00, 0xff, 0xff,
  0xff, 0xff, 0xe0, 0x1f, 0xff, 0xff, 0xf0, 0x1f, 0xff, 0xff, 0xff, 0xf9, 0xc0, 0x00, 0xff, 0xff,
  0xff, 0xff, 0xc0, 0x3f, 0xff, 0xff, 0xf8, 0x7f, 0xff, 0xff, 0xc0, 0x7f, 0xe0, 0x00, 0x7f, 0xff,
  0xff, 0xff, 0xc0, 0x60, 0x7f, 0xff, 0xff, 0x7f, 0xff, 0xff, 0xff, 0xff, 0xe0, 0x00, 0x7f, 0xff,
  0xff, 0xff, 0xc0, 0x7f, 0xfc, 0x7f, 0xff, 0x7f, 0xff, 0xff, 0xff, 0xff, 0xf0, 0x00, 0x7f, 0xff,
  0xff, 0xff, 0x80, 0xff, 0xff, 0xff, 0xff, 0x7f, 0xff, 0xff, 0xff, 0xff, 0xf8, 0x00, 0x7f, 0xff,
  0xff, 0xff, 0x80, 0xff, 0xff, 0xff, 0xff, 0xff, 0xff, 0xff, 0xff, 0xff, 0xf8, 0x00, 0x3f, 0xff,
  0xff, 0xff, 0x81, 0xff, 0xff, 0x3f, 0xff, 0xff, 0xff, 0xff, 0xff, 0xff, 0xf8, 0x00, 0x3f, 0xff,
  0xff, 0xff, 0x81, 0xff, 0xc3, 0xff, 0xff, 0xbf, 0xff, 0xff, 0xff, 0xff, 0xfc, 0x00, 0x3f, 0xff,
  0xff, 0xff, 0x81, 0xf8, 0xff, 0xff, 0xff, 0xff, 0xff, 0xff, 0xff, 0xff, 0xfc, 0x00, 0x3f, 0xff,
  0xff, 0xff, 0x83, 0xff, 0xff, 0xff, 0xff, 0xff, 0xff, 0xff, 0xff, 0x8f, 0xfc, 0x00, 0x3f, 0xff,
  0xff, 0xff, 0x83, 0xff, 0xff, 0xff, 0xff, 0xff, 0xff, 0xfe, 0x00, 0x1f, 0xfe, 0x00, 0x3f, 0xff,
  0xff, 0xff, 0x83, 0xff, 0xff, 0xff, 0xff, 0xff, 0xf8, 0x00, 0x00, 0x1f, 0xfe, 0x00, 0x3f, 0xff,
  0xff, 0xff, 0x83, 0xff, 0xff, 0xff, 0xff, 0xc0, 0x00, 0x00, 0x00, 0x3f, 0xfe, 0x00, 0x21, 0xff,
  0xff, 0xff, 0x83, 0xff, 0xff, 0xff, 0x00, 0x00, 0x00, 0x00, 0x00, 0x7f, 0xfe, 0x00, 0x7f, 0xbf,
  0xff, 0xff, 0x83, 0xff, 0xf8, 0x00, 0x00, 0x00, 0x00, 0x00, 0x00, 0x7f, 0xfe, 0x01, 0xff, 0xcf,
  0xff, 0xff, 0x83, 0xff, 0x80, 0x00, 0x00, 0x00, 0x00, 0x00, 0x00, 0xff, 0xfe, 0x03, 0xff, 0xe7,
  0xff, 0xff, 0x83, 0xff, 0xc0, 0x00, 0x00, 0x00, 0x00, 0x00, 0x01, 0xff, 0xfe, 0x03, 0xff, 0xe3,
  0xff, 0xff, 0xc3, 0xff, 0xe0, 0x00, 0x00, 0x00, 0x00, 0x00, 0x01, 0xff, 0xfe, 0x07, 0xff, 0xe3,
  0xff, 0xff, 0xc3, 0xff, 0xe0, 0x00, 0x00, 0x00, 0x00, 0x00, 0x03, 0xff, 0xfe, 0x07, 0xff, 0xf3,
  0xff, 0xff, 0xc3, 0xff, 0xf0, 0x00, 0x00, 0x00, 0x00, 0x00, 0x07, 0xff, 0xfe, 0x0f, 0xff, 0xf1,
  0xff, 0xff, 0xe3, 0xff, 0xf8, 0x00, 0x00, 0x00, 0x00, 0x00, 0x0f, 0xff, 0xfe, 0x0f, 0xff, 0xf1,
  0xff, 0xff, 0xe3, 0xff, 0xfc, 0x00, 0x00, 0x00, 0x00, 0x00, 0x1f, 0xff, 0xfe, 0x0f, 0xff, 0xe1,
  0xff, 0xfd, 0xe1, 0xff, 0xfe, 0x00, 0x00, 0x00, 0x00, 0x00, 0x1f, 0xff, 0xfc, 0x07, 0xff, 0xe3,
  0xff, 0xff, 0xf1, 0xff, 0xff, 0x00, 0x00, 0x00, 0x00, 0x00, 0x3f, 0xff, 0xfc, 0x07, 0xff, 0xe3,
  0xff, 0xff, 0xd1, 0xff, 0xff, 0x80, 0x00, 0x00, 0x00, 0x00, 0x7f, 0xff, 0xfc, 0x03, 0xff, 0xc3,
  0xf7, 0xff, 0xf8, 0xff, 0xff, 0xc0, 0x00, 0x00, 0x00, 0x00, 0xff, 0xff, 0xf8, 0x01, 0xff, 0x87,
  0xe7, 0xff, 0xf8, 0xff, 0xff, 0xe0, 0x00, 0x00, 0x00, 0x01, 0xff, 0xff, 0xf8, 0x00, 0xfe, 0x0f,
  0xe7, 0xff, 0xfc, 0x7f, 0xff, 0xf0, 0x00, 0x00, 0x00, 0x07, 0xff, 0xff, 0xf0, 0x00, 0x00, 0x3f,
  0xc7, 0xff, 0xf6, 0x7f, 0xff, 0xf8, 0x00, 0x00, 0x00, 0x0f, 0xff, 0xff, 0xf0, 0x00, 0x03, 0xff,
  0xc7, 0xff, 0xf6, 0x3f, 0xff, 0xfe, 0x00, 0x00, 0x00, 0x1f, 0xff, 0xff, 0xc0, 0x00, 0x07, 0xff,
  0xc7, 0xff, 0xf7, 0x1f, 0xff, 0xff, 0x00, 0x00, 0x00, 0x7f, 0xff, 0xff, 0x80, 0x00, 0x07, 0xff,
  0xc3, 0xff, 0xf1, 0x9f, 0xff, 0xff, 0xc0, 0x00, 0x01, 0xff, 0xff, 0xff, 0x00, 0x00, 0x07, 0xff,
  0xe3, 0xff, 0xf0, 0x4f, 0xff, 0xff, 0xf0, 0x00, 0x07, 0xff, 0xff, 0xfe, 0x00, 0x00, 0x0f, 0xff,
  0xe1, 0xff, 0xf0, 0x27, 0xff, 0xff, 0xfe, 0x00, 0x3f, 0xff, 0xff, 0xf8, 0x00, 0x00, 0x0f, 0xff
};
setup()
Inside the setup() function, we will initialize the OLED display by using display.begin(). Make sure you specify the correct address of your display. In our case, it is 0X3C. Next we will use clearDisplay() to clear the buffer before displaying the bitmap image on the screen.
display.begin(SSD1306_SWITCHCAPVCC, 0x3C);
display.clearDisplay();
Through drawBitmap() function, we will display the bitmap image on the OLED display. This takes in six parameters. The first two parameters are the (x, y) starting coordinates. The third parameter is the name of the image array that is ‘image’ in our case. The next two parameters are the image width and height in pixels that we are specifying as 128 and 64 respectively so that the image fills the OLED display. Lastly, the sixth parameter is the color. Additionally, we will call the display() function on the display object so that the image displays on the OLED.
display.drawBitmap(0, 0, image, 128, 64, WHITE);
display.display();
Demonstration
To see the demonstration of the above code, upload the code to ESP8266. Before uploading the code, make sure to select NodeMCU 1.0 from Tools > Board and also select the correct COM port to which the ESP8266 board is connected from Tools > Port.
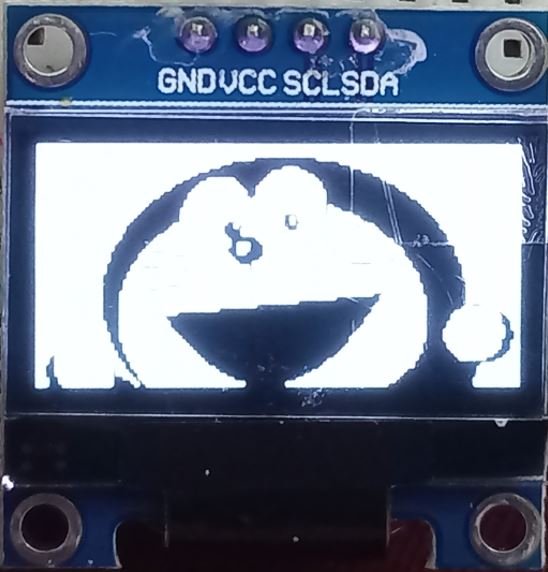
Once the code is uploaded to ESP8266, you will be able to view the monochrome bitmap image as shown below:
Conclusion
In conclusion, we comprehensively looked at the OLED display and set it up with the ESP8266 board using Arduino IDE. We have learned its introduction, pinout, connection with the development board and some Arduino sketches to get started with the OLED display. The program sketches included finding the address of the OLED display, displaying simple texts, pixels, lines, and shapes. Additionally, we were also able to display monochrome bitmap images on the OLED screen by following a series of steps.
Very good detailed tutorial.. Thank You So Much!!!