In this tutorial, we will learn to design a mini-project in LabView that will give us an indication of the water level in a water tank. When the water level goes beyond a certain minimum or maximum limit we have specified, an LED will turn on. We will install two LEDs, one of which will turn on if the water level is less than the minimum limit and the other if the water level is greater than the maximum limit. At the end of the tutorial, you are provided with an exercise to do by yourself, and in the next tutorials, we will assume that you have done those exercises, and we will not explain the concept regarding them.
Water Level Indicator
A water level indicator is a device designed to measure and display the water level within a container, tank, or reservoir. It uses sensors or probes that are placed at different levels to detect the height of the water’s surface. These sensors then send signals to a control unit, which processes the information and translates it into a visual or audible output, indicating the current water level. This is quite valuable in preventing overflow or underflow situations, optimizing resource management, and ensuring a steady supply of water. Fortunately, this water level indication system can be simulated in LabVIEW.
We can use water level indicators in various sectors, such as agriculture, industry, and domestic settings. In agriculture, they provide efficient irrigation management by ensuring optimal water levels in fields, while these indicators regulate liquid storage for production purposes in industries. Additionally, we can use water level indicators in households to prevent overflows in tanks, ensuring a consistent water supply and preventing waste. The compact design and ease of use make water level indicators a practical solution for maintaining control over water resources.
Water level indicator in LabView example VI
We will now design a VI in LabView. This will give us an indication in the following scenarios:
- The tank’s water level decreases below a specified lower limit.
- The tank’s water level increases above a specified upper limit.
To do so, first of all, create a VI as we have discussed in Tutorial 1 and save it for future use by pressing <Ctrl+S>. From the Control Palette on the front panel, select Numeric and then select Tank, as shown in the figure below.

Place the tank on the front panel and adjust its size according to your needs. Now from the Control Palette on the front panel, select Numeric and then select Vertical Pointer Slide, as shown in the figure below.

Tank and Controls
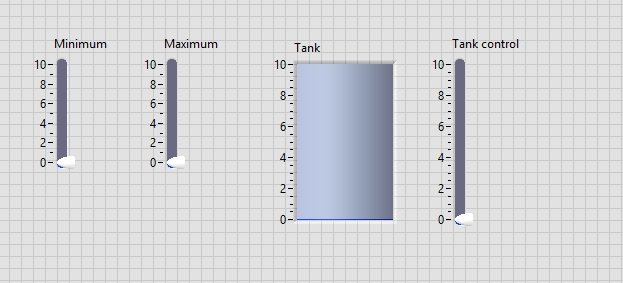
Place three similar vertical slide bars on the front panel. These vertical pointers are of type control, and one of them is used to control the minimum limit or lower limit of water level in the tank; one is used to control the maximum limit or upper level of water level in the tank; and the third is used to control the water level in the tank present on the front panel of LabVIEW’s VI. The resulting three slides and a tank are shown in the figure below.
Now for the indication of maximum and minimum levels, we need two indicators, i.e., LEDs for visual indication. From the Control Palette on the front panel, select Boolean and then select Round LED, as shown in the figure below.

Front Panel
Place two such LEDs below the vertical pointer in LabVIEW’s VI, one for the indication of the lower limit of water level in the tank and the other for the indication of the upper limit of water level in the tank, as shown in the figure below.

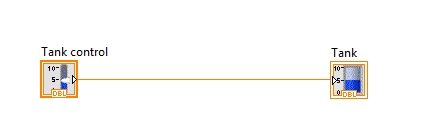
Now let’s move toward the block diagram part. First, connect the tank control to the tank indicator directly, as shown in the figure below.
Now we have to design a VI in LabVIEW that will compare the current value of the water level with the specified upper and lower limits. From the function palette on the block diagram window, select comparison, and then select greater or equal. As shown in the figure below.
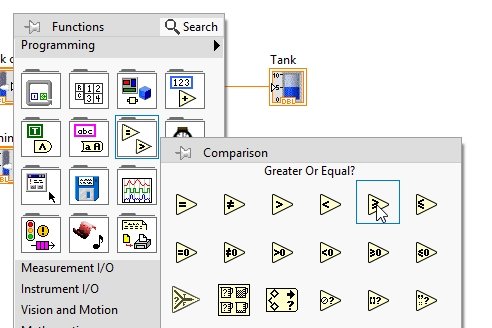
If we have any ambiguity regarding the working of any block, we can refer to the LabView help center and see its working in detail.
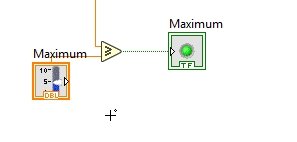
At the input side of this block, connect the tank level control on the upper input, and at the lower input, connect the maximum limit control, and at the output, connect the maximum level indicator, i.e., the round LED, as shown in the figure below.
Do the same for the minimum condition indication too. From the function palette on the block diagram window, select comparison, and then select less or equal. As shown in the figure below.

At the input side of this block, connect the tank level control on the lower input, and at the lower input, connect the minimum limit control, and at the output, connect the minimum level indicator, i.e., the round LED, as shown in the figure below.

Block Diagram
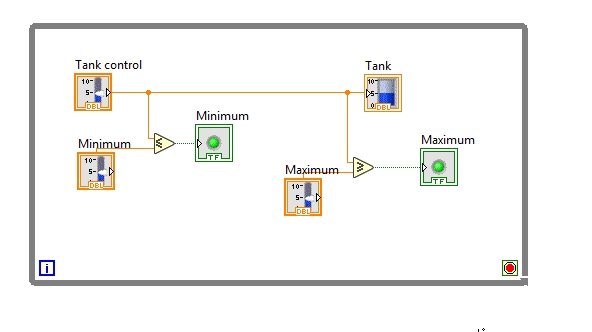
The complete block diagram for water level detection in LabVIEW is shown in the figure below.

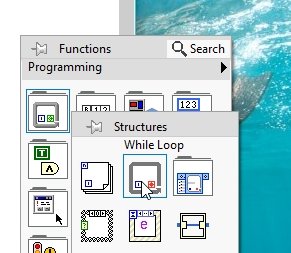
This block diagram will only run once; if we want it to run continuously, we can use a while loop and place the whole block diagram inside it. From the Function Palette, select Structures and then select While Loop. This while loop will then be dragged to the outer boundary of the block diagram. Refer to the figure below.
After placing the while loop, the block diagram will look like the one shown in the figure below.
Now, to add the termination condition for the while loop, click right on the red button, and from the dropdown menu select create control, as shown in the figure below.

Minimum and Maximum Values
This will create a stop button. When we press it during the runtime, the loop will terminate. Now set the lower and upper limits of the tank as shown in the figure below.
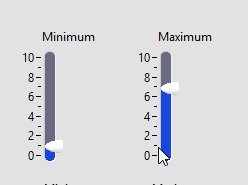
Remember that the lower limit should always be less than the upper limit. Now run the VI and change the level of the water tank from the tank level control. If the level of the tank is below the lower limit, the minimum LED will turn on, as shown in the figure below.
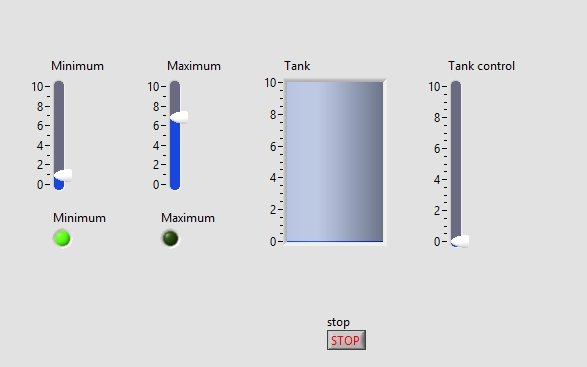
If the water level on LabVIEW’s VI is between the maximum and minimum values, then both LEDs will be off, as shown in the figure below.

And if the water level on LabVIEW’s VI is higher than the upper limit, the maximum LED will turn on, as shown in the figure below.

Exercise
- Update the VI provided above to display the water level in a numeric indicator, and both the minimum and maximum limits of the water level are also displayed in a numeric indicator.
Conclusion
In conclusion, this tutorial has provided a comprehensive overview of the importance of water level indicators and how to build them in LabVIEW. This also covers step-by-step procedures for designing a block diagram of this water level indicator in LabVIEW’s VI purpose. This helps us understand the principle of level detection for application. You can utilize this concept in various applications, including level indication for a specific task. Lastly, an exercise is provided to reinforce the concept of water level indication in LabVIEW. We hope that this tutorial has been helpful in expanding your knowledge of LabVIEW programming.
You may also like to read:
- ESP32-CAM Capture Photo and Save to MicroSD Card
- Control Relay Module Remotely with ESP32 Web Server and 220V Lamp
- Bidirectional Rotation of an Induction Motor with a Remote Control Device
- 28BYJ-48 Stepper Motor with Raspberry Pi Pico using MicroPython
- RCWL-0516 Microwave Radar Sensor Module with ESP8266 NodeMCU
This concludes today’s article. If you face any issues or difficulties, let us know in the comment section below.