In this tutorial, you will learn how to receive or send data on a webpage that is being sent from Arduino board using an ESP8266 WiFi module. We will send some strings encoded in HTML code from Arduino to WiFi module. In response, ESP-01 will send this data to a web client through AT commands. This data will be sent to a webpage whenever a web client requests data by accessing a server hosted on ESP8266 through an IP address.
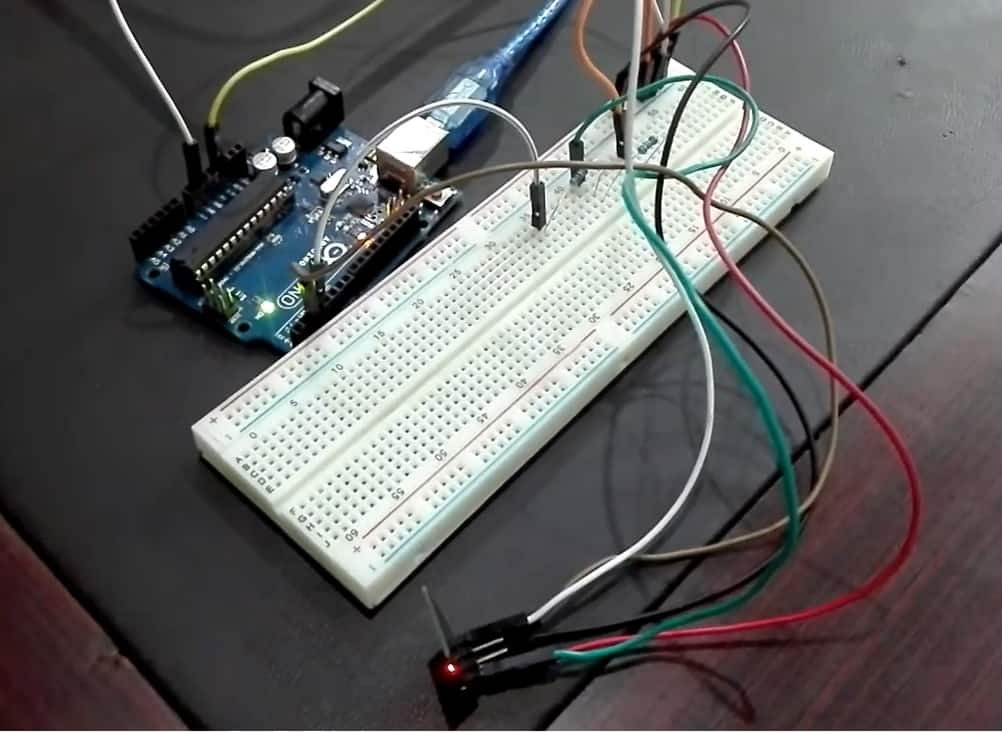
Arduino Uno R3 does not support Wi-Fi capabilities hence we have to use a separate Wi-Fi module to enable Wi-Fi connectivity. Therefore, we will interface and program the ESP-01 Wi-Fi module with Arduino to enable Wi-Fi features. We will use Arduino IDE to program our Arduino with ESP-01. AT commands through the serial port that is UART will be used to configure the ESP-01 Wi-Fi module.
Recommended Reading: Interface Arduino with esp8266 WI-FI module
ESP-01 Wi-Fi Module Introduction
Wireless Fidelity is a term used for products that use any type of 802.11 technology. Wi-Fi network operates with 11 Mbps or 54 Mbps data rate in the unlicensed 2.4 GHz and 5GHz radio frequency band. Devices which have Wi-Fi enabled can send and receive data wirelessly from locations which are equipped with wireless access. Access points which are located in a Wi-Fi location transmit RF signal for the Wi-Fi enabled devices. These Wi-Fi enabled devices can receive the signal if they are located within access point range. The speed of data transmission depends upon the speed of pipeline fed into the access point.
Working Principle
A radio signal is the base of operation of Wi-Fi. It is made up of three elements which are essential for its working.
The radio signals are transmitted by antenna and routers and they are received by Wi-Fi receiver such as computers.
ESP8266 WiFi Module
In August 2014 Espressif Systems launched their first raw module which is manufactured by a third part AI-Thinker and module referred to as ESP-01 module.
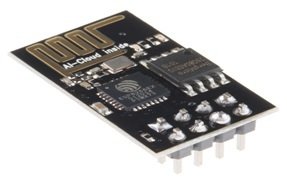
ESP8266 delivers a highly integrated WiFi solution that meets the needs of the Internet of Things industries such as low cost, efficient power usage, trustworthy performance, and compact design.
The ESP8266 WIFI module is basically a complete Wi-Fi solution, which has self-contained integrated TCP/IP protocol stack that can be easily connected to the microcontroller for gaining access to any Wi-Fi network.
There are many ESP8266 WiFi modules available in the market ranging from ESP-01 to ESP-12. But in this tutorial, we are using ESP-01. AT commands are the same for all these ESP modules.
ESP-01 Module pinout
The ESP8266-01 WiFi module consists of two rows of eight pins. The pin configuration diagram is shown in the figure below:
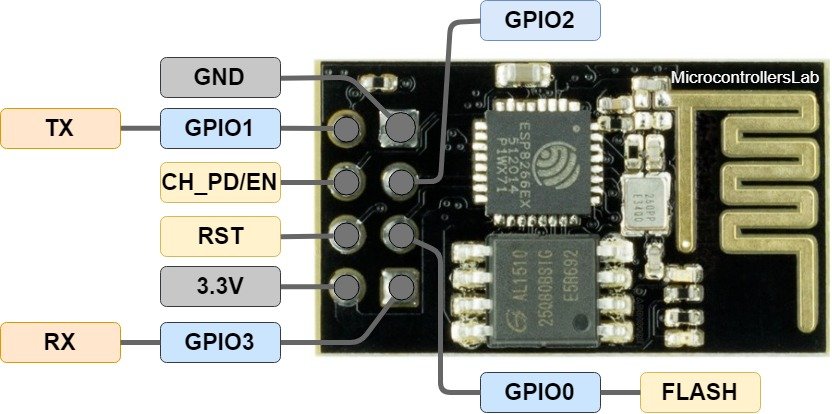
It has a total of 8 pins of which 6 pins are active.
| Label | Description |
|---|---|
| 3.3V | Supply 3.3 volts pin |
| GND | Ground pin |
| RST | Reset Pin |
| CH_PD/EN | Chip Power and Enable pin |
| GPIO 0 to 3 | UART interface and input/output pins |
- Pin_1, which is a GND pin, is directly connected to the ground for power on this module.
- Pins_2 and 3, which are the GPIO 2 and GPIO 0, these pins decide in which mode the module would be a start-up, in other words, these are mode selected pins.
- Pins_4 and 5, which are RX and TX, these pins are used for communication purposes and program the module.
- Pin_6 which is CH_PD, it is called chip power-down pin.
- Pin_7 which is the RST pin and this pin is used to reset module.
- Pin_8 is a VCC pin that is used to power the module. The operating voltage of ESP-01 is 3.3 volts.
Send Data to a Web Page using Arduino
We will require the following components for this project.
Required Components:
- Arduino Uno: We will use Arduino due to its easy use. It also provides several digital pins to interface with the ESP8266 Wi-Fi module. It is very friendly when you prototyping any project.
- ESP8266 Wi-Fi Module: ESP8266 is a Wi-Fi chip that provides Transfer Control Protocol (TCP) and Internet Protocol (IP). There are different ESP8266 modules available in the market. In this project, we will use ESP-01. It has 6 pins and operates on 3.3v.
Arduino with ESP-01
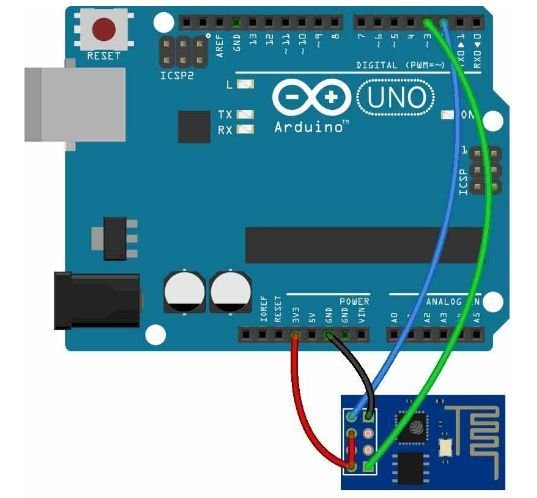
The ESP-01 module consists of 8 pins. However, we will use 5 of these pins to connect with Arduino. These include the VCC, EN, GND, RX, and TX pins.
The table below shows the connections that we will use to connect the two devices:
| ESP-01 | Arduino UNO |
|---|---|
| VCC | 3.3V |
| EN | 3.3V |
| GND | GND |
| TX | Pin 2 |
| RX | Pin 3 |
Explanation of Process:
The general procedure for receiving data consists of the following steps
- Connect Wi-Fi module to Wi-Fi router for network connectivity
- Configure the local server
- Send the data to Webpage
- Close the connection
Send Data to a web page with Arduino Sketch
We will use Arduino IDE to program our Arduino board.
Arduino Sketch
Open your Arduino IDE and go to File > New to open a new file. Copy the code given below in that file and save it.
#include<SoftwareSerial.h>
SoftwareSerial comm(2, 3); //setting Tx and Rx pins

String server = ""; //variable for sending data to webpage
boolean No_IP = false; //variable to check for ip Address
String IP = ""; //variable to store ip Address
char temp1 = '0';

int a = 0;
int b = 0;

String str1 = "<p>I am Arduino</p>"; //String to display on webpage
String str2 = "<p>Data Received Successfully.....</p>"; //another string to display on webpage

void setup()
{
  Serial.begin(9600);
  comm.begin(9600);
  wifi_init();
  Serial.println("System Ready..");
}

void loop()
{
  b = 0;
  Serial.println("Refresh Page");
  while (b < 1000)
  {
    b++;
    while (comm.available())
    {
      if (comm.find("0,CONNECT"))
      {
        Serial.println("Starting");
        sendToServer();
        Serial.println("Finished");
        delay(1000);
      }
    }
    delay(1);
  }
}


void findIp(int time1) //check for the availability of IP Address
{
  int time2 = millis();
  while (time2 + time1 > millis())
  {
    while (comm.available() > 0)
    {
      if (comm.find("IP has been read"))
      {
        No_IP = true;
      }
    }
  }
}

void showIP()//Display the IP Address
{
  IP = "";
  char ch = 0;
  while (1)
  {
    comm.println("AT+CIFSR");
    while (comm.available() > 0)
    {
      if (comm.find("STAIP,"))
      {
        delay(1000);
        Serial.print("IP Address:");
        while (comm.available() > 0)
        {
          ch = comm.read();
          if (ch == '+')
            break;
          IP += ch;
        }
      }
      if (ch == '+')
        break;
    }
    if (ch == '+')
      break;
    delay(1000);
  }
  Serial.print(IP);
  Serial.print("Port:");
  Serial.println(80);
}

void establishConnection(String command, int timeOut) //Define the process for sending AT commands to module
{
  int q = 0;
  while (1)
  {
    Serial.println(command);
    comm.println(command);
    while (comm.available())
    {
      if (comm.find("OK"))
        q = 8;
    }
    delay(timeOut);
    if (q > 5)
      break;
    q++;
  }
  if (q == 8)
    Serial.println("OK");
  else
    Serial.println("Error");
}

void wifi_init() //send AT commands to module
{
  establishConnection("AT", 100);
  delay(1000);
  establishConnection("AT+CWMODE=3", 100);
  delay(1000);
  establishConnection("AT+CWQAP", 100);
  delay(1000);
  establishConnection("AT+RST", 5000);
  delay(1000);
  findIp(5000);
  if (!No_IP)
  {
    Serial.println("Connecting Wifi....");
    establishConnection("AT+CWJAP=\"Apna lawao\",\"p4panama\"", 7000); //provide your WiFi username and password here
  }
  else
  {
  }
  Serial.println("Wifi Connected");
  showIP();
  establishConnection("AT+CIPMUX=1", 100);
  establishConnection("AT+CIPSERVER=1,80", 100);
}

void sendData(String server1)//send data to module
{
  int p = 0;
  while (1)
  {
    unsigned int l = server1.length();
    Serial.print("AT+CIPSEND=0,");
    comm.print("AT+CIPSEND=0,");
    Serial.println(l + 2);
    comm.println(l + 2);
    delay(100);
    Serial.println(server1);
    comm.println(server1);
    while (comm.available())
    {
      //Serial.print(Serial.read());
      if (comm.find("OK"))
      {
        p = 11;
        break;
      }
    }
    if (p == 11)
      break;
    delay(100);
  }
}

void sendToServer()//send data to webpage
{
  server = "<h1>Welcome to Data Receiving from Arduino</h1>";
  sendData(server);
  server = str1;
  server += str2;
  sendData(server);
  delay(5000);
  comm.println("AT+CIPCLOSE=0");
}
How the Code Works?
Include the software serial library which enables us to use other pins as Tx and Rx pins. This saves us from plugging out the wires from pin0 and pin1 of board each time we upload our program. If you use D0 and D1 as Tx and Rx pins then you will have to unplug these pins each time you upload program to Arduino board.
#include<SoftwareSerial.h>The following line defines the serial communication Tx pin at Arduino pin 2 and Rx at Arduino pin 3.
SoftwareSerial comm(2, 3); //setting Tx and Rx pinsThe following two strings ‘str1’ and ‘str2’ will be sent to the web server.
String str1 = "<p>I am Arduino</p>"; //String to display on webpage
String str2 = "<p>Data Received Successfully.....</p>"; //another string to display on webpage
setup()
Inside the setup() function, we initialize the serial UART communication for Wi-Fi module and also initialize the serial monitor using 9600 baud rate. Moreover, we also call the wifi_init() function and print ‘System Ready..’ in the serial monitor.
void setup()
{
  Serial.begin(9600);
  comm.begin(9600);
  wifi_init();
  Serial.println("System Ready..");
}
loop()
This function asks the user to refresh the webpage. It also checks for the connectivity of the server. When data is available it is automatically sent to the webpage using void sendToServer() function.
void loop()
{
  b = 0;
  Serial.println("Refresh Page");
  while (b < 1000)
  {
    b++;
    while (comm.available())
    {
      if (comm.find("0,CONNECT"))
      {
        Serial.println("Starting");
        sendToServer();
        Serial.println("Finished");
        delay(1000);
      }
    }
    delay(1);
  }
}
findIp()
The findIp() function is used to check for the availability of the IP address. However it does not display the IP Address. If the IP Address is available, then it changes the state of the Boolean variable ‘No_IP’ to true.
void findIp(int time1)
{
  int time2 = millis();
  while (time2 + time1 > millis())
  {
    while (comm.available() > 0)
    {
      if (comm.find("IP has been read"))
      {
        No_IP = true;
      }
    }
  }
}
showIP()
The showIP() function is used to display the IP address. This IP Address is used for the communication between the webpage and the Wi-Fi module
AT+CIFSR: This command obtains the local IP address.
void showIP()
{
  IP = "";
  char ch = 0;
  while (1)
  {
    comm.println("AT+CIFSR");
    while (comm.available() > 0)
    {
      if (comm.find("STAIP,"))
      {
        delay(1000);
        Serial.print("IP Address:");
        while (comm.available() > 0)
        {
          ch = comm.read();
          if (ch == '+')
            break;
          IP += ch;
        }
      }
      if (ch == '+')
        break;
    }
    if (ch == '+')
      break;
    delay(1000);
  }
  Serial.print(IP);
  Serial.print("Port:");
  Serial.println(80);
}
establishConnection()
This function defines the process of sending AT commands to Wi-Fi connection and then reads back the response of the Wi-Fi module. It takes in two parameters. The first is the AT command and the second is the delay time.
void establishConnection(String command, int timeOut)
{
  int q = 0;
  while (1)
  {
    Serial.println(command);
    comm.println(command);
    while (comm.available())
    {
      if (comm.find("OK"))
        q = 8;
    }
    delay(timeOut);
    if (q > 5)
      break;
    q++;
  }
  if (q == 8)
    Serial.println("OK");
  else
    Serial.println("Error");
}
wifi_init()
The wifi_init() function is used to send the AT commands to the Wi-Fi module. It initializes the Wi-Fi connection by sending the AT commands.
This is done by following commands:
AT: This command is sent to the test Wi-Fi Module whether it is working properly or not, whether its connections are fine or not send. Wi-Fi module should reply OK against this command.
AT+CWMODE=mode_id This command is used to select mode of operation of Wi-Fi module. Mode-id can carry following values.
Mode ids
1 = Station mode (client)
2 = AP mode (host)
3 = AP + Station mode
AT+CWQAP This command is used to disconnect the Wi-Fi module from previously connected network. The Wi-Fi module is configured to automatically connect with any previous network.
AT+RST This command is used to reset the module. The use of this command is optional which means we don’t need to reset the module every time. However in case you think there is some problem you can use this command.
AT+CWJAP=”wifi_username”,”wifi_password” This command is used to connect the Wi-Fi module with the Wi-Fi router. Replace wifi_username with the name of your Wi-Fi router and wifi_password with the password of your Wi-Fi router.
AT+CIPMUX=1 This command is used to enable multiplexing mode. 1 is used for multiple connections and 0 is used for single connection.
AT+CIPSERVER=1, port_no This command is used to configure the module as a server. Here ‘1’ is used to create the server and ‘0’ to delete the server. Default port number is 80. However, if your internet service provider has blocked it, you need to provide your respective port number by consulting him.
void wifi_init()
{
  establishConnection("AT", 100);
  delay(1000);
  establishConnection("AT+CWMODE=3", 100);
  delay(1000);
  establishConnection("AT+CWQAP", 100);
  delay(1000);
  establishConnection("AT+RST", 5000);
  delay(1000);
  findIp(5000);
  if (!No_IP)
  {
    Serial.println("Connecting Wifi....");
    establishConnection("AT+CWJAP=\"Apna lawao\",\"p4panama\"", 7000); //provide your WiFi username and password here
  }
  else
  {
  }
  Serial.println("Wifi Connected");
  showIP();
  establishConnection("AT+CIPMUX=1", 100);
  establishConnection("AT+CIPSERVER=1,80", 100);
}
sendData()
The following function is used to send data to the sendToServer() function. These data strings will be further sent to the webpage.
AT+CIPSEND =id, length of data This command is used to send data to the locally created server.
Id = ID no. of transmit connection
Length = Max length of data is 2 kb
After sending ID and Length to the server, we need to send data by using this AT command which will be displayed on webpage and serial monitor.
void sendData(String server1)
{
  int p = 0;
  while (1)
  {
    unsigned int l = server1.length();
    Serial.print("AT+CIPSEND=0,");
    comm.print("AT+CIPSEND=0,");
    Serial.println(l + 2);
    comm.println(l + 2);
    delay(100);
    Serial.println(server1);
    comm.println(server1);
    while (comm.available())
    {
      //Serial.print(Serial.read());
      if (comm.find("OK"))
      {
        p = 11;
        break;
      }
    }
    if (p == 11)
      break;
    delay(100);
  }
}
sendToServer()
This function is used to send data to locally created webserver, in our case, a webpage.
AT+CIPCLOSE=0 This command is used to close the connection at the end. It is necessary to close the connection after sending data to locally created server i.e. webpage.
void sendToServer()//send data to webpage
{
  server = "<h1>Welcome to Data Receiving from Arduino</h1>";
  sendData(server);
  server = str1;
  server += str2;
  sendData(server);
  delay(5000);
  comm.println("AT+CIPCLOSE=0");
}
Demonstration
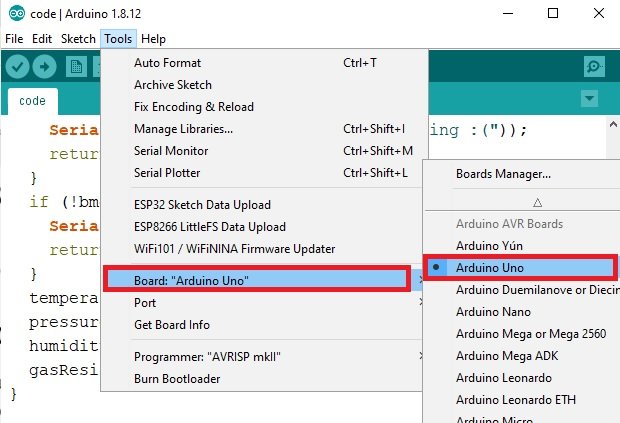
Make sure you choose the correct board and COM port before uploading your code to the board. Go to Tools > Board and select Arduino UNO. Next, go to Tools > Port and select the appropriate port through which your board is connected.
Click on the upload button to upload the code to the board.
After you have uploaded your code to the development board, open the serial monitor and set the baud rate to 9600. In a few moments, the Wi-Fi will get connected and you will receive an IP address. Now type that IP address in a new web browser and press enter.

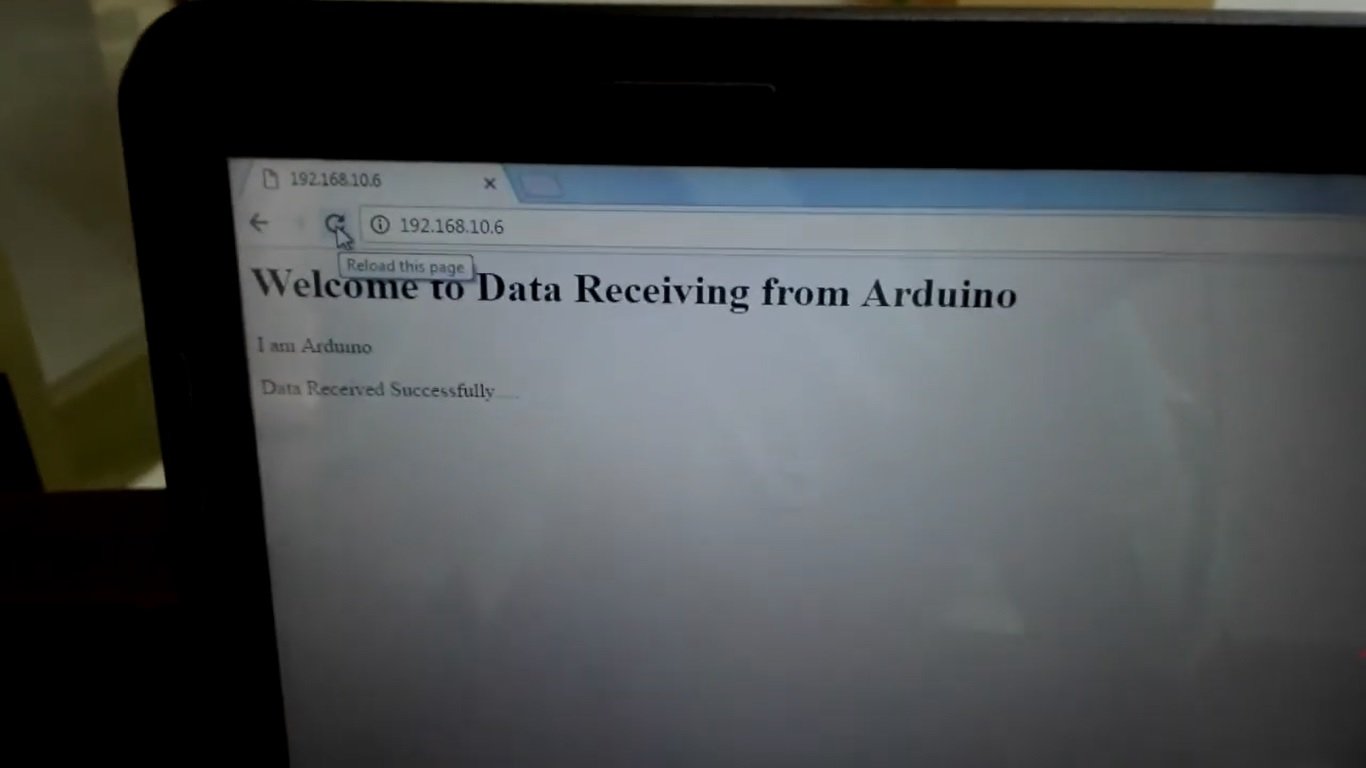
The web page will open. Here you can view the data sent by ESP8266 Wi-Fi module.
Watch the video demonstration below:
You may also like to read:
- WiFi based Home Automation System over cloud using Arduino
- Voice Controlled Robot using Arduino and Voice Recognition App
- WiFi Controlled Robot using Arduino and Blynk App
- Sending Data from GSM module to a Web Server using Arduino
- Web Controlled Servo Motor using Arduino and ESP8266
- ESP8266 Wi-Fi Module interfacing with Arduino: Send data to server (ThingSpeak)
- GSM module interfacing with Arduino: Send and receive SMS


Im wondering if you could help me with reading the data from the server, instead of submiting it
Hey,i have the same probleme, i can send data from arduino to a server but how can i read from the server?
how you send data from arduino to server plz can you guide me or refences
it did not work with pin 2 and 3 as tx ,rx i had to connect it with 9,10.
after that it was working properly i got my ip address as “192.178.0.103”
but i am unable to open this in my browser it takes to long to open
what can be done?
thanks in advance.
Did you get a solution for this?
I M GETTING ERROR GUYS
AT
ERROR
AT+CWQAP
ERROR
LIKE THIS WHAT SHOULD I DO NOW
sir;
i am b.tech 3 rd year student and i am kind of struggling with a new idea or aspects in the field of energy consuming and billing through energy meter and internet …that’s iot…
few ideas i have regarding that like—THEFT PROTECTION AND DISCONNECTION..
AND
ESTIMATION THROUGH VOLTMETER SENSORS,CURRENT AND POWER FACTOR,PHASE ANGLE …AND ALSO SOME FOR MAKING AN AMAZING SMART SYSTEM. (energy flow…)
your project was amazingly well..i’m deeply inspired..i am wondering to get help to make that iot server too..so please do send me your help to my email-id..it will be my pleasure…
so please help me with something which could be implemented into this.. and also send me schematics of this project.
Hi there, were your issues solved? Im kind of in the same situation and struggling with the coding and sending and viewing data from esp8266. I would be very thankful to you for some help /guidance
please let us know what issue you are facing?
sir, i didn’t understand how to interface wi-fi module with arduino uno using proteus software”. please help me out in interfacing it.
thank you
i am getting this error:
AT
AT
AT
AT
AT
AT
AT
Error
AT+CWMODE=3
AT+CWMODE=3
AT+CWMODE=3
AT+CWMODE=3
AT+CWMODE=3
AT+CWMODE=3
AT+CWMODE=3
Error
AT+CWQAP
AT+CWQAP
AT+CWQAP
AT+CWQAP
AT+CWQAP
AT+CWQAP
AT+CWQAP
Error
AT+RST
Can you please help.
just remove the resistor
did you get the solution?
I have the same problem, Did you get solution for this?
This cannot work. Communication with a webserver is based on the http protocol. In this code I can just see AT commands and serial communication
Then you don’t know how ESP8266 makes HTTP request get/post requests through AT commands.
Hi there!
We are a group of students currently in university, your awesome code just saved us an entire week of work. We are forever grateful.
– p + e