This is a getting started guide on STM32 Nucleo with Arduino IDE. In this tutorial, we will learn to use STM32 Nucleo boards with Arduino programming framework. Firstly, we will see how to install the STM32duino framework in Arduino IDE. Secondly, we will see a LED blinking example to use GPIO pins of Nucleo board as digital output pins.
Recommended Components
The following components are used in this project or are helpful for getting started with STM32 Nucleo development.
| Component | How it’s used in this project | Buy on Amazon |
|---|---|---|
| STM32 Nucleo Board (NUCLEO-F103RB) | The STM32 Nucleo-64 development board used in this guide. | Check Price |
| Micro USB / Mini-B USB Cable | Type-A to Mini-B cable to program and power the Nucleo over its onboard ST-Link. | Check Price |
As an Amazon Associate we earn from qualifying purchases. Prices and availability are accurate as of the date/time indicated and are subject to change.
STM32 Nucleo Boards Introduction
ST Microelectronics introduced powerful, low-cost, and affordable development boards as compared to STM32 discovery boards. Because discovery boards have higher prices than Nucleo boards. These boards allow you to develop and prototype your application quickly at a low cost. Most importantly, they are compatible with a large number of hardware add-ons available for Arduino Uno and Arduino Nano.
Three are three main types of Nucleo boars which are classified in terms of flash size, high performance, ultra-low power, and wireless capability features such as Nucleo-32, Nucleo-64, and Nucleo-144.
There are different programming environments are available to program Nucleo boards such as Arduino, STM32Cube, Mbed, Zephyr RTOS, etc. But we will be using the Arduino framework in this series of tutorials.
Why Use Arduino to Program STM32 Nucleo Boards?
The main reason to use Arduino to program STM32 boards is due to the simplicity and ease of use of Arduino IDE to program various boards. Secondly, if you are already familiar with Arduino and used it to program Arduino boards, you can easily apply that experience to program STM32 boards also. Most importantly, the STM32 Core official team has ported all Nucleo and other STM32 boards into Arduino IDE. That means we can use the same Arduino APIs to use STM boards.
You can get more information about the STM32 Arduino core from this repository.
Installing STM32 Core in Arduino IDE
After having a brief introduction of STM32 Nucleo boards and STM32 Arduino core, let’s see how to install STM32 library in Arduino IDE.
First of all, you should make sure, you have Arduino IDE installed on your system. Download and install Arduino IDE for your operating systems such as Windows, Linux, and MAC,
Adding Board Support Package
After installing Arduino IDE, we need to add a board support package of STM32 Arduino core in Arduino IDE. The board support package manager allows you to add additional boards into Arduino IDE. Follow these steps to add STM32:
Open IDE and click on Files –> preferences:
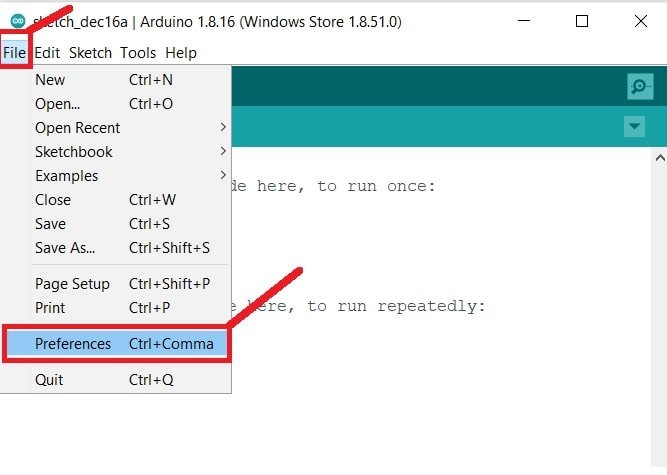
After that, the”Preferences” window will appear. Click on the rectangular box next to “Additional boards manager URLs”.

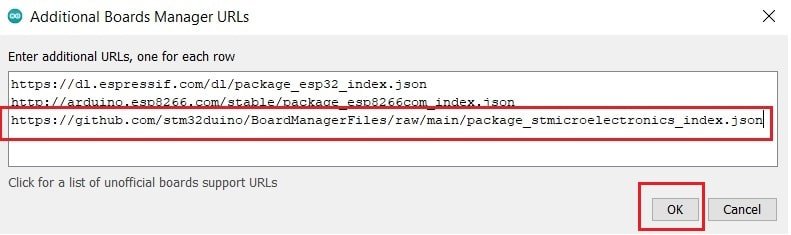
Now add the following link to the “Additional Boards Managers URLs” field:
https://github.com/stm32duino/BoardManagerFiles/raw/main/package_stmicroelectronics_index.json
Depending on the additional boards which you have used with Arduino IDE, there may be other URLs already. You should add them to a new line. Now, click on “OK” to save settings.
Now go to tools > board > Boards Manager
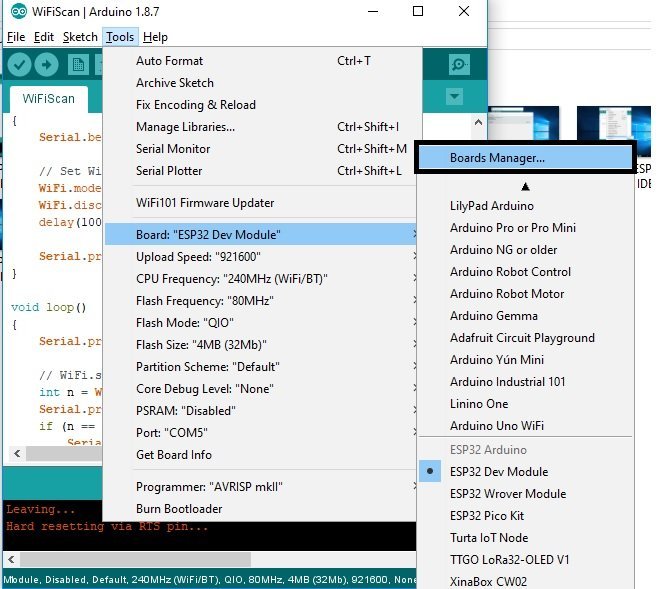
After that, a board manager window will open where you can see a list of installed boards in your Arduino IDE.
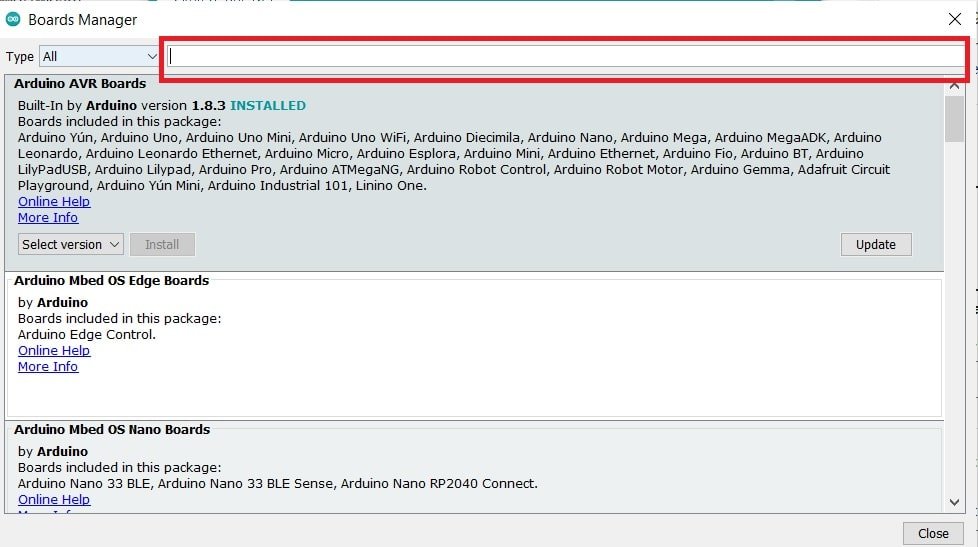
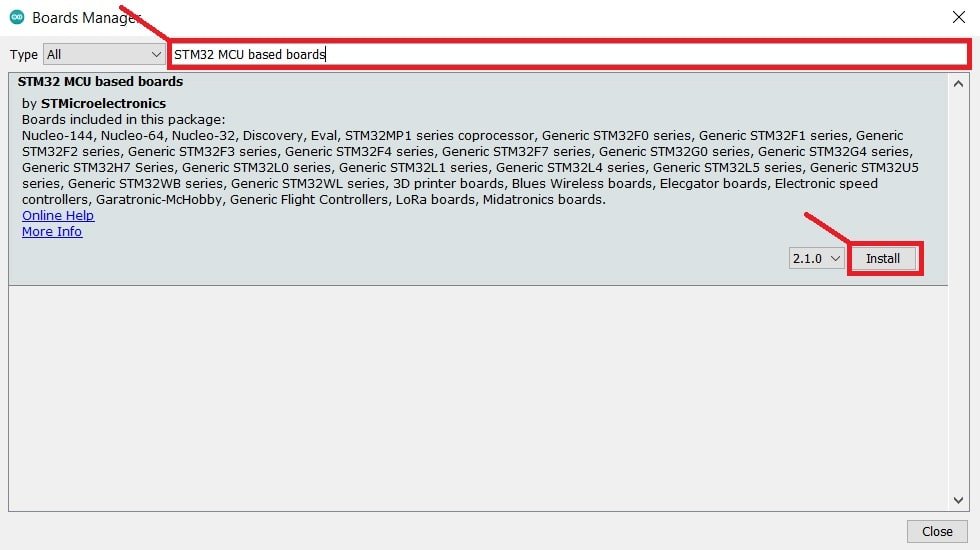
Type the “STM32 MCU based boards” in the search bard and select “STM32 MCU based boards” and click on install button:
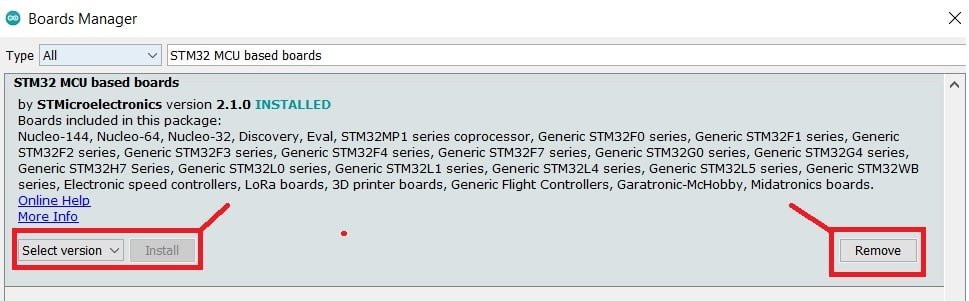
It will install all required STM32 Arduino core libraries and APIs. After installation is finished an “INSTALLED” message arises next to the STM32 core name.
That’s it. You are able to install STM32 Arduino core in Arduino IDE. You can now close the board manager window.
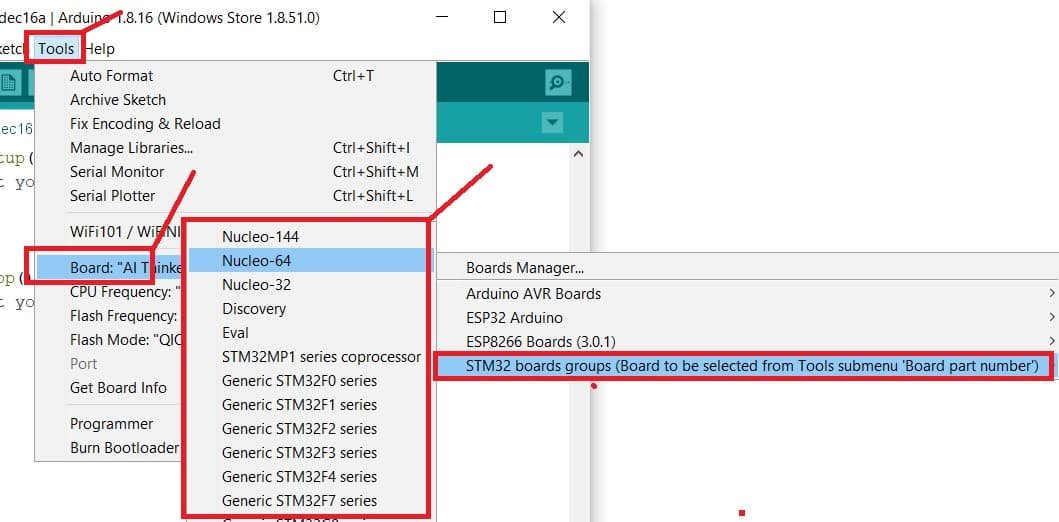
To check if the library is installed properly or not, you can go to tools > boards > stm32 boards groups. You can select the Nucleo boards such as Nucleo-64, Nucleo-144, etc.
Programming STM32 Nucleo with Arduino IDE
Till now, in this tutorial, we have installed STM32 Arduino core in Arduino IDE. In this section, we will see how to write your first program and upload it to the STM32 Nucleo board.
In this tutorial, we will use the Nucleo-F103RB board. But you can use any other Nucleo board also and follow the same instructions to program your boards.
The Nucleo-F103RB board which we are using in this tutorial belongs to Nucleo-64 types. Therefore select, Nucleo-64 from STM32 board groups. You can select other Nucleo types according to the board which you are using such as Nucleo-32 and Nucleo-144.

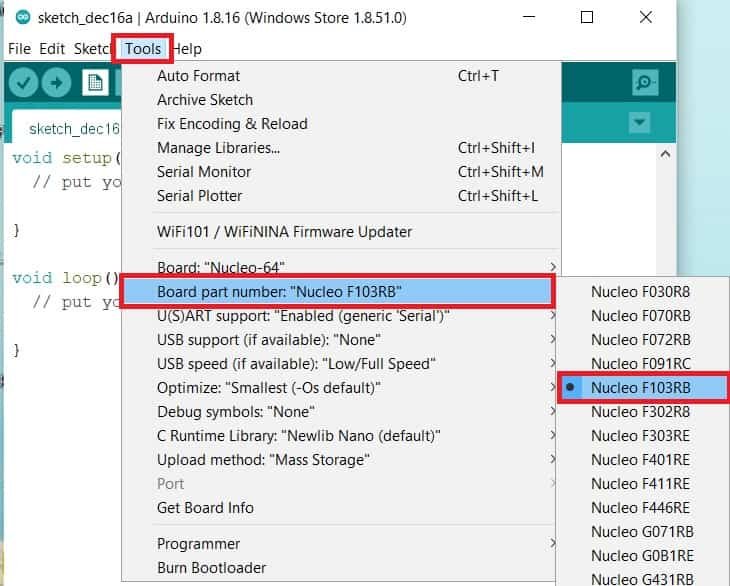
As mentioned earlier, there are many variants of Nucleo boards that come with different STM32 chips. The one which we are using has a part number of Nucleo-F103RB. Hence, select your board part number from Tools > Board Part Number:
STM32 Nucleo LED Blinking Example
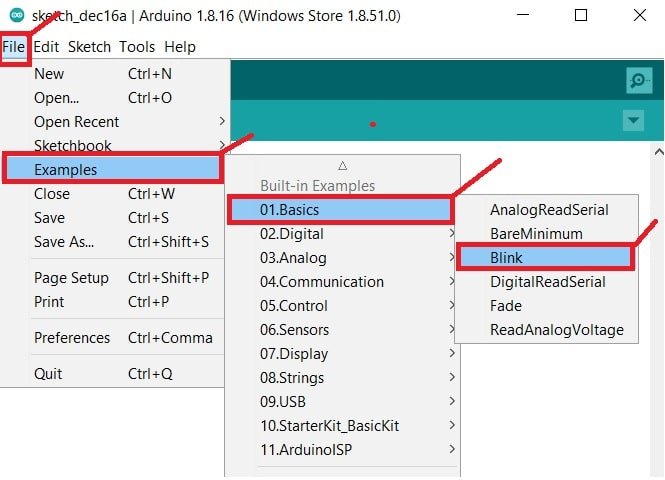
Now let’s see a sample LED blinking example available in examples of Arduino IDE. To open the LED blinking example go to File > Examples > Basics > Blink and click on it. It will open a simple LED blinking example which will blink onboard LED of Nucleo-F103RB at the rate of 1 second.
/*
Blink
Turns an LED on for one second, then off for one second, repeatedly.
Most Arduinos have an on-board LED you can control. On the UNO, MEGA and ZERO
it is attached to digital pin 13, on MKR1000 on pin 6. LED_BUILTIN is set to
the correct LED pin independent of which board is used.
If you want to know what pin the on-board LED is connected to on your Arduino
model, check the Technical Specs of your board at:
https://www.arduino.cc/en/Main/Products
modified 8 May 2014
by Scott Fitzgerald
modified 2 Sep 2016
by Arturo Guadalupi
modified 8 Sep 2016
by Colby Newman
This example code is in the public domain.
https://www.arduino.cc/en/Tutorial/BuiltInExamples/Blink
*/
// the setup function runs once when you press reset or power the board
void setup() {
// initialize digital pin LED_BUILTIN as an output.
pinMode(LED_BUILTIN, OUTPUT);
}
// the loop function runs over and over again forever
void loop() {
digitalWrite(LED_BUILTIN, HIGH); // turn the LED on (HIGH is the voltage level)
delay(1000); // wait for a second
digitalWrite(LED_BUILTIN, LOW); // turn the LED off by making the voltage LOW
delay(1000); // wait for a second
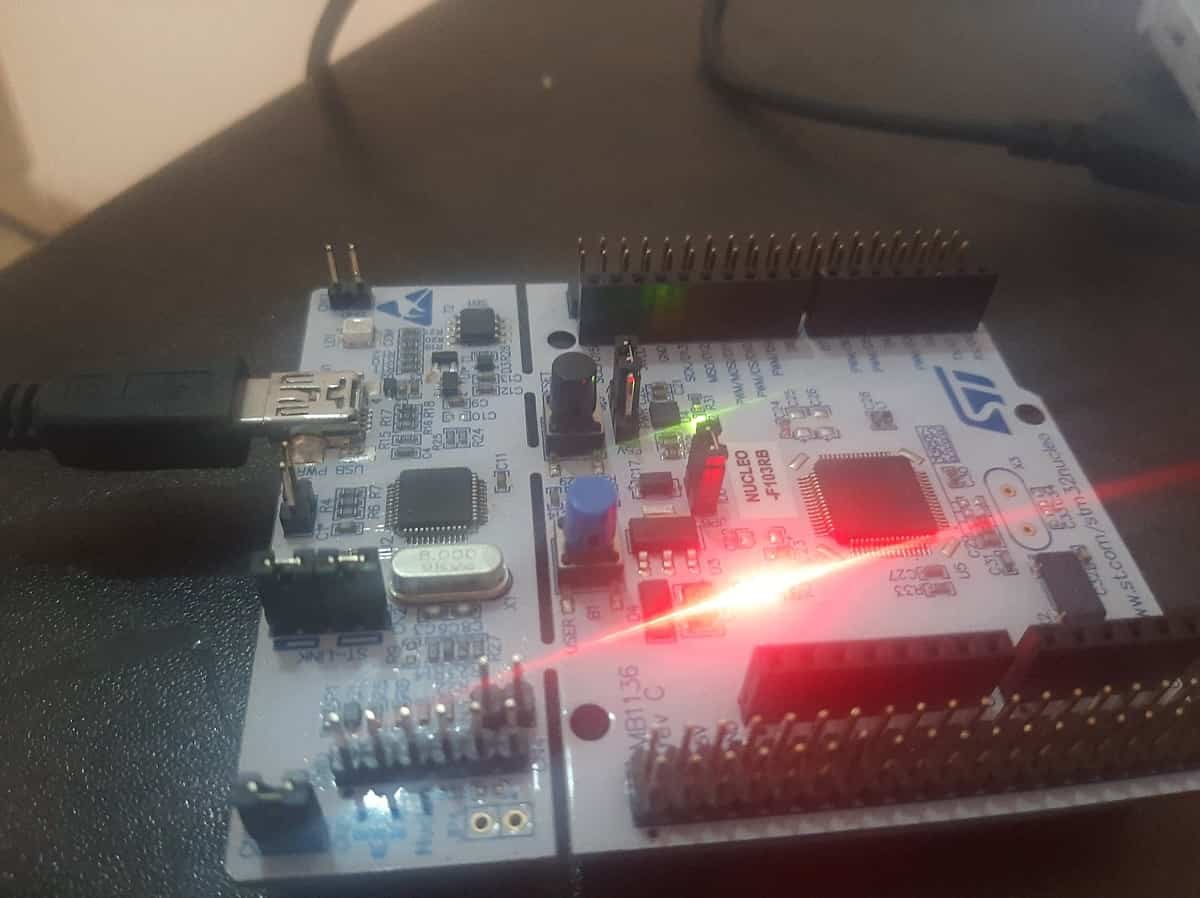
}The above code blinks an onboard LED of Nucleo-F103RB after every one second. This is mentioned as LD2 on the Nucleo board and it is connected with the PA5 pin of F103RB.
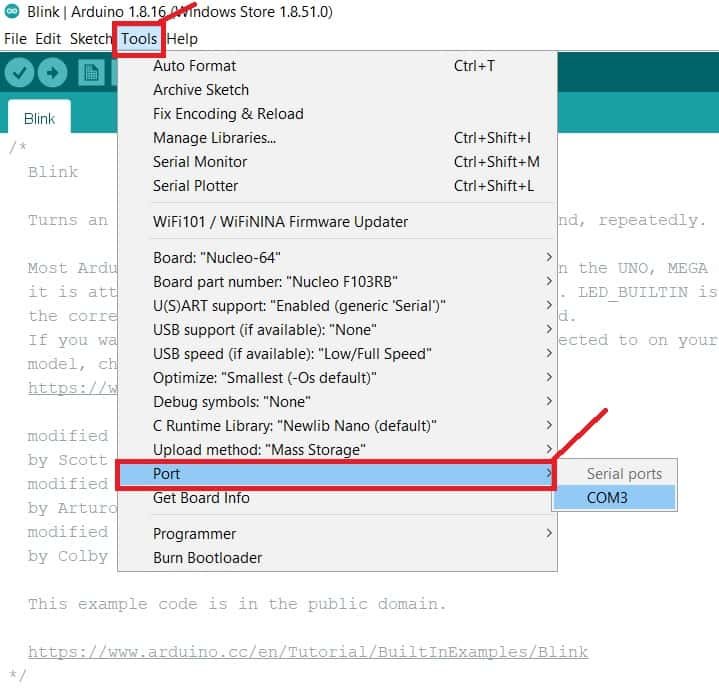
Now select the COM port to which your Nucleo board is connected. Go to Tools > Ports:
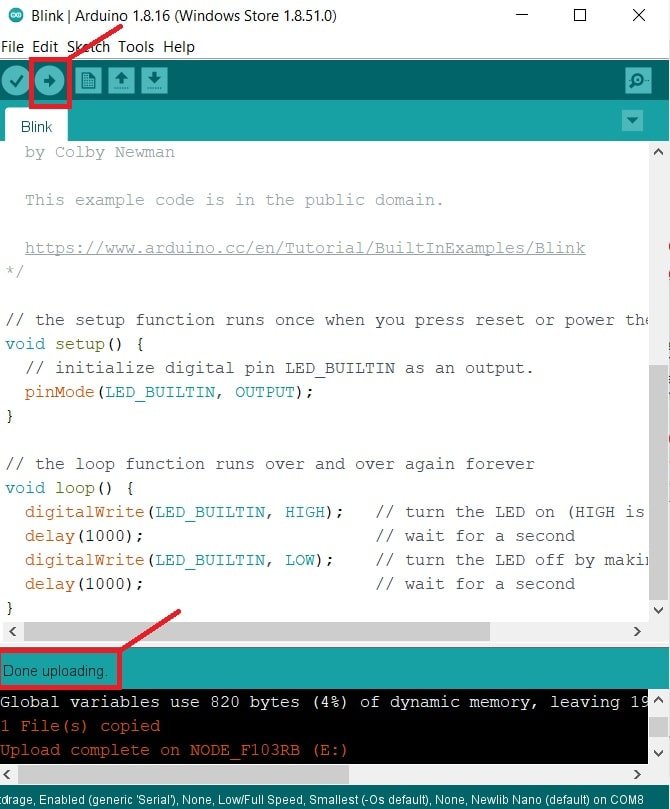
After that, compile the code and hit on upload button to upload code to the Nucleo board.
After uploading the code, you will notice that the onboard LED of the Nucleo board will start blinking as follows:
In summary, in this tutorial, we have learned to use STM32 Nucleo boards with Arduino. Firstly, we have seen an Introduction to Nucleo boards. Secondly, we have learned to install STM32 Arduino Core in Arduino IDE. In the end, we see how to program and upload code to the Nucleo board using Arduino IDE.
You may also like to read:
- LED Blinking Tutorial STM32F4 Discovery Board – GPIO Pins with HAL Library
- Getting started with Keil uVision: Write your first Program for Tiva LaunchPad
- STM32 Blue Pill GPIO Pins with STM32Cube IDE: LED Blinking Tutorial
- DS18B20 Sensor with STM32 Nucleo using STM32CubeIDE
- DHT22 Sensor with STM32 Nucleo using STM32CubeIDE
- BME280 Sensor with STM32 Nucleo using STM32CubeIDE
- I2C LCD with STM32 Nucleo using STM32CubeIDE
With Best thanks
Thank you.