AT commands are essential for communication with GSM modules and modems. In this tutorial, we will explore the fundamentals of AT commands, their format, and types. By understanding these commands, you will be able to utilize GSM modules effectively, whether it’s for sending SMS messages or performing other tasks. We will also discuss how to interface GSM modules with microcontrollers using AT commands. So let’s dive into the world of AT commands and discover the power they hold in GSM-based projects.
AT Commands Introduction
AT commands are used in many applications. In this tutorial, you will learn what AT commands are, their types, and format. How to use them for GSM modem or GSM module? How to use them for SIM300D GSM module? AT is a mnemonic code for Attention. It is like saying attention to anyone you want to communicate with. To know whether that person is ready to communicate with you or not, you want a response. Similarly, the ‘AT’ command is sent to the modem as an attention command to communicate, and a basic response is ‘OK’ from the modem. By using these commands, a GSM module can be used to send SMS using GSM and perform many other tasks. You can easily interface GSM with a microcontroller by using AT commands.
AT Commands Format
Every AT command has three important parts which are prefix, a body, and a terminator.
- Prefix is known to be the AT.
- Body is the instruction/command to be executed(using ‘+’ or ‘&’ operator).
- Terminator is the carriage return<CR>.
The characters entered in the AT command must be in the same case, either upper or lower. The command is analyzed by the modem after receiving the ENTER key character.
Response of AT commands
- AT commands response always start with <CR><LF>, and after this the response may be different according the execution statement
- In case of incorrect syntax of the command, an ERROR is returned by the modem
- In case of correct syntax but with something inappropriate in parameters, INVALID INPUT PARAMETERS error is returned.
- If the command executed successfully, along with the reply that was required an OK is also received.
Types of AT commands
AT commands can be handled in different ways. The types and the purpose of their difference in types are mentioned below:
- Test command: This command when deal with a ‘?’, is known as the test command. This command tells about the value ranges of the parameters.
- Read command: This command is also deal with a ‘?’, but this command tells us the values set by the user. This command can be used in a situation where you want to know the time of the Modem.
- Write command: This type of command consists of complete command to be executed. It actually sets the parameter values of the command.
- Execution command: This command is used very rarely. It reads the non-variable parameters of the modem that are only affected by internal processes executed in the GSM Modem.
You may also like to read: ESP8266 AT Commands
AT Commands with GSM module
ATE
Turns OFF/ON the echo mode of the modem. ATE1 turns ON the echo of the modem as sh0wn in figure below:

ATE0 turns OFF the echo mode of the modem. The instruction written after turning OFF the echo, are not visible but their responses can be seen. It is shown in figure below:

AT+IPR
Sets the baud rate on which the communication can be done.Figure below shows AT+IPR Hyper-terminal Demonstration. The figure shows that the baud rate set is 9600 for the communication.

AT&W
Modem stores the previous executed instruction into its non-volatile memory.Figure below AT+IPR Hyper-terminal Demonstration.

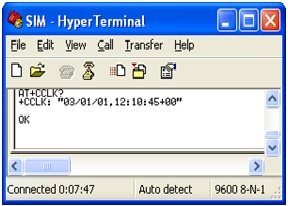
AT+CCLK
This command is used as read command, this command when used with’?’ reads the time of the modem in this format “year/month/day,hour:min:sec+/time zone”.Figure below shows AT+CCLK results.
AT+CALARM
Sets the alarm of the desired time for the modem. This command has variety of options to tackle with the alarm. The purpose for this command is used to set the alarm to turn ON the power of the modem, as the alarm timer gets UP. To set the alarm, proper format is required as shown in the figure below.

AT+CPOWD
This command turns the power OFF of the modem. As the Modem 300z is not hot removal, so we need to turn OFF the modem, while switching to another network.Figure below shows AT+CPOWD Hyper-terminal Demonstration.

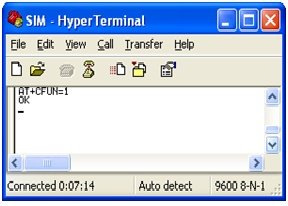
AT+CFUN
When we turn OFF the modem, and ON it through the alarm, we need to set its phone functionality to ‘1’, to attain full phone functionality.Figure shows AT+CFUN Hyper-terminal Demonstration.
AT+CPMS
It selects the memory sim/phone to access the messages. The memory is divided into three parts. The response shows the total memory and used memory.

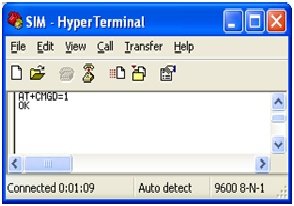
AT+CMGD
It deletes the message specified, from the sim/phone memory.
AT+CMGF
The message format needs to be decided, whether to be in PDU or TEXT mode. PDU mode is selected through ‘0’ whereas TEXT mode by ‘1’.

AT+CMGR
The message can be read by using above mention command, by just specifying the number of the message to be read.

AT+STRT
This command sets a timer for the sim, the minimum time that the sim should get a response. It can be set from 1sec to 3600sec.

AT+CMEE
This command is used in the STK toolkit, to keep check on the reported errors.

AT+STPD
The command sets integer for the number of bytes of data and the data in hexadecimal notation. Just like an initialization of sim.

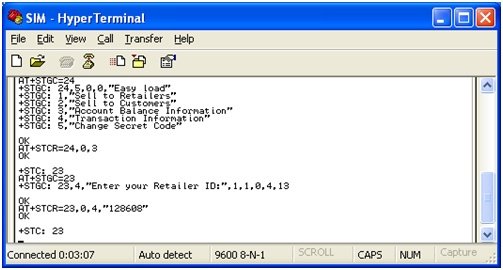
AT+STGC
This command is used to excess the next menu, by entering the ID returned from previous Instruction.

AT+STMS
To access the main menu of any sim, we can use this command by just specifying the menu number. As a response sub menu are listed.

AT+STCR
To send data to a specific menu or on the network. The menu number should also be given in the command.

Another demonstration to show the use of this command, by sending the message on the network
Conclusion
This is all about the article on AT commands introduction and implementation. I hope that after reading this article, you will be able to use AT commands in your GSM-based projects. Let me know if you come across any issues while using these commands in your project. You may also check out the wireless temperature sensor using GSM. Good luck! 🙂
Related content:
- SIM900A GSM Module
- Sending Data from GSM module to a Web Server using Arduino
- GSM Based Home Automation project using Arduino
- SIM900A GSM Module Interfacing with Arduino
- Receive SMS GSM Module using pic microcontroller
- How to Answer Phone Call using GSM Module and Computer
- How to Make Call using GSM Module on Mobile Phone
- Send sms using gsm module and pic microcontroller
How to interface the GSM with pic16f877a for read and display the SMS