Smart solar charge controller using a microcontroller is designed to charge batteries in an efficient way so that their lifetime can be increased. The pulse width modulation technique is used to charge the battery effectively. A PIC microcontroller is used to generate PWM. A liquid crystal digital display is used to show the values of the battery’s charging current, solar panel voltage, battery voltage, and load current. The PIC microcontroller is used to read all these analog values of voltage and current. Protection is also introduced through programming techniques so that in case of excess current, the solar charge controller will stop working. It can handle up to 10 amperes, making it a 10 Ampere solar charge controller.
What is a solar charge controller?
A solar charge controller, also known as a solar regulator, is a crucial component in a solar power system. Its primary function is to regulate the voltage and current coming from solar panels to ensure that the batteries connected to the system are charged efficiently and not overcharged. Solar panels generate varying levels of electric current depending on factors such as sunlight intensity and temperature, and without proper regulation, the batteries could be damaged.
There are two main types of solar charge controllers:
PWM (Pulse Width Modulation)
This type of controller rapidly switches the solar panel voltage on and off, effectively “chopping” the voltage to maintain the desired battery voltage. PWM controllers are a cost-effective option and work well for smaller solar power systems.
MPPT (Maximum Power Point Tracking)
MPPT controllers are more advanced and efficient. They dynamically adjust the electrical operating point of the solar panels, maximizing the power output from the solar array. MPPT controllers are particularly beneficial in situations where there are variations in temperature and sunlight intensity. They are more expensive than PWM controllers but are often preferred for larger solar installations.
Why do We need a Solar Charge Controller?
Using batteries in conjunction with solar panels can be problematic. To prevent premature battery failure, it is essential to incorporate a solar charge controller. For instance, if you possess a 12-volt battery and intend to charge it using a 12-volt solar panel, be aware that the solar panel typically outputs 17-20 volts. This higher voltage may pose a risk of damaging the battery through overcharging, as the battery’s maximum charging voltage typically falls between 13.5-14 volts.
To mitigate this potential issue, a regulator capable of managing the charge flow from the solar panel to the battery becomes necessary. This is where a solar charge controller comes into play. In the context of this project, PWM control has been implemented to prevent overcharging and ensure the longevity of the battery.
PWM Solar Charge Controller
There are many techniques used to make a solar charge controller. But in this project, I have used PWM (pulse width modulation) control technique. In upcoming articles, I will also write an article on the latest technique used in solar charge controllers: Maximum Power Point Tracking (MPPT). To get information about this MPPT article, subscribe to my blog by entering your email address and receive info about MPPT charge controllers in your inbox.
Coming back to PWM charge controllers, they use semiconductor devices like MOSFETs or IGBTs as switches to control the flow of charge into the battery by changing the duty cycle. The duty cycle ratio changes from the maximum value to the minimum value as the battery charging reaches the minimum to the maximum value.
If you don’t know what a duty cycle is or what a varying duty cycle entails, I suggest you to read the following article before continuing with this one.
Solar Panel Battery Voltage Measurement
A difference amplifier is used to measure the voltage of a solar panel, while a voltage divider is used to measure the voltage of a battery with the help of an analog-to-digital converter of a PIC microcontroller. However, the question arises as to why a voltage divider is not used to measure the voltage of a solar panel. There are two reasons:
1. Because solar panel voltage keeps fluctuating according to the intensity of light.
2. Because we are charging the battery with respect to the negative terminal of the solar panel.
To learn more about how to measure voltage using a PIC microcontroller, please refer to the following article:
MOSFET as a switch and MOSFET driver
IRF3205 is used as a switch to vary the duty cycle according to the amount of change in the battery. A Totem pole is used as a MOSFET driver to drive the MOSFET IRF3205.
To learn more about the working and circuit diagram of this project, watch the following video.
PCB Layout
The complete PCB layout of the smart solar charger controller using a PIC microcontroller is shown below:
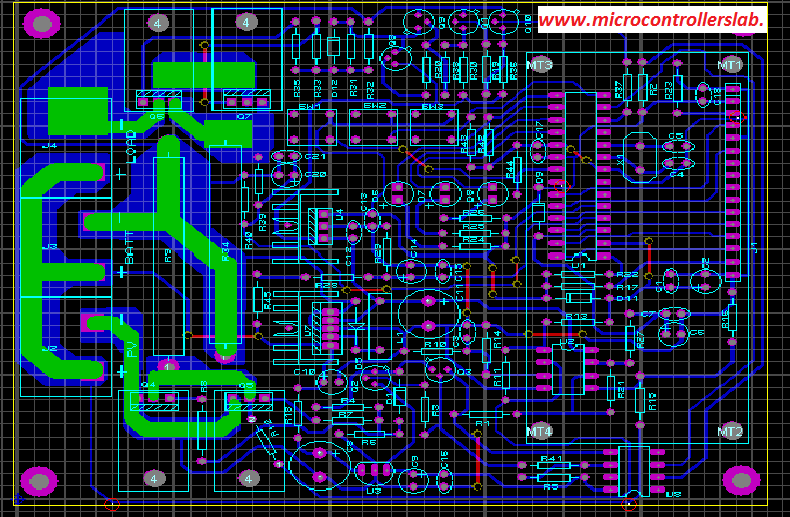
Complete PCB design of smart solar charger controller using pic microcontroller :
Top view :
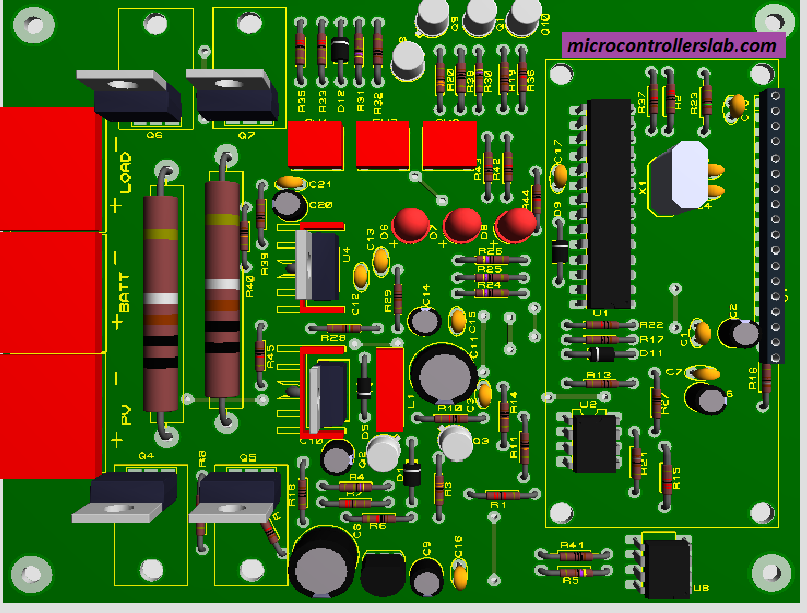
Front view :

If you want to purchase a code for a smart solar charge controller, contact me at microcontrollerslabhub@gmail.com
You may also like to read:
hello , can you send me the code ?
salam nice to meet u,if u have something new about mppt please be free to share with me
Assalam Alaykom
It’s the same of my project but I’m MPPT not PWM solar charge.
Can you help me about get more information and the code of mircrocontroller
Can I get the coding and the hex file please?
I hope are well< do you still have your project, do you mind to share, i will make share i mentioned you in my research
can you send the hex file and full diagram and pcb to me
Assalm-o-Alaikum
Can you send me full project.
Please reply as soon as possible.
i want to do the same with MPPT technique not PWM. Plz suggest me few microcontrolers for the charge controller as well as the coding for it with circuit diagram.
ASAP
hey bilal
i want to do same with mppt
please help me by send circuit and code
your brother of palestine
Salam Bilal.
would you mind letting me to have PCB and HEX file?
Thanks a lot.
hi..
please help me by send circuit and code….
majid.bagheri.1987@gmail.com
Bilal malik
Please send me smart solar charger schematic. Thanks.
Bilal Malik
Please send me smart solar charge circuit schematic.
Thanks
salamo alaykom I appreciate your effort please help me by send circuit and code
anan01963@hotmail.fr
As i have mentioned in article you have to write code yourself by using resources available on my blog or you can purchase code.
i want to buy this circuit data. but how ???? reply me and price
contact me at microcontrollerslabhub@gmail.com
Please send me all the information you have in regard to this project as soon as possible i will pay you in usd.
Hi..
please help me by send circuit and code….
nineneapna@gmail.com
code is not for free. you can purchase it from me
how much it’s code price ? i want to purchase for learn.
contact me at microcontrollerslabhub@gmail.com
I am using easyeda software.I am making 1kw solar charge controller using microcontroller.when run the ckt,it show error.
Hi Bilal,
i want to buy this project.
is this Project Open source ? i want to check the code and if i need modify the code.
Thanks.
plz help me with the code …
essalamun aleykum hove much code
uzeyirilden@hotmail.com
Ass.wr.wb. Senang sekali membaca tulisan anda menyangkut controller pwm. Namun akan lebih senang jika ditambahkan uraian mengenai maximum power point yracking (MPPT).
Saya mau belajar merakit dan membuat MPPT. Bagaimana cara beli layout dan PCB nya
hi my name sameera i want to know 5w panel 4ah solar latern design
Hi how does it recharge the battery, from full discharge state ?