Getting started with Arduino. In this article, I have explained the basics of Arduino hardware and software: how to use Arduino for the first time, how to connect the Arduino board to your computer, and how to start learning Arduino. I have answered all the questions in this article. If you are a beginner in Arduino learning, then this article is for you. Arduino is an easy-to-learn microcomputer system. Many engineering students and professionals are using it in their projects because it is a ready-to-use board.
We have covered following things in this Article :
- What is Arduino?
- Application of Arduino.
- Software for Arduino
- How to program Arduino?
- Basic over view of Arduino Uno R3 borad
- What are Arduino sheilds?
- Projects to get started with Arduino
- From where to learn more about Arduino?
What is Arduino ?
Arduino is an open-source hardware board with many open-source libraries to interface its onboard microcontroller with many other external components like LEDs, motors, LCDs, keypads, Bluetooth modules, GSM modules, and many other things one wants to interface with Arduino board. Arduino is basically made from a microcontroller, but Arduino has all external pinouts to connect with other devices, and it also has a built-in programmer which is used to program Arduino from a computer. So Arduino is a complete board which includes all things to connect with external peripherals and is easy to program through a computer. There are many Arduino boards available. But in this article, I will give you a brief review of Arduino UNO R3, which is a very popular board among engineering students.
Arduino is one of the most excellent electronic platforms of the 21st century. It has transformed the entire microcontroller system into a small and handy device. Being an open-source hardware, anyone can use it due to its user-friendly nature and simplicity. Arduino can be used to create complex projects by implementing simple programming algorithms. It not only aids in designing and developing projects but also allows testing prototypes and hardware multiple times. The hardware consists of different microcontrollers depending on the model you are using, along with other electronic components. These can be programmed using Arduino IDE, the software specifically designed for Arduino, enabling users to perform a wide range of tasks from basic LED lighting to building advanced Mars Rovers and Drone Systems. The Arduino language, known for its simplicity, makes it accessible for anyone interested in building prototypes and hardware for personal or industrial purposes. Furthermore, it features a simplified version of C++, making it easier to write programs according to individual requirements.
Arduino is intended for those who want to play, experiment, and build complex hardware without requiring extensive programming skills or algorithmic knowledge. It is currently the best open-source platform available in the market and has sparked a revolution in its widespread use. Being open-source, most programs and hardware for Arduino can be found on the internet. The development cost of Arduino is incredibly low compared to other microcontrollers from tech giants.
The software files include the basic programs for beginners in their source code libraries. Users can use them to make their projects versatile and can further edit the program to improve its capabilities. The software also has a strong online community that provides help and support.
What is the Best Way to Learn Arduino Programming?
Learning Arduino programming can be an exciting journey. Here are some recommended steps to help you get started:
- Understand the Basics of Electronics: It’s important to have a basic understanding of electronics before diving into Arduino programming. Learn about components like resistors, capacitors, transistors, diodes, and how they work in circuits.
- Get an Arduino Board: Purchase an Arduino board, such as Arduino UNO, which is a popular choice for beginners. This will be your hardware platform for practicing and executing your programs.
- Install Arduino Software: Visit the Arduino website and download the Arduino software (IDE) for free. The software is available for various operating systems. Install it on your computer following the provided instructions.
- Explore Arduino Documentation: Familiarize yourself with the official Arduino documentation, which includes guides, tutorials, and example codes. This documentation is a valuable resource for understanding the features and capabilities of Arduino.
- Start with Simple Projects: Begin with simple projects like blinking an LED or reading input from a push button. These projects will help you understand the basics of writing and uploading code to your Arduino board.
- Study Example Codes: Arduino IDE comes with a wide range of example codes that demonstrate different functionalities. Study these examples to learn about different programming techniques and how to interact with external components.
- Join Online Communities: Arduino has a vibrant online community where you can find support, tutorials, and project ideas. Join forums, discussion boards, and social media groups to connect with fellow Arduino enthusiasts and learn from their experiences.
- Experiment with Sensors and Actuators: As you gain confidence, start working with sensors (e.g., temperature, humidity, light) and actuators (e.g., motors, displays, relays). This will enable you to build more complex projects and explore the full potential of Arduino.
- Work on Projects: Once you have a good grasp of Arduino programming, challenge yourself by working on projects that align with your interests. Whether it’s robotics, home automation, or art installations, Arduino offers endless possibilities for creative projects.
- Continuous Learning: Arduino is a constantly evolving platform, so it’s essential to keep learning and exploring new features and libraries. Stay updated with the latest developments in the Arduino ecosystem by regularly visiting the official website and other online resources.
Remember, practice and hands-on experience are key to mastering Arduino programming. Enjoy the learning process and have fun experimenting with this versatile platform!
Applications of Arduino
Arduino is very easy to use for embedded system applications. Because of Arduino open source software availability and those who don’t have good skills in programming skills and but still want to work on embedded system project, they can easily use Arduino for their embedded system base projects development. One should only have idea about basics of electronics like how to use resistor, capacitor, transistor, diode and other basic electronics components to get started with Arduino. But if you don’t know any thing about electronics, don’t worry I have discussed all things in Arduino tutorials.Followings are the few applications of Arduino :
- Robotics
- Gsm base projects
- Ethernet base projects
- WiFi
- Bluetooth
- And many others.
Software and How to Program Arduino
Software used for programming Arduino is free to download. To download Arduino software, visit the Arduino website at www.arduino.cc. It is very easy to install, and I assume that you are intelligent enough to know how to download and install Arduino software on your computer. Arduino software provides you with sketches for different libraries like GSM, Ethernet, Bluetooth, and many others. To learn how to program Arduino or how to upload these sketches to the Arduino board, watch the video at the end of this article. Diagram of the software is shown below:

How to Download and Install Arduino IDE
To download and install the Arduino IDE (Integrated Development Environment), follow these steps:
- Visit the Arduino Website: Go to the official Arduino website at www.arduino.cc.
- Navigate to the Software Page: On the website’s homepage, click on the “Software” tab located in the top menu bar.
- Choose the Arduino IDE: On the Software page, you will find different software options. Look for the Arduino IDE software and click on the “Download” button next to it. Choose the version that is compatible with your operating system (Windows, macOS, or Linux).
- Download the Arduino IDE: Once you click on the “Download” button, the Arduino IDE software will start downloading to your computer. The download might take a few minutes depending on your internet speed.
- Open the Installer: Once the download is complete, locate the downloaded file on your computer. Double-click on the file to open the installer.
- Run the Installer: Follow the instructions provided by the installer to install the Arduino IDE on your computer. You may need to choose the installation location and agree to the terms of use.
- Complete the Installation: After running the installer, the Arduino IDE will be installed on your computer. Once the installation is complete, you can find the Arduino IDE in your list of installed programs.
Congratulations! You have successfully downloaded and installed the Arduino IDE on your computer. You can now start using it to program and upload code to your Arduino board.
Basic Overview of Arduino UNO R3
The diagram below shows the basic overview of the Arduino UNO R3. I have also described each part of the board using numbers, and the description of each number is given below:
Arduino Components
Arduino possesses a vast family of models and versions, but in this article, we will discuss the main components which are present in all Arduino models. Arduino can be used for a variety of applications, ranging from blinking LEDs, running motors, GPS units, speakers, cameras, the internet, and even supporting your smartphone and TV. This accessibility proves the fact that it is the most efficient microcontroller on the market, and some experts refer to it as “a mini computer”.
It uses also include making a simple line follower robot to making a 6 DOF manipulator, making an automatic door lock system as well as an advanced security system for your home.
Pins (5V, 3.3V, GND, Analog, Digital, PWM, AREF)
- GND (3): for providing a ground to your circuit.
- 5V (4) & 3.3V (5): 5v supply for running LEDs.
- Analog (6): for the analog of the sensor.
- Digital (7): digital pins for the digital input.
- PWM (8): for provides 255 resolution.
- AREF (9): Stands for Analog Reference.
Reset Button
It has a reset button and by pushing it restart the program.
Power LED Indicator
An indicator as soon as you connect the board with the computer.
TX RX LEDs
The TX is for transmitting and RX is for receiving. For serial communication.
Main IC
The main core and heart of the board.
Voltage Regulator
For converting 5v for the board.
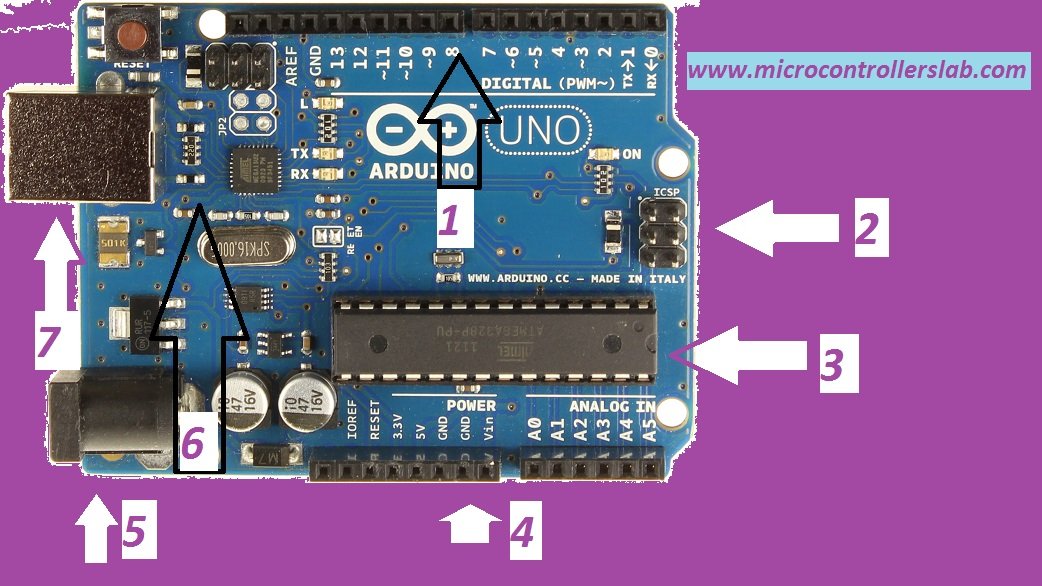
- Digital input or output pins to communicate with external devices.
- ICSP pins; I will discuss them in upcoming tutorials.
- On-board ATMEGA32 microcontroller.
- Analog pins and power pins. Analog pins are used to communicate with the analog world, like sensors, etc. Basically, they are analog-to-digital converter channels. Details in upcoming articles about Arduino.
- 9-12 volt DC power supply connector.
- On-board programmer used to upload sketches into ATMEGA32 microcontroller.
- USB connector is used to connect Arduino UNO R3 with a computer and to upload sketches from the computer to the on-board microcontroller.
Write Your First Arduino Program
Sure! Here’s a simple Arduino program that will blink the on-board LED:
void setup() {
  pinMode(LED_BUILTIN, OUTPUT); // Set the built-in LED pin as an output
}

void loop() {
  digitalWrite(LED_BUILTIN, HIGH); // Turn on the LED
  delay(1000); // Wait for 1 second

  digitalWrite(LED_BUILTIN, LOW); // Turn off the LED
  delay(1000); // Wait for 1 second
}
To get started, follow these steps:
- Connect your Arduino board to your computer using a USB cable.
- Launch the Arduino IDE software.
- In the Arduino IDE, go to
File->Newto create a new sketch. - Copy and paste the above code into the Arduino IDE.
- Go to
Tools->Boardand select the appropriate board (e.g., Arduino Uno). - Go to
Tools->Portand select the port your Arduino board is connected to. - Click on the
Uploadbutton to compile and upload the program to your Arduino board. - Once the upload is successful, you should see the on-board LED blinking at a regular interval.
You have successfully written and uploaded your first Arduino program to blink the on-board LED. Feel free to experiment with different delay times to customize the blinking pattern. Have fun exploring the possibilities of Arduino programming!
What are Arduino sheilds
Arduino shields are easy-to-use boards which you can use to perform various tasks. Various Arduino shields are available in the market. But you can also make these Arduino shields yourself if you have enough circuit designing skills. However, if you want to complete your project in no time, then you can purchase these shields. The names of some of the famous shields are given below:
- Motor controller shield
- Bluetooth shield
- WiFi shield
- Camera interfacing
- ZigBee shield
- GSM shield
- and many others.
Getting Started Tutorials
Here is a list of all the tutorials in the “Arduino” category on microcontrollerslab.com:
- LED Blinking with Arduino UNO R3
- How to use Push Button with Arduino – Pull Up/Down Mode
- 16×2 LCD Interfacing with Arduino – Explained with Example Codes
- Measure Analog voltage using Arduino ADC
- Light Sensor and Street Light Control using Arduino
- Interface HC-SR501 PIR Sensor with Arduino
- Infrared Sensor Module Interfacing with Arduino – Obstacle Detection
You can visit each tutorial to learn more about the specific topic.
To learn more about how to use software of Arduino watch following video.
Arduino UNO R3 tutorial by bilalmalikuet
You may also like to read:
- Piezoelectric Sensor Interfacing with Arduino
- Interface Zigbee with Arduino and Configure Xbee Modules
- Obstacle Avoidance Robot using Arduino
- ADXL320 Acceleration Measurement using Arduino
- Servo Motor Control and Interfacing with Arduino
- Three phase sine wave inverter using Arduino
- Pick and Place Multi-axis Robotic ARM with Arduino
Very Impacting
Thanks
Great guide about arduino information.informative content about what are the arduino current shields available in market. Thanks for sharing useful information
Thanks for sharing informative content