In this tutorial, we will show you how to send Whatsapp messages to your account with Raspberry Pi Pico W using Whatabot or callmebot free APIs and MicroPython. You can use any one of them. But we will use callmebot API for demonstration. These free WhatsApp APIs can be helpful in sending message notifications, sensor readings, motion detection, and door-opening alerts. We will see how to call these APIs using the HTTP client library urequests in Thonny IDE and send messages to your WhatsApp number.

Recommended Components
The following components are used in this project or are helpful for getting started with Raspberry Pi Pico development.
| Component | How it’s used in this project | Buy on Amazon |
|---|---|---|
| Raspberry Pi Pico W | The Wi-Fi-enabled RP2040 board that sends the WhatsApp message. | Check Price |
| Micro USB Cable | Data cable to connect the Pico W to your computer and upload code. | Check Price |
| Breadboard | Handy for prototyping circuits as you extend the project. | Check Price |
As an Amazon Associate we earn from qualifying purchases. Prices and availability are accurate as of the date/time indicated and are subject to change.
We have a similar guide with ESP32/ESP8266:
WhatsApp Messenger Introduction
WhatsApp Messenger is a famous, free, and most widely used platform to share instant messages, voice messages, voice calls, video calls, and shared documents owned by an American company known as Meta or Facebook. It is available to download and install
for Android and iOS based smartphones. Anyone can sign up for this service by using his mobile phone number, and users must have an active mobile internet connection to use this service.
This application was initially developed by WhatsApp Inc. of Mountain View, California, and later on, acquired by Facebook (Meta).
CallMeBot and Whatabot WhatsApp API Introduction
The Whatabot and CallMeBot are free and easy-to-use APIs to send WhatsApp messages by only calling an API from Raspberry Pi Pico W using an HTTP client. These APIs are a service that allows you to send yourself messages in real-time. You only have to register your phone and take note of your API key! To send a message is necessary to execute an http GET and POST from your microcontroller/app. It’s easy to use and you can receive real-time alerts in all your projects.
In the case of Whatabot, we need to send an HTTP GET request and with Callmebot, we send an HTTP POST request.
We will use this service to send messages on our WhatsApp number. It is a gateway service that allows us to send messages to ourselves from Raspberry Pi Pico W or any other HTTP client.
How to setup Whatabot API Key
In order to use this service, we need an ApiKey before calling API from the Raspberry Pi Pico W development board. Now let’s see how to get API key:
Follow these steps:
- 1) Create the Whatabot contact in your smartphone.
- The phone number is: +54 9 1123998026
- 2) Send: “I allow whatabot to send me messages”
- 3) Copy the link that Whatabot sent you and change the “text” tag of the URL for whatever you want.
- 4) Enjoy Whatabot!
Note: If you don’t receive the ApiKey in 2 minutes, please try again after 24hs.
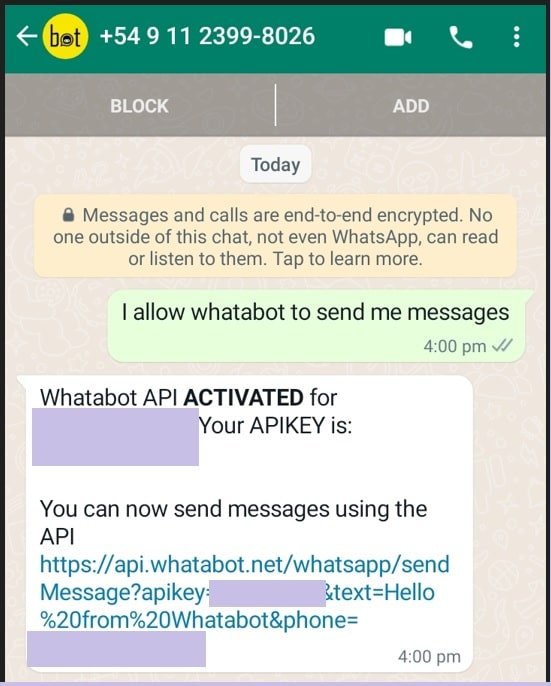
The WhatsApp message from the bot will contain the apikey needed to send messages using the API. You can send text messages using the API after receiving the confirmation.
If you forgot your api key, send “I allow whatabot to send me messages” again and Whatabot will send you the key you had
- If you want to change your api key, send “I want to update my apikey” and Whatabot will send you a new one. Note that you have to change the key in all your apps!
- If you want to delete your Whatsapp Whatabot account, sent “I want to delete my account”
How to Get CallMeBot API Key
You need to get the API key from the bot before using the API:
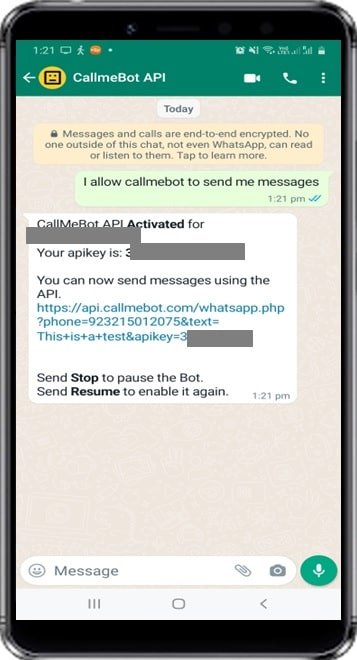
- Add the phone number +34611011637 to your Phone Contacts. (Name it as you wish)
- Send this message “I allow callmebot to send me messages“ to the new Contact created (using WhatsApp of course)
- Wait until you receive the message “API Activated for your phone number. Your APIKEY is 123123” from the bot.
- Note: If you don’t receive the ApiKey in 2 minutes, please try again after 24hs.
The WhatsApp message from the bot will contain the API key needed to send messages using the API. For more details, you can check this link.
How to send a WhatsApp text message with Whatabot and CallMeBot ApiKey
Now let’s see the APIs of both services one by once.
WhataBot API
To send a WhatsApp message with Whatabot API, we need to call the following API inside Raspberry Pi Pico W MicroPython script with an HTTP GET request. In later sections of this article, we will see how to call an HTTP GET request with Raspberry Pi Pico W.
http://api.whatabot.net/whatsapp/sendMessage?text=" + (message) + "&apikey=" + api_key + "&phone=" + mobile_number;CallMeBot API
To send a WhatsApp message with Callmebot API, we need to call the following API inside Raspberry Pi Pico W MicroPython with an HTTP POST request.
https://api.callmebot.com/whatsapp.php?phone=[phone_number]&text=[message]&apikey=[your_apikey]We need to change the following things before calling above APIs:
[phone_number]: This is the phone number which you used to sign-up for WhatsApp. Make sure to include your country code along with your mobile phone number. For example 92 301 22 222 22
[text]: This field is a message that you want to send on your WhatsApp number and it should be URL encoded. We will see later on how to convert messages into URL-encoded format. For example in URL encoded format %20 is for space and %0A is for new lines).
[your_apikey]: The apikey is a key that we get from Whatabot callmebot API in the last section during the activation process.
MicroPython Script to Send Messages to WhatsApp using Raspberry Pi Pico W
try:
  import urequests as requests
except:
  import requests

import network
import gc

ssid = 'HUAWEI-u67E'
password = '4uF77R2n'

phone_number = '+923215012075'
api_key = 'CALLMEBOT_API_KEY'

def is_ascii(s):
    return (ord(s) > 33) and ( ord(s) < 128)

    # Encode the text
def urlencode(text):
  #data = urlencoded_text.encode()
  encoded_text = ""
  for char in text:
      if (is_ascii(char)) or char in "-_.~":
          encoded_text += char
          #print("if")
      else:
          encoded_text += "%{:02x}".format(ord(char))
          #print("else")
  print(encoded_text)
  return encoded_text

def connect_wifi(ssid, password):
  station = network.WLAN(network.STA_IF)
  station.active(True)
  station.connect(ssid, password)
  while station.isconnected() == False:
    pass
  print('Connection successful')
  print(station.ifconfig())

def send_whatsapp_message(phone_number, api_key, message):
  url = 'https://api.callmebot.com/whatsapp.php?phone='+phone_number+'&text='+str(urlencode(message))+'&apikey='+api_key

  response = requests.get(url)
  if response.status_code == 200:
    print('Success!')
  else:
    print('Error')
    print(response.text)

connect_wifi(ssid, password)
message = "WhatsApp Message Test!"
send_whatsapp_message(phone_number, api_key, message)
How MicroPython Script Works?
Now let’s see how above MicroPython script works?
First start by importing require MicroPython modules such as import requests – this module imports the ‘requests’ library, which is used to make HTTP requests. Secondly, this import network module imports the ‘network’ library, which is used to interact with the device’s network interfaces.
try:
  import urequests as requests
except:
  import requests

import network
import gc
These two line assigns variable ‘ssid’, which is used to store the name of the wifi network and variable ‘password’ is used to store the wifi network’s password to which Raspberry Pi Pico W will connect.
ssid = 'Enter_Your_SSID'
password = 'Enter_Your_Password'
Here, we assign a phone number as string to the variable ‘phone_number’, which is used to store the phone number to send the WhatsApp message to and similarly string ‘CALLMEBOT_API_KEY’ to the variable ‘api_key’, which is used to store the API key which we get from CallMeBot API.
phone_number = 'Enter Your Mobile number'
api_key = 'Enter API key'
This function def is_ascii(s) takes in a single parameter ‘s’ and it checks if the ASCII code of the character passed is between 33 and 128. We use this function inside urlencode() method to convert text message into URL encoded format.
def is_ascii(s):
    return (ord(s) > 33) and ( ord(s) < 128)
This def urlencode(text) convert message passed to it into URL encoded format. Because callmebot AP required message to be in URL Encoded format. This encoded_text initializes an empty string variable ‘encoded_text’.
We check each character of text one bye one and see it is need to replaced with respective URL encoded value or not. This “for char in text” line starts a for loop that iterates through each character in the ‘text’ string.
This for loop check if the current character in the ‘text’ string is an ASCII character or one of the characters “-“, “.”, “”, or “~”. If either condition is true, the current character will be added to the ‘encoded_text’ string. If the current character in the ‘text’ string is an ASCII character, then the URL encoded format equivalent will added to ‘encoded_text’ string.
 # Encode the text
def urlencode(text):
  #data = urlencoded_text.encode()
  encoded_text = ""
  for char in text:
      if (is_ascii(char)) or char in "-_.~":
          encoded_text += char
          #print("if")
      else:
          encoded_text += "%{:02x}".format(ord(char))
          #print("else")
  print(encoded_text)
  return encoded_text
MicroPython: Connecting to a Wi-Fi Network
Next, we will connect the Raspberry Pi Pico W board to the Wi-Fi network. The network.WLAN() is used to create a WLAN network interface object.
Supported interfaces are:
- network.STA_IF (station mode)
- network.AP_IF (Soft access point mode)
After that, activate the station by passing the “True” argument to the sta_if.active() method. The connect() method is used to connect to the specified wireless network using the specified Wi-Fi name (SSID) and password.
In station mode, isconnected() method returns “True” if Raspberry Pi Pico W successfully connects to a Wi-Fi network and a device also assigned a valid IP address. Otherwise, it returns “False”. This statement checks if the Raspberry Pi Pico W device connects to the Wi-Fi or not. The code does not move to the next step till the board is not connected to the Wi-Fi network.
After a Wi-Fi connection is established on the Raspberry Pi Pico W board, an IP address gets assigned. The ifconfig() method provides an IP address assigned to the Raspberry Pi Pico W. In this statement, we print the IP address using the ifconfig() method on the station object which we created previously.
def connect_wifi(ssid, password):
  station = network.WLAN(network.STA_IF)
  station.active(True)
  station.connect(ssid, password)
  while station.isconnected() == False:
    pass
  print('Connection successful')
  print(station.ifconfig())
Raspberry Pi Pico W HTTP GET Request to Callmebot API
The function def send_whatsapp_message(phone_number, api_key, message) make an HTTP GET request to callmebot API. This function takes in three parameters: ‘phone_number’, ‘api_key’, and ‘message’.
Next, construct a CallMeBot API string with the phone number, encoded message, and API key parameters.
url = 'https://api.callmebot.com/whatsapp.php?phone='+phone_number+'&text='+str(urlencode(message))+'&apikey='+api_keyFinally, requests.get() makes a GET request to the ‘url’ using the ‘requests.get’ function and stores the response in the ‘response’ variable.
response = requests.get(url)After that we check if the status code of the ‘response’ is 200. if yes, print the message ‘Success!’, indicating that the WhatsApp message was sent successfully. If not, status code is not 200, print the message ‘Error’ indicating that an error has occurred while sending the message.
def send_whatsapp_message(phone_number, api_key, message):
  url = 'https://api.callmebot.com/whatsapp.php?phone='+phone_number+'&text='+str(urlencode(message))+'&apikey='+api_key

  response = requests.get(url)
  if response.status_code == 200:
    print('Success!')
  else:
    print('Error')
    print(response.text)
Call the ‘connect_wifi’ function defined earlier to connect Raspberry Pi Pico W to Wi-Fi network.
connect_wifi(ssid, password)
Define a WhatsApp message “WhatsApp Message Test!” which will be the message sent in the WhatsApp message.
message = "WhatsApp Message Test!"Finally call send_whatsapp_message(phone_number, api_key, message) function by passing in the ‘phone_number’, ‘api_key’, and ‘message’ variables as arguments.
send_whatsapp_message(phone_number, api_key, message)
In summary, this code will sends the WhatsApp message to your number using callmebot API and Raspberry Pi Pico W.
Demonstration
In the above MicroPython code, add the Wi-Fi credentials of your router into the above code and replace the API key.
Now let’s see the demo of the above MicroPython script which will send a WhatsApp message to your number. Open Thonny IDE and create a new file with the name of main.py. After that save that file to Raspberry Pi Pico W. Lastly, click on the run button on Thonny IDE.
As soon as you click on the run button and if everything goes well, you will see a success message on the Thonny ID console as shown below:
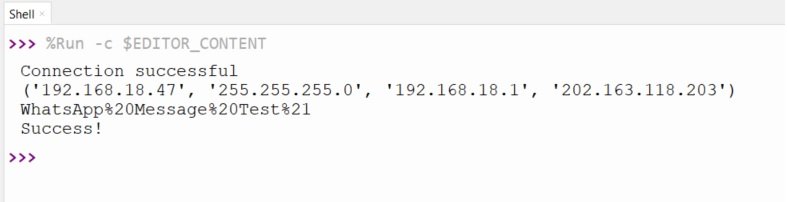
If there is any issue with the http request, you will get an error response on the Thonny IDE terminal.
Now open your WhatsApp and within seconds you will see a message received from callmebot API on your WhatsApp number.

In summary:
In this tutorial, we learned to connect Raspberry Pi Pico to a specified Wi-Fi network using the network’ library. Most importantly, we have seen how to send a WhatsApp message to a specific phone number using the ‘urequests’ MicroPython library and the CallMeBot API.
You may also like to read:
- ESP32 Send BME280 Sensor Readings to WhatsApp Messages
- Node-RED Send Messages to WhatsApp Number
- Telegram ESP32 and ESP8266 Control GPIOs and LEDs using Arduino IDE
- Telegram ESP32/ESP8266: Display BME280 sensor readings using Arduino IDE
- ESP32 Motion Detection Notification on WhatsApp Number
- ESP8266 NodeMCU WhatsApp Messages Notification BME280 Sensor Readings
- Send SMS with the ESP32 using Twilio