This is a getting started tutorial on FreeRTOS using Arduino. To demonstrate examples and use of various features of the FreeRTOS operating system, we will use Arduino Uno board and Arduino IDE for writing programs. But you can also use other development boards such as ESP32 and ESP8266.
In this article, you will learn how to use FreeRTOS real-time operating system with Arduino to perform multiple specific tasks within a specified deadline. We will learn to execute multiple threads or tasks with FreeRTOS using the Arduino Uno board.
In this tutorial, we will cover the following topics:
- RTOS Introduction
- FreeRTOS Introduction
- Add FreeRTOS library in Arduino IDE
- How to use FreeRTOS with Arduino IDE
- Writing your first FreeRTOS based Arduino sketch
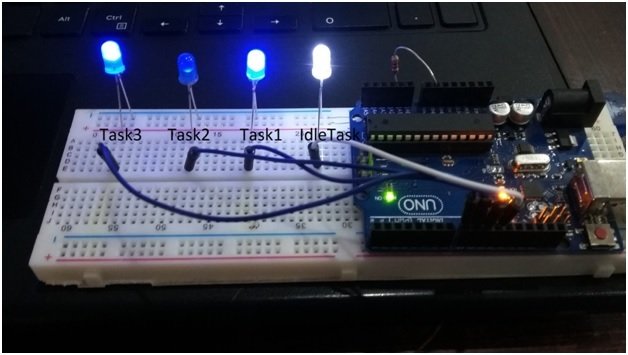
For demonstration, we will create four tasks and assign Arduino’s resources to each task for a specific time and also assign priority to each task.
Recommended Components
The following are recommended for following along with these FreeRTOS Arduino tutorials.
| Component | How it’s used in this project | Buy on Amazon |
|---|---|---|
| Arduino Starter Kit (Uno R3) | An Arduino board and parts to build and run the FreeRTOS example tasks. | Check Price |
| 37-in-1 Sensor Modules Kit | Assorted sensor modules handy for the FreeRTOS tasks, queues and semaphore demos. | Check Price |
| Hands-On RTOS with Microcontrollers (Book) | Recommended reference for learning FreeRTOS concepts in depth. | Check Price |
| Hands-On RTOS with Microcontrollers (2nd Edition) | Updated second edition of the FreeRTOS reference book. | Check Price |
As an Amazon Associate we earn from qualifying purchases. Prices and availability are accurate as of the date/time indicated and are subject to change.
RTOS Introduction
A Real Time Operating System is also known as RTOS is an operating system which is intended to fulfill the requirement of real time application. It is able to process data as comes in, typically without buffering delays. RTOS is the combination of calling predefined functions.
The key factors in Real Time Operating Systems are minimum interrupt latency and minimum threads switching latency. The Real Time Operating System is valued more for how quickly and how predictably it responds to complete the tasks in a given period of time.
There are three types of RTOS:
1. Hard RTOS; bound to complete a task within a given deadline
2. Firm RTOS; bound of a deadline but if they miss the deadline it is acceptable but not in the case of Hard RTOS.
3. Soft RTOS; not bound by any deadline.
LynxOS, RTLinux, VxWorks, FreeRTOS, OSE, QNX, Windows CE
RTOS Features
When we write good embedded software for Arduino we do not need FREERTOS but when its complexity and size increases FreeRTOS is always beneficial for the reasons listed below:
- Abstract out timing information
- Maintainability/Extensibility
- Modularity
- Cleaner interfaces
- Easier testing (in some cases)
- Code reuse
- Improved efficiency
- Idle time
- Flexible interrupt handling
- Mixed processing requirements
- Easier control over peripherals
RTOS Cons
These are the advantages of using RTOS but there are also some disadvantages listed below:
- Low Priority Tasks
- Precision of code
- Limited Tasks
- Complex Algorithms
- Device driver and interrupt signals
- Thread Priority
- Expensive
- Not easy to program
To explore further, you can read this post:
FreeRTOS Introduction
Unlike typical real-time operating systems, FreeRTOS is specially designed for microcontrollers. Because Microcontrollers come with limited resources, therefore, we need an operating system as per the available resources of microcontrollers. It is an open-source Kernel that means it can download free of cost and be used in RTOS-based applications. Although, it has two commercial variants also such as OpenRTOS and SafeRTOS.
As we mentioned earlier, by using FreeRTOS, we can make sure that each task of Arduino will have a deterministic execution pattern and every task will meet its execution deadline. In other words, it is a scheduler that assigns Arduino CPU resources to every task according to a scheduling algorithm. The real-time operating system has different scheduling algorithms such as:
- Difference Between Preemptive and Non-Preemptive Scheduling
- What is a Scheduling Algorithm
- Rate Monotonic Scheduling
- Earliest Deadline First
- Least Laxity First
FreeRTOS Features
Followings are the main kernel features:
- Fixed Priority Preemptive Time slicing Scheduler
- Inter-Process Communication through Queues
- Tasks Management such as Task priority setting, task suspension, task deletion, and Task delay
- Tasks Synchronization with Gatekeeper Tasks, Semaphore, and Mutex
- Timing measurement hook
- Run time Tracing hooks
- Software timers management
- Interrupt management
How to use FreeRTOS with Arduino?
The RTOS used in this project is FreeRTOS. FreeRTOS is developed by Real Time Engineers Ltd. It is an open-source popular Real-Time Operating System kernel. Furthermore, it is used for embedded devices which as microcontrollers, Arduino. It is mostly written in C but some functions are written in assembly. There are also SafeRTOS and OpenRTOS available online which are similar to FreeRTOS.
Download and Install FreeRTOS in Arduino IE
First, you need to download and install FreeRTOS in Arduino IDE. But if you did not use Arduino IDE before, you should go through the following tutorial:
Getting Started with Arduino IDE
After that go to this GitHub link and download the FreeRTOS library:
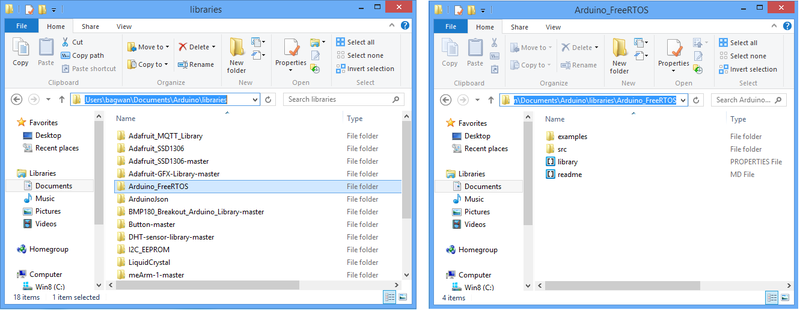
After downloading the FreeRTOS library, extract the folder and paste this extracted folder in the Arduino IDE libraries folder as shown below:
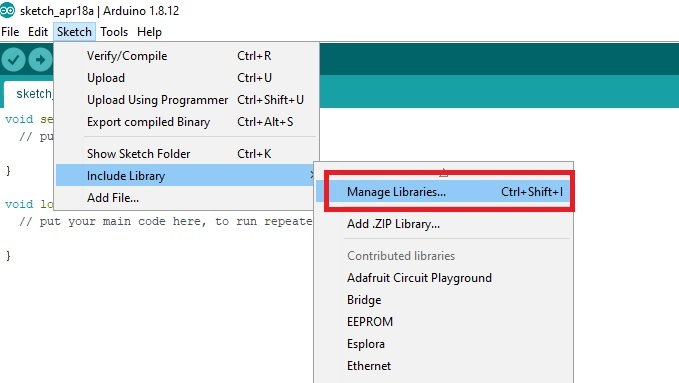
FreeRTOS library can also be installed directly through the Arduino Library Manager. For this, open Arduino IDE and go to Sketch>>”Include Library” and click on Manage libraries.
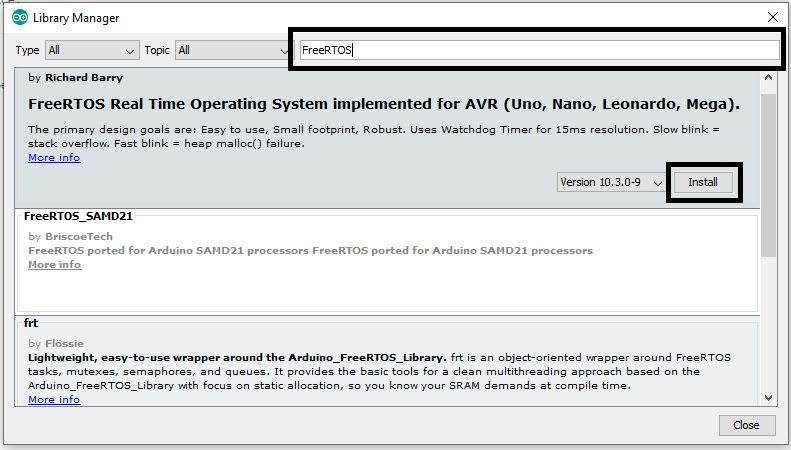
After that, type “FreeRTOS in the search window, this library will appear. After that click on the install button.
FreeRTOS Task Management
In a multitasking system, an application can consist of many tasks. If we are using a single-core processor, then only one task can run on the processor at any given time. Hence, only one task will be in the running state and all other tasks will be in the not running state. That means, in RTOS based applications, tasks can be either in running state or not running state.
The running state of a task can be further divided into three sub-states such as blocked state, ready state, and suspended state. The figure below shows the transition lifetime of a task in a multitasking system.

FreeRTOS Tasks States
Blocked State
A task can be in a blocked state due to many reasons. For example, a task is delayed due to the periodic nature of the task and it will become available periodically after every specified delay. Another reason could be due to interrupt waiting or resource waiting. A task is waiting for the external interrupt or a resource such as binary semaphore, counting semaphore, and a mutex.
Suspended State
A suspended state is also a substrate of a not-running task. The application programmer can suspend the task by using vTaskSuspend() FreeRTOS API function and resume the task using vTaskResume() API function.
Note: The tasks in blocked or suspended states can not be scheduled by a scheduler.
Ready State
If a task is not in either a blocked or suspended state, it will be in a ready state. Tasks that are in a ready state, are ready for execution as soon as the processor picks them according to a scheduling policy.
Whenever a task makes the transition from a running state to a not-running state, a context switch happens. That means, it saves its registers values, temporary variable values, etc into its task control block, and next time when it will enter the running state again, it will start execution from the same point where it left the execution. To start execution from the same location, it will again load values from TCB into processor registers.
How to Create Tasks in FreeRTOS?
Multitasking benefits can be achieved only by performing every execution with the help of tasks. For instance, in your Arduino project, you want to measure temperature and want to display its value on LCD. We can divide this project into three tasks such as:
- Read Arduino ADC Value
- Converter ADC Value into Temperature
- Print Temperature on LCD
In this way, we can also assign, priority to each task according to the critical nature of the task. For example, ADC value reading is the most important, and printing temperature value on LCD is the least important task. Hence, we can assign the highest priority to the ADC task and the lowest to the LCD task.
FreeRTOS task Creation
xCreateTask function is used to create tasks and adds them to the ready queue. It takes 5 arguments as inputs to define various features of the task
xTaskCreate(MyTask_pointer, "task_name", 100, Parameter, Priority, TaskHandle);Pointer to Task Function
MyTask_pointer: This first argument to task creation function is a pointer to a function definition of a task. Because we need to define a task with the help function. We will see later how to define a function and pass this pointer to a function as an argument.
task_name: This argument is just the name of the function/task that we will create.
Stack Size
StackDepth: In multitasking, each task/thread has its own stack. It defines the stack size of a task in bytes. Therefore, you should make sure to select stack size according to the complexity of computation. For instance, we select 100 bytes size in this example.
Parameter: If we want to pass a pointer to a variable as an argument to the task function, we can use this argument. Otherwise, we can pass the NULL value. This argument is a pointer to a variable that the task (function) can receive.
How to set Priority ?
Priority: This is an important parameter because it is used to set the priority of tasks. We set priority with passing numbers as an argument. For example, if we create four tasks and assign them priority 0, 1,2, and 3. Hence, zero means the lowest priority, and 3 means the highest priority.
TaskHandle: This argument keeps the handle of the function that we can use to change function features such as the deletion of a task, changing its priority, etc.
In summary, we can create multiple threads by using xCreatTask. But make sure to provide unique pointer name and name to each task.
Setting Task Execution Pattern
vTaskDelayUntil is used to define a deterministic sequence of task execution. For example, if we have four tasks and we want to execute each task after 100, 120, 130, and 140ms, vTaskDelayUntil blocks the task for a defined time after its first execution.
Note: vTaskDelayUntil is different from delay() of Arduino IDE. Because delay() stalls the CPU execution. On the ther hand, vTaskDelayUntil delays a specific task and CPU keeps executing other threads.
You can learn more details about the two functions in the link.
FreeRTOS Arduino Getting Started Example
Now that you have successfully set up the Arduino IDE and installed the RTOS library. Let’s move forward with the first program in Arduino.
Task switching Example
In this example code, we will create four different tasks using xTaskCreate with different priorities. 3 LEDs indicate three tasks and one Led indicates an idle state. Three tasks are labels as Task1, Task2, and Task3 respectively.
LED blinking with FreeRTOS and Arduino Uno
This code shows a simple example where we control three LEDs with three different tasks. Each task executes after a certain time. This program is similar to typical Arduino code except we include the library file of FreeRTOS.
Arduino Sketch
FreeRTOS follows both pre-emptive scheduling and cooperating scheduling. But by default, this API implements pre-emptive time-slicing scheduling. That means high priority tasks pre-empt low priority tasks and equal priority tasks use time-shared policy to get CPU resources. This code creates four tasks with different priorities. But all three tasks are periodic. Because of vTaskDelay() function, each task goes to a blocking state for a specified time.
#include <Arduino_FreeRTOS.h>
void setup()
//Initialize the Serial Monitor with 9600 baud rate
{
Serial.begin(9600);
Serial.println(F("In Setup function"));
//Set the digital pins 8 to 11 as digital output pins
  pinMode(8,OUTPUT);
  pinMode(9,OUTPUT);
  pinMode(10,OUTPUT);
  pinMode(11,OUTPUT);

//Create three tasks with labels Task1, Task2 and Task3 and assign the priority as 1, 2 and 3 respectively.
//We also create the fourth task labeled as IdelTask when there is no task in
//operation and it has the highest priority.

 xTaskCreate(MyTask1, "Task1", 100, NULL, 1, NULL);
 xTaskCreate(MyTask2, "Task2", 100, NULL, 2, NULL);
 xTaskCreate(MyTask3, "Task3", 100, NULL, 3, NULL);
 xTaskCreate(MyIdleTask, "IdleTask", 100, NULL, 0, NULL);}

//We can change the priority of task according to our desire by changing the numeric’s //between NULL texts.

void loop()

{
//There is no instruction in the loop section of the code.
// Because each task executes on interrupt after specified time
}

//The following function is Task1. We display the task label on Serial monitor.

static void MyTask1(void* pvParameters)
{

  while(1)

  {
    digitalWrite(8,HIGH);

    digitalWrite(9,LOW);

    digitalWrite(10,LOW);

    digitalWrite(11,LOW);

    Serial.println(F("Task1"));

    vTaskDelay(100/portTICK_PERIOD_MS);
  }
}

//Similarly this is task 2

static void MyTask2(void* pvParameters)

{
while(1)

  { digitalWrite(8,LOW);
    digitalWrite(9,HIGH);
    digitalWrite(10,LOW);
    digitalWrite(11,LOW);
    Serial.println(F("Task2"));
    vTaskDelay(110/portTICK_PERIOD_MS);
  }
}

//Similarly this is task 3

static void MyTask3(void* pvParameters)
{
while(1)
  {
   digitalWrite(8,LOW);
   digitalWrite(9,LOW);
   digitalWrite(10,HIGH);
   digitalWrite(11,LOW);
   Serial.println(F("Task3"));
   vTaskDelay(120/portTICK_PERIOD_MS);
  }
}

//This is the idle task which has the lowest priority and calls when no task is running.

static void MyIdleTask(void* pvParameters)

{
  while(1)
   {
    digitalWrite(8,LOW);
    digitalWrite(9,LOW);
    digitalWrite(10,LOW);
    digitalWrite(11,HIGH);
    Serial.println(F("Idle state"));
    delay(50);
  }
}Each task has its unique priority and different running duration.
How Code Works?
In this example, task3 has the highest priority and task_idle has the lowest priority. Hence, you will see on your serial monitor that task3 will execute first when we first-time power up the Arduino board. On the contrary, task_idle which is the lowest priority task will execute at the end or when no other task is available to run. For the demo, check this video:
Hardware Demonstration
Serial Monitor Ouput
As you can see from the output of the serial monitor, the lowest priority task ( Idle task) executes only when the processor is free and not any other task is available to execute.
- T1: Task3 starts to execute first being the highest priority task that is three. After that, it enters the blocking state for 120ms.
- T2: After that Task2 starts to execute because it now attains the highest priority because Task3 is in blocking state. Similarly, it also completes its execution and goes to a blocked state and remains there for 110ms.
- T3: Currently, both Task3 and Task2 are waiting for the blocked time to end. Hence, Task1 starts to execute because its priority is higher than the idle task. Therefore, it also enters the running state and completes its execution and goes to blocking mode for 120ms.
- T4: Now, all high priority task has completed their execution and they are in blocked state waiting for their blocking time to end. Therefore, the processor keeps executing, idle_task until a high priority task comes out of a blocking state.
- Furthermore, the shortest blocking time is used for task1 that is 100ms. Therefore, it will enter the running state before other high priority tasks and similarly for task2 and task3.
After that, all threads keep executing according to their priority and blocking time.

Other FreeRTOS tutorials, you may like to read:
- Arduino FreeRTOS Queue Management – How to use Queues
- How to use FreeRTOS structure Queue to Receive Data from Multiple Tasks
- FreeRTOS Arduino : How to Delete Tasks with vTaskDelete() API
- How to change Task Priority in FreeRTOS?
- FreeRTOS Binary Semaphore – Examples of Tasks Interrupt Synchronization using Arduino
- FreeRTOS Mutex Tutorial with Arduino – Avoid Priority Inversion
Other Related Tutorials:
I’ve doanloaded the same library version as in the example, but ‘m getting the following error message:
Sketch uses 65526 bytes (203%) of program storage space. Maximum is 32256 bytes.text section exceeds available space in board
Global variables use 1584 bytes (77%) of dynamic memory, leaving 464 bytes for local variables. Maximum is 2048 bytes.
Sketch too big; see https://support.arduino.cc/hc/en-us/articles/360013825179 for tips on reducing it.
Error compiling for board Arduino Uno.
The memory allocation problem is still there, despite the use of the F() macro. We have noticed that the same code works very well under another version of FreeRTOS (V10) or the version 8 given for download in this article still solves the problem!
So, we recommend to uninstall/remove the FreeRTOSArduino library from the master.zip file and install the latest version (V10) of freertos from arduino/librairie_management directly.
Result for the same code 30% of the memory instead of 203%!