In this tutorial, we will explain the workings of conditional loops and how to implement them using Simulink. At the beginning, we provide a brief introduction of loops and their uses, as well as a basic introduction of loops in other programming languages and their working principles. After that, we implement the loops on Simulink’s platform and explain their working in a step-by-step procedure. After a simple implementation, loops are implemented using examples of counters. We will design an up-counter in Simulink and display its outputs to check the results. At the end, we gave a simple exercise to perform on your own. This will help you strengthen your concepts regarding algebraic loops in Simulink.
Introduction to Algebraic loops
Algebraic loops mean performing a certain task iteratively up to a certain number of times or until a specific condition is fulfilled. In Simulink, there is no proper block to implement loops; however, we can design our own loop in which we feed the output to the input with a delay in between to remove any ambiguity. Usually, in order to make the loop error-free, we provide a condition that will decide whether the loop continues or stops.
In other programming languages, the loops are named for loop and while loop. At this stage, we assume that you are already familiar with these loops.
Designing an Up-Counter with Simulink using Loops
Let’s now move towards the programming part. We will now perform a simple example that will help us understand the workings of loops in Simulink. Open MATLAB, and then open Simulink. In Simulink, click on the library browser icon and open the library browser, as we have been doing in previous tutorials. From the library browser, click on the commonly used blocks section and then select the constant block from it. Refer to the figure below.

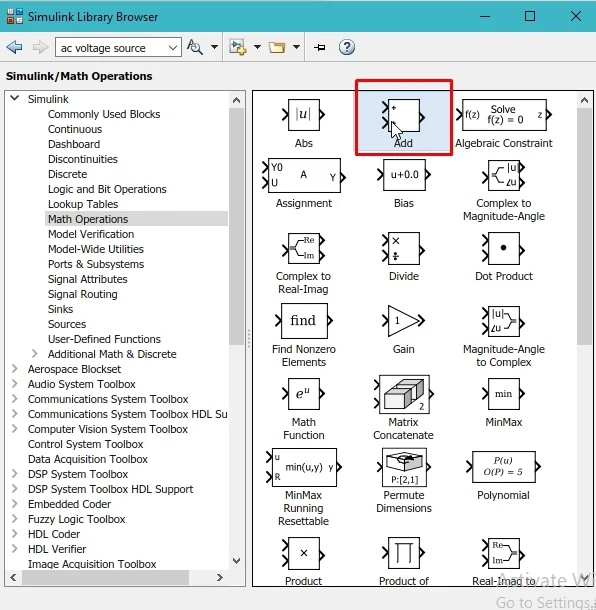
We will use this block as the step size of the counter, i.e., if we set it to 2, the counter will change its value in steps of 2, as we will see shortly. Once the model of the up counter is complete, in order to design an algebraic loop for the implementation of the up counter, we need an add block. This will add 1 to the previous value after each iteration of the loop. From the library browser, select the math operation section as shown in the figure below.

Now, from the library browser window, select an add block from the math operation section. Refer to the figure below.
This add block will add the previous value of the counter to the constant block to complete one iteration. Now, if we directly attach the output of the add block to its input, Simulink will consider it an error. This is because the implementation of both operations will occur at the same instant. Therefore, we need a delay block that will add a delay to the addition of the previous value. From the library browser, select the commonly used blocks section, and from that section, select the delay block. As we can see in the figure below.

Add Block to Model
Up until now in these tutorials, we have been using the drag-and-drop method to place a component on the Simulink model. We also have another choice, right-click on the block to add or place in Simulink’s model, and then click on Add block to the model loops from the drop-down menu, as shown in the figure below.

This will add the selected block to the current model. Now, in order to see the output of the counter, we also need some output display. This display block, however, will only show the most recent value after the execution, which is why it is not suitable here. We will use the scope block of Simulink to see all the processes of the loop in one window. Therefore, from the commonly used blocks section, select the scope block as shown in the figure below.

After selecting the block, add the block to the current model using any of the suitable methods. The components for the up counter are shown in the figure below.

As we need to add a delay to the output of the add block and feed its output to the input of the add block, we must flip it first. Right-click on the flip block, then select rotate and flip. After that, select flip, as shown in the figure below.

Simulink Model
We can also do this by selecting the block and pressing Ctrl+I on the keyboard. Connect all the components as shown in the figure below.

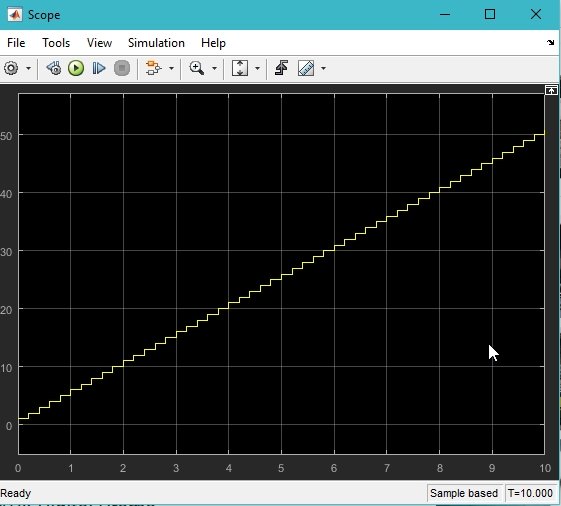
Run the model from the run icon present at the top of the Simulink model and wait for the compilation to be done. Once the compilation is done, double-click on the scope to see the output of the counter, which must be a stair case as shown in the figure below.
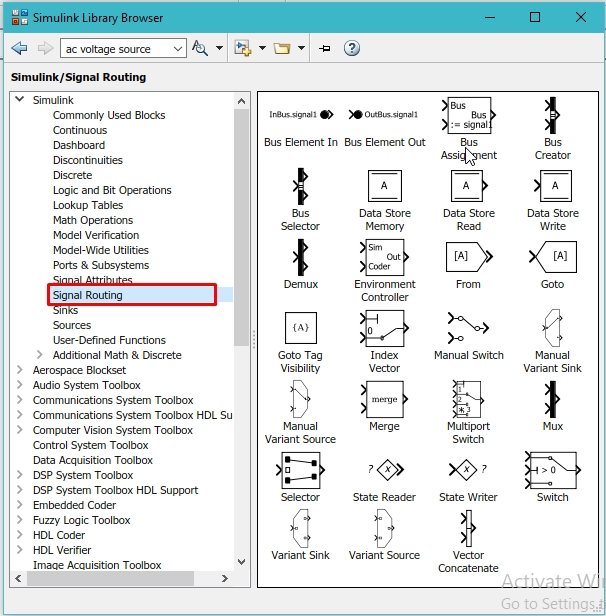
The problem with the counter is that there is no reset condition for it. A counter with no resetting condition is of no use. It will start updating the previous value to infinity due to the loop. We must provide it with some limiting value, after which it must reset its value to zero and start over again. For that purpose, we need a conditional statement, as we have used in previous tutorials. From the library browser, select the signal routing section as shown in the figure below.
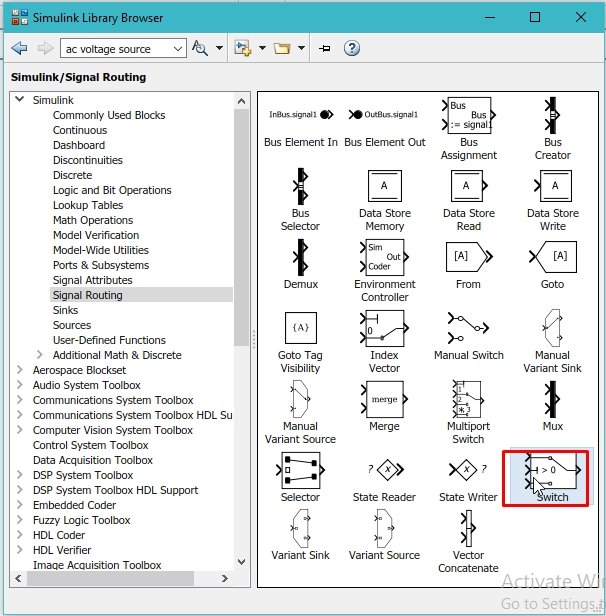
After that, select the switch block from this section, as shown in the figure below.
Now, we will set the threshold value of the switch block for loop termination up to a specific value at which we want our counter to travel all the way from zero. In this case, we have selected the value of 10, as shown in the figure below.

Setting Conditions
The counter will start adding one as long as this condition is false, so the false condition will be simply the output of the counter as shown in the figure below.

The true condition, however, will reset the value of the counter to 0. Therefore, in the true condition, place a constant block with a value of 0 in it, as shown in the figure below.

The input to the delay block this time will be the output of the switch block, and the complete block diagram is shown in the figure below.

Simulation
Run the block diagram, and the output of the counter can be viewed by double-clicking on the scope block as shown in the figure below.

This is a simple up counter that will start from zero and end at the value provided by us in the switch block.
Exercise:
- Design a down counter using MATLAB’s Simulink.
(Hint: You might need to change the condition of the switch block from > to <.)
Conclusion
In conclusion, this tutorial provides an in-depth overview of designing and simulating an up-counter in Simulink. It covers step-by-step procedures along with an explanation of an example to help us better understand the concept. You can use this to design more complex counters. At last, we have provided an exercise to reinforce the concept. Hopefully, this tutorial was helpful in expanding your knowledge of Simulink.
You may also like to read:
- Raspberry Pi Pico W MQTT Client Publish Subscribe Messages
- Reconnect ESP32 to WiFi after Lost Connection (Solved)
- Simple One Way Traffic Light using arduino
- ESP32 Web Server with SPIFFS SPI Flash File System
- ESP32 ESP8266 MicroPython Send Messages to WhatsApp
- ESP32 OTA Over-The-Air Updates using AsyncElegantOTA Library in VS Code with PlatformIO IDE
- HT12E RF Encoder IC for wireless communication
This concludes today’s article. If you face any issues or difficulties, let us know in the comment section below.