In this tutorial, we will learn to create a web server with ESP32 using SPIFFS and Arduino IDE. Firstly, we will learn how to store CSS and HTML files in the SPI flash file system of ESP32 and build a web server through those files. Instead of hard coding the HTML as string literals which takes up a lot of memory, the SPIFFS will help us access the flash memory of the ESP32 core.
To show the working of the SPIFFS, we will create and store individual HTML and CSS files through which we will build a web server that will control the output GPIO pins of the ESP32 module by toggling the onboard LED.
We have a similar project with ESP8266 NodeMCU:
SPIFFS Web Server Overview
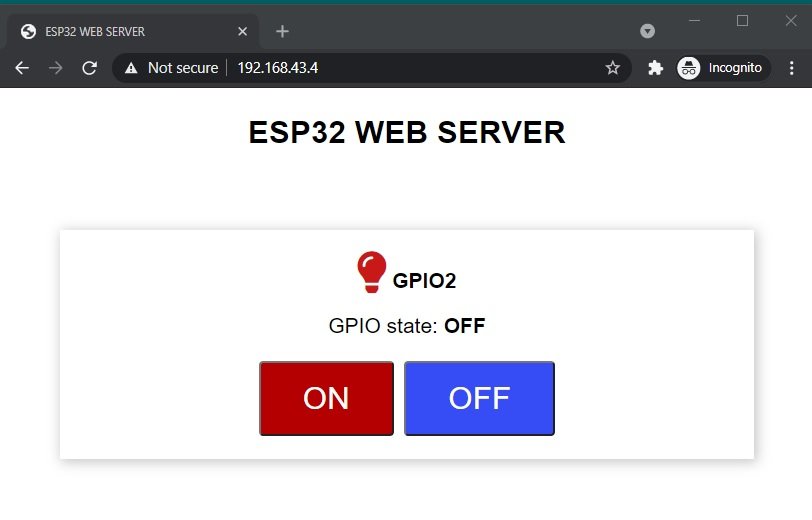
We will build a web server to control the onboard LED which is connected with GPIO2 of ESP32. The web server responds to a web client request with HTML and CSS files stored in the SPIFFS of the ESP32 module.
A simple HTML page consists of a title: ‘ESP32 WEB SERVER’ followed by two ON/OFF buttons which the user will click to control the ESP32 output which will be GPIO2 through which the on-board LED is connected. In other words, the user will control the onboard LED through the buttons available on the web page. The current GPIO state will also be mentioned.
How Does SPIFFS Web Server Work?
A series of steps will be followed:
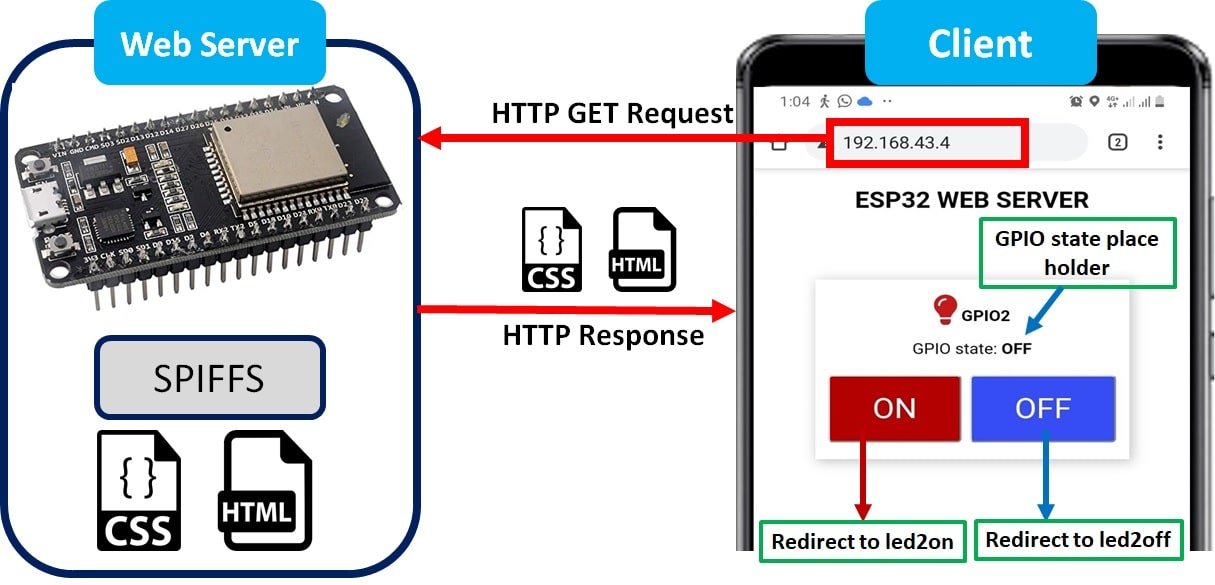
- The ESP32 contains the web server and the web browser will act as the client. We will create the web server with the help of the ESPAsyncWebServer library which updates the web page without having to refresh it.
- We will create HTML and CSS files and store them in ESP32’s SPIFFS. Whenever the user will make a request by entering the IP address on the web browser, the ESP32 will respond with the requested files from a filesystem.
- To show the current GPIO state, we will create a placeholder inside our HTML file as the state will constantly change after clicking the ON/OFF buttons. This placeholder will be placed inside %% signs e.g., %GPIO_STATE%
- On an HTML page, there are two buttons. The first will be the “ON” button and the second will be the OFF button. Through these buttons, the user will be able to turn the onboard LED on and off after clicking on the respective button.
- When a user clicks the ON button, they will be redirected to an IP address followed by /led2on, and the onboard LED turns on.
- Similarly, When a user clicks the OFF button, they will be redirected to an IP address followed by /led2off, and the onboard LED turns off
Setting up Arduino IDE
To follow this SPIFFS bases web server project, make sure you have the latest version of Arduino IDE and the ESP32 add-on installed on your Arduino IDE. If you have not installed it before you can follow this tutorial:
Install ESP32 in Arduino IDE ( Windows, Linux, and Mac OS)
Also, you will have to download and install the ESP32 Filesystem Uploader Plugin in your Arduino IDE so that you are able to upload the SPIFFS files on your ESP32 board. If you haven’t, you can follow this tutorial:
Install ESP32 Filesystem Uploader in Arduino IDE – SPIFFS
Installing ESPAsyncWebServer and Async TCP Library
We will need two libraries to build SPIFFS based web server. The ESPAsyncWebServer library will help us in creating our web server easily. With this library, we will set up an asynchronous HTTP server. AsyncTCP is another library that we will be incorporating as it a dependency for the ESPAsyncWebServer library. Both of these libraries are not available in the Arduino library manager. Therefore, we will have to download and install them on our ESP32 board ourselves.
- To install ESPAsyncWebServer library, click here to download. You will download the library as a .zip folder which you will extract and rename as ‘ESPAsyncWebServer.’ Then, transfer this folder to the library folder in your Arduino IDE.
- To install the Async TCP library, click here to download. You will download the library as a .zip folder which you will extract and rename as ‘AsyncTCP’. Then, copy the ‘AsyncTCP’ folder to the library folder in your Arduino IDE.
Similarly, you can also go to Sketch > Include Library > Add .zip Library inside the IDE to add the libraries. After installation of the libraries, restart your IDE.
Save Web Server Files into ESP32 SPIFFS
In most of our web server projects with ESP32, we have included HTML and CSS files inside our Arduino sketch. We save these HTML documents inside Arduino Sketch by converting them into strings. Whenever a web client makes an HTTP request, we send this string as a response which is basically a web page.
On the contrary, with SPIFFS, we can save HTML, CSS, and JavaScript files in the ESP32 flash file system. Whenever a web client makes an HTTP request, we can serve these files directly from SPIFFS.
To build an ESP32 web server using SPIFFS, we will create three different files: HTML, CSS, and Arduino sketch and organize them in a project folder like shown below:
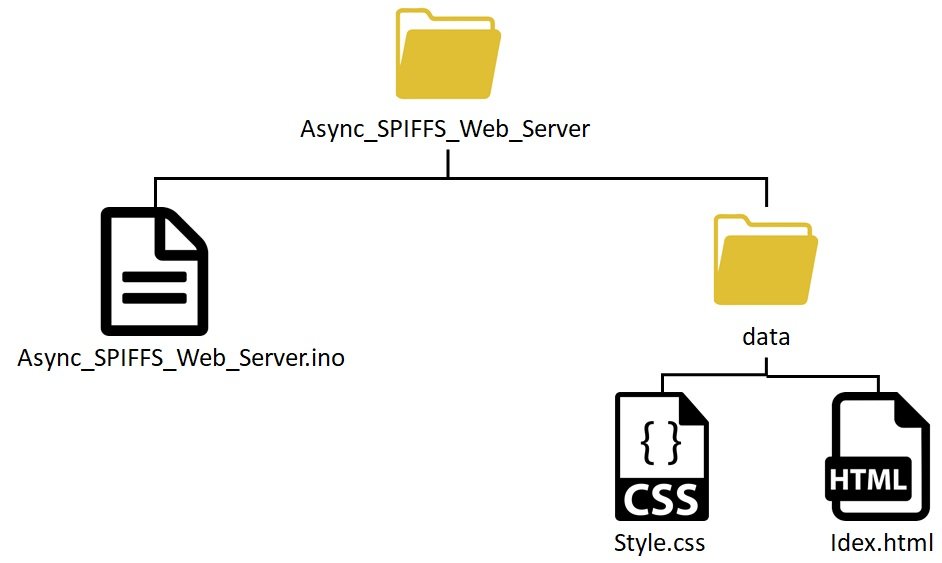
Note: You should place HTML and CSS files inside the data folder. Otherwise, SPIFFS library will not be able to read these files.
Creating HTML file
Inside our HTML file, we will include the title, a paragraph for the GPIO state, and two on/off buttons.
Now, create an index.html file and replicate the code given below in that file.
<!DOCTYPE html>
<html>

<head>
  <title>ESP32 WEB SERVER</title>
  <meta name="viewport" content="width=device-width, initial-scale=1">
  <link rel="icon" href="data:,">
  <link rel="stylesheet" href="https://use.fontawesome.com/releases/v5.7.2/css/all.css"
    integrity="sha384-fnmOCqbTlWIlj8LyTjo7mOUStjsKC4pOpQbqyi7RrhN7udi9RwhKkMHpvLbHG9Sr" crossorigin="anonymous">
  <link rel="stylesheet" type="text/css" href="style.css">
</head>

<body>
  <h2>ESP32 WEB SERVER</h2>
  <div class="content">
    <div class="card-grid">
      <div class="card">
        <p><i class="fas fa-lightbulb fa-2x" style="color:#c81919;"></i>     <strong>GPIO2</strong></p>
        <p>GPIO state: <strong> %GPIO_STATE%</strong></p>
        <p>
          <a href="/led2on"><button class="button">ON</button></a>
          <a href="/led2off"><button class="button button2">OFF</button></a>
        </p>
      </div>
    </div>
  </div>
</body>

</html>
We will start with the title of the web page. The <title> tag will indicate the beginning of the title and the </tile> tag will indicate the ending. In between these tags, we will specify “ESP32 WEB SERVER” which will be displayed in the browser’s title bar.
<title>ESP32 WEB SERVER</title>Next, we will create a meta tag to make sure our web server is available for all browsers e.g., smartphones, laptops, computers etc.
<meta name="viewport" content="width=device-width, initial-scale=1">In our web page, we also use icons of lamps to show ON and OFF states. This link tag loads the icons used in the webpage from fontawesome.
<link rel="stylesheet" href="https://use.fontawesome.com/releases/v5.7.2/css/all.css"
     integrity="sha384-fnmOCqbTlWIlj8LyTjo7mOUStjsKC4pOpQbqyi7RrhN7udi9RwhKkMHpvLbHG9Sr" crossorigin="anonymous">
Between the <head></head> tags, we will reference the CSS file as we’ll be creating different files for both HTML and CSS by using the <link> tag. This tag will be used so that we can link with an external style sheet which we will specify as a CSS file. It will consist of three attributes. The first one is rel which shows the relationship between the current file and the one which is being linked.
We will specify “stylesheet” which will change the visuals of the web page. The second attribute is type which we will specify as “text/css” as we will be using the CSS file for styling purpose. The third attribute is href and it will specify the location of the linked file. Both of the files (HTML & CSS) will be saved in the same folder (data) so we will just specify the name of the CSS file that is “style.css.”
<link rel="stylesheet" type="text/css" href="style.css">Inside the HTML web page body, we will include the heading, the paragraph and the buttons. This will go inside the <body></body> tags which will mark the beginning and the ending of the script. We will include the heading of our webpage inside the <h1></h1> tags and it will be the same as that of the web browser title i.e., ESP32 WEB SERVER.
<h1>ESP32 WEB SERVER</h1>The first paragraph displays the lamp icon and GPIO2 text. We use the icons from Font Awesome Icons website. Besides this when a user clicks the LED ON button, you will be redirected to /?led_2_on URL.
To Create font, we will use the fontawesome.com website. Go this link (fontawesome) and type light in search bar as shown below:
You will see many icons for light bulbs. You can select any one of them to be used in your MicroPython web server. We use the first and second lamp icons in this tutorial. After that click on the selected icon.
You will see this window which contains the link tag. Copy this link tag and use it on your HTML page as follows:
iv class="card">
        <p><i class="fas fa-lightbulb fa-2x" style="color:#c81919;"></i>     <strong>GPIO2</strong></p>
Next, we will use a placeholder to monitor the correct GPIO states. %GPIO_STATE% will be used as the placeholder which will help us check for the current state of the output GPIO2 connected with the on-board LED.
<p>GPIO state: <strong>%GPIO_STATE%</strong></p>Then, we will define the buttons on our web page. We have two buttons one after another: an ON button and an OFF button. When the user will click the ON button, the web page will redirect to /on URL likewise when the OFF button will be clicked, the webpage will be redirect to /off URL.
<p><a href="/led2on"><button class="button">ON</button></a></p>
<p><a href="/led2off"><button class="button button2">OFF</button></a></p>
Creating CSS File
Next, create another file “style.css” in the same folder as the HTML file and replicate the code given below in that file.
html {
  font-family: Arial;
  display: inline-block;
  margin: 0px auto;
  text-align: center;
}
h1{
  color: #070812;
  padding: 2vh;
}
.button {
  display: inline-block;
  background-color: #b30000; //red color
  border: none;
  border-radius: 4px;
  color: white;
  padding: 16px 40px;
  text-decoration: none;
  font-size: 30px;
  margin: 2px;
  cursor: pointer;
}
.button2 {
  background-color: #364cf4; //blue color
}
.content {
  padding: 50px;
}
.card-grid {
  max-width: 800px;
  margin: 0 auto;
  display: grid;
  grid-gap: 2rem;
  grid-template-columns: repeat(auto-fit, minmax(200px, 1fr));
}
.card {
  background-color: white;
  box-shadow: 2px 2px 12px 1px rgba(140,140,140,.5);
}
.card-title {
  font-size: 1.2rem;
  font-weight: bold;
  color: #034078
}
Inside our CSS file which will be used to give styles to our web page, we will specify the font types, size, and colors of the headings, paragraphs, and the two buttons. We will set the display text to font type Arial and align it in the center of the webpage.
The font color of the title (h1) and the font size of the first paragraph (p) will also be set. Next, as we are using two buttons, one for ON and another for OFF, thus we will use two different colors to differentiate them. We will incorporate their font size, color, and positioning as well.
ESP32 SPIFFS Web Server Code
Finally, we will create a new file and save it as ESP32_webserver. Copy the code given below in that file.
// Import required libraries
#include "WiFi.h"
#include "ESPAsyncWebServer.h"
#include "SPIFFS.h"
// Replace with your network credentials
const char* ssid = "Enter_Your_WiFi_Name"; //Replace with your own SSID
const char* password = "Enter_Your_WiFi_Password"; //Replace with your own password
const int ledPin = 2;
String ledState;
// Create AsyncWebServer object on port 80
AsyncWebServer server(80);
// Replaces placeholder with LED state value
String processor(const String& var){
Serial.println(var);
if(var == "GPIO_STATE"){
if(digitalRead(ledPin)){
ledState = "ON";
}
else{
ledState = "OFF";
}
Serial.print(ledState);
return ledState;
}
return String();
}
void setup(){
Serial.begin(115200);
pinMode(ledPin, OUTPUT);
// Initialize SPIFFS
if(!SPIFFS.begin(true)){
Serial.println("An Error has occurred while mounting SPIFFS");
return;
}
// Connect to Wi-Fi
WiFi.begin(ssid, password);
while (WiFi.status() != WL_CONNECTED) {
delay(1000);
Serial.println("Connecting to WiFi..");
}
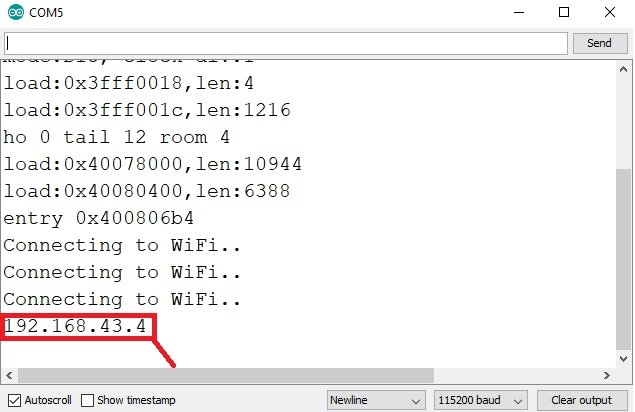
// Print ESP32 Local IP Address
Serial.println(WiFi.localIP());
// Route for root / web page
server.on("/", HTTP_GET, [](AsyncWebServerRequest *request){
request->send(SPIFFS, "/index.html", String(), false, processor);
});
// Route to load style.css file
server.on("/style.css", HTTP_GET, [](AsyncWebServerRequest *request){
request->send(SPIFFS, "/style.css", "text/css");
});
// Route to set GPIO to HIGH
server.on("/led2on", HTTP_GET, [](AsyncWebServerRequest *request){
digitalWrite(ledPin, HIGH);
request->send(SPIFFS, "/index.html", String(), false, processor);
});
// Route to set GPIO to LOW
server.on("/led2off", HTTP_GET, [](AsyncWebServerRequest *request){
digitalWrite(ledPin, LOW);
request->send(SPIFFS, "/index.html", String(), false, processor);
});
// Start server
server.begin();
}
void loop(){
}
Firstly, we will include the necessary libraries. For this project, we are using three main libraries such as WiFi.h, ESPAsyncWebServer.h and SPIFFS.h. As we have to connect our ESP32 to a wireless network, we need WiFi.h library for that purpose. The other ESPAsyncWebServer library is one that we recently downloaded and will be required to build the asynchronous HTTP web server. Also, the SPIFFS library will allow us to access the flash memory file system of our ESP32 core.
#include "WiFi.h"
#include "ESPAsyncWebServer.h"
#include "SPIFFS.h"
Next, we will create two global variables, one for the SSID password. These will hold our network credentials which will be used to connect to our wireless router. Replace both of them with your credentials to ensure a successful connection.
// Replace with your network credentials
const char* ssid = "Enter_Your_WiFi_Name"; //Replace with your own SSID
const char* password = "Enter_Your_WiFi_Password"; //Replace with your
Next, define the variable ledPin to give a symbolic name to the GPIO2 pin through which the on-board LED will be connected. The ledState variable will be used to store the current LED state which will be used later on in the program code.
const int ledPin = 2;
String ledState;
The AsyncWebServer object will be used to set up the ESP32 web server. We will pass the default HTTP port which is 80, as the input to the constructor. This will be the port where the server will listen to the incoming HTTP requests.
// Creating an AsyncWebServer object
AsyncWebServer server(80);
Processor Function
Inside the processor() function, we will replace the placeholder %GPIO_STATE% with the LED state (1 or 0). The series of if-else statement will check whether the placeholder is indeed the one that we created in our HTML file. If it is, then it will check for the variable ledPin which specifies the GPIO2 connected to the on-board LED. If the state is 1(HIGH) then ledState variable will be saved as ‘ON’ otherwise it will be saved as ‘OFF.’ As a result, this variable will be returned and will replace GPIO_STATE with the ledState value.
String processor(const String& var){
  Serial.println(var);
  if(var == "GPIO_STATE"){
    if(digitalRead(ledPin)){
      ledState = "ON";
    }
    else{
      ledState = "OFF";
    }
    Serial.print(ledState);
    return ledState;
  }
  return String();
}
setup() Function
Inside the setup() function, we will open a serial connection at a baud rate of 115200. By using the pinMode() function, the GPIO PINs will be passed as a parameter inside the function which will be configured as an output pin.
Serial.begin(115200);
pinMode(ledPin, OUTPUT);
These lines of code will initialize the SPIFFS.
if(!SPIFFS.begin(true)){
  Serial.println("An Error has occurred while mounting SPIFFS");
  return;
}
WiFi Network Connection
The following section of code will connect our ESP32 board with the local network whose network credentials we already specified above. After the connection will be established, the IP address of the ESP32 board will get printed on the serial monitor. This will help us to make a request to the server.
WiFi.begin(ssid, password);
while (WiFi.status() != WL_CONNECTED) {
  delay(1000);
  Serial.println("Connecting to WiFi..");
}
Serial.println(WiFi.localIP());
Async Web Server SPIFFS
Now, we will look into how Async Web Server handles the HTTP requests received from a client. We can configure the Async Web Server to listen to specific HTTP requests based on configured routes and execute particular function whenever a HTTP request is received on that route.
We will use the on() method on the server object to listen to the incoming HTTP requests and execute functions accordingly.
The send() method uses to return the HTTP response. The index.html file will send to the client, whenever the server will receive a request on the “/” URL. We will replace the placeholder with the value saved in the variable ledState as we will be using processor as the last argument of the send() function.
server.on("/", HTTP_GET, [](AsyncWebServerRequest *request){
  request->send(SPIFFS, "/index.html", String(), false, processor);
});
Next, we will also add the /style.css as the first argument inside the on() function as we have already referenced it on our HTML file. Hence, whenever the client will request a CSS file, it will be delivered to the client as can be seen through the send() function.
server.on("/style.css", HTTP_GET, [](AsyncWebServerRequest *request){
  request->send(SPIFFS, "/style.css","text/css");
});
As you already know, when the user will click the ON/OFF buttons the web page will redirect to either /led2on or /led2off URL. Therefore, this section of code deals with what happens when either of the buttons is clicked.
Whenever an HTTP GET request is made on either of the two /on or /off, the on-board LED of the ESP32 module will turn ON or OFF and HTML page will be sent in response to a client.
Also, we will set the on-board LED’s GPIO pin to a LOW state so that initially it will be OFF at the time of boot.
server.on("/on", HTTP_GET, [](AsyncWebServerRequest *request){
  digitalWrite(ledPin, HIGH);
  request->send(SPIFFS, "/index.html", String(),false, processor);
});
server.on("/off", HTTP_GET, [](AsyncWebServerRequest *request){
  digitalWrite(ledPin, LOW);
  request->send(SPIFFS, "/index.html", String(),false, processor);
});
To start the server, we will call the begin() on our server object.
server.begin();Our loop function is empty as we are building an asynchronous server so we do not need to call any handling function inside it.
void loop() {

}
Demonstration
After you have saved all three files go to Sketch > Show Sketch Folder and create a new folder. Place both the HTML and CSS files inside that folder and save the folder as ‘data.’
Make sure you choose the correct board and COM port before uploading your code to the board. Go to Tools > Board and select ESP32 Dev Module. Next, go to Tools > Port and select the appropriate port through which your board is connected.

Click on the upload button to upload the code into the ESP32 development board.
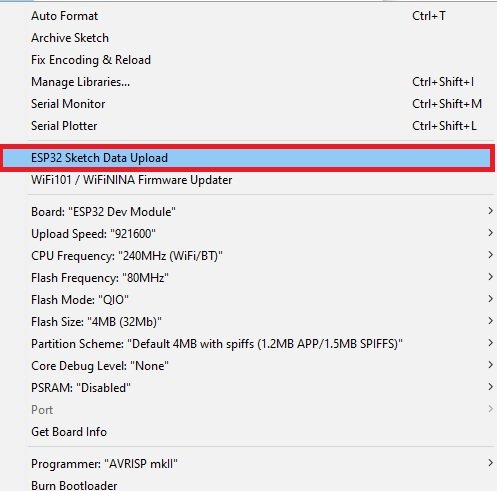
Now, we will upload the files into our ESP32 board. Go to Tools > ESP32 Data Sketch Upload. After a few moments, the files will be uploaded.
After you have uploaded your code and the files to the ESP32 development board, press its ENABLE button.

In your Arduino IDE, open up the serial monitor and you will be able to see the IP address of your ESP module.
Copy this ESP32 IP address into a web browser and press enter. The web server will look something like this:
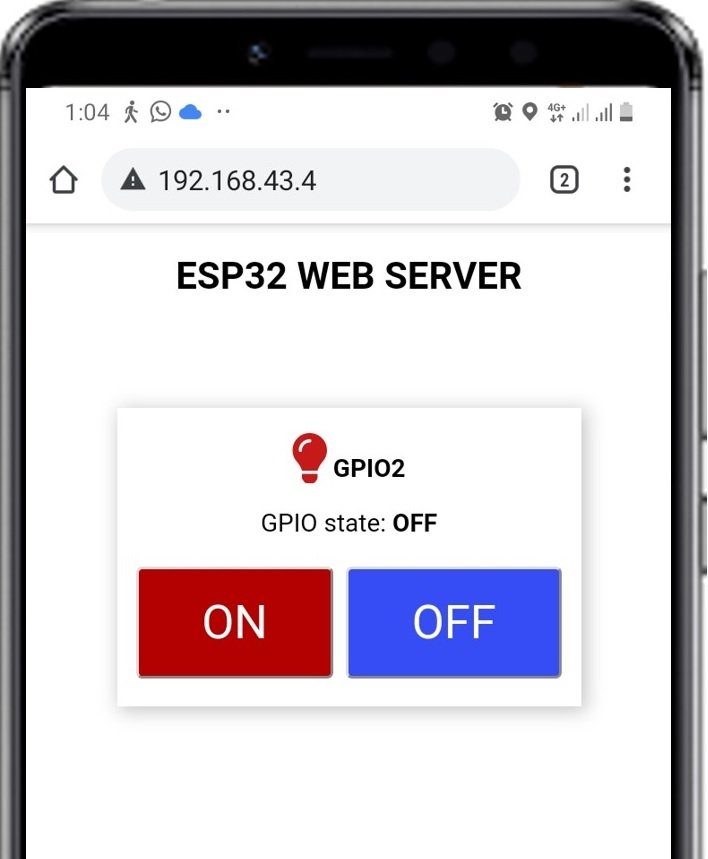
Now, press the ON and OFF buttons and the on-board LED will turn on and off accordingly. The GPIO state on the web server will also change and get updated.
In conclusion, we learned about a very useful feature of the ESP32 its flash memory through SPIFFS. Instead of having to hardcode all the HTML and CSS files in ESP32 code, it is very convenient to save them once in the ESP32 SPIFFS.
In this tutorial, we have learned how to create a web server on ESP32 using the SPI Flash File System (SPIFFS) and the step-by-step process to mount the SPIFFS, store files in the SPI Flash memory, serve their content through the web server and efficiently manage and access data on your ESP32 web server. Mainly, it shows the power of SPIFFS and enhances your IoT projects with seamless file storage and retrieval.
You may like to read our other web server project where we used SPIFFS of ESP32:
- ESP32 SHT31 Temperature and Humidity Web Server
- Display Sensor Readings in Gauges with ESP32 Web Server
- ESP32 MPU6050 Web Server Accelerometer and Gyroscope Dashboard with 3-D animation (SSE Events)
- ESP32 Multiple Sliders WebSocket Web Server – PWM Control LEDs Brightness
Other interesting ESP32 Web Server Projects:
- ESP32 web server control relay and 220 volt lamp
- LM35 Temperature Sensor with ESP32 – Web Server
- ESP32 BMP180 Web Server using Arduino IDE
- Getting Epoch/Unix time with ESP32 through NTP server using Arduino IDE
- ESP32 Web Server Control Servo motor with Arduino IDE
- MicroPython: BME680 Web Server with ESP32 and ESP8266
- ESP32 static/fix IP address
- ESP32 SPI Tutorial Master Slave Communication Example
Hello,
have successfully tried the project “ESP32 Web Server with SPIFFS (SPI Flash File System)”, thanks for the contribution. I have a question about an extension, now if I want to build this web server with 4 or 5 pages, can you give me some guidance here. I would be glad to receive a message.
Hi Thomas,
You just need to add those HTML and CSS pages to SPIFFS and check if SPIFFS has enough space to host 4-5 pages.
Thanks for the quick reply, yes the space is there, but how do I call these different pages in the script. Am unfortunately not yet a super programmer. I would like to choose as a start page for example /daschboard and in the page a menu to the others.
THX
Thomas
Hello,
I have done everything according to your instructions. After the sketch is uploaded, resetting the board the IP info is received in the terminal. But when I introduce the IP in the browser I receive the message “This … page can’t be found”. Could you give me some help?
Regards
looks like your files are not storing correclty in spiffs
I was expecting to be sufficiente to upload the code and I have not done the upload of the data. Doing both everything is OK.