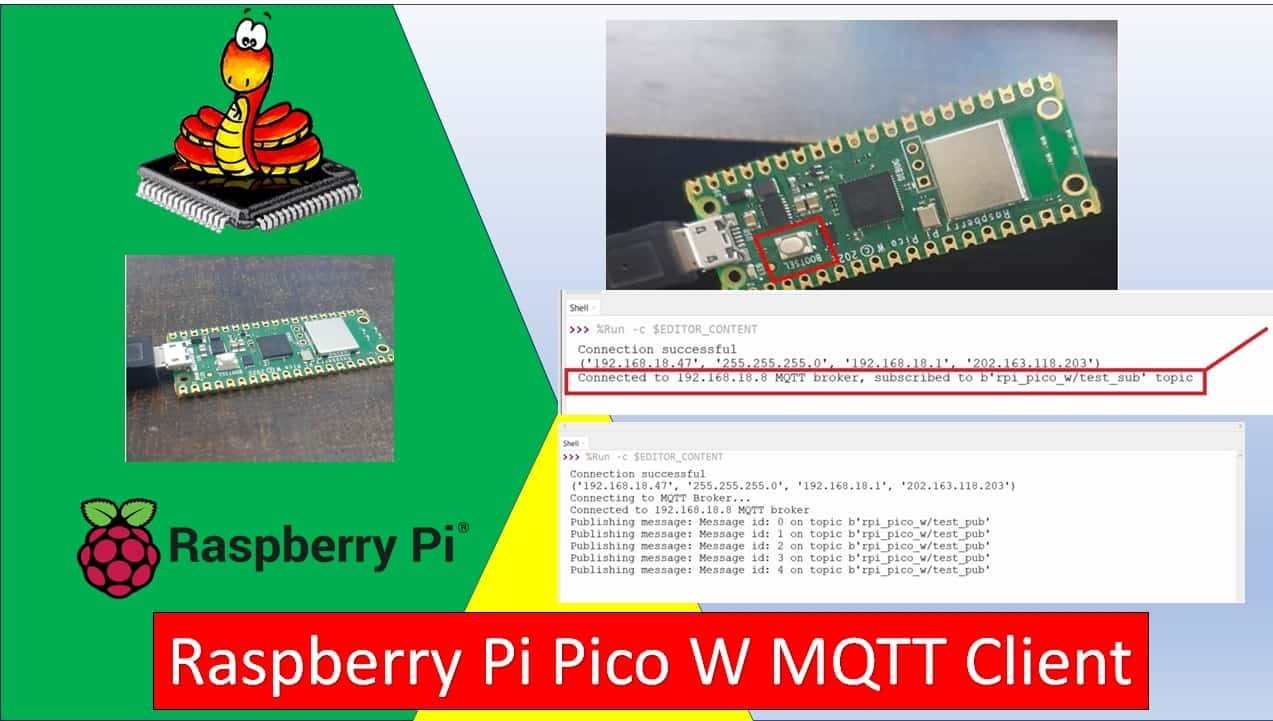
In this tutorial, we will learn to use MQTT client on Raspberry Pi Pico W to publish and subscribe MQTT messages using MicroPython. We will see two examples. In first example, Raspberry Pi Pico W will publish message on “rpi_pico_w/test_pub” topic after every few seconds. Similarly in the second example, Pico W will subscribe to “rpi_pico_w/test_sub” topic. For demonstration, we will use MQTT desktop client application to send and receive MQTT messages.
Recommended Components
The following components are used in this project or are helpful for getting started with Raspberry Pi Pico development.
| Component | How it’s used in this project | Buy on Amazon |
|---|---|---|
| Raspberry Pi Pico W | The Wi-Fi-enabled RP2040 board acting as the MQTT client. | Check Price |
| Micro USB Cable | Data cable to connect the Pico W to your computer and upload code. | Check Price |
| Breadboard | Handy for prototyping circuits as you extend the project. | Check Price |
As an Amazon Associate we earn from qualifying purchases. Prices and availability are accurate as of the date/time indicated and are subject to change.
We will use the Mosquitto broker that is installed on the Raspberry Pi. But if you do not have Raspberry Pi, you can also install it on your Windows or Linux Ubuntu machine.
Raspberry Pi Pico W will make connection with the MQTT broker installed on Raspberry Pi.
Prerequisites
Before we start this tutorial, make sure you are familiar with and have the latest version Python 3 in your system, have set up MicoPython in Raspberry Pi Pico, and have a running Integrated Development Environment(IDE) in which we will be doing the programming. We will be using the same Thonny IDE as we have done previously in the getting started guide. If you have not followed our previous tutorial, you check here:about:blank
What is MQTT?
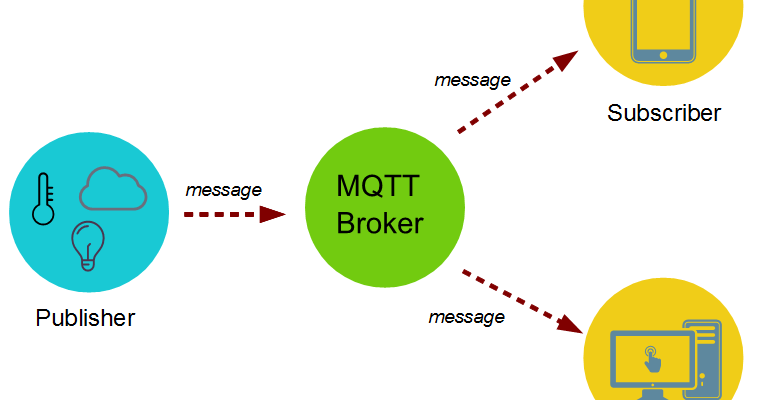
Message Queuing Telemetry Transport (MQTT) transmits messages between two devices. It follows a publish-subscribe network protocol to perform its functionality.
There are many MQTT brokers available which we can use. The main job of the broker is to receive, filter and publish messages to the clients who are subscribed. Among free self hosted brokers, Mosquitto is the most abundantly used. It is a free open source MQTT broker which works on Windows and Linux.
For a detailed tutorial regarding MQTT, its main components, MQTT broker and working follow the link:
MicroPython MQTT Client Library
To use MQTT client on Raspberry Pi Pico W, we need to add MQTT library in Thonny IDE. You can install either using upip or from packager manager in Thonny IDE. But upip and package manager in Thonny IDE gives different issues on different versions. Therefore, we are adding MQTT client library manually to Raspberry Pi Pico W.
The first step is to get the umqttsimple library MicroPython script from this link:
Copy this MQTT client MicroPython script and create a new file in Thonny IDE.
try:
import usocket as socket
except:
import socket
import ustruct as struct
from ubinascii import hexlify
class MQTTException(Exception):
pass
class MQTTClient:
def __init__(self, client_id, server, port=0, user=None, password=None, keepalive=0,
ssl=False, ssl_params={}):
if port == 0:
port = 8883 if ssl else 1883
self.client_id = client_id
self.sock = None
self.server = server
self.port = port
self.ssl = ssl
self.ssl_params = ssl_params
self.pid = 0
self.cb = None
self.user = user
self.pswd = password
self.keepalive = keepalive
self.lw_topic = None
self.lw_msg = None
self.lw_qos = 0
self.lw_retain = False
def _send_str(self, s):
self.sock.write(struct.pack("!H", len(s)))
self.sock.write(s)
def _recv_len(self):
n = 0
sh = 0
while 1:
b = self.sock.read(1)[0]
n |= (b & 0x7f) << sh
if not b & 0x80:
return n
sh += 7
def set_callback(self, f):
self.cb = f
def set_last_will(self, topic, msg, retain=False, qos=0):
assert 0 <= qos <= 2
assert topic
self.lw_topic = topic
self.lw_msg = msg
self.lw_qos = qos
self.lw_retain = retain
def connect(self, clean_session=True):
self.sock = socket.socket()
addr = socket.getaddrinfo(self.server, self.port)[0][-1]
self.sock.connect(addr)
if self.ssl:
import ussl
self.sock = ussl.wrap_socket(self.sock, **self.ssl_params)
premsg = bytearray(b"\x10\0\0\0\0\0")
msg = bytearray(b"\x04MQTT\x04\x02\0\0")
sz = 10 + 2 + len(self.client_id)
msg[6] = clean_session << 1
if self.user is not None:
sz += 2 + len(self.user) + 2 + len(self.pswd)
msg[6] |= 0xC0
if self.keepalive:
assert self.keepalive < 65536
msg[7] |= self.keepalive >> 8
msg[8] |= self.keepalive & 0x00FF
if self.lw_topic:
sz += 2 + len(self.lw_topic) + 2 + len(self.lw_msg)
msg[6] |= 0x4 | (self.lw_qos & 0x1) << 3 | (self.lw_qos & 0x2) << 3
msg[6] |= self.lw_retain << 5
i = 1
while sz > 0x7f:
premsg[i] = (sz & 0x7f) | 0x80
sz >>= 7
i += 1
premsg[i] = sz
self.sock.write(premsg, i + 2)
self.sock.write(msg)
#print(hex(len(msg)), hexlify(msg, ":"))
self._send_str(self.client_id)
if self.lw_topic:
self._send_str(self.lw_topic)
self._send_str(self.lw_msg)
if self.user is not None:
self._send_str(self.user)
self._send_str(self.pswd)
resp = self.sock.read(4)
assert resp[0] == 0x20 and resp[1] == 0x02
if resp[3] != 0:
raise MQTTException(resp[3])
return resp[2] & 1
def disconnect(self):
self.sock.write(b"\xe0\0")
self.sock.close()
def ping(self):
self.sock.write(b"\xc0\0")
def publish(self, topic, msg, retain=False, qos=0):
pkt = bytearray(b"\x30\0\0\0")
pkt[0] |= qos << 1 | retain
sz = 2 + len(topic) + len(msg)
if qos > 0:
sz += 2
assert sz < 2097152
i = 1
while sz > 0x7f:
pkt[i] = (sz & 0x7f) | 0x80
sz >>= 7
i += 1
pkt[i] = sz
#print(hex(len(pkt)), hexlify(pkt, ":"))
self.sock.write(pkt, i + 1)
self._send_str(topic)
if qos > 0:
self.pid += 1
pid = self.pid
struct.pack_into("!H", pkt, 0, pid)
self.sock.write(pkt, 2)
self.sock.write(msg)
if qos == 1:
while 1:
op = self.wait_msg()
if op == 0x40:
sz = self.sock.read(1)
assert sz == b"\x02"
rcv_pid = self.sock.read(2)
rcv_pid = rcv_pid[0] << 8 | rcv_pid[1]
if pid == rcv_pid:
return
elif qos == 2:
assert 0
def subscribe(self, topic, qos=0):
assert self.cb is not None, "Subscribe callback is not set"
pkt = bytearray(b"\x82\0\0\0")
self.pid += 1
struct.pack_into("!BH", pkt, 1, 2 + 2 + len(topic) + 1, self.pid)
#print(hex(len(pkt)), hexlify(pkt, ":"))
self.sock.write(pkt)
self._send_str(topic)
self.sock.write(qos.to_bytes(1, "little"))
while 1:
op = self.wait_msg()
if op == 0x90:
resp = self.sock.read(4)
#print(resp)
assert resp[1] == pkt[2] and resp[2] == pkt[3]
if resp[3] == 0x80:
raise MQTTException(resp[3])
return
# Wait for a single incoming MQTT message and process it.
# Subscribed messages are delivered to a callback previously
# set by .set_callback() method. Other (internal) MQTT
# messages processed internally.
def wait_msg(self):
res = self.sock.read(1)
self.sock.setblocking(True)
if res is None:
return None
if res == b"":
raise OSError(-1)
if res == b"\xd0": # PINGRESP
sz = self.sock.read(1)[0]
assert sz == 0
return None
op = res[0]
if op & 0xf0 != 0x30:
return op
sz = self._recv_len()
topic_len = self.sock.read(2)
topic_len = (topic_len[0] << 8) | topic_len[1]
topic = self.sock.read(topic_len)
sz -= topic_len + 2
if op & 6:
pid = self.sock.read(2)
pid = pid[0] << 8 | pid[1]
sz -= 2
msg = self.sock.read(sz)
self.cb(topic, msg)
if op & 6 == 2:
pkt = bytearray(b"\x40\x02\0\0")
struct.pack_into("!H", pkt, 2, pid)
self.sock.write(pkt)
elif op & 6 == 4:
assert 0
# Checks whether a pending message from server is available.
# If not, returns immediately with None. Otherwise, does
# the same processing as wait_msg.
def check_msg(self):
self.sock.setblocking(False)
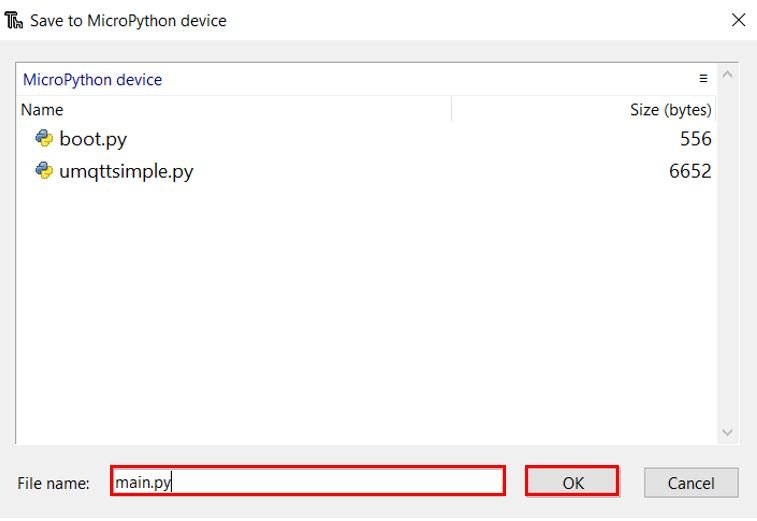
return self.wait_msg()Open Thonny IDE and create a new file. Copy the code given above and save it your MicroPython device.

Save the new file by the name umqttsimple.py.
Note: You should give it same name as umqttsimple.py. Otherwise, you will get errors when you use in your main application.
Raspberry Pi Pico W MQTT Publish Data to Broker
In this section, we will see an example to publish data to MQTT broker from Raspberry Pi Pico W on any topic.
For example, the following MicroPython script will publish message counter values to MQTT broker after every
from machine import Pin
import time
from umqttsimple import MQTTClient
import ubinascii
import machine
import micropython
import network
import gc
gc.collect()

ssid = 'HUAWEI-u67E'
password = '4uF77R2n'
mqtt_server = '192.168.18.8'  #Replace with your MQTT Broker IP

client_id = ubinascii.hexlify(machine.unique_id())
topic_pub = b'rpi_pico_w/test_pub'

station = network.WLAN(network.STA_IF)
station.active(True)
station.connect(ssid, password)

while station.isconnected() == False:
  pass

print('Connection successful')
print(station.ifconfig())

def connect():
  print('Connecting to MQTT Broker...')
  global client_id, mqtt_server
  client = MQTTClient(client_id, mqtt_server)
  client.connect()
  print('Connected to %s MQTT broker' % (mqtt_server))
  return client

def restart_and_reconnect():
  print('Failed to connect to MQTT broker. Reconnecting...')
  time.sleep(10)
  machine.reset()

try:
  client = connect()
except OSError as e:
  restart_and_reconnect()

push_button = Pin(15, Pin.IN)
push_button_Prv_state = False
mesg_id = 0

while True:
  try:
    msg = "Message id: " + str(mesg_id)
    print('Publishing message: %s on topic %s' % (msg, topic_pub))
    client.publish(topic_pub, msg)
    time.sleep(2)
    mesg_id = mesg_id + 1
  except OSError as e:
    restart_and_reconnect()
Open Thonny IDE and create a new file. Copy the code given above and save it your MicroPython device with the name of main.py.
How MicroPython Script Works?
We start off by importing all the necessary libraries which would be required including time ,umqttsimple, MQTTClient, ubinascii, machine micropython, network, esp and Pin class from machine module.
from machine import Pin
import time
from umqttsimple import MQTTClient
import ubinascii
import machine
import micropython
import network
Then we activate the garbage collector and set the debug to ‘None.’
import gc
gc.collect()
Next, we will enter our network Wi-fi, its password and the IP of our MQTT broker. You will have to specify your own figures in order for Raspberry to connect with the network.
ssid = 'YOUR_SSID' #write your own wi-fi name
password = 'YOUR_PASSWORD' #write your own password
mqtt_server = 'Enter_Your_Broker_IP_ADDRESS'  #Replace with your MQTT Broker IP
Then we will create a client_id variable which saves the ESP unique ID. This is required to form a MQTT client.
client_id = ubinascii.hexlify(machine.unique_id())Now will create a variable named: ‘topic_pub’. This (rpi_pico_w/test_pub) is the topic on which the Raspberry Pi Pico W MQTT client will publish message.
topic_pub = b'rpi_pico_w/test_pub'
Next ,we will connect the Raspberry Pi Pico W board to the Wi-Fi network.
station = network.WLAN(network.STA_IF)
station.active(True)
station.connect(ssid, password)

while station.isconnected() == False:
  pass

print('Connection successful')
print(station.ifconfig())
First, we will define the connect() function. This is used to connect the Raspberry Pi Pico W with the MQTT broker. We will initialize global variables for client_id and mqtt_server. This way we will be able to use them anywhere in the program code.
The next step is to initialize the MQTTClient() method with two parameters. The first parameter is the ID of the client named as: ‘client_id’ and the second parameter is the mqtt_server which is the IP address of the broker. This method will be assigned to the object ‘client.’ Then we will connecting the client with the broker. This would be done by using the connect() method on the object which we created previously: ‘client.’
def connect():
  print('Connecting to MQTT Broker...')
  global client_id, mqtt_server
  client = MQTTClient(client_id, mqtt_server)
  client.connect()
  print('Connected to %s MQTT broker' % (mqtt_server))
  return client
In case of failure of connecting with MQTT broker, we will also create a restart_and_reconnect() function which would display a failure message on the screen. The Pico W development board will restart after 10 seconds.
The next step is to learn how to connect Raspberry Pi Pico W to the MQTT broker. This is accomplished by forming a client. We will create a client through the connect() function which we defined previously. Moreover, we have to keep track of a failure in connection as well. In case it happens, the Raspberry Pi Pico W will restart.
def restart_and_reconnect():
  print('Failed to connect to MQTT broker. Reconnecting...')
  time.sleep(10)
  machine.reset()

try:
  client = connect()
except OSError as e:
  restart_and_reconnect()
Raspberry Pi Pico W Publish MQTT Message to a Topic
After that, set up a while loop which continuously publish MQTT messages to on rpi_pico_w/test_pub after every two seconds. The payload consists of Messsage id: string and a counter value. Also, on each loop iteration value of counter will increment by one.
To publish the messages we use the publish() method. This method has two arguments. The first argument is the topic_pub which is the publishing topic. The second argument is the msg which displays the content of the message.
In case of a failure during the process, we will call the restart_and _reconnect() function which restarts the Raspberry Pi Pico W.
while True:
  try:
    msg = "Message id: " + str(mesg_id)
    print('Publishing message: %s on topic %s' % (msg, topic_pub))
    client.publish(topic_pub, msg)
    time.sleep(2)
    mesg_id = mesg_id + 1
  except OSError as e:
    restart_and_reconnect()
Uploading MicroPython Script
To upload this MicroPython script to your Raspberry Pi Pico W device, go to Files and click on ‘Save as’ or click the Save icon. Save the file to the MicroPython device as main.py and click ok.
Now press the Run current script icon.
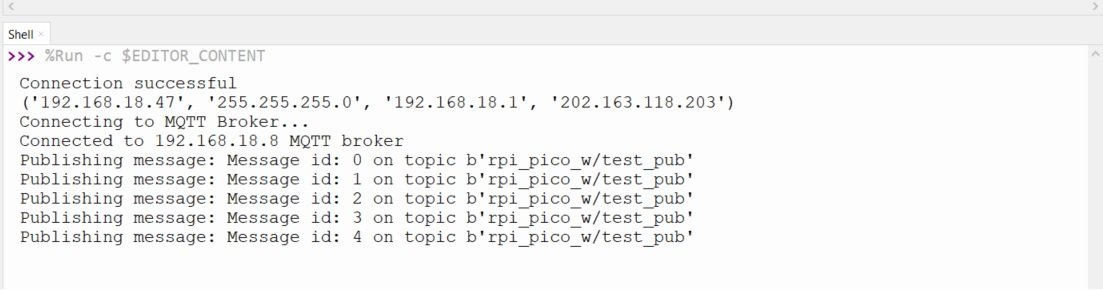
This would upload the code onto our Raspberry Pi Pico W board. After the code is uploaded, you will see this output of Thonny IDE terminal which shows that board has successfully connected with your Wi-Fi network and also connected to MQTT broker.
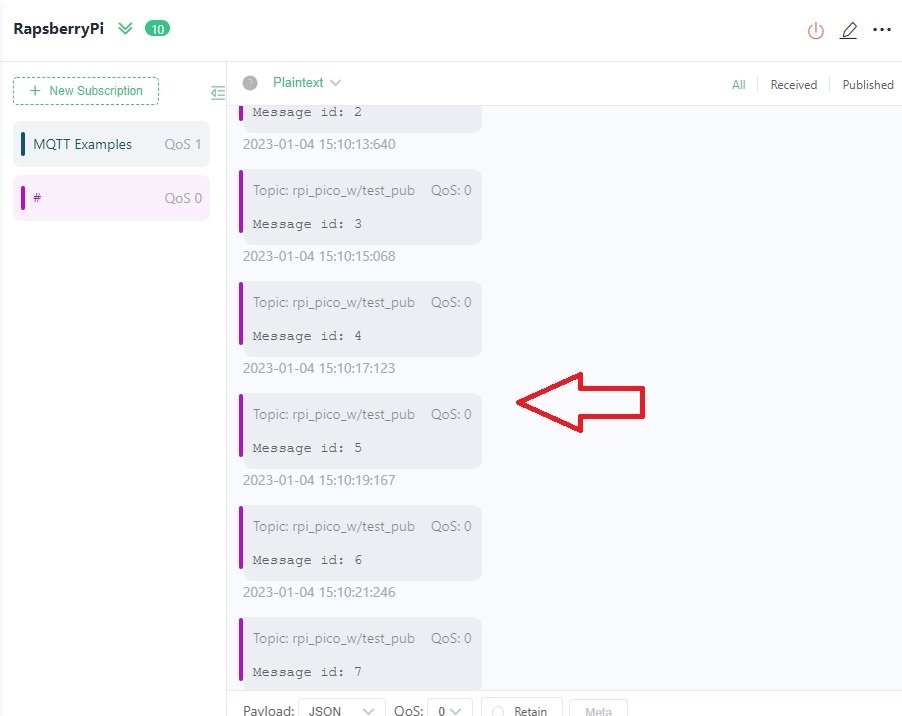
As soon as it connects with broker, it starts publishing messages on on the give topic after every two seconds.
To see these messages, you can use any MQTT Desktop client application. We use MQTTx for this demo. You can download it from this link.
As you can see we are getting MQTT messages from Raspberry Pi Pico W here:
Raspberry Pi Pico W MQTT Subscriber Receive Data from Broker
In this section, we will see an example to subscribe to MQTT topics with Raspberry Pi Pico W MQTT client.
For example, the following MicroPython script subscribes to “rpi_pico_w/test_sub” topic and display message on Thonny IDE terminal whenever it receives any message.
from machine import Pin
import time
from umqttsimple import MQTTClient
import ubinascii
import machine
import micropython
import network
import gc
gc.collect()

ssid = 'HUAWEI-u67E'
password = '4uF77R2n'
mqtt_server = '192.168.18.8'  #Replace with your MQTT Broker IP

client_id = ubinascii.hexlify(machine.unique_id())
topic_sub = b'rpi_pico_w/test_sub'

station = network.WLAN(network.STA_IF)
station.active(True)
station.connect(ssid, password)

while station.isconnected() == False:
  pass

print('Connection successful')
print(station.ifconfig())

def sub_cb(topic, msg):
  print ('Received Message %s from topic %s' %(msg, topic))

def connect_and_subscribe():
  global client_id, mqtt_server, topic_sub
  client = MQTTClient(client_id, mqtt_server)
  client.set_callback(sub_cb)
  client.connect()
  client.subscribe(topic_sub)
  print('Connected to %s MQTT broker, subscribed to %s topic' % (mqtt_server, topic_sub))
  return client

def restart_and_reconnect():
  print('Failed to connect to MQTT broker. Reconnecting...')
  time.sleep(10)
  machine.reset()

try:
  client = connect_and_subscribe()
except OSError as e:
  restart_and_reconnect()

while True:
  try:
       new_msg = client.check_msg()

  except OSError as e:
    restart_and_reconnect
How the Code Works?
The starting code where Raspberry Pi Pico W connected with Wi-Fi and MQTT broker is the same as explained in the last section. The only difference is that how to subscribe to topics.
Here, we will create a callback function which has two arguments. The first argument is the topic and the second one is the received message. This callback function displays the received message and the topic on the shell terminal. This callback function display message on Thonny IDE terminal whenever it receives any message.
def sub_cb(topic, msg):
  print ('Received Message %s from topic %s' %(msg, topic))
Raspberry Pi Pico W MQTT Client Subscribe Topics
Next, we will define the connect_and_subscribe() function. This is used to subscribe to the topic and also to connect with the MQTT broker. The next step is to initialize the MQTTClient() method with two parameters. The first parameter is the ID of the client named as: ‘client_id’ and the second parameter is the mqtt_server which is the IP address of the broker. This method will be assigned to the object ‘client.’ Then we will set the call back function to the client and connect that client with the broker. This would be done by using the connect() method on the object which we created previously: ‘client.’ Next, we will subscribe to topic_sub by using the MQTTClient object.
def connect_and_subscribe():
  global client_id, mqtt_server, topic_sub
  client = MQTTClient(client_id, mqtt_server)
  client.set_callback(sub_cb)
  client.connect()
  client.subscribe(topic_sub)
  print('Connected to %s MQTT broker, subscribed to %s topic' % (mqtt_server, topic_sub))
  return client
In case of failure of connecting with MQTT broker we will also create a restart_reconnect() function which would display a failure message on the screen. The Raspberry Pi Pico W will restart after 10 seconds.
def restart_and_reconnect():
  print('Failed to connect to MQTT broker. Reconnecting...')
  time.sleep(10)
  machine.reset()
The next step is to connect Raspberry Pi Pico W to the MQTT broker and also to subscribe to the topic. This is accomplished by forming a client. We will create a client through the connect_and_subscribe() function which we defined previously. Moreover, we have to keep track of a failure in connection as well. In case it happens, the Raspberry Pi Pico W will restart.
try:
  client = connect_and_subscribe()
except OSError as e:
  restart_and_reconnect()
The while loop runs endlessly and keeps track of any new messages which were received and stores it in the variable new_message. In case of a failure in connection, the Raspberry Pi Pico W would restart as we are calling the restart_and reconnect() function.
while True:
  try:
       new_msg = client.check_msg()

  except OSError as e:
    restart_and_reconnect
Uploading MicroPython Script
To upload this MicroPython script to your Raspberry Pi Pico W device, go to Files and click on ‘Save as’ or click the Save icon. Save the file to the MicroPython device as main.py and click ok.
This would upload the code onto our Raspberry Pi Pico W board. After the code is uploaded, you will see this output of Thonny IDE terminal which shows that board has successfully connected with your Wi-Fi network and also connected to MQTT broker.
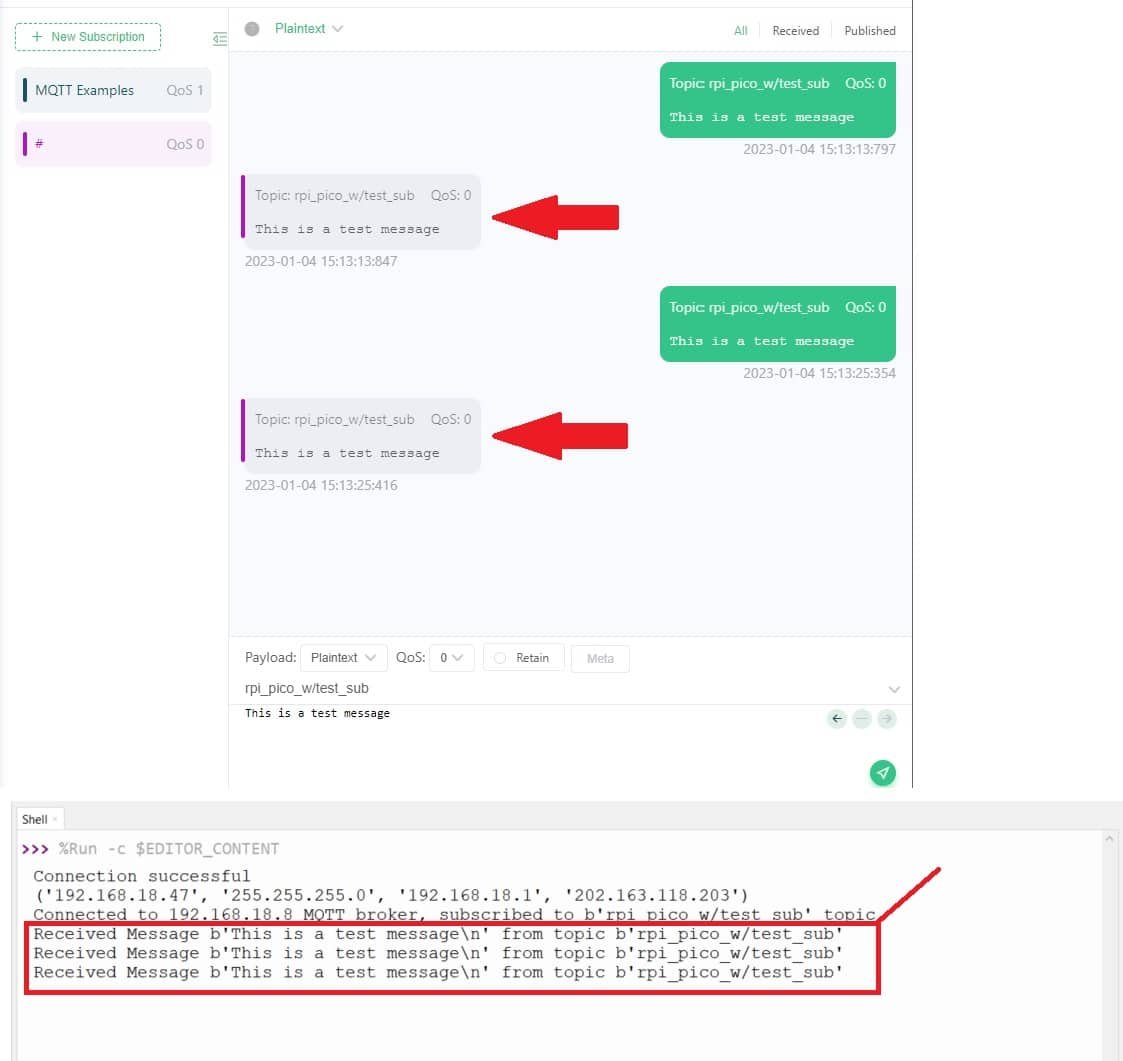
As soon as it connects with broker, it show that it has subscribed to a topic “rpi_pico_w/test_sub”.

Now open MQTTX Desktop client application and publish a message on rpi_pico_w/test_sub topic and as soon as you publish message it will display on terminal of Thonny IDE.
Other Raspberry Pi Pico W tutorials:
- Raspberry Pi Pico W Web Server Control LED
- Raspberry Pi Pico W Wireless BME280 Web Server
- Raspberry Pi Pico W Wi-Fi Manager Web Server using MicroPython
- Raspberry Pi Pico W Soft Access Point Web Server Example
- Raspberry Pi Pico W OpenWeatherMap API Sensorless Weather Station
- Raspberry Pi Pico W Send Sensor Readings to ThingSpeak (BME280)
- Raspberry Pi Pico W Send Sensor Readings via Email with IFTTT