Simple One Way Traffic Light: In this tutorial simple one way traffic signal is designed using Arduino Uno R3. Check a complete list of Arduino tutorials. Traffic Lights are used to control the vehicular traffic. That’s why traffic lights are used to avoid the traffic jams and accidents. There are three lights in the traffic signal, having different message for the drivers. Red light instruct the driver to stop, green light instruct the driver GO through the intersection whereas the yellow light alerts the driver.
Components Required
- Arduino UNO Board
- Red, Green, Yellow(amber) LED’s
- Resistors
- Breadboard
Circuit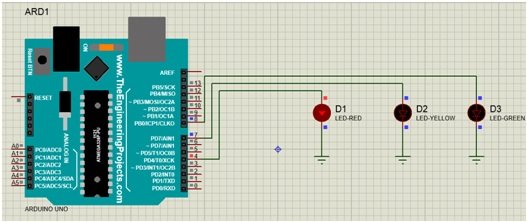
Connect the anode of the Red, Yellow and Green LED’s with digital pins 4, 7 and 8 respectively. And connect the cathode of LED’s directly to ground.
Code
- In void setup() function I declare the red, green and yellow LED’s 4,8 and 7 digital pins for OUTPUT.
- In void loop() function use digitalWrite() function 1st the Red led is High which instruct the driver to stop the instruction
- Then after the 10 second delay the Yellow led is High which instruct the driver to ready state , and Red led is low.
- Then after the 1 second delay both Red and Yellow led’s are Low and Green Led is High which instruct the driver to Go the instruction.
- Yellow Lights has two Possibility for the driver which alerts the driver
- Wait if the next light is red
- And get ready to go / turn the engine ON if the green light is next.
Recommended Components
The following components are used in this project or are helpful for building it with the Arduino.
| Component | How it’s used in this project | Buy on Amazon |
|---|---|---|
| Arduino Uno R3 | The main controller board that sequences the traffic-light timing. | Check Price |
| 5mm LED | Acts as the red, yellow and green traffic-light indicators driven by the Arduino. | Check Price |
| Resistor Kit (220Ω) | 220Ω resistors limit the current through each LED to protect them. | Check Price |
| Breadboard | Solderless board to build and prototype the circuit without soldering. | Check Price |
| Jumper Wires | Used to make the connections between the Arduino, breadboard, and LEDs. | Check Price |
As an Amazon Associate we earn from qualifying purchases. Prices and availability are accurate as of the date/time indicated and are subject to change.
code for simple one way traffic signal
int ledred=4;

int ledgreen=8;

int ledyellow=7;

void setup() {

  pinMode(ledred,OUTPUT);

  pinMode(ledgreen,OUTPUT);

  pinMode(ledyellow,OUTPUT);

  // put your setup code here, to run once:

}


void loop() {

  digitalWrite(ledred,HIGH);

  delay(10000);

  digitalWrite(ledyellow,HIGH);

  digitalWrite(ledred,LOW);

  delay(1000);

  digitalWrite(ledgreen,HIGH);

  digitalWrite(ledred,LOW);

  digitalWrite(ledyellow,LOW);

  delay(10000);

  digitalWrite(ledyellow,HIGH);

  digitalWrite(ledgreen,LOW);

  delay(2000);

  digitalWrite(ledyellow,LOW); }  // put your main code here, to run repeatedly:
so this is all about simple one way traffic signal code and circuit diagram using Arduino.