Arduino Programming with C Language Our today’s tutorial is about Arduino board programming using the C language. We will learn how to create a project in Arduino using C language? We will learn the basics of Arduino Programming in the C language. We will discuss structures i.e., loops used in C language to program Arduino. We will also work on some sample projects created in Arduino IDE using the C language. I recommend you to check the getting started tutorial on Arduino as well.
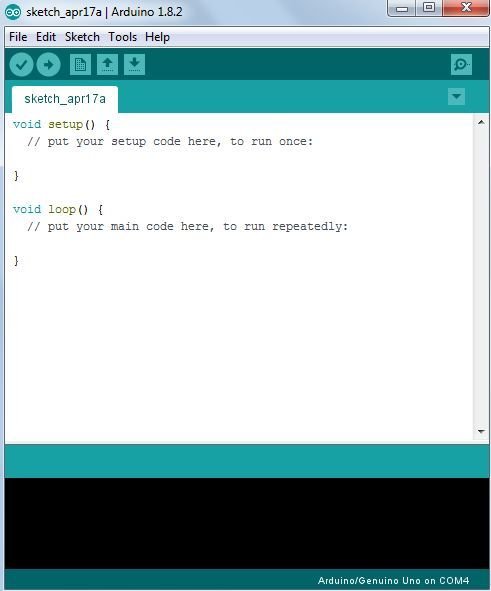
An Arduino program that is written using C language programming is usually called a sketch. The first thing that we need is Arduino IDE, which is available on the Arduino official website free of cost. After downloading and installing Arduino IDE. Start the Arduino IDE. You will see a window like this. (In this tutorial I am using Arduino 1.8.2).
This tutorial is designed to teach you about how to use C programming language to control and program Atmel family microcontroller especially Arduino Uno and Arduino Mega. This is a programming series of tutorials on Arduino. In every tutorial, we will have some small hardware projects to exercise your code. But the real purpose of these tutorials is to test your understanding of C programming, not the hardware. So this will a series of tutorials on Arduino programming. After reading this series of tutorials on Arduino programming, you will feel comfortable in writing your own Arduino codes very easily.
What you will learn in these Arduino programming tutorials?
These tutorials are designed to keep in mind that the audience knows absolutely nothing about C programming in general and nothing about Arduino programming. So if you are completely a beginner in this field of embedded systems project, you will surely learn about embedded c programming after these tutorials on Arduino programming in c. We assume that you have no knowledge of electronics. Some hardware concepts are used in these tutorials to better understand the code, but you don’t need to worry as you will be taught what you need to know to make things function properly.
List of Arduino programming tutorials
Before starting this tutorial it would be better to introduce you guys to the topics which we will cove in this series of tutorials on Arduino programming in c. We will start by introduction in which we will introduce you to the software and hardware requirement of this these tutorials.
- In this tutorial, we will also load and run a sample code in Arduino Uno in order to verify the software and hardware used for these series of tutorials.
- In second tutorial. we have chapter named C for arduino in which will introduce you to the basics of hardware programming like basic building blocks of Arduino programming and steps of programming the Arduino
- In third tutorial on getting started with Arduino programming is very interesting and it discusses about data type used in Arduino IDE.
- In tutorial four we will teach you about the decision making in C using if else statements.
- In tutorial five, we will discuss about the program loops in C…
- In tutorial six, we will talk about introduces functions in Arduino. How to define functions in Arduino IDE and how to call functions with in main code.
- Tutorial seven will cover about storage classes and scope of variables in a Arduino program.
- In tutorial eight , you will be introduced to the pointers. How to use pointer in Arduino programming effectively.
- Tutorial nine will also discuss some techniques so that you can use the pointers effectively.
- Article 10 will discuss structures, unions and data storage in Arduino programming.
- The C pre processor and Bit wise operation will be discussed in article number eleven.
- In tutorial 12, We will look into some useful arduino libraries and how to add libraries in Arduino. Different ways to add libraries in Arduino IDE.
So now let’s start with our first tutorial on introduction to Arduino programming.
Microcontrollers used in Arduino
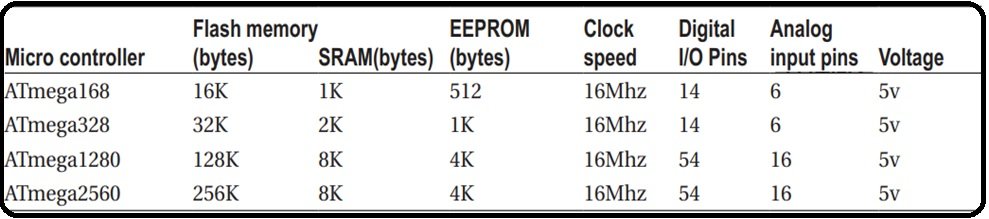
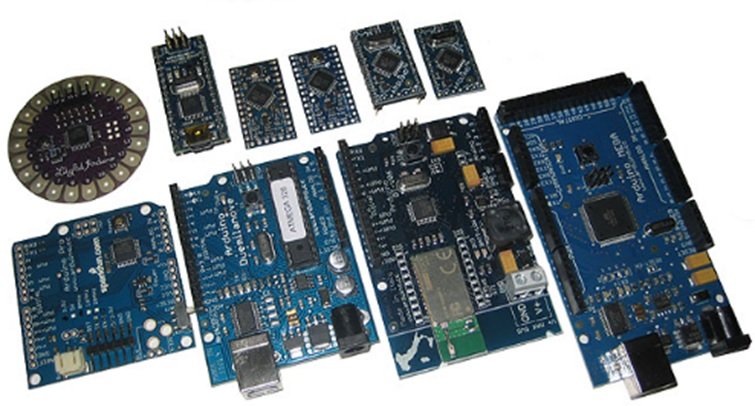
- Atmel produces a wide variety of microcontrollers. you can select any microcontroller from the given table as shown in picture below. but you should know why you are selecting a particular microcontroller.

- Selection of a board depends on what you want to do with it. For example if you want to blink an LED only, then the cheapest one will do just fine. But if you are setting up an experiment that must sample several dozen sensors in one second then you will probably want to use a microcontroller that has a lot of digital input pins, digital output pins and enough built in analog to digital converters. So first you will see number of pins required for your microcontroller based project.
- After that you need to examine the software architecture by considering that how light or heavy is the processing requirement for your code or your project. Whether you need an 80MHz processor or 8MHz processor. So you must estimate the required clock speed for your project.
- The program you develop on a compiler is written on your PC. when you upload the program on microcontroller board, it is stored in the card’s flash memory.This memory is nonvolatile which means that even if you disconnect the board from its power source, the contents of the flash memory remains intact. so you must know the flash memory which will limit your program. So the size of flash memory is also critical in choosing the Arduino board for Arduino programming
- Another factor you must consider is the SRAM or static random access memory. It is the memory in which program variables are stored during the program execution. This data is volatile which means data is usually lost when power is removed form the board.
- Next factor you need to keep in mind while selecting microcontroller is Electrically erasable programmable read only memory or EEPROM. It is the memory which is often used to store configuration or other types of information that are needed when the system powers up.
- Physical size of the microcontroller is also important depending on your application. you must know that larger available memory and more Input/output pins dictates a larger footprint for the card.
- So, keeping in view our requirement for these series of tutorials, we have selected arduino UNO. This board uses ATmega328P microcontroller,which has 32KB flash memory, 2KB SRAM, 1KB EEPROM, 16MHz clock speed, 14 digital and 6 analogue pins…its operating voltage is 5V.


Preparing Compiler
- To benefit from these series of tutorials, you need to test your code on some hardware. You will be needing this Arduino Uno board at many stages of these series of tutorials. I would suggest that you buy the hardware Arduino board, if you really want to learn Arduino programming.
- So you need Arduino Uno board, a solder less breadboard, some LEDs, some resistors and some jumper wires.
- A microcontroller without software is a bicycle without handle bars. like any other computer, a microcontroller need a program of instructions to do something useful. Arduino has provided all the software tools as free download from their website which you use for writing your program code.
How to download and install Arduino IDE
- This section demonstrate downloading, installation and testing of the software you need for this tutorial
- Start the internet browser and enter the address arduino.cc and press enter
- Go to “Download the arduino IDE”
- It gives you different options for installation according to you operating system
- You can download Arduino IDE windows installer for windows. you can download windows zip file for non-admin installation.you can download and install windows app for windows 8.1 or windows 10.
- There are also installation options for MAC operating system and Linux Operating system.
- As I am using windows, so I will click on windows zip file option.
- On the next page. It will give you two options, whether you want to contribute for this download or you want a free download.
- If you want to contribute then click on “contribute and download”. if you want it free then click on “just download” option
- The zipfile is downloaded.
- Now extract the zip file to a directory of your choice.
- Open the extracted folder and run the application file. within few seconds, you should see the IDE for the arduino. If you see the IDE, you can be fairly certain that the software downloading and installation was performed successfully
- Now that you have the software installed and verified, we can check to see whether the microcontroller board is functioning properly. This section demonstrate the hardware verification using an example code which we will upload in the microcontroller and observe it working.
How to upload code to Arduino board
- Now lets see how to upload your first code to Arduino Uno using Arduino IDE. Start with plugging your board into laptop using the USB cable. Micro usb end which will be plugged into the board and the other end which will be plugged into the PC.
- The minute you connect the USB cable to your computer. Power is applied to the Arduino Uno board and an LED will light up on the board. The USB connection is providing power for the board. The Arduino board has on board LED which is connected with pin number 13 of Arduino. This pin can be used either as digital input pin or output pin. You don’t need to worry about these pins right now, I will discuss more about digital input, output pins in the coming tutorials.
- The power provided by the PC via USB cable is not much. Therefore Arduino Uno board are provided with a power plug so that supply with greater power can be connected to the board.
- The arduino IDE support a variety of different microcontroller boards. Therefore, You must tell the IDE which board you will be using for writing your program code.

- For this purpose, open the IDE and go to the tools in the drop down menu of tools, click on boards. It will show different available boards of arduino. as we are using arduino UNO. We will select the arduino UNO board.
- The IDE does a pretty good job of automatically figuring out which USB port you have selected to power and communicate with the microcontroller board.
- To determine which port is being used, connect the arduino to the PC. Go to the tools and go to port in a drop down menu and see which port is selected. In my case COM4 is selected.
- What we need to do now is load and run a program code to see that everything is working properly. Although we could write a short program from scratch but we can not do that yet because we simply do not have enough information under our belt at this junction to make much of a learning experience from the process. Rather writing our own program we will load and run a simple program that is included as a part of the arduino IDE and it blinks an LED
Basic building blocks of Arduino programming
Hi and welcome to C programming for arduino a step by step guide. The C programming language began its march to become formally defined by American national standard institute with the formation of X3J11 committee in 1983. The committee’s work was completed and standard passed in 1989 since then the language is often referred to as ANSI C.The standard is also recognized by the International organization for standardization. Sometimes you will hear it referred to as ISO C for all the practical purposes, ANSI C and ISO C are the same. These both versions are also called as standard C
The C you are about to learn is not standard C. Rather you will be learning a robust subset of standard C. A few standard features are missing but you will soon discover that the subset version of standard C, which we call arduino C programming is more than able to perform just about any task you throw at it. So let’s start learning arduino C. I recommend you to check introduction to Arduino programming tutorial also.
Basic building blocks of Arduino c programming

- All programming languages have 4 basic building blocks
- Expressions
- statements
- statement blocks
- function blocks
Expressions in Arduino c programming

An expression is created by combining operands and operators. What is operand? Operand is simply a piece of data that is acted on by an operator and what is operator? Operator is often a mathematical or logical action that is performed on one or more operands. Examples of expression are.
- a+b
- m-3000
- g<d.

This expression is addition expression in which operands a and b are added together using an arithmetic operator. This is subtraction expression in which two operands m and 3000 are subtracted using this arithmetic operator.This is relational expression in which operand g is compared to operand d to determine whether g is less than d using this relational operator. In these examples, two operands are used in conjunction with a single operator. Binary operator is an operator that always uses two operands. Previous three examples are referred to as expressions using binary operators. It should be kept in mind that it does not matter how many operands are there in the expression. Every expression will ultimately resolve to a value.
For example, take the following expression. It has three operands and two operators. let A=1, B=2 and C=3. As I have said earlier that all expressions resolve to a value. We can start resolving this expression by solving the first expression A+B. so, expression is simplified to 1+2+C. because the first expression is now pure numbers. You can resolve the first expression to the value of 3. You can then resolve the complete expression to 3+C. Note what happened here, you took a complex expression with two operators and three operands and resolved one of the expressions to 3. However in the process, you reduced the complex expression into single expression. Now you can resolve the remaining expression to 3+C, putting value of C. We get 3+3 which gives value equal to 6 and our complex expression is resolved in to a single value. This simplification of a complex expression is called a factoring an expression or resolving an expression.
Rational expression in Arduino c programming
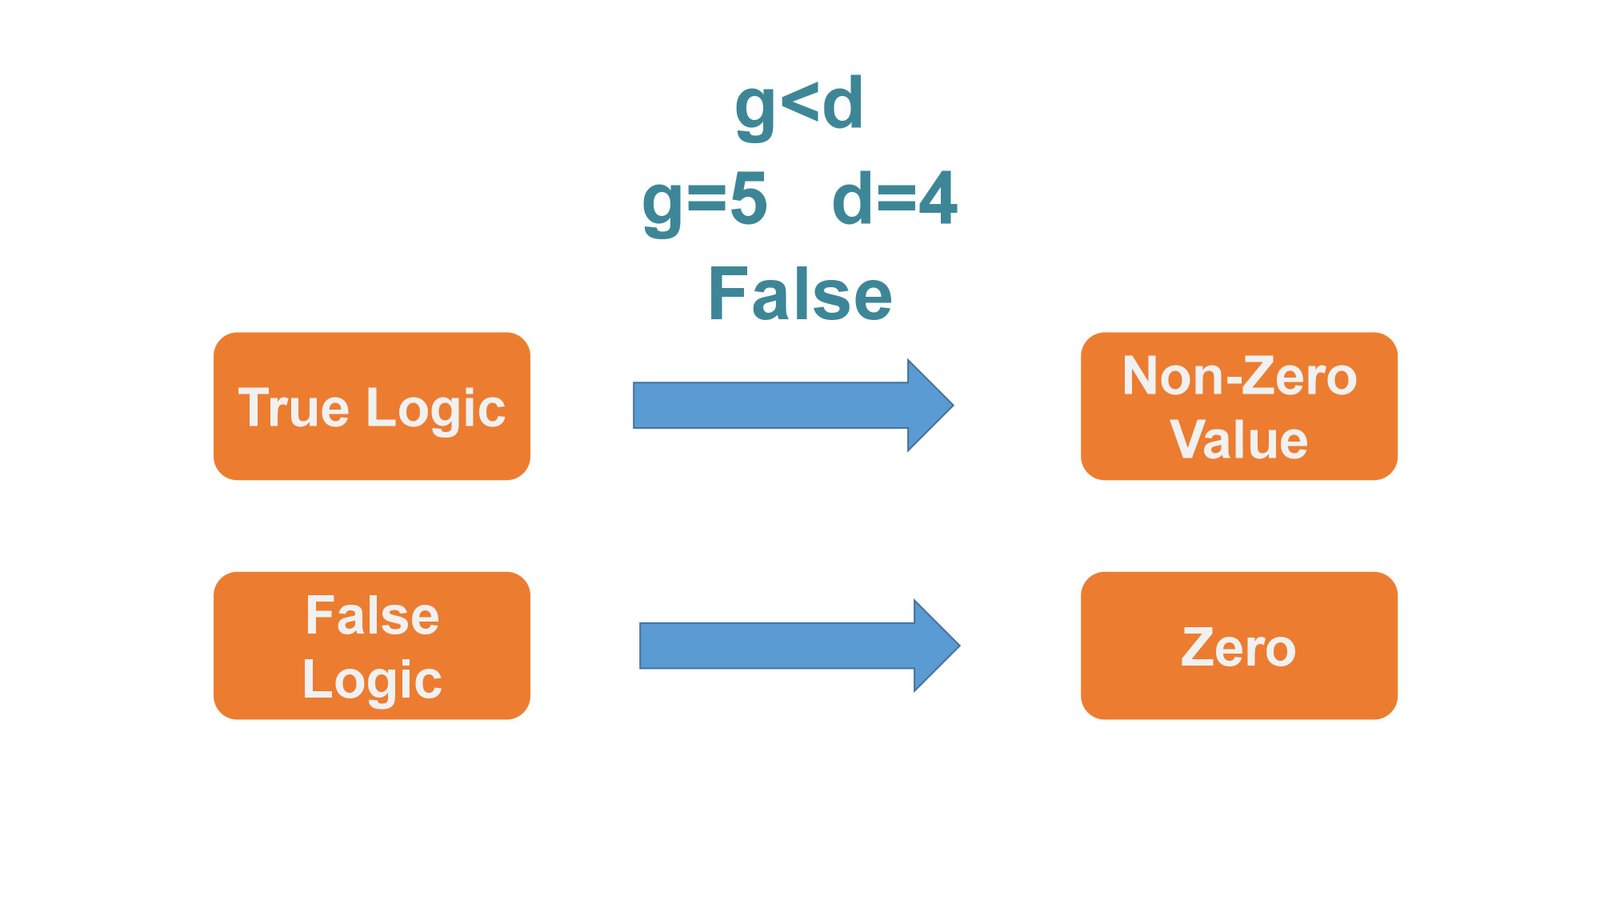
In previous examples, we discussed this example. This expression is saying that g is less than d. Now lets suppose that the value of g is 5 and the value of d is 4. when the expression is resolved it gives false as an answer. Here a question arises that previously we discussed that all expressions resolve to a value but false is not a value. In programming languages, logic true and logic false do resolve to a value in the end. In most languages, true logic resolves to a non-zero value and logic false resolves to zero. Relational expressions are designed to resolve to a logical true or false state. So they ultimately do resolve to a value that can be used in a program.
Statements in Arduino c programming
A statement is a complete C instruction for the computer. All C statements end with a semicolon. Examples are
- i=50;
- a=b+c;
- m=d/2 ;
In the first example, operands are variable i and 50. The equal sign is called the assignment operator and is used to assign the value on the right hand side of the equal sign to the operand in the left hand side of the assignment operator. Therefore in the first statement value 50 is assigned to the variable i. Note that this example is nothing more than an expression using the assignment operator with a semicolon in the end of the line. The operand here is 50 and variable is i.
What is a variable in Arduino c programming ?


We have used a word variable in the explanation of a statement. You must be wondering what is a variable. A variable is nothing more than a location in the memory that has been assigned a name. In example 2, we have a complex expression with a semicolon at the end. In this expression the value to assign into the variable a is not yet known. So you must resolve the expression to get that value. Lets suppose that b is equal to 4 and c is equal to 5. Then we can resolve it to the last expression that assigns the value 9 into the variable a by adding semicolon at the end of the line. The expression becomes a statement. For example in previous expression it causes variable a to change its value to 9.In the previous tutorial, we discussed that C compiler is responsible for changing the english like syntax of C into ones and zeros which the microcontroller understands. it is the semicolon that makes the C compiler finish whatever task the statement wants to be done. For example, if you have a complex statement like shown in above picture. Then the compiler must resolve all of the intermediate expressions like a plus b, c plus g and h plus k before it can determine what new value to assign into variable x. It is the semicolon at the end of the statement that tells the compiler it has all the intermediate information it needs to resolve the statement. Semicolon is a statement terminator. Each statement must end with a semicolon. Without a semicolon, the compiler would not know when it has the information necessary to process the statement.Suppose you have the following statement. Where k is equal to 3 and the asterik is the multiplication operator.
There are two ways to solve it one way gives j equal to 16 and second method gives j equal to 11. This statement is ambiguous because we are not sure about the order in which the complex expression is resolved. We are not sure which method to adopt. clearly the result differ because of the order in which we resolve the complex expression.
Order of precedence in Arduino programming
Arduino C programming resolves such ambiguities by assigning each operator a precedence or priority level. Operator precedence refers to the order in which complex expressions are resolved.

Given table shows the precedence level of an operator. This table shows that multiplication, division and modulo operations are resolved before addition and subtraction. therefore in the previous examples the correct answer is 11 because the multiplication expression is resolved before the addition expression. If there is a tie between mathematical operators or we can say that if two operators with same precedence level appear in an expression then we use the concept of associativity. In this case expressions are resolved by solving the sub expression in a left to right manner. For example multiplication and division operators have same precedence according to the given table. Therefore the expression “100/10*10” is treated as “(100/10) * 10”. Because there are more operators than are presented in the table. We will be expanding the precedence table as we learn more about C.
Statement blocks in Arduino programming

A statement block consists of one or more statements grouped together. So they are viewed by the compiler as though they are a single statement. For example, suppose you are an apartment manager and if there is 4 or more inches of snow on the ground then you need to shovel the side walk you might express this as if snow is greater than or equal to 4 put on snow shovel removal stuff get snow shovel, shovel side walk, else go to bed. So we will see a code for this purpose.
Statement block start with an opening brace character and end with a closing brace character. All the statements between the opening and closing braces form the statement block body. In our example, it appears that when 4 or more inches of snow exist. We pull on our coat, grab a snow shovel and shovel the side walks. if there is less than 4 inches of snow, a different statement block is executed according to which we go back to the bed. You can place any type of statement you wish within the statement block. We will discuss lots of examples of statement block in the coming tutorials on Arduino programming. For now just think of a statement block as being defined by opening and closing braces.
Function Blocks in Arduino programming

A function block is a block of code that is designed to accomplish a single task. Previously, we have seen an example. In that example, we used a function blocks, it was put on snow removal stuff().The function that is designed to have to put on your coat. The actual code of this function block is in this example function block also starts with an opening brace and and ending brace. let’s see an example
functions are usually written to create, lets say, “black boxes” in which the details of how we are doing something are buried in the function. For example, you might be thinking of writing the code to control a robot that will require sensors to sense whatever lies ahead. You might write turn right function that turns your robot 90 degrees to the right. Now the function block for this task will contain the details of how it will be done.
The details probably involves turning one of the wheels perhaps applying a greater voltage to a stepper motor to cause the front two wheels to turn to the right. You have created the function block containing the above details. Now when ever you want to turn to right in the code you do not need to write the whole code for turning right. You just need to call this function block at that instant in the code. Now suppose that you have completed your code and your robot is working but you change your mind at later time and you decide to change your robot from four wheels to three wheels. Now you don’t need to turn two wheels. Only one needs to turn it means that you cannot use code which was made for 4 wheeled robot. So for this purpose you need to change the code written in the function block and you just need to make that change in one place that is the function block.
There will be no need to do this in a whole bunch of places where a right turn might be needed by writing a turn right function you can avoid duplicating all of the statements that are in the turn right function each time a turn right is called for in the program. let’s take another example to make things more clear. Suppose you are writing an application that input a phone number from a keypad. Your application requires home, cell and work phone numbers to make sure a valid phone number was entered. You need to check that it fits a certain format. Now you can duplicate the format checking program code three times or you could write a check phone format function and simply call it three times. If you duplicate the program code three times then you need to test and debug it three times but if you make a function block. You need to test and debug it only one time and it also means that you will be using less memory.
If you think of a computer program as a sequence of smaller tasks. Function blocks are used to delimit the code for each of those smaller tasks as you will soon find out the arduino programming environment has hundreds of p rewritten function blocks that you can use in your own program. This means you do not need have to reinvent the wheel each time a common programming task steps in front of you. You just grab one of the existing function blocks from the library of p rewritten function blocks and use it in your program.. For example, in previous video we loaded and run an example code which blinked the led at regular intervals that code used a digital write function..which writes high or a low value to a digital pin.
Every program you can think of is built from the four basic parts discussed previously. Rest of this course is nothing more than showing you how to use these simple parts in an effective way to solve a particular programming problem. But there is a problem. There are infinite number of ways to combine these elements into a computer program and some will work and others won’t. In fact even if you get your program to work does not mean there is not a different or better way to accomplish same task. For example you want to sort a group of numbers into a list, going from smallest to the largest number in the group. There are dozens of ways to sort a list of numbers into ascending order, each with its own advantages and disadvantages. In fact you will find that your range of choices increases as you learn about programming in general. Even something as simple as scanning a sequence of text looking for a particular pattern can be done in many different ways. The more programming knowledge and experience you gain., the more you will be able to craft an elegant solution to a Arduino programming problem.
LED Blinking program with Arduino IDE to Arduino programming

- For this purpose, Go to file, go to examples, then click on basic, finally click on blink.
- This is the source code, we are going to ignore the actual program code for now because our real interest at this moment is simply to see whether the program can be run on Arduino board or not. we will come to programming part later on.
- The window with the white background in which code is written is called source code window. It has a white tab with the name of code which is “Blink” in our case. The source code window is used to enter and edit the code you want the program to execute.
- The program code is presented in a more-or-less readable format that looks a little bit like normal english narrative. The computers don’t understand English. computer understands only two things ON or off , hence the term binary computers, these two states are represented by 0 for an off state and 1 for an on state. simply stated by combining these ones and zeros together in a very specific sequence. We can make the computer do what we wish.
- Back in the early days of PC programming, some computers actually had switches that were flipped on or off. And when the sequence formed a computer instruction you wanted to perform. You pressed a button and that sequence of ones and zeros was deposited into computer memory. Hours later you might have a program that said “Hi” on the computer screen. Programming then was a very laborious and error prone process.
- Luckily, Now we have a program called a compiler, which translates the english like C language program instructions into the proper ones and zeros sequence for us. The arduino IDE has a compiler built into it that does the translation work for us.
- Now we will compile this program using the leftmost button on the tool bar. When we press the compile button the IDE examines the code for errors and if there is no error, it will compile the program.
- Now click on the compile button.
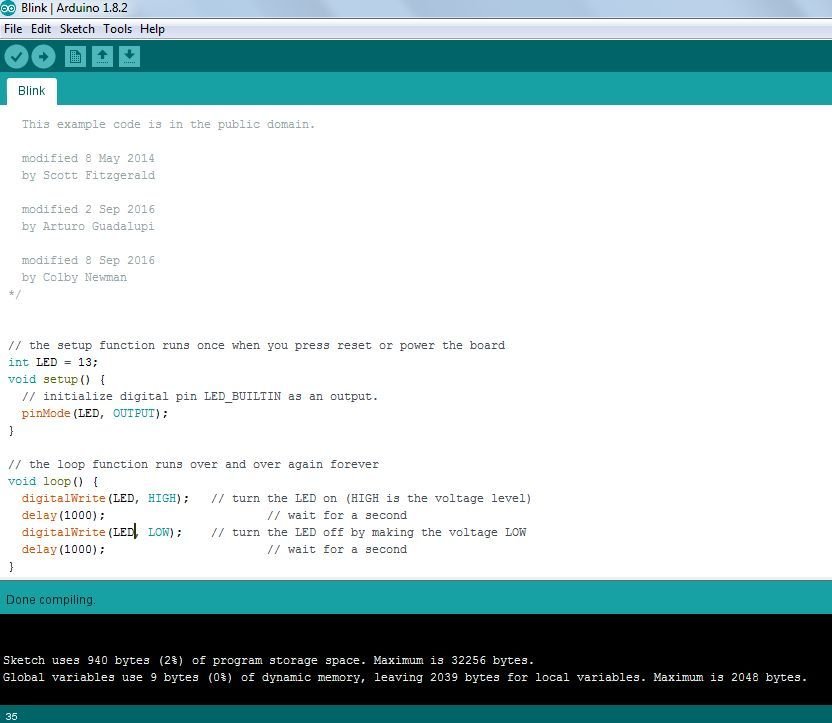
- When compiling is complete you will see this message telling you that compiling is done.
- After the compiling is done this message will be displayed which shows the memory used by this program. It means that the compiled blink LED program used upto 928 bytes of memory to generate the necessary sequence of ones and zeros to accomplish the task the program is designed to do. Here maximum memory is 32256 bytes because the IDE is set for arduino UNO. Arduino UNO uses ATmega 328P microcontroller which has a flash memory of 32256bytes. It would be different for different microcontrollers…
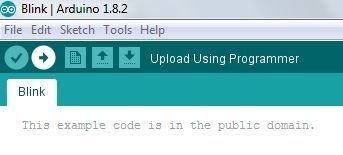
- We have compiled our program successfully, but the program is still siting in you PC’s memory, not the microcontroller memory. Therefore you need to click on upload button in order to move the compiled program instruction from you PC’s memory to the flash memory of your Arduino board.
- when you upload the program, it will start moving to the microcontroller board and you will see two LEDs flash on and off as the upload proceeds. This simply indicates the communication process that transpires over the serial communication between your PC and the Arduino board via USB cable.
- The instant program uploading to Arduino uno is complete. An LED will start blinking on regular intervals as instructed in the program which is uploaded.
Second example for Arduino programming push button
- Now we will repeat the whole procedure for another arduino programming example to make the concept clear. The program instructions in this example perform a task of fading the LED light at regular intervals. This program does not use built in LED. but it gives an output at pin 9. So for this purpose, we need to connect an external LED with pin 9
- Use the given circuit digram in which we have an LED, which has its positive terminal connected in series with a 330 ohm resistor. Other end of the register is connected to the pin 9 of the arduino board. The negative terminal of LED is connected to the ground.
- Go to file- examples-basic-fade.
- The program code is loaded. Now compile it
- Program is compiled as you can see “done compiling here” and it has used 1150 bytes out of 32256 bytes, which is the total flash memory of arduino UNO.
- As program is compiled successfully, click on upload to transfer the instructions from PC memory to Arduino board memory. As transfer of instructions proceeds, you can see the LED lights on board blinking.
- The program is done loading as soon as the uploading is completed, the LED fades after a regular interval according to the instructions written in program code.
- You have successfully installed the IDE software and connected you Arduino board to you PC. In addition you have loaded, compiled and uploaded and run your first Arduino programming code.
How to write your first program with arduinio

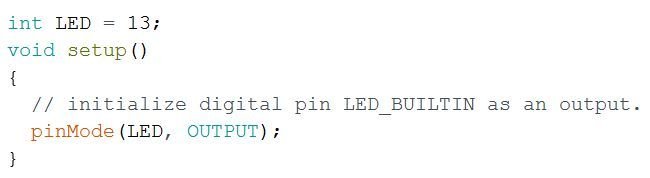
1. Go to File -> Example -> Basics -> Blink. A new window pops up which looks like a figure shown below. It is a program written using C language.
NOTE: We will modify this C language program so that people who are not familiar with C language programming can understan. Write “int LED = 13; ” without quotes above “void setup ()” statement. And replace all “LED_BUILTIN” wit “LED” without quotes. After modification our C language program at Arduino IDE window looks alike

2. Go to Tools -> Boards on Arduino IDE, and select your board which you are having physically with you. Mine is Arduino UNO.
3. Below the board on menu, you can see Port. Select the port you have connected the Arduino. Mine is COM4.
4. Next click on the tick mark below file menu on Arduino IDE windon. This is compilation button for program. If everything is right with your C language program i.e. if you have followed correct syntax of C language programming, you will see a “Done compiling” dialogue below white part of window.
5. As a next step upload the C language program written in Adruino IDE, to board as follows
6. If C language program is successfully uploaded to Arduino Board, you will see “Done uploading” dialogue below white part of window.
You will see LED blinking on board near digital pin 13 of Arduino Board.
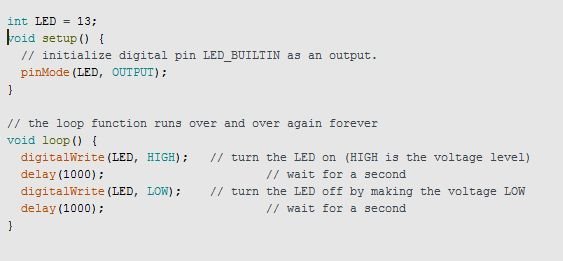
Let’s try to understand the program written in C language in Arduino IDE.
7. “int LED=13; ” defines a variable of type integer with value 13. It is actually pin number to which LED is connected on Arduino board. Be careful about ; it is the syntax (rule) of C language programming to end every line with ;
8. Void setup ()
{ }
Anything placed inside this code will be considered once. The small and curly brackets indicate that it is a function not a variable (as defined in above step) of C language programming.
9. Inside this portion we define pinmode and its number. pinmode could be input or output. LED indicates pin number to which output is connected.
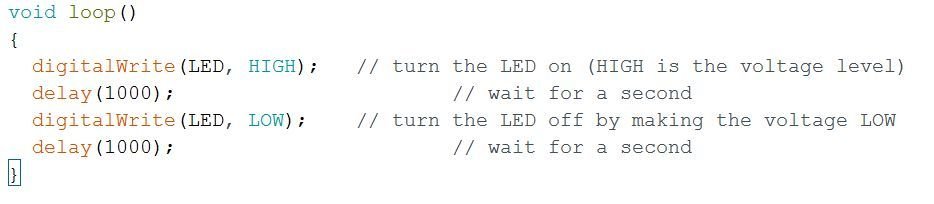
10. Void loop ()
{ }
Anything written inside this will be repeated until board is connected to system.
11. digitalWrite function writes the LED pin with HIGH that is 1
12. delay(1000) waits for next instruction. 1000=1sec in physical word.
13. digitalWrite function writes the LED pin with LOW that is 0.
This was our first C language program in Arduino IDE and it was very basic. Explore some other examples and try to figure out other functions from Arduino official website.
Variables and Data Types in arudino programming in C language

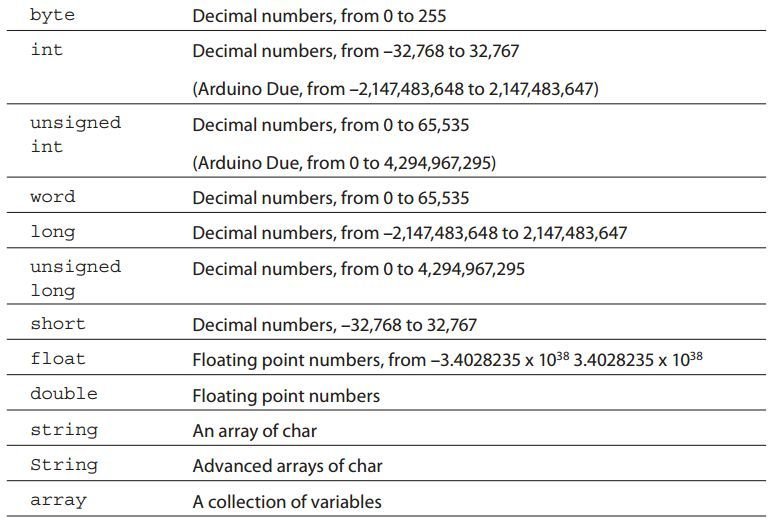
In your sketches, most of the times you want to store data and perform some type of calculation. Counting the number of times a button is pushed, storing the voltage on an analog pin, or performing a complex mathematical calculation with vectors: require data to be calculated and stored. This data is saved in a variable, a memory location that can be changed as required. By declaring a variable, you are asking the compiler to allocate a specific amount of memory, depending on the data typeData types and variables are used to store the information. When we declare variable we are actually telling compiler to allocate a specific amount of memory, depending on data type.
Control Structure in C Language
if Statement in C Language:
The if statement is used to detect if an expression is equal to a result
Following versions are used.
One is:
if (expression)
{
statement;
}
Two conditions are as follows:
if (expression)
{
do_this;
}
else
{
do_that;
}
We can mix several if else statements using:
if (expression)
{
do_this;
}
else if (expression)
{
do_that;
}
Try to evaluate given program:
int var1 = 42;
if (var1 == 42)
{
run_this; // var1 equals 42; this function will be executed
}
else
{
run_that; //This one will not
}
if (var1 < 50)
{
run_another_function; //This will be run, since 42 is less than 50
}
Switch Statement in Arduino programming in C Language
When we need to check a large number of conditions and need to execute a statement according to a specific condition, we use switch/case statement. It is like if statement. A switch statement the value of variable, and execute a different case statement depending on value.
 switch(button)
 {
 case 1:
 turn_on_lights();
 break;
 case 2:
 if (blinds_up == false)
 {
 raise_blinds();
 blinds_up = true;
 }
 break;
 case 3:
 ----
 }
Break; at the end of each instruction actually tells compiler to stop the execution. If break; is not mentioned it will continue executing case instruction. For example if button 4, 5, 6 do same task you can write
 switch (button)
 {
 case 4:
 case 6:
 case 8:
 //code to be run
 break;
 }
while Loop in Arduino programming in C Language
It is one of the basic loops of C language; it will execute same code again and again until a condition is specified. As long as condition is true it will continue running same code and keep checking the condition at the end of each loop.
while (button == false)
{
button = check_status(pin4);
}
In this example, the function check status runs until it returns true. When that happens, the variable button becomes true, and the while loop will be broken. It might be within a few milliseconds, or the system might wait indefinitely.
for Loop in Arduino programming in C Language
In cases in which you need a portion of code to loop an exact number of times, the for loop is used. It is similar to while, only it is written differently. The for loop keeps track of the number of times it has run.
 for (expression1; expression2; expression3)
 {
 instructions;
 instructions;
 }
This might look complicated, but don’t worry; it is simple. It requires three expressions:
• expression1 is the initializer; it will initialize a variable.
• expression2 is the conditional expression; as long as this condition is true, the loop keeps on executing.
• expression3 is the modifier; when a loop is completed, this action is performed.
For example:
 for (int i = 0; i < 10; i++)
 {
 myfunc(i);
 }
In this example, a variable is defined with the name i. The variable is set to zero, and each time the function myfunc is run, i is increased by one. Finally, when i reaches 10, the loop stops before running myfunc. This saves you from writing out all the commands one by one like this:
myfunc(0);
myfunc(1);
…
myfunc(8);
myfunc(9);
This is a complete guide on Arduino programming.
Great
#include //Import library to control motor shield
#include //Import library to control the servo
AF_DCMotor rightBack(1); //Create an object to control each motor
AF_DCMotor rightFront(2);
AF_DCMotor leftFront(3);
AF_DCMotor leftBack(4);
Servo servoLook; //Create an object to control the servo
byte trig = 2; //Assign the ultrasonic sensor pins
byte echo = 13;
byte maxDist = 150; //Maximum sensing distance (Objects further than this distance are ignored)
byte stopDist = 50; //Minimum distance from an object to stop in cm
float timeOut = 2*(maxDist+10)/100/340*1000000; //Maximum time to wait for a return signal
byte motorSpeed = 55; //The maximum motor speed
int motorOffset = 10; //Factor to account for one side being more powerful
int turnSpeed = 50; //Amount to add to motor speed when turning
void setup()
{
rightBack.setSpeed(motorSpeed); //Set the motors to the motor speed
rightFront.setSpeed(motorSpeed);
leftFront.setSpeed(motorSpeed+motorOffset);
leftBack.setSpeed(motorSpeed+motorOffset);
rightBack.run(RELEASE); //Ensure all motors are stopped
rightFront.run(RELEASE);
leftFront.run(RELEASE);
leftBack.run(RELEASE);
servoLook.attach(10); //Assign the servo pin
pinMode(trig,OUTPUT); //Assign ultrasonic sensor pin modes
pinMode(echo,INPUT);
}
void loop()
{
servoLook.write(90); //Set the servo to look straight ahead
delay(750);
int distance = getDistance(); //Check that there are no objects ahead
if(distance >= stopDist) //If there are no objects within the stopping distance, move forward
{
moveForward();
}
while(distance >= stopDist) //Keep checking the object distance until it is within the minimum stopping distance
{
distance = getDistance();
delay(250);
}
stopMove(); //Stop the motors
int turnDir = checkDirection(); //Check the left and right object distances and get the turning instruction
Serial.print(turnDir);
switch (turnDir) //Turn left, turn around or turn right depending on the instruction
{
case 0: //Turn left
turnLeft (400);
break;
case 1: //Turn around
turnLeft (700);
break;
case 2: //Turn right
turnRight (400);
break;
}
}
void accelerate() //Function to accelerate the motors from 0 to full speed
{
for (int i=0; i=200 && distances[1]>=200) //If both directions are clear, turn left
turnDir = 0;
else if (distances[0]<=stopDist && distances[1]=distances[1]) //If left has more space, turn left
turnDir = 0;
else if (distances[0]<distances[1]) //If right has more space, turn right
turnDir = 2;
return turnDir;
}. Pls help check it out, is this program correct, pls I need ur help, today
Can you please help me with the codes in the fingerprint doorlock security system using Arduino Uno? I really want to learn