In this tutorial, you will learn how to use the AnalogRead function of Arduino. If you are working on a project, where you need to measure the analog voltage or analog sensor value which gives you output in the form of voltage, then you need to use an analog to digital converter of Arduino. AnalogRead and AnalogWrite are the two function which is used to deal with the variable value like voltages as same as sensors values. An Arduino has a number of analog inputs, which enables us to measure parameters in the analog domain. This could be a voltage, current, resistance, temperature, light, and so on.
Arduino Analog Read Pins
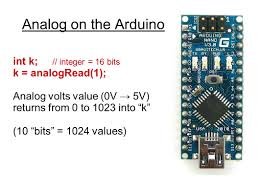
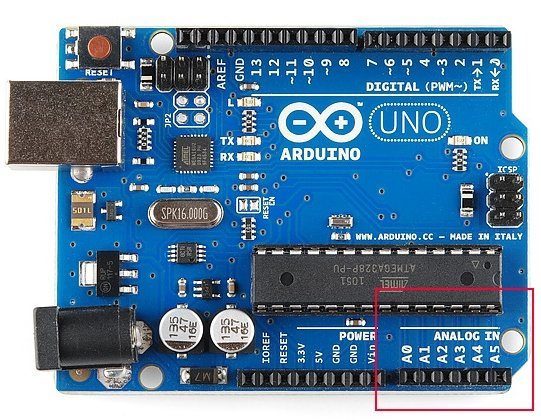
Analog pins in the Arduino board are marked with the letter ‘A’ e.g. a0, A1, A2, A3, A4. That means it has 5 built-in analogs to digital converter channels.
Only these analog pins of Arduino can be used to measure analog signals. But If you want to use more channels, you can interface external ADC with Arduino. Check these guides:

I2C ADC ADS1115 Interfacing with Arduino and ESP32
Each analog channel is a 10-bit ADC. Therefore, each ADC can measure 1024 (2^10) voltage levels and the magnitude of each voltage level or step can be determined by this formula:
Discrete Step = Vref / total steps = 5 / 1023 = 0.0048874 = 4.88mv
In short, for every 4.88 millivolts of the voltage value of on Arduino analog pin, the digital value will be incremented by one and so on for every multiple voltage of 4.88mV, the respective digital value will be produced.
Arduino ADC Resolution
To understand, ADC resolution let’s take an example of ADC with a 2-bit resolution and a reference voltage of 4 volts, it can only represent the voltage with four possible resulting values that are 2^2. The input voltage and digital output will be according to this table:
| Analog Voltage | Digital Output |
|---|---|
| 0 to 0.99 volt | 0 |
| 1 to1.99 volt | 1 |
| 2 – 2.99 volt | 2 |
| 3 – 3.99 volt | 3 |
| 4 volts | 4 |
As you can see from the above table for 2-bit ADC, the one discrete step is equal to one-volt analog input and so on. You can also depict from the above table that small bits ADC causes a lot of error. This 2-bit ADC can not measure voltage level between 0-1, 1-2, 2-3, and 3-4. Any voltage value between these numbers will be considered as an error. This error can be minimized by using higher bits ADC.
As we mentioned earlier, Each analog channel of Arduino is 10-bit long. That means the Arduino ADC range is between 0 to 1023, so have 1024 possible values or 2 to the power of 10. So Arduino has an ADC with a 10-bit resolution.
In normal analogRead use, the reference voltage is the operating voltage of the board. For the more popular Arduino boards such as the Uno, Mega boards, the operating voltage of 5V. So if you have a reference voltage of 5V, each unit returned by analogRead() is valued at 0.00488 V. (This is calculated by dividing 1024 into 5V).
AnalogRead() Function Arduino
Arduino AnalogRead function is used to measure the voltage between 0 to 5 volts and converts it into a digital value between 0 to 1023. The reason for value 1023 is because the analog to digital converters is 10-bit long.
For example, if we apply 0 volts on the ADC pin, an analogRead() output will provide zero digital value. Similarly, if we apply 5 volts on the ADC pin, an analogRead() output will provide 1023 digital values. The voltage in between (0-5) volts will give numbers between those values.
To receive analog input the Arduino uses analog pins 0 to 5 on most of the boards. These pins are designed to use with the components that output analog information can be used for analog input. The command used to read
- “analogRead(pinNumber);” pinNumber represents the pins where the analog components are connected in Arduino.
- For example: int sensorvalue = analogRead(A2);. The function is used to program and address analog pins on the Arduino board and will also return the analog input reading which is between 0 to 1023.
How to use Meausre Analog Signal?
Let’s connect a potentiometer or variable resistor to the analog pin A0 into the Arduino board and provide supply to power on the Arduino Board.
At a very start, need to define the pin as an input:
pinMode(A0, INPUT) ;And then reading the analog voltages through the analog pin A0 into the x:
int x = analogRead(A0) ;That value which is stored in x is the value in between 0 to 1023 because the Arduino has 10-bit ADC (2*10 = 1023) than store this value into the int because int x size is bigger than 10-bits.
At the end print the analog value on Arduino serial monitor by using serial communication library functions such as Serial.print().
Serial.print ( “Analog value : “);
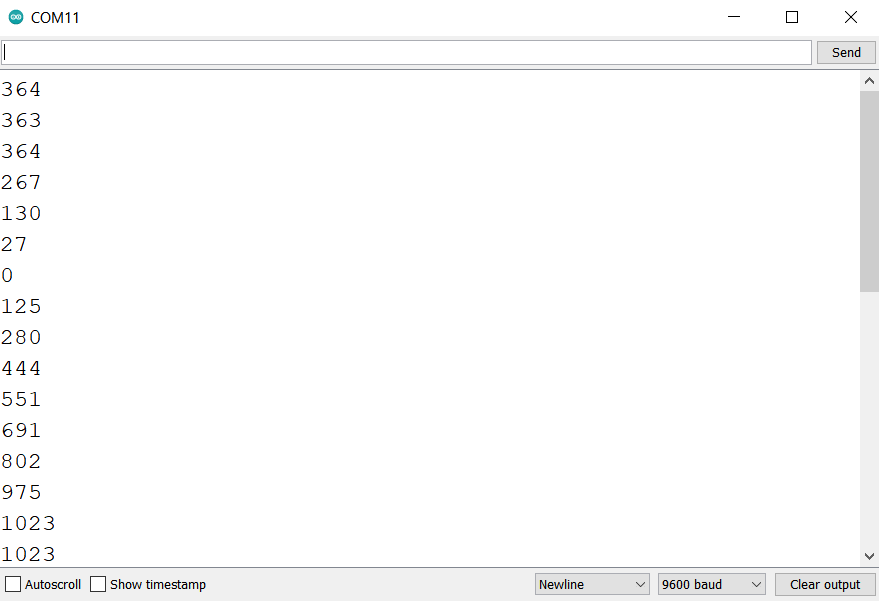
Serial.println (x);When the analog value changes, then x should also change. Analog voltage never is readable if the pin is connected to any other digital pin. The analog voltages only are readable on the analog pins into the board. If there is a voltage of 2.5 V applied to pin number 0, analogRead(0) returns 512 this means the analog voltage is not readable in any digital pin.
Schematic Diagram
Make schematic diagram according to these connections.

Arduino AnalogRead Example Code
Upload this code to Arduino. This code measures analog signal from A0 pin of Arduino every one second and prints value on serial monitor.
//Potentiometer is connected at analog pin 0:
int analogPin = A0;
int val = 0;
//variable to store the value read
void setup ()
{
 Serial.begin (9600);
//Setup serial
}

void loop ()
{
     val = analogRead (analogPin);
    //Used to read the input pin
     Serial.println(val);
     delay(1000);
}
How Code Works?
The analogRead() returns the value from 0 to1023, this is because of the resolution of the ADC. The resolution is the degree to which something can be represented numerically. The higher the resolution, the greater accuracy with which something can be represented. Measure the resolution in the terms of the number of bits of resolution.
For example, a 1-bit resolution would only allow two (two to the power of one) values zero and one. A 2-bit resolution would allow four (two to the power of two) values zero, one, two, and three. If we tried to measure a five volt range with a two-bit resolution, and the measured voltage was four volts, our ADC would return a numerical value of 3 as four volts falls between 3.75 and 5V.
Check these Arduino programming tutorials:
analogRead() not works in proteus always shows value 1023
there might be a problem with your code. Share your code here.
I have taken code from standard example of Arduino library analogRead function from basic examples
void setup() {
// initialize serial communication at 9600 bits per second:
Serial.begin(9600);
}
// the loop routine runs over and over again forever:
void loop() {
// read the input on analog pin 0:
int sensorValue = analogRead(A0);
// Convert the analog reading (which goes from 0 – 1023) to a voltage (0 – 5V):
float voltage = sensorValue * (5.0 / 1023.0);
// print out the value you read:
Serial.println(voltage);
}
The code looks perfectly fine and there might be a problem with your Arduino board and if you are using proteus, try other proteus library or check the connections between the serial pins of Arduino and the virtual serial terminal of proteus, also check the baud rate of the virtual terminal.
hello i am using water level sensor ….using analogread function , the value is always 1023 . the same was in the case of sound sensor . the analog read alwasy return the maximum
my code
int resval = 0; // holds the value
int respin = A5; // sensor pin used
void setup() {
// start the serial console
Serial.begin(9600);
}
void loop() {
resval = analogRead(respin); //Read data from analog pin and store it to resval variable
if (resval100 && resval300 && resval330){ Serial.println(“Water Level: High”);
}
delay(1000);
}
A 2 bit AD can only give output values 0, 1, 2, 3
If it gave 4 as well, then that would be 5 values.
The digital values are 00, 01, 10 and 11 corresponding to 0, 1 2 and 3.
Can u just elaborate your problem