In this tutorial, you will learn about water level sensors, interface them with Arduino and monitor specific water levels using this assembly. A water level sensor is used to measure water level in a water tank or in any other equipment. In our daily life, we need to detect the level of water like for example in water tank at the top of roof which is not directly accessible, and in laboratories where a specific level of any liquid is required to be monitored. Therefore in such applications, water level sensor is very useful.
The water level sensor gives output in the form of voltage. So before using water level sensor, you should know, how to measure analog voltage using Arduino and if you are new to Arduino programming I recommend you to check this Arduino programming in c tutorial first.
Recommended Components
The following components are used in this project or are helpful for building it with the Arduino.
| Component | How it’s used in this project | Buy on Amazon |
|---|---|---|
| Arduino Uno R3 | The main controller board that runs the sketch and drives all the components in this project. | Check Price |
| Water level sensor | Measures the water level and sends an analog reading to the Arduino. | Check Price |
| Breadboard | Lets you build and prototype the circuit without soldering. | Check Price |
| Jumper Wires | Used to make all the connections between the Arduino and the components. | Check Price |
As an Amazon Associate we earn from qualifying purchases. Prices and availability are accurate as of the date/time indicated and are subject to change.
Introducing Water Level Sensor
The water level sensor is an easy-to-use and cost-effective sensor that measures water volume to detect the water level. This is achieved by a series of parallel copper wires exposed traces found on the sensor. The traces are of two kinds, sense trace and power trace which alternate one after the other.
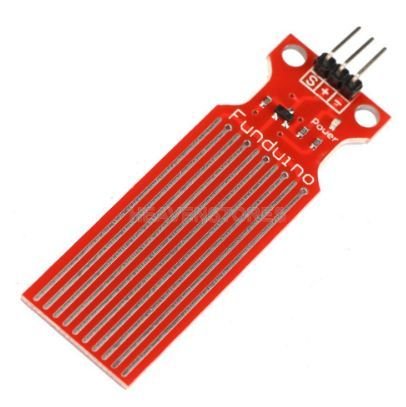
Moreover, there is also a Power LED that turns ON whenever the sensor is powered on.
The table below gives some key specifications of the water level sensor commonly available in the markets.
| Operating Voltage | 3-5V DC |
| Operating Current | <20mA |
| Detection Area | 40mm x 16mm |
| Sensor Type | Analog |
Water Level Sensor Pinout
As you may see in the diagram of the water level sensor above, it consists of 3 output terminals.

- + stands for VCC: This pin provides power to sensor. Power it with (3.3-5V).
- – stands for GND: This pin is connected with the ground.
- S stands for signal: This is the analog output pin.
How Water Level Sensor Works?
As we mentioned before, the water level sensor is equipped with a series of parallel conductors traces. These traces act as a variable resistor whose resistance changes according to the water level. In other words, it works like a potentiometer.
As these traces conduct electricity, hence in the presence of water they are short-circuited. This leads to lower resistance of the sensor. Hence, it can be said that the resistance of the copper traces decreases as the water level rises. Therefore, the current increases which leads to an increase in voltage.
The water level sensor’s signal pin gives us the analog output voltage. This will help us to detect the water level as greater output voltage means a greater liquid level.
Interfacing Water Level Sensor with Arduino
After learning about the water level sensor let us interface it with Arduino and build a water level detector. You will require the following components.
Hardware Required
- Arduino UNO
- Water level sensor
- Connecting wires
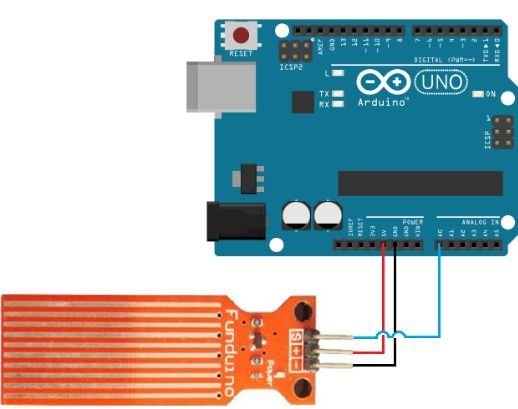
Connecting the water level sensor is very simple. Follow the connections as given below:
Sensor S pin with Arduino Analog pin A0
Sensor + pin with Arduino 5V
Sensor – pin with Arduino GND

Arduino Sketch Water Level Detector
Open your Arduino IDE and go to File > New to open a new file. Copy the code given below in that file.
This sketch shows how the analog output of the sensor changes as it is submerged in varying water levels.
void setup()
{
  Serial.begin(9600);
}

void loop()
{
  int val = analogRead(A0); // read input value
  Serial.print("Pin Value   ");
  Serial.println(val);
  delay(2000);
}
How Code Works?
Inside the setup() function we open the serial communication at a baud rate of 9600.
void setup()
{
  Serial.begin(9600);
}
We use analogRead() function to read the analog output of pin A0. The reading will get stored in the int variable ‘val.’
int val = analogRead(A0); We will display this analog output in the serial monitor after every 2 seconds.
  Serial.print("Pin Value   ");
  Serial.println(val);
  delay(2000);
Demonstration
To see the demonstration of the above code, upload the code to Arduino. But, before uploading code, make sure to select the Arduino board from Tools > Board and also select the correct COM port to which the Arduino board is connected from Tools > Port.

Once the code is uploaded to Arduino, open your serial monitor and set its baud rate to 9600. Start submerging the water level sensor in water. The more and more you dip the sensor in water the value on serial monitor keeps on increasing.
Watch the video demonstration below:
You may also like to read:
- IoT-based Contactless Water level Monitoring with ESP32 and HC-SR04
- Water level indicator in LabView : tutorial 28
- Water Flow Sensor Interfacing with Arduino – Measure Flow Rate
- IOT based Liquid Level Monitoring System
- Contactless Liquid Level Controller System using pic microcontroller
- Arduino Send Email through IFTTT using Ethernet Shield
- ESP32 Insert Data into MySQL Database using PHP and Arduino IDE
- Arduino with BMP180 Atmospheric Pressure and Temperature sensor
is it possible to convert it to assembly language?
you can check the output file where you code is stored to know either Arduino IDE generate ASM file or not.
Every compiler first generate assembly file and then convert it into hex or binary file
Hi Sir Good Afternoon i am trying to interface the water level sensor using Arduino nano for harvesting the fish Aquarium automatic water level detecting and filling the water below average of water but, the tank depth was 45CM the sensor size only the 5 cm how to apply the same application using long height sensor OR if any chance to increase the size of sensor please reply this question sir thank you
Hi Sir Good Afternoon i am trying to interface the water level sensor using Arduino nano for harvesting the fish Aquarium automatic water level detecting and filling the water below average of water but, the tank depth was 45CM the sensor size only the 5 cm how to apply the same application using long height sensor OR if any chance to increase the size of sensor please reply this question sir thank you