In this tutorial, we will discuss the Arduino USB to TTL converter. At first, we will look at the brief introduction along with its benefits. Then we will see the different methods that we can use to implement it with the Arduino board. Finally, we will provide a video tutorial for better understanding.
Introduction
There are many people looking for USB to TTL solutions on the internet. This is because new personal computers, especially laptops, do not come with COM ports. So the use of the USB to TTL converter is increasing day by day among engineers. Mostly those people who are related to the embedded systems field. They want to use a USB to TTL converter. There are many USB to TTL converters available on the market. We can also purchase them for this purpose. But if we have an Arduino Uno R3 or any other Arduino board, we can use it as a USB to TTL converter. There are three ways to use it. But first, let us look at its benefits.
Benefits of Using USB to TTL Converter with Arduino
There are several benefits to using a USB to TTL converter rather than a simple USB connection to upload code to an Arduino. We will discuss some of these advantages below:

- Flexibility: These converters are flexible in terms of connecting to different devices. We can use them with a wide range of microcontrollers, not just Arduino boards. These are quite handy when working on diverse embedded systems projects.
- Cost-effective: These converters are more cost-effective in comparison to a normal USB programmer. Instead of purchasing a separate USB programmer for each microcontroller, we can use a USB to TTL converter with our existing Arduino board, saving both money and space.
- Compatibility: We use these converters to ensure compatibility with computers that do not have COM ports. As some laptops and computers are without COM ports, it becomes necessary to use a USB to TTL converter for connecting microcontrollers and debugging embedded systems.
- Debugging Capabilities: The monitoring of data becomes easy with a USB to TTL converter. We can easily send and receive data from the microcontroller through the serial monitor of the Arduino IDE. This helps us identify and troubleshoot any issues with our project.
Thus, we can say that using a USB to TTL converter with Arduino boards serves as a cost-effective, versatile, and convenient solution for uploading code. We can easily establish serial communication and debug microcontroller-based projects.
Methods of USB to TTL Converter with Arduino
In this section, we will discuss three different methods, which are as follows:
Serial Communication with Arduino
The first method is the serial communication code of the Arduino. In this method, we will upload the code below to the Arduino. After this, we will connect our device to the serial communication pins of the Arduino. Finally, we can send and receive data on the serial monitor of the Arduino IDE. This method requires code. We can change the baud rate of the code according to our requirements.
Code
#include <SoftwareSerial.h>

SoftwareSerial mySerial(10, 11); // RX, TX

void setup()
{ // Open serial communications and wait for port to open:
  Serial.begin(9600);
  while (!Serial) {
    ; // wait for serial port to connect. Needed for native USB port only
  }

  Serial.println("Goodnight moon!"); // set the data rate for the SoftwareSerial port  mySerial.begin(4800);
  mySerial.println("Hello, world?");
}
void loop()
{ // run over and over
  if (mySerial.available()) {
    Serial.write(mySerial.read());
  }
  if (Serial.available()) {
    mySerial.write(Serial.read());
  }
}
Disconnect Microcontroller from Arduino Board
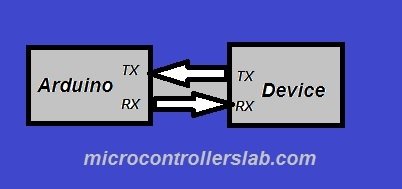
The second method is to disconnect the microcontroller from the Arduino. In this method, we simply disconnect the microcontroller from the Arduino board. Now our Arduino can be used as a USB to TTL converter. But we need to make sure to connect the TX pin of the Arduino board with the TX pin of the device to which we want to connect.
Connect Reset Pin of Arduino with Ground
The last method is to connect the reset pin of the Arduino to ground. In this method, we will connect the reset pin of the Arduino to ground. Now the microcontroller will completely bypass the board, and we can use it as a USB to TTL converter only. For more information, check out the following video:
So this is all about the USB to TTL converter design for a very popular development board. This method is very easy and inexpensive to utilize.
Conclusion
In conclusion, this article provides an in-depth overview of the USB to TTL converter and its benefits. It covers three steps to use an Arduino board as a USB to TTL converter to help us better understand the concept. Hopefully, this was helpful in expanding your knowledge about this topic.
You may also like to read:
- Arduino Uno Introduction, Pinout, Examples, and Programming
- Push Button with STM32 Nucleo using STM32CubeIDE
- ATMega32 Microcontroller
- types of oscillator used in microcontrollers
- Multilevel inverter design Using Pic Microcontroller
- Multilevel Inverters with Introduction, Types, Advantages and Applications
We hope you liked this article and keep visiting our website for more information. If you need any assistance, feel free to comment on this post. We will try our best to answer your question as soon as possible.
Very usefull article
Thank you