In this guide, we will show you how to use IR remote transmitter and receiver used to send and receive information using Arduino. We will provide a brief description of the IR protocol and its working. Then we will learn how to use IR module with Arduino.
IR Communication
IR or infra-red is a common and easy to use wireless communication. The light of IR is visible like similar light, have a low frequency but slightly longer wavelength. The IR LED detects and works at 980 nm (nanometer), that’s considered near to infra-red. IR radiation is basically a light that cannot be seen by a human eye. As it is undetectable to human eye, it is perfect for wireless communication. IR radiations are everywhere, they emits from sun, light bulbs and many other things.
IR Signal
The IR signal is infra-red whose flashes turn ON and OFF 38,500 time per second that means IR light is undetectable to the human eye.
Important Concepts
- Pulse Width Modulation (PWM)
The IR detector sends low pulses that can be measured to determine what information the IR remote is sending, it’s an example of using PWM for communication.
- Carrier signal
The IR remote use a 38,500 remote signal to transmit the pulse durations.
Testing IR Receiver Module
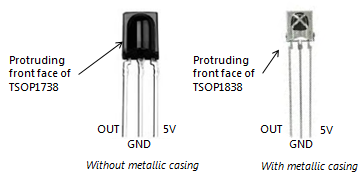
The IR receiver is used to receive the infrared rays that are emitted by IR emitter. The module consists of an IR receiver. The IR receiver is of many types, some are shown below
IR receiver modules usually come with three pins:
- Signal
- +V
- GND
The IR receiver which we will use in this tutorial is shown below:
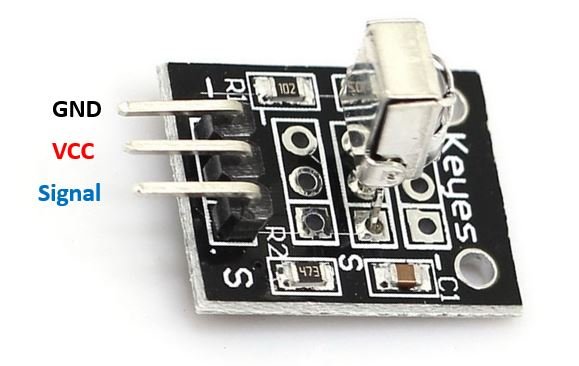
This KY-022 IR receiver module is used to receive commands from IR remote controllers. The module consists of a 1838 IR receiver, an LED, 3 male header pins and a 1kΩ resistor.
Specifications of IR Receiver Module
The IR Receiver Module has the following specifications
- Operating voltage of 2.7V to 5.5V
- Supply current of 1.5 mA
- Operating temperature from -25 C to 85 C
- Receiving distance of 18 meter
- The frequency at which it operates is 37.9 kHz
Interfacing Arduino with KY-022 Infrared Receiver Module
Required Hardware:
- Arduino Uno Board
- IR Receiver
The connections are very easier. Connect the 5V and ground of the Arduino to the VCC and GND pins of the IR receiver. Moreover, connect any digital pin of Arduino with the signal pin of the receiver module. In our case we will use pin 11.
| KY-022 Module | Arduino |
| Signal | Pin 11 |
| VCC | 5V |
| GND | GND |

Install IRremote Library
We will install IRremote library to receive and process IR signals This library is available in Arduino Library Manager.
Open your Arduino IDE. Go to Sketch > Include Library > Manage Libraries. Type ‘IRremote’ and press enter. Install the library shown below:

After installing all the library, restart your IDE.
Arduino Sketch IR Receiver Module
Open your Arduino IDE and go to File > New. A new file will open. Copy the code given below in that file and save it.
We will use an IR remote control to send data to the receiver module. This received data will be decoded and used to control the onboard LED of Arduino board connected at pin 13. When we will press ‘1’ from the remote, the LED will turn ON. When we will press ‘2’ from the remote, the will LED turn OFF.
#include <IRremote.h>

const int RECV_PIN = 11;
const int led_pin = 13;

IRrecv irrecv(RECV_PIN);
decode_results results;

void setup(){
  irrecv.enableIRIn();
  pinMode(led_pin, OUTPUT);
}

void loop(){
    if (irrecv.decode(&results)){

        switch(results.value){
          case 0xFF6897: //Keypad button "1"
          digitalWrite(led_pin, HIGH);
          }

        switch(results.value){
          case 0xFF9867: //Keypad button "2"
          digitalWrite(led_pin, LOW);
          }

        irrecv.resume();
    }
}
How the Code Works?
Firstly, include the IRremote library that we just installed.
#include <IRremote.h>Next, specify the Arduino digital pin connected with the receiver module’s signal pin. It is pin 11 in our case.
const int RECV_PIN = 11;As we want to control the onboard LED of our Arduino, hence we will specify the pin it is connected to. In the following line we have defined a const int varaible called ‘led_pin’ set at 13.
const int led_pin = 13;The next important step is to create an object called irrecv() that takes in the receiver pin as a parameter inside it.
IRrecv irrecv(RECV_PIN);
Moreover, we will create another object called results of the decode_results class. This will be used later on in the code to manage the decoded data.
decode_results results;Inside the setup() function, we start the IR receiver by using irrecv.enableIRIn(). Also, we will configure the led_pin as an output pin.
void setup(){
  irrecv.enableIRIn();
  pinMode(led_pin, OUTPUT);
}
Inside the loop() function, we will first check if decoded information is available or not (in our case where a remote key is being pressed). This gets stored in ‘results.value’. Then if key ‘1’ is pressed, we will turn the LED on and if key ‘2’ is pressed we will turn the LED off. After that we will use irrecv.resume() so that the IR receiver resets.
Note: You will have to find the corresponding codes for each key for this to work properly.
void loop(){
    if (irrecv.decode(&results)){

        switch(results.value){
          case 0xFF6897: //Keypad button "1"
          digitalWrite(led_pin, HIGH);
          }

        switch(results.value){
          case 0xFF9867: //Keypad button "2"
          digitalWrite(led_pin, LOW);
          }

        irrecv.resume();
    }
}
Video Demonstration
Testing IR Transmitter Module
The IR emitter is also known as the IR transmitter. The IR emitter module is very inexpensive and it is very easy to use. It has many applications. It can be used in the projects like controlling a TV, controlling a motor and many things can be controlled using it. The IR emitter module consists of a Light emitting diode that is similar to the common light emitting diode but different material is used. This diode sends the information in the form of infrared rays that is then received by the receiver.
IR light (Transmitter) is almost similar to visible light except its wavelength is longer. When you hit a TV remote button, IR Led transmits information to the TV. IR Led turns on and off 38000 times a second to transmit information to IR receiver in TV. The module comes with a remote. These are inexpensive and can be used in many projects from simple to complicated. They basically consists of an IR emitter that sends a signal to IR receiver connected with the Arduino.
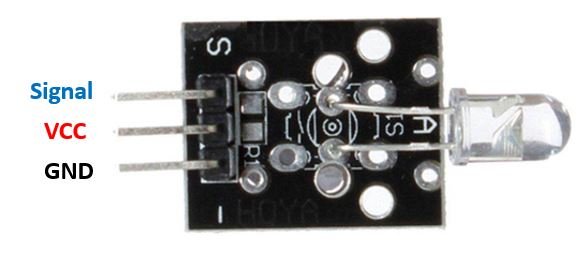
The KY-005 IR Transmitter Module consists of a 5mm infrared LED and 3 male header pins as shown in the diagram below.
Specifications
- Operating voltage of 5V.
- Operates at a frequency signal of 38 kHz
- It sends information to a distance of 18 meters
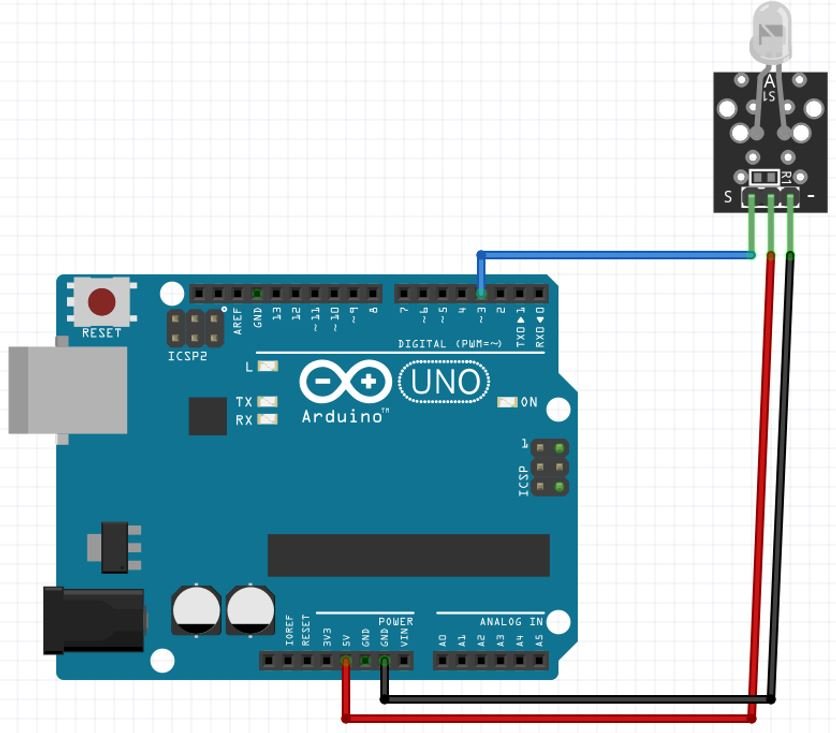
Interfacing Arduino with KY-005 Infrared Transmitter Module
Required Hardware:
- Arduino Uno Board
- IR Transmitter
The connections are very easier. Connect the 5V and ground of the Arduino to the VCC and GND pins of the IR transmitter. Moreover, connect digital pin3 of Arduino with the signal pin of the transmitter module.
| KY-005 Module | Arduino |
| Signal | Pin 3 |
| VCC | 5V |
| GND | GND |
Arduino Sketch IR Receiver Module
Open your Arduino IDE and go to File > New. A new file will open. Copy the code given below in that file and save it.
#include <IRremote.h>

#define transmitter_pin 3

void setup()
{
  IrSender.begin(transmitter_pin); // Initializes IR sender
}

void loop()
{
  IrSender.sendNEC(0x0102, 0x34, true, 0); // the address 0x0102 with the command 0x34 is sent
  delay(1000); // wait for one second
}
Include the IRremote library:
#include <IRremote.h> Define the Arduino pin connected with the IR transmitter module’s signal pin.
#define transmitter_pin 3Inside the setup() function we will start the IR transmitter using the begin() method on IrSender. We pass the Arduino pin connected with the transmitter signal pin as a parameter inside it.
void setup()
{
  IrSender.begin(transmitter_pin); // Initializes IR sender
}
Inside the loop function, we will call the sendNEC() method on IrSender to send the message. It takes in the parameters 0x0102 (address), 0x34 (command), true and 0. Then we add a delay before continuing again.
void loop()
{
  IrSender.sendNEC(0x0102, 0x34, true, 0); // the address 0x0102 with the command 0x34 is sent
  delay(1000); // wait for one second
}
You may also like to read:
I want to know about IR sensor name and the circuit diagram of IR module.
I want to receive remote TV signal by Arduino and send it back to Ardino to tv the program code show me