In this tutorial, we will learn how to interface BH1750 light sensor with Arduino Uno. Have you ever wondered how your mobile phone screen automatically adjusts its screen light? If yes, then your curiosity will end today. Because, in this tutorial, we will use one such sensor that is BH1750. We will display Lux value on 16×2 LCD.
BH1750 Light Sensor Module Introduction
BH1750 is a 16-bit digital ambient light sensor developed by Rohm Semiconductors which can accurately measure the light intensity over a wide range. This sensor has a breakout board that consists of BH1750 sensor along with a 16-bit analog to digital converter.
BH1750 Pinout
BH1750FVI is a digital ambient light sensor. It can be easily used for backlight adjustments of mobile phone keypads and LCDs. This figure shows the pin configuration layout of an ambient light sensor module.


Pins Description
- GND: Pin1 is a ground pin.
- ADDR: It sets the address of the I2C interface. Connect this pin either to the ground or Vcc after selecting address via I2C.
- SDA: Serial Data Address pin transfers data through I2C bus.
- SCL: It is a serial clock pin for communication through I2C interface.
- Vcc: Apply 3.3V-5V at this pin.
- DVI: This is the sensor’s pin. It is not present on the breakout board. If you want to set power-down mode, apply Vcc at this pin.
Features
- Operating Voltage = 2.4V to 3.6V
- Light Intensity Range = 1 to 65535 LUX (small variation of +/- 20%)
- It consumes 0.12mA current and in power-down mode, this value is further reduced to 0.01µA.
- Communication Interface: I2C
- Built-in Illuminance to Digital Converter
- Minimum IR Radiations Effect
- Digital Output Format ( that makes it easy to interface with microcontrollers)
Where to use BH1750?
The sensor communicates with other devices by the I2C interface and gives an output in LUX. Lux is the unit of light intensity. The sensor uses an I2C interface due to which you can easily interface it with microcontrollers. It provides an accurate value and high resolution.
We can set its resolution up to 0.5 lx, 1 lx, and 4 lx. Light-dependent resistors also measure the intensity of light. They perform well only in simple applications like controlling an LED lamplight.
It contains a photodiode which senses the light and produce electricity which is proportional to the light intensity.
You don’t need to perform complex calculations and calibration it provides you directly digital output. The ambient light sensor on mobile phones changes the brightness of display or backlight of keypad based on the luminous intensity automatically. In vehicles, they help to turn headlights automatically on in dark.
There are many devices such as mobile phone etc. which uses these ambient light sensors for controlling display brightness, turning off and on lights and for many other functions.
When it comes to complex applications like mobile phones, vehicle headlights then these resistors fail to provide an accurate result.
In such applications, we use the BH1750 sensor. It can measure light intensity more accurately as compared to light-dependent resistors. So, you can use this sensor in applications where high accuracy and high resolutions are in demand.
BH1750 Modes of Operation
This light sensor operates in two modes of operation namely, continuous mode and one-time measurement mode. In continuous mode, as it name suggests, sensor keeps measuring ambient light value endlessly. On the other hand, in one-time measurement mode, it takes light intensity measurement and shifts into power-down mode.
Furthermore, each mode has three different settings for precisions:
- Low Resolution Mode – (4 lx precision, 16ms measurement time)
- High Resolution Mode – (1 lx precision, 120ms measurement time)
- High Resolution Mode 2 – (0.5 lx precision, 120ms measurement time)
In programming section, we will show you how to select different modes of operation.
Other LDR based projects:
- LDR Interfacing with Pic Microcontroller
- Light Intensity Measurement with Pic Microcontroller
- Automatic Street Light Control
- Dark Detection Circuit
BH1750 Schematic
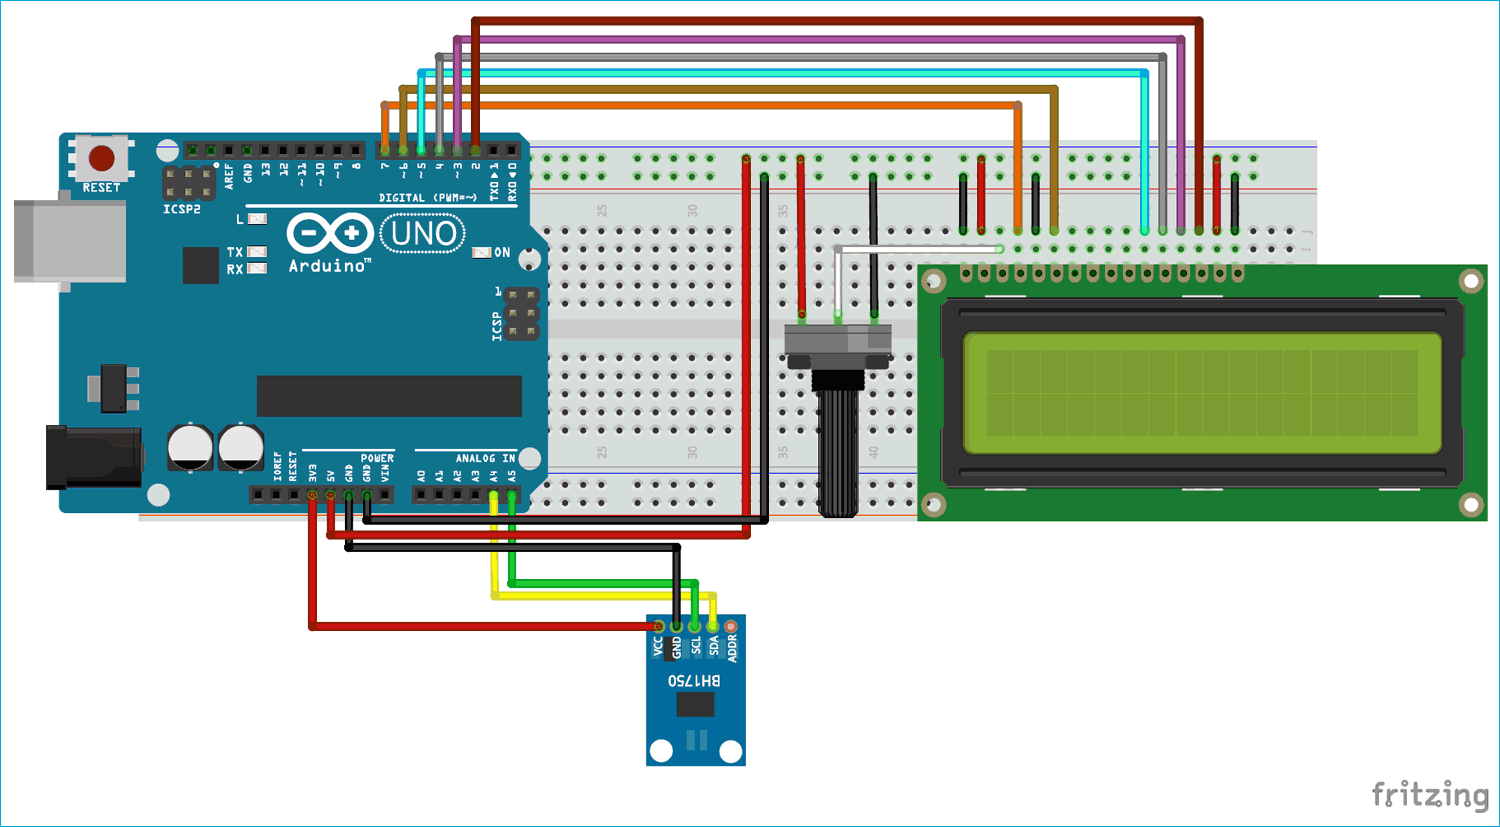
As we mentioned earlier, BH1750 ambient light sensor can be interfaced with Arduino through I2C bus pins such as SDA and SCL that are A4 and A5 pins of Arduino Uno. This schematic diagram shows the internal circuit of the breakout board:

Connection with Arduino Uno
To interface, this light sensor with Arduino, we use I2C pins of Arduino Uno. The figure shows the connections of the breakout board with Arduino. Make connections with BH1750 with Arduino according to this table:
| Arduino Uno | VL53L0X Module |
|---|---|
| 3.3 or 5V | Vin |
| GND | GND |
| A4 | SDA |
| A5 | SCL |
You will also need a 16×2 LCD to display measured flux value. If you don’t know how to interface LCD with Arduino, you should read this post:
16×2 LCD Interfacing with Arduino
For LCD interface, we used D2-D7 pins of Arduino. Connect D2-D5 pins with lower data pins of LCD (D4-D7) and also D6-D7 pins with LCD RS and EN pins respectively.
Arduino Library
We will use an Arduino library for the BH1750 light sensor. Go to this link and download the Arduino library. This library is provided by claws on Github. One of the major pros of using this library is that we do not have to worry about the internals of module and configuration settings.
After that add this library to the Arduino library folder. If you did not add a library to Arduino IDE before, you should watch this video:
BH1750 Light Sensor Arduino Code
This sample code displays light (lux) value on 16×2 LCD.
#include <Wire.h> // adds I2C library
#include <BH1750.h> // adds BH1750 library file
#include<LiquidCrystal.h> // include LCD library function
// Define which pins of Arduino used with 16X2 LCD
LiquidCrystal lcd (7,6,5,4,3,2); //RS, E, D4, D5, D6, D7
// Create an object "lightMeter" from sensor library structure
// Because we can interface multiple sensor
// by giving them different names.
BH1750 lightMeter;
// Initialization of library functions and codes
void setup()
{
Serial.begin(9600); // set serial buad rate of 9600
Wire.begin(); // Enable I2C pins of Arduino
lcd.begin(16,2); // Defines LCD size to 16x2
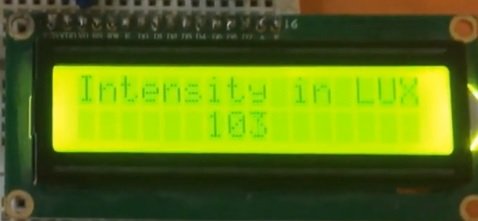
lcd.print("Intensity in LUX"); //Print "Intensity in LUX" message on first line LCD
delay(2000); // add delay
// accessing library function through dot operator and object name
// .begin function start with object name initialize sensor library
lightMeter.begin();
delay(2000);
}
void loop()
{
// readLightLevel() function use to reads light intensity value
// this line reads light value and store it in float variable "lux")
float lux = lightMeter.readLightLevel();
// set the LCD curson to second line and 6th position
lcd.setCursor(6,1);
// print lux value on LCD (2nd row and 6th position)
lcd.print(lux);
delay(1000);
}After adding library, upload above code to Arduino board. You will see light intensity value on LCD like this:
Setting different modes with BH1750 Library
As we mentioned eariler, this light sensor library can be configured in two modes. By default, craws library configure lux sensor in continouse measurement mode. But we can change the mode easily by using BH1750.begin() function.
By default, this routine does not require any argument, but we can pass arguments to this routine if we want to change sensor mode of operation. We can pass these arguments to the .begin() to select different modes:
BH17// Continous mode arguments
 BH1750.begin(BH1750::CONTINUOUS_HIGH_RES_MODE); // 1 lx precision, 120ms measurement time
BH1750.begin(BH1750::CONTINUOUS_HIGH_RES_MODE_2); // 0.5 lx precision, 120ms measurement time
BH1750.begin(BH1750::CONTINUOUS_LOW_RES_MODE); //4 lx precision, 16ms measurement time
// One-time measuremnt arguments
BH1750.begin(BH1750::ONE_TIME_HIGH_RES_MODE); // 1 lx precision, 120ms measurement time
BH1750.begin(BH1750::ONE_TIME_HIGH_RES_MODE_2); // 0.5 lx precision, 120ms measurement time
BH1750.begin(BH1750::ONE_TIME_LOW_RES_MODE);  //4 lx precision, 16ms measurement time
BH1750 One-Time Measurement Code Arduino
This example code measures light sensor value by using one-time measurement mode.
#include <Wire.h>
#include <BH1750.h>

BH1750 lightsensor1;

void setup(){

  Serial.begin(9600);
  Wire.begin();
  lightsensor1.begin(BH1750::ONE_TIME_HIGH_RES_MODE);
  Serial.println(F("BH1750 One-Time Test"));

}


void loop() {

  float  light_value = lightsensor1.readLightLevel();
  Serial.print("Light: ");
  Serial.print(light_value);
  Serial.println(" lx");
  delay(1000);

}
You can also use this library to interface Arduino Nano, Arduino Leonardo, Arduino Mega, Due and esp8266 WiFi Module.
Applications
Some of the applications of BH1750 are:
- Pulse sensors
- Digital cameras, game machine and LCD display
- Cell phones and smartphones to adjust their brightness and backlight of keyboard
- Automatic turning on/off headlights of vehicles and streetlights