For software writing and mild simulation, the tool used is Visual Micro Lab. Visual Micro Lab, generally referred to as VMLAB, is a virtual prototyping design framework, especially designed for AVR and ST6 controllers. VMLAB compiler is used to write code for AVR microcontrollers, for example, ATmega16 microcontroller. In this article, you will learn how to use it for writing your first project for an AVR microcontroller. It is a getting-started guide for AVR microcontroller coding. You can download the VMLAB software from the following link:
It is a combination of:
- A powerful multi-window multi-file text editor.
- A microcontroller IDE with integrated tools.
- A symbolic processor.
- A mixed-mode analog-digital circuit simulator.
- A code quality checker.
you may also like to read what is best way to learn avr microcontroller
Recommended Components
The following parts and reference books are useful for building and learning AVR microcontroller projects.
| Component | How it’s used in your AVR projects | Buy on Amazon |
|---|---|---|
| ATmega32 (AVR) microcontroller | The 8-bit AVR MCU used across these tutorials (LED, LCD, motors, timers, etc.). | Check Price |
| USBasp programmer (ISP) | Burns the compiled HEX file into the AVR over the ISP header. | Check Price |
| Breadboard | Solderless base for wiring the AVR and the project’s components. | Check Price |
| Jumper Wires | Make the connections between the MCU, components and power rails. | Check Price |
| Book: The AVR Microcontroller & Embedded Systems (Mazidi & Naimi) | AVR programming in Assembly & C — timers, USART, ADC, SPI, I2C and PWM. | Check Price |
| Book: AVR Programming (Elliot Williams, Make:) | A hands-on, project-based guide to bare-metal AVR programming. | Check Price |
As an Amazon Associate we earn from qualifying purchases. Prices and availability are accurate as of the date/time indicated and are subject to change.
VMLAB Introduction
VMLAB is a virtual prototyping design framework, specifically created for AVR and ST6 controllers. It provides a powerful combination of features including a multi-window multi-file text editor, a microcontroller IDE with integrated tools, a symbolic processor, a mixed-mode analog-digital circuit simulator, and a code quality checker. With VMLAB, hardware and software are co-simulated, offering a true virtual microcontroller design lab experience.
- Start the VMLAB program by clicking on: Start >> Programs >> VMLAB
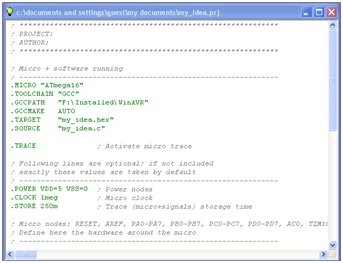
- Create a Project File, selecting the microcontroller and software modules. Use the command New Project, Open Project or Open Last Project to work in a project created

After that select a microcontroller you are using in your project. Check the following figure:

- Add or modify the hardware around the micro in the Project To ease these tasks use the Components menu.
- Create or modify the software modules defined in Step 1, using the built-in text.The software modules are placed in the Code Notebook window.

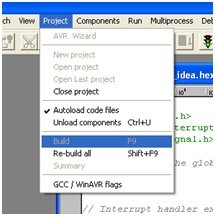
Build the hardware/software database using the command “build”. Any errors or warnings will be shown in the messages. The automatic in-line error reporting feature of VMLAB allows for fast error location, as it takes you directly to the source line responsible for the error. Simply double-click on the reported error.
When all errors are removed, VMLAB enables the green light button. Click on it to run the application. At this step, variables, hardware signals, the microcontroller’s registers, memory, and peripherals can be controlled.
When the application behavior is okay, you can obtain the target .HEX file, which is ready to be burned onto the micro EPROM or OTP, and so on.
This is all about this tutorial and guide on Visual Micro Lab. If you encounter any issues while using it, please let me know in the comments. Thank you!
Conclusion
In conclusion, Visual Micro Lab (VMLAB) is a powerful and versatile tool for software writing and mild simulation, specifically designed for AVR and ST6 controllers. With its comprehensive set of features, including a multi-window multi-file text editor, microcontroller IDE, symbolic processor, and mixed-mode analog-digital circuit simulator, VMLAB provides a complete virtual prototyping design framework. This tutorial has provided a step-by-step guide on how to use VMLAB for writing your first project for an AVR microcontroller. Whether you are a beginner or an experienced programmer, VMLAB offers a user-friendly environment for developing and testing code. It is recommended to download the VMLAB software from the provided link and start exploring its capabilities.
Related content:
- LED Blinking Using ATmega32 AVR Microcontroller
- How to use Push Button with ATMEGA32 AVR Microcontroller
- LCD Interfacing with ATmega32 AVR Microcontroller
- DC Motor Interfacing with Atmega32 and L293
- DS18S20 interfacing with pic and avr microcontroller
- PonyProg Tutorial for Beginners
- How to Use Timers of AVR Microcontroller with Code
Nice Work.