In this tutorial, we will learn about the push button and how to use it with the AVR ATmega32 microcontroller. We can use this button to control any device, but we will use an LED for this example. Here we will also learn the use of “if and else” statements in C.
If this is your first project with ATmega32, we will recommend checking out ATMega32 Microcontroller and Atmel Studio 6 Tutorial Step-by-Step Guide.
In the previous tutorial, we learned how to use GPIO pins of the ATmega32 microcontroller as digital output pins. In this tutorial, we will focus on using them as digital input pins.
Recommended Components
The following parts and reference books are useful for building and learning AVR microcontroller projects.
| Component | How it’s used in your AVR projects | Buy on Amazon |
|---|---|---|
| ATmega32 (AVR) microcontroller | The 8-bit AVR MCU used across these tutorials (LED, LCD, motors, timers, etc.). | Check Price |
| USBasp programmer (ISP) | Burns the compiled HEX file into the AVR over the ISP header. | Check Price |
| Breadboard | Solderless base for wiring the AVR and the project’s components. | Check Price |
| Jumper Wires | Make the connections between the MCU, components and power rails. | Check Price |
| Book: The AVR Microcontroller & Embedded Systems (Mazidi & Naimi) | AVR programming in Assembly & C — timers, USART, ADC, SPI, I2C and PWM. | Check Price |
| Book: AVR Programming (Elliot Williams, Make:) | A hands-on, project-based guide to bare-metal AVR programming. | Check Price |
As an Amazon Associate we earn from qualifying purchases. Prices and availability are accurate as of the date/time indicated and are subject to change.
What is Push Button?
A push button is basically a small controlling device that is pressed to operate any electrical device. In this article, we use this button with the AVR microcontroller Atmega32 to provide a basic idea of how to develop codes for controlling devices.
Push Button Interfacing with ATmega32
When we want to interface a push button with a microcontroller, we actually want to read the state of the push button either pressed or not pressed state. When a push button is pressed or unpressed, it provides either logic high or logic low output depending on the configuration mode in which the push button circuit is designed.
There are two configuration modes to interface a push button with ATmega32. Let’s discuss both these modes one by one.
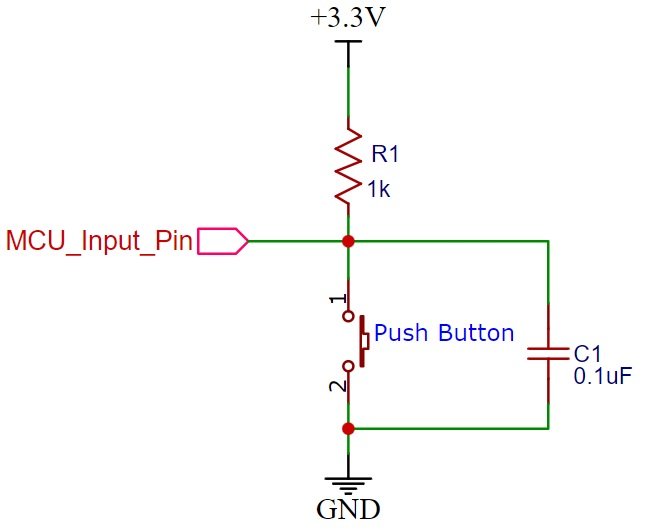
Pull-Up Mode
In Pull-up mode, when a push button is not pressed, a logic high input appears at MCU_Input_Pin. Because a 3.3V signal appears on the input terminal through an R1 resistor. On the contrary, when the push button is pressed, metallic contacts of the push button make contact with the ground terminal and the input terminal. Therefore, a logic low input will reflect on the digital input pin of the ATmega32. In short, by reading this state of the push button with a digital input pin of a microcontroller, we can identify whether a push button is pressed or not. The following schematic diagram shows the connection of a push button with a pull-up resistor.
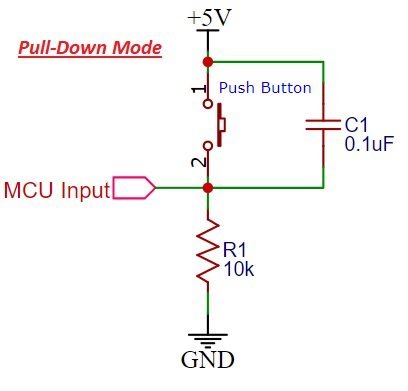
Pull-Down Mode
In Pull-down mode, when a push button is not pressed, a logic low input appears on the ATmega32 GPIO pin. Because a ground reference signal appears on the input terminal through an R1 resistor. On the contrary, when the push button is pressed, metallic contacts of the push button make contact with the +5V signal and the input terminal. Therefore, a logic high input reflects on the digital input pin of ATmega32. The following schematic diagram shows the connection of a push button with a pull-down resistor.
Develop the Code
First, we have to develop the code using Atmel Studio 6. We will write code in C in which we will use a push button as a controlling device for the LED. When we press the button, the LED will glow, and when we release it, the LED will stop blinking.
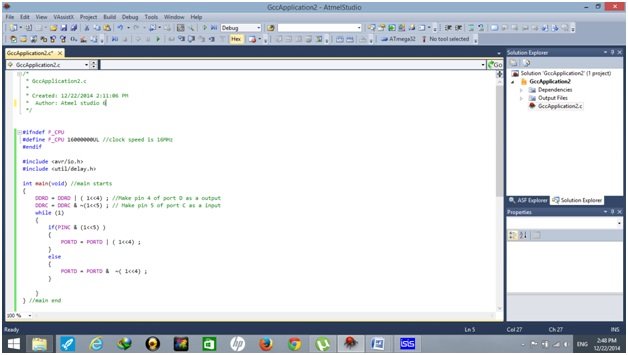
Now open Atmel Studio 6, choose “New Project,” and select “GCC C Executable Project”. After selecting the device (Atmega32), click “OK”. A new window will open where you can write your code.
To control the blinking of the LED by using a push button, the code is given below:
ATmega32 Control LED with a Push Button Code
In this code, we use two registers: the data direction register (DDR) and the PORT register. The DDR command shows whether the direction of the pin is input or output. A PORT register is an output register that shows the status of a pin, whether it is high or low.
A push button is connected to the fifth pin of PORT C, while an LED is connected to the fourth pin of PORT D. When we press this button, the LED will glow; otherwise, it will remain off.
#ifndef F_CPU
#define F_CPU 16000000 UL //clock speed is 16MHz
#endif

#include <avr/io.h>
#include <util/delay.h>

int main(void) //main starts
{
  DDRD = DDRD | (1 << 4); //Make pin 4 of port D as a output
  DDRC = DDRC & ~(1 << 5); // Make pin 5 of port C as a input

  while (1) //initialize while loop
  {
    if (PINC & (1 << 5)) //if PIN5 of port C is high
    {
      PORTD = PORTD | (1 << 4); //PIN4 of port D is high

    } else //otherwise
    {
      PORTD = PORTD & ~(1 << 4); //PIN4 of port D will remain low
    }
  } // while loop ends
} //main end
Code Explanation
In this section, we will look at the workings of this code.
#ifndef F_CPU
#define F_CPU 16000000 UL //clock speed is 16MHz
#endif

#include <avr/io.h>
#include <util/delay.h>
Firstly, we set the clock speed to 16 MHz for the ATmega32 microcontroller. Then we include the header tags <avr/io.h> and <util/delay.h>, which deal with input/output pins and the delay of the microcontroller, respectively.
int main(void) //main starts
{
  DDRD = DDRD | (1 << 4); //Make pin 4 of port D as a output
  DDRC = DDRC & ~(1 << 5); // Make pin 5 of port C as a input
In the main function, we first declare pin 4 of port D as the output. Then we declare pin 5 of port C as input.
  while (1) //initialize while loop
  {
    if (PINC & (1 << 5)) //if PIN5 of port C is high
    {
      PORTD = PORTD | (1 << 4); //PIN4 of port D is high

    } else //otherwise
    {
      PORTD = PORTD & ~(1 << 4); //PIN4 of port D will remain low
    }
  } // while loop ends
} //main end
Lastly, in the while loop, we check whether pin 5 is high; this pin connects with the push button, so when we press the button, pin 5 of port C will receive high logic. Now, we can set pin 4 of Port D to high to turn the LED on. If we release the button or don’t press it, then the else condition will perform, and pin 4 of port D remains low. This marks the end of the while loop and the main function.
Proteus Schematic and Simulation
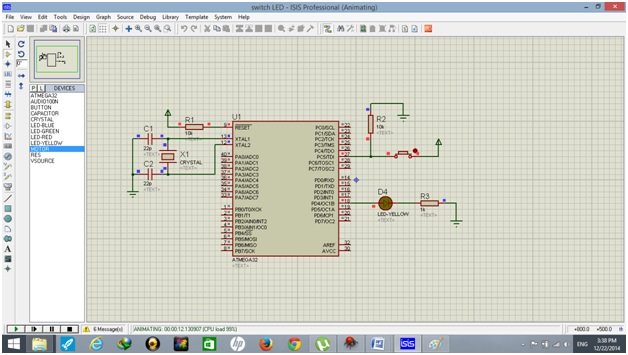
The Proteus schematic design is provided below. We use the Atmega32, crystal oscillator, capacitors, resistors, LED, and push button from the built-in library of Proteus. Notice that the VCC and ground pins of the Atmega32 are connected by default, so there is no need to connect them until or unless you are working in the real world.

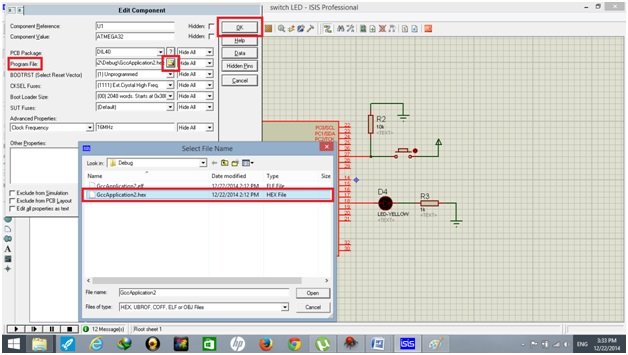
After designing the circuit, make the necessary changes by double-clicking on the crystal and Atmega32. A dialog box will appear now to set the frequency of the crystal and Atmega32, which is 16 MHz, and the fuse bits of the Atmega32.
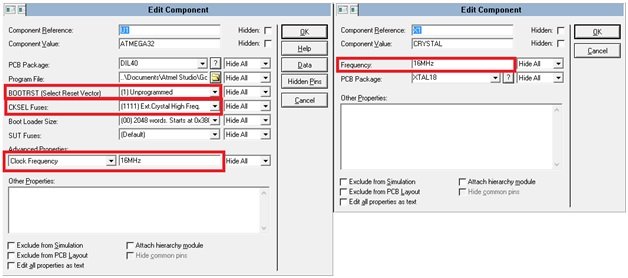
Again, double-click on Atmega32 and a dialog box will appear. Go to the option of Program File, select your required HEX file, and click “OK”.
Now the final step is to press the play button on the bottom left corner of the Proteus window. The following circuit shows that as we press the push button, the LED will glow.
Conclusion
In this tutorial, we have discussed the following topics:
- Introduction about push button.
- Code with an explanation.
- Proteus schematic with simulation results.
Related Articles
- ATMega32 Microcontroller.
- DC motor interfacing with atmega32 and L293.
- Interface Push Button with Raspberry Pi Pico and Control LED.
- Push Button with STM32 Nucleo using STM32CubeIDE.
- ESP32/ESP8266 Control Outputs with Web Server and Push Button Simultaneously.
- Push button with ESP32 – GPIO pins as digital input.
Button press led on again button press led off. I need this program.
Thank you for the detailed explanation.
i have AVR Studio8 but this tutorial ist avaible?