In this article, we will learn to setup KEIL IDE to program the 8051 microcontroller. Hobbyists and developers use Atmel 8051 microcontrollers in IOT projects. These microcontrollers require KEIL IDE software for their programming. The program can be written in C or assembly language. Now we will discuss how to write the first program in the KEIL IDE software for the 8051 microcontroller and convert it to a hex file.
For downloading the software, visit the KEIL website by clicking here.
Recommended Components
The following parts and reference books are useful for building and learning 8051 microcontroller projects.
| Component | How it’s used in your 8051 projects | Buy on Amazon |
|---|---|---|
| AT89S52 (8051) microcontroller | A modern, in-system-programmable 8051-core MCU that runs the code in these tutorials. | Check Price |
| USBasp programmer (ISP) | Burns the compiled HEX file into the AT89S51/AT89S52 over the ISP header. | Check Price |
| Breadboard | Solderless base for wiring the 8051 and the project’s components. | Check Price |
| Jumper Wires | Make the connections between the MCU, components and power rails. | Check Price |
| Book: The 8051 Microcontroller & Embedded Systems (Mazidi) | The classic 8051 textbook — architecture, assembly & C programming with interfacing examples. | Check Price |
| Book: The 8051 Microcontroller, 3rd Ed. (Ayala) | A popular reference covering 8051 architecture, programming and applications. | Check Price |
As an Amazon Associate we earn from qualifying purchases. Prices and availability are accurate as of the date/time indicated and are subject to change.
Download KEIL IDE Setup
Firstly, we will download the KEIL µVision 3 setup from the KEIL website. Then we will install it by following the guidelines provided by KEIL. The installation is quite simple, as the user manual and setup guide are included with the software package.
Steps to Use KEIL IDE
Start the KEIL µVision software and follow these steps.
Starting a New Project
- For a new project, click on Project >> New µVision Project.
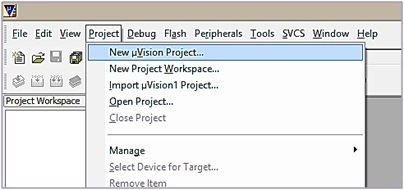
- A new window will appear on screen, which will prompt for the project name and directory. Here, we will select the name and the path of our project (where we need to store the data). In our case, the project name is “First Program”.
Selecting Microcontroller
- When we click on the Save button, a new window will appear with the title “Select Device for Target ‘Target 1′“. Here, we have to select the specific microcontroller we are going to use in our project. We are going to use 8051 for this tutorial, which belongs to the Atmel family, so we will double-click on Atmel. A list of all Atmel microcontrollers will be displayed. Select AT89C51 and then click “OK”.

- When we click on OK, a window pops up with the title “Copy Standard 8051 Startup Code to Project Folder and Add File to Project?”. Click “Yes” to proceed further.

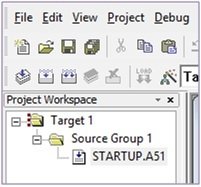
- If we look on the left side of the screen, i.e., in the Project workspace, we can see the “STARTUP.A51” file. It is the file that contains the assembly language commands for the 8051 microcontroller. Leave it just as it is because we have to first set option values for Target 1.
Configuring the Microcontroller
- To configure the option value of our microcontroller project. Select Target 1, click on Project >> “Option for Target ‘Target 1′”.
- Select the Target tab to configure the microcontroller. Change the crystal value from 24 MHz to 12 MHz and go to the output tab.

- In the Output tab, check the “create HEX file” option and then click “OK”.

Creating File
- Now click on File >> New to create a new file. A blank text file will open, and we have to write our code in it. After writing the code, save this file, and the most important thing is to give the file an extension of .c or.asm (according to the language used for the program) in the file name.
Right-click the target and select “Manage Components“. From the Project Component tab, select STARTUP.A51 >> click Add Files.
- Add the saved file and close the components window by clicking “OK”.
- Now we are again on the code. Just click on “Rebuild all target files” from the toolbar. We can also choose Project >> Rebuild all target files. By clicking this button, our program will start compilation and display the compilation results at the bottom of the output window. If our code is correct, then no errors will be generated.

Now the hex file is created in the specified folder with the “.hex” extension. We can burn it on a microcontroller through Fly Pro software and a burner circuit.
Writing Program – 8051 KEIL IDE
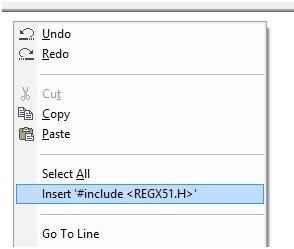
We have to first add the header file to our program. This will help us access register-related peripherals. To place the correct header file, just right-click on the text file screen and insert the header file into it. All four ports P0, P1, P2, and P3 of the 8051 microcontroller have 8 pins, which makes them 8-bit ports. All the ports of the 8051 chip are configured as inputs upon RESET.
- When the PORT is to be used as an output port, 0 is given to that port.
- To configure PORT as an input, 1 must be sent to that port.
Proteus Schematic
In this schematic, we have connected an 8051 microcontroller to an LED. Firstly, we will attach An external crystal to pins 18 and 19 of the microcontroller. The frequency setting of the crystal oscillator needs to be 11.059 MHz. We have used PORT 2 as an output port, so 0 is given to that specific PORT pin. We have tested the code provided below on Proteus by making the following circuit:

8051 Example Code in KEIL IDE
We have written a simple program to blink an LED. In this program, we toggle the LED’s output. This toggling LED will blink continuously, as we used a “while loop”. We can make the delay function separately, so whenever we call this function, it will create a delay of almost 1 second in the output. The sketch for the 8051 microcontroller is as follows:
#include<reg51.h>

sbit led = P2 ^ 0; // led at PORT 2 pin 0

void Delay(void); // Delay function declaration

void main() // main function
{
  led = 0; //output PORT pin

  while (1) // infinite loop
  {
    led = 1; // LED ON
    Delay();
    led = 0; // LED OFF
    Delay();
  }
}

void Delay(void) // delay function
{
  int j;
  int i;

  for (i = 0; i < 10; i++)
  {
    for (j = 0; j < 10000; j++)
    {
    }
  }
}
We will make the circuit according to the schematic above. Then we will burn the Hex file into the microcontroller. When the microcontroller connects with the power supply, the LED will start blinking with a delay of 1 sec. We can change this delay by setting the values in “for loops”.
Video Demonstration
Conclusion
In this article, we have discussed these topics:
- KEIL IDE installation and setup.
- Configuring the KEIL IDE for a project.
- Writing program in KEIL IDE.
- Schematic and Sketch.
Related Articles:
If you liked reading this article, check out these links below for similar content:
- How to download and install Keil uVision for ARM and 8051.
- serial communication 8051 microcontroller using KEIL.
- servo motor interfacing with 8051 using keil compiler.
- Getting started with Keil uVision: Write your first Program for Tiva LaunchPad.
So this is all about how to use KEIL IDE for the 8051 microcontroller for the first time and how to write our first program using KEIL IDE for programming the 8051 chip.
Sir i got enable chip error how i solve it.
Plz give me the solution
Thanx
there is a space missing in the programm initi; should be init i;