LabVIEW is a popular programming language used in industries such as engineering and scientific research. In this tutorial, the focus is on the tips and tricks related to the Front Panel in LabVIEW. The front panel is the user interface of a LabVIEW program, and understanding how to manipulate and arrange blocks on the front panel can greatly enhance efficiency. The tutorial covers topics such as adding free labels to blocks, grouping and moving multiple blocks together, locking and unlocking elements, and aligning blocks. These tricks can help programmers create organized and user-friendly interfaces in LabVIEW. While this tutorial provides a useful introduction to the front panel, there is much more to explore in LabVIEW for those looking to expand their programming skills.
Introduction to Front Panel in LabVIEW
Whenever we open an existing VI in LabVIEW or create a new one, two different windows will pop up. One of them is known as the “Block Diagram” window, and the other is the “Front Panel” window. The programmer is supposed to draw their respective block diagram using both of them, as we have discussed in quite a bit of detail in all the previous tutorials.
Controls and indicators are all present in the Control Palette of the Front Panel. On the other hand, a complete block diagram window includes wires, icons, functions, possibly subVIs (to be discussed in upcoming tutorials), and other LabVIEW objects. At the upper right corner of the front panel and block diagram windows, there is an icon in every VI, and this icon is nothing but the graphical representation of the VI.
LabVIEW Front Panel Tips and Tricks
Whenever we open a new or existing VI, the front panel window as well as the block diagram window of the VI appear. The front panel window, as we have discussed before, is the user interface for the VI. The front panel of a LabVIEW program (VI) is as follows:
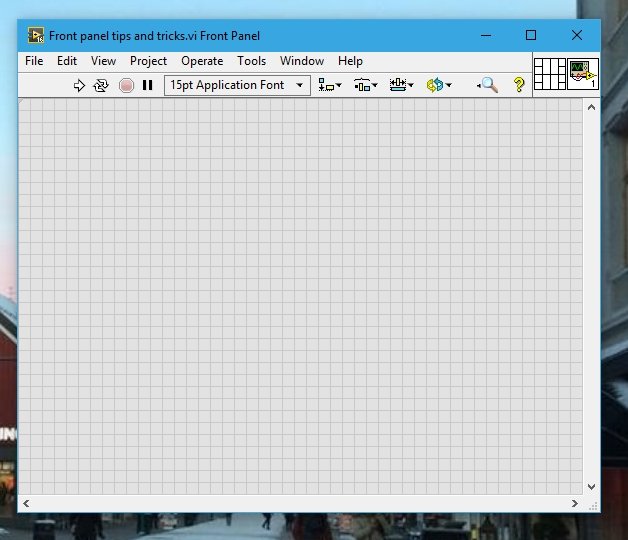
At the very right corner of this panel, an icon is visible, as we have discussed previously.
Control Palette in LabVIEW
Right-click anywhere on the Front Panel, and a drop-down menu will appear. This menu is known as the Control Palette, as shown below.
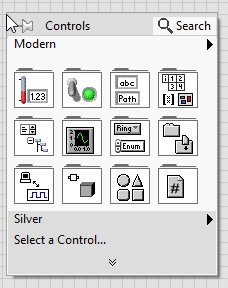
We have already used most of the indicators and controls in this panel in our previous tutorials. The list of all the controls and indicators available on the control palette is as follows:
| Numeric | Boolean |
| String and paths | Array matrix and clusters |
| List tables and trees | Graphs |
| Ring and enum | Containers |
| I/O | Variants and classes |
| Decoration | Refnum |
These are only a few of the blocks available in the control palette. We have already used most of them, and the remaining will be used in the upcoming tutorials. Now, let’s come to the main purpose of this tutorial. We are going to discuss some quick and easy tricks of the Front Panel just to clear things up a little about VIs. Firstly, we will talk about the reordering blocks on the front panel.
Free Labels in LabVIEW
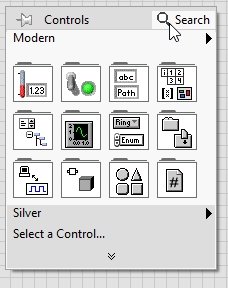
As we have seen previously, we can add labels to a block. On the front panel, we can add free labels to any block, even a Boolean button or a simple on/off switch. Right-click on the Front Panel, and at the upper right corner of the control palette, there is a search bar, as shown in the figure below.
In the search bar, type “free label” and select “Functions”, and then place a label next to the key and name it properly, as shown in the figure below.

Place two free labels for both states (On and off) of the Boolean switch. The resulting block diagram will look like the one shown below.

Grouping Ability of Elements in LabVIEW
When we place a series of blocks connected with each other, or simply decorate a button or a key with on and off labels (free labels). As we have done in the section above. Then, if we want to move these blocks from one place to another, we will try to move every block separately. But using grouping will save us time. Select all the blocks that require moving by hovering over them, as shown below.

From the top right corner, click on the reorder button, and from the drop-down menu, select Group. This will group all the selected blocks together, and now when we move the blocks, they will all move together, saving us time.
Front Panel Locking and Unlocking Elements in LabVIEW
Once we have placed all the components in their desired or expected locations, we can restrict their movement. To do this, use the lock button present in the drop-down menu of the reorder button. This lock key will not allow us to move the locked blocks in the future unless we unlock them first using the unlock button; see the figure below.

We can unlock the blocks in the future by selecting the locked blocks and pressing the unlock button below the lock button, as can be seen in the menu above.
Front Panel Blocks Alignment in LabVIEW
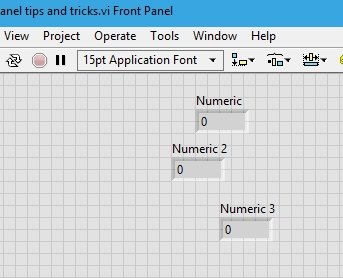
We can also align the blocks in the shortest amount of time using the following tips and make our block diagram look more organized. Let’s suppose we place a few blocks on our front panel randomly, as shown in the figure below.
Now if we want to align all the blocks to one side, first select all the blocks, and from the upper bar, select Align Objects, and then select Align to Left or Align to Right according to the requirement. Refer to the figure below.

After alignment, the blocks will look as shown below.

Now, if we want to maintain the space between consecutive blocks from top to bottom, there is also a trick available for this. Select the blocks to be oriented from the top bar, select distribute objects, and then select the Top Edges.
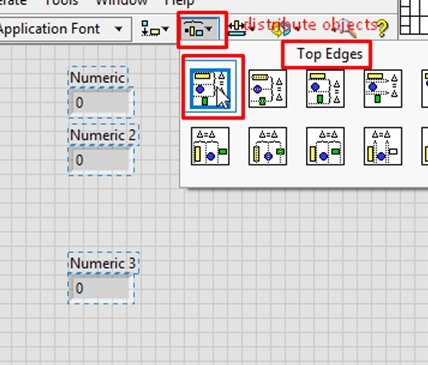
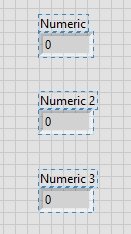
This option will maintain the spacing between two consecutive blocks as shown below.
The tricks discussed in this tutorial are just to improve our programming skills while working with LabVIEW. These are required to be efficient in developing a program in less time. All of the tricks cannot be mentioned in one tutorial, and there is a lot in LabVIEW to learn about. Try to explore the front panel as well as the block diagram on your own. This will help you learn more tricks and increase your efficiency with LabVIEW.
Conclusion
In conclusion, this tutorial has provided an in-depth introduction to the front panel in LabVIEW and has shared valuable tips and tricks to enhance efficiency while working on projects. From understanding the control palette to utilizing free labels and grouping elements, these techniques can streamline the development process. Additionally, the tutorial explored the locking and unlocking of elements, as well as the alignment of blocks to maintain a visually organized front panel. While there is much more to learn about LabVIEW, mastering these tricks will undoubtedly contribute to improved programming skills and overall proficiency in using the software. So go ahead, and explore the front panel and block diagram on your own to uncover even more hidden gems and further increase your productivity with LabVIEW.
Related Articles:
- MPLAB XC8 Compiler – Write your First Program
- Set ESP32 Custom Hostname with Arduino IDE
- HC-05 Bluetooth Interfacing with TM4C123G Tiva C Launchpad – Keil uvision
- ESP32 Retain the Last GPIO State After a Reset
- STM32 Nucleo GPIO Pins with LED Blinking using STM32CubeIDE
This concludes our tutorial. If you have any questions, let us know in the comment section below.